Bright Life is an upcoming 3D flora generation toolkit to allow indie game developers to create flourishing ecosystems instantly.


Articles
The world of plants is exceptionally diverse. So, when it comes to deciding on materials, artists need an intuitive way to both find and select them. This challenge is something I’ve already encountered in the last video when selecting shapes for each component of a mushroom. While I initially settled on a dropdown checklist with image tooltips, this solution is hardly perfect.
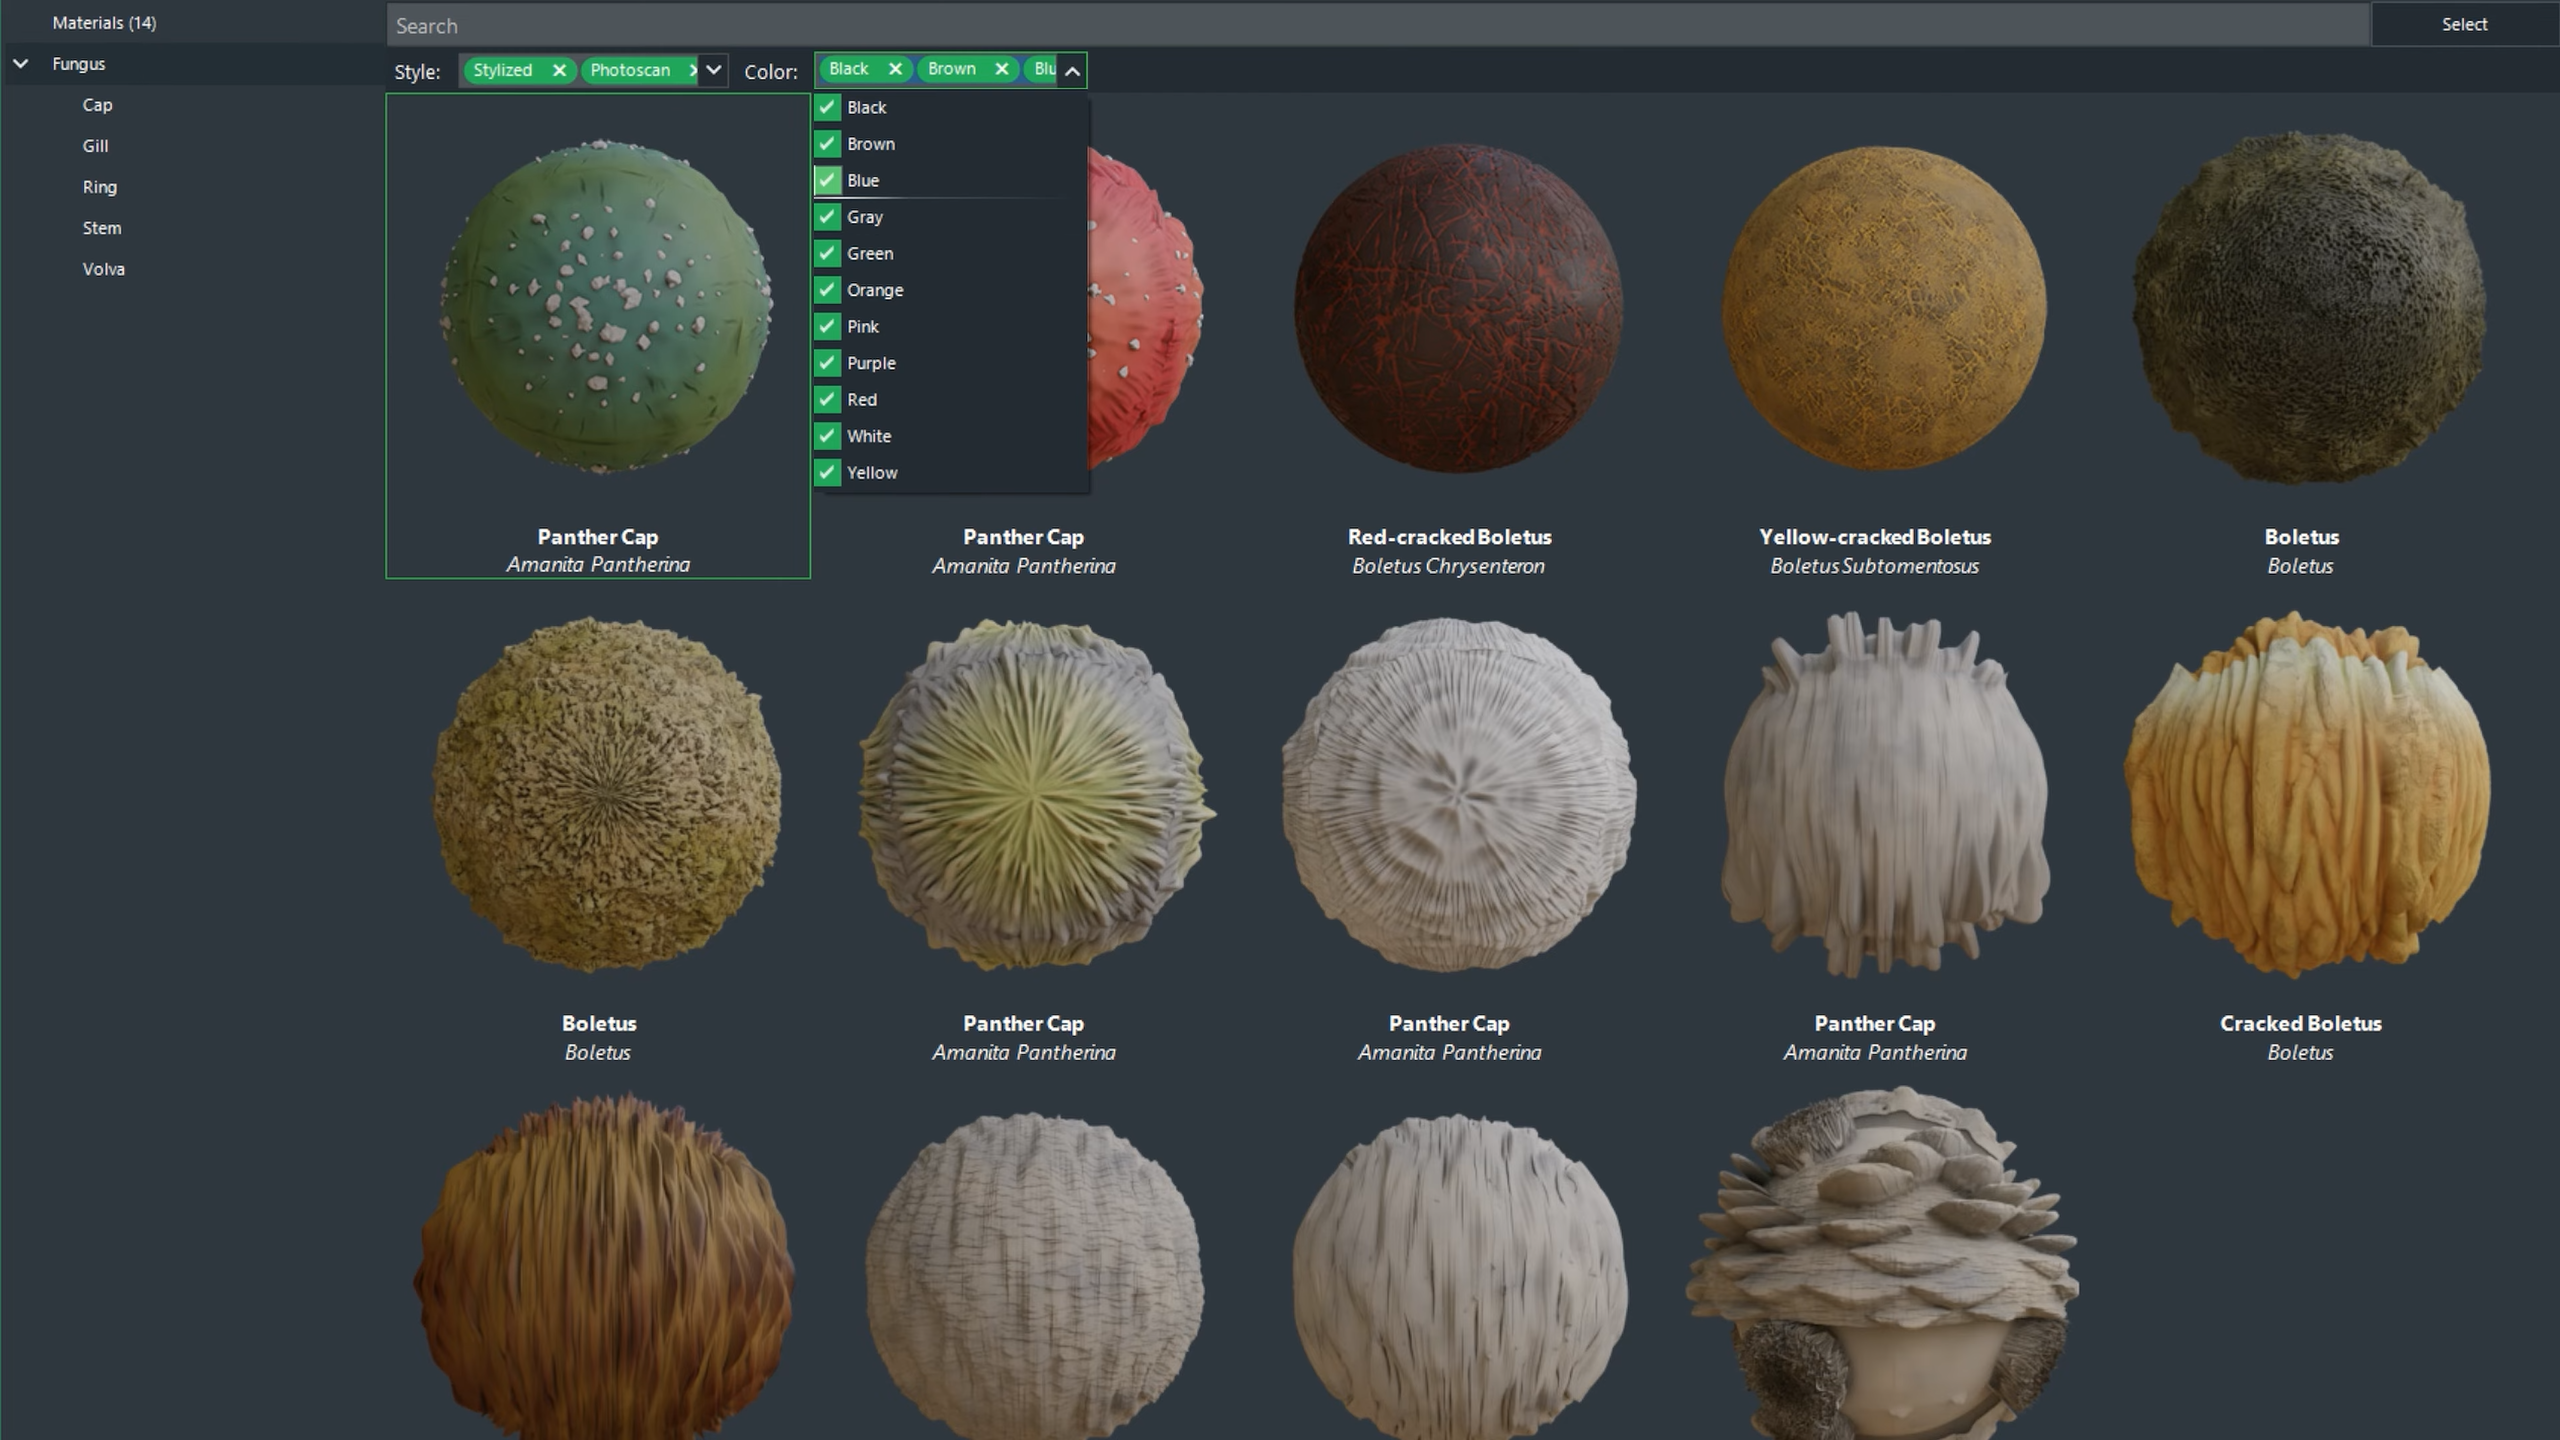
A far better approach is through a dedicated asset browser. And what better example to take inspiration from than Quixel Megascans?
With tens of thousands of materials and 3d models in its archive, Megascans has numerous filtering tools available to help artists narrow down their search. And for Bright Life, I’m going to implement a similar solution.
Rebuilding Quixel Megascans
Building up the interface for the asset browser is a fairly straightforward process. Where things get a bit trickier is the creation of individual Items.
Using some clever tricks with HTML, creating the UI design for each item is relatively simple. However, additional information is needed to categorise and filter them correctly. Therefore, I created two custom metadata formats—one for meshes and the other for materials.
These files use a similar structure to Bright Life project files, allowing me to reuse the existing loading system, to save time. Upon launch, Bright Life will locate and process all the metafiles it finds for shapes and materials, creating an Asset Browser Item for each one. Then, a filtering function uses the metadata of each item to return only the relevant entries instantly.
Improving Plant Shape Selection
With the Asset Browser done and dusted, artists need to be able to launch it from within the main Bright Life interface. For shape selection, I created a new UI editor for the PropertyGrid system to replace the drop-down checklist I started in the last video. Once again, designing PropertyGrid editors is a bit of a faff, but after a while, it slowly comes together.
The existing values for shape selection is also passed onto the Asset Browser that way it can pre-select the shapes that are already being used. The introduction of metadata files also removed the need to pre-load the plant component meshes upon startup. Now Bright Life will only load the assets that are needed. And using Bright Engine’s dynamic memory management system, shapes that are no longer being used are removed from memory. The end result is faster loading times and reduced RAM consumption.
To launch the Material Browser from the Bright Life editor, I quickly populated the material tab that has been empty until now. The layout is similar to the Shape tab, where the artist can adjust the individual parameters used during the geometry generation of plants. Artists can select multiple materials, which will then be randomly assigned to the target component.
Building a PBR Material System
The materials themselves are split into two primary classes. The Standard Material class contains a pointer to the shaders and textures stored inside the Bright Engine Resource Manager. The Smart Material class contains a pointer to the Standard Material being used, along with additional settings that can be adjusted by the artist inside the Material Tab of Bright Life.
In addition, I created another three auxiliary classes to improve organisation and access to these materials throughout the code base. The PlantShapeLibrary and PlantMaterialLibrary classes store a list of pointers to the metadata for meshes and Materials as well as handle the loading of the connected assets.
While this does add an extra step, it makes it easier to ensure there is no data duplication in memory. The third and final supplementary class is the SmartMaterialManager. As the name suggests, it’s responsible for the creation and management of new Smart Materials using the information provided by the PlantMaterialLibrary.
The SmartMaterialManager also contains a list of pointers to all the smart materials currently in use. It also houses the default Smart Material that’s automatically applied to plant components that haven’t been assigned a specific material by the artist.
Solving The Mipmapping Problem
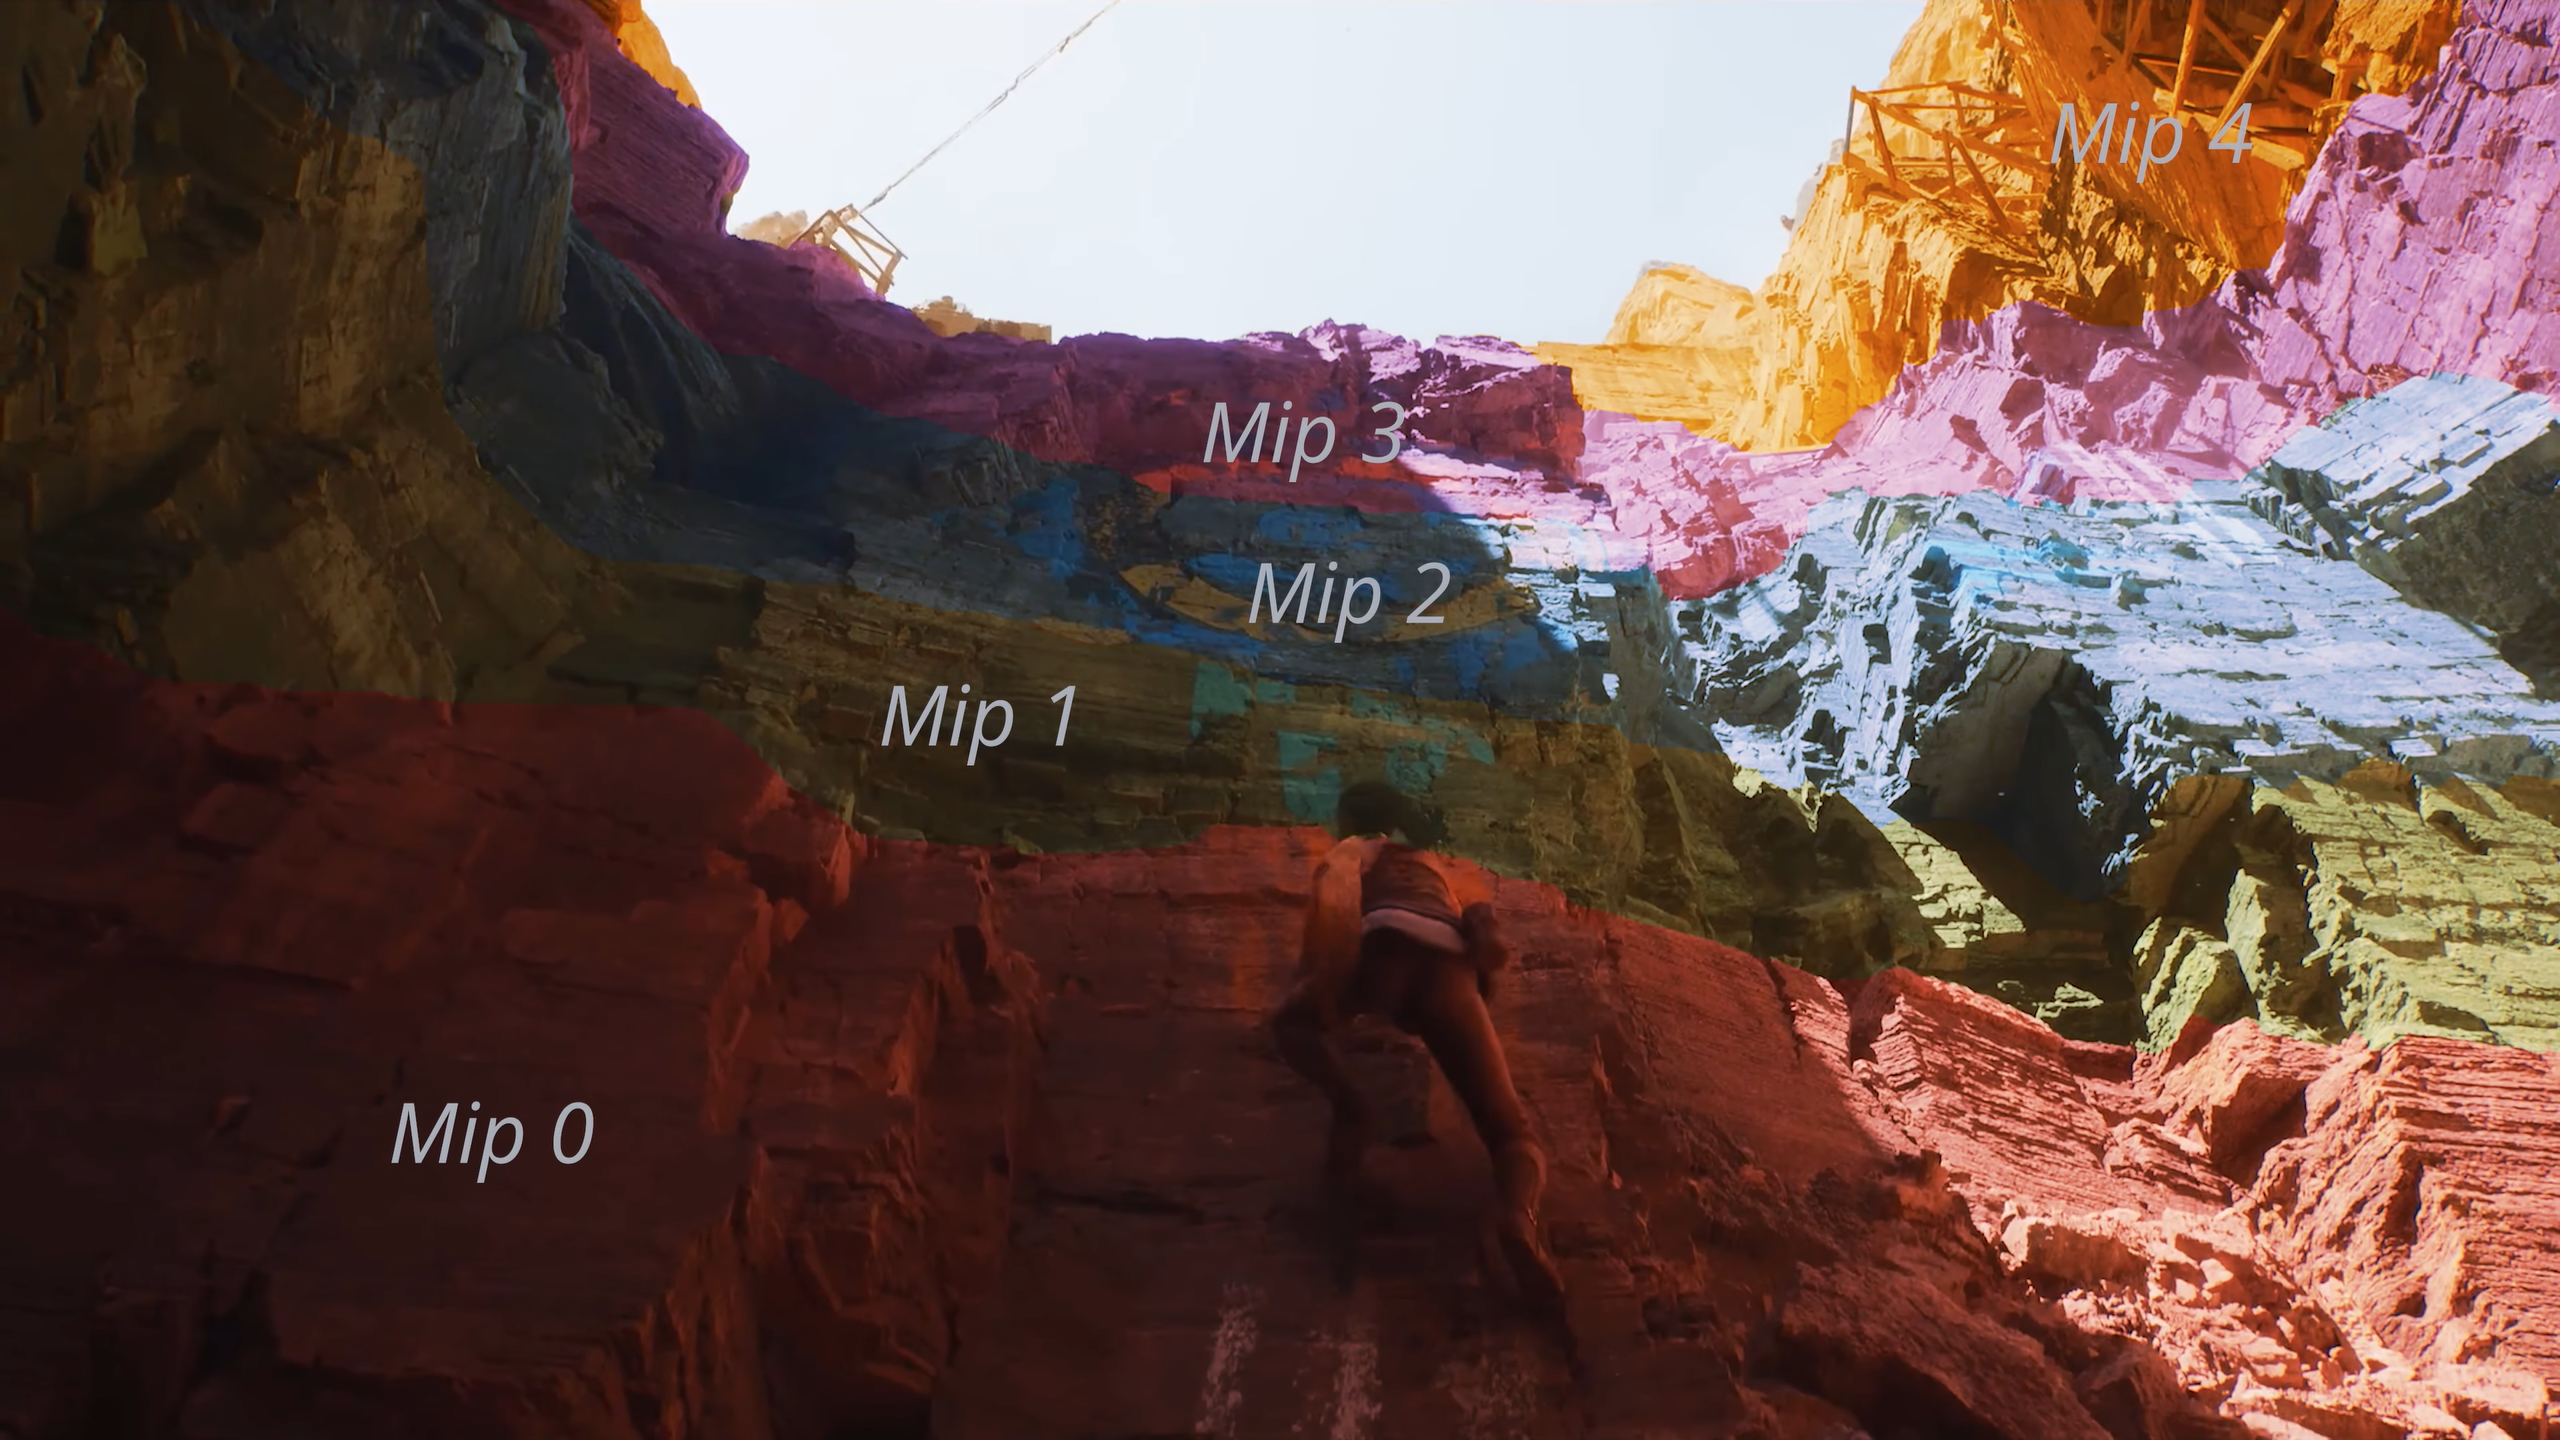
While the introduction of the materials wasn’t too problematic, they revealed a serious problem relating to loading speed. The materials currently available in the Bright Life ecosystem are all 4K resolution and saved as PNGs. This format provided the most optimum compression, resulting in a relatively small file size on a hard drive. However, the decision to use PNGs didn’t take into consideration a critical factor – mipmaps.
Mipmaps are used across almost all textures within a game. They are an optimised sequence of images generated from an original texture, with each Mip halving in resolution. Game engines use mipmaps to dynamically change the resolution of textures in real time.
Assets far away from the camera likely don’t need full detail. Therefore, a lower-level mipmap of a high-resolution texture is used to improve rendering speeds. As such, they need to be generated whenever the texture is loaded into memory.
Generating mipmaps isn’t difficult. But it’s time-consuming. For a single 4k resolution material that has seven different PBR textures, the generation of mipmaps took close to 30 seconds. And since plant projects are likely to use a large number of materials, the loading times were horrendous. This is where the DirectDrawSurface format comes to the rescue.
Despite being released over 25 years ago, the format and variants of it continue to operate behind the scenes of most game engines, including Unity and Unreal Engine. How this format works in detail is a bit complicated. But in the case of Bright Life, the biggest advantage is being able to save pre-generated Mipmaps inside the texture files themselves. This does increase the overall file size of textures on the hard drive. But it also reduces the loading times per material to less than a second.
Performance was further improved by saving the PBR textures as channeled-packed images. Roughness, ambient occlusion, metallic, and height maps are all grayscale textures that can be packed into the red, green, blue, and alpha channels of a single image. This reduced the number of files needed to be stored per material, resulting in fewer I/O calls by the CPU, and fewer texture binds by the GPU, improving both loading and render speeds, respectively.
Creating a PBR Shader
With material selection done and dusted, it’s time to build a fully functional PBR shader. Up until now, Bright Life has been using a basic colour shader to display geometry in the viewport. Needless to say, a PBR shader is a bit more complicated and requires a lot of additional environmental data that I previously described in the second dev log video of this series.
There are numerous approaches to take, each with its own advantages and disadvantages. But just like Bright Engine, Bright Life will use the roughness/metallic workflow rather than specular/gloss. It’s a bit more intuitive, and with all colour values captured in an albedo map, there are more grayscale textures, resulting in more channel packing opportunities.
Regardless, artists will be able to export their selected materials to be compatible with either workflow. For those interested in the mathematics of physically based rendering, the methods I’ve chosen are:
- Cook-Torrance approximation for BRDF map computation.
- Trowbridge-Reitz for the normal distribution function.
- Fresnel-Schlick for reflectivity function.
- And Smith’s Schlick-Beckmann approximation for the geometry function.
These were selected based on the research of Brian Karis and Sebastien Lagarde, who worked on Unreal Engine 4 and Frostbite 3, respectively. Luckily, all these complicated formulas are already built into my Bright Engine SDK, so I don’t need to deal with working out the mathematics again. However, there are some further adjustments made to improve render quality.
Converting From sRGB To Linear Space
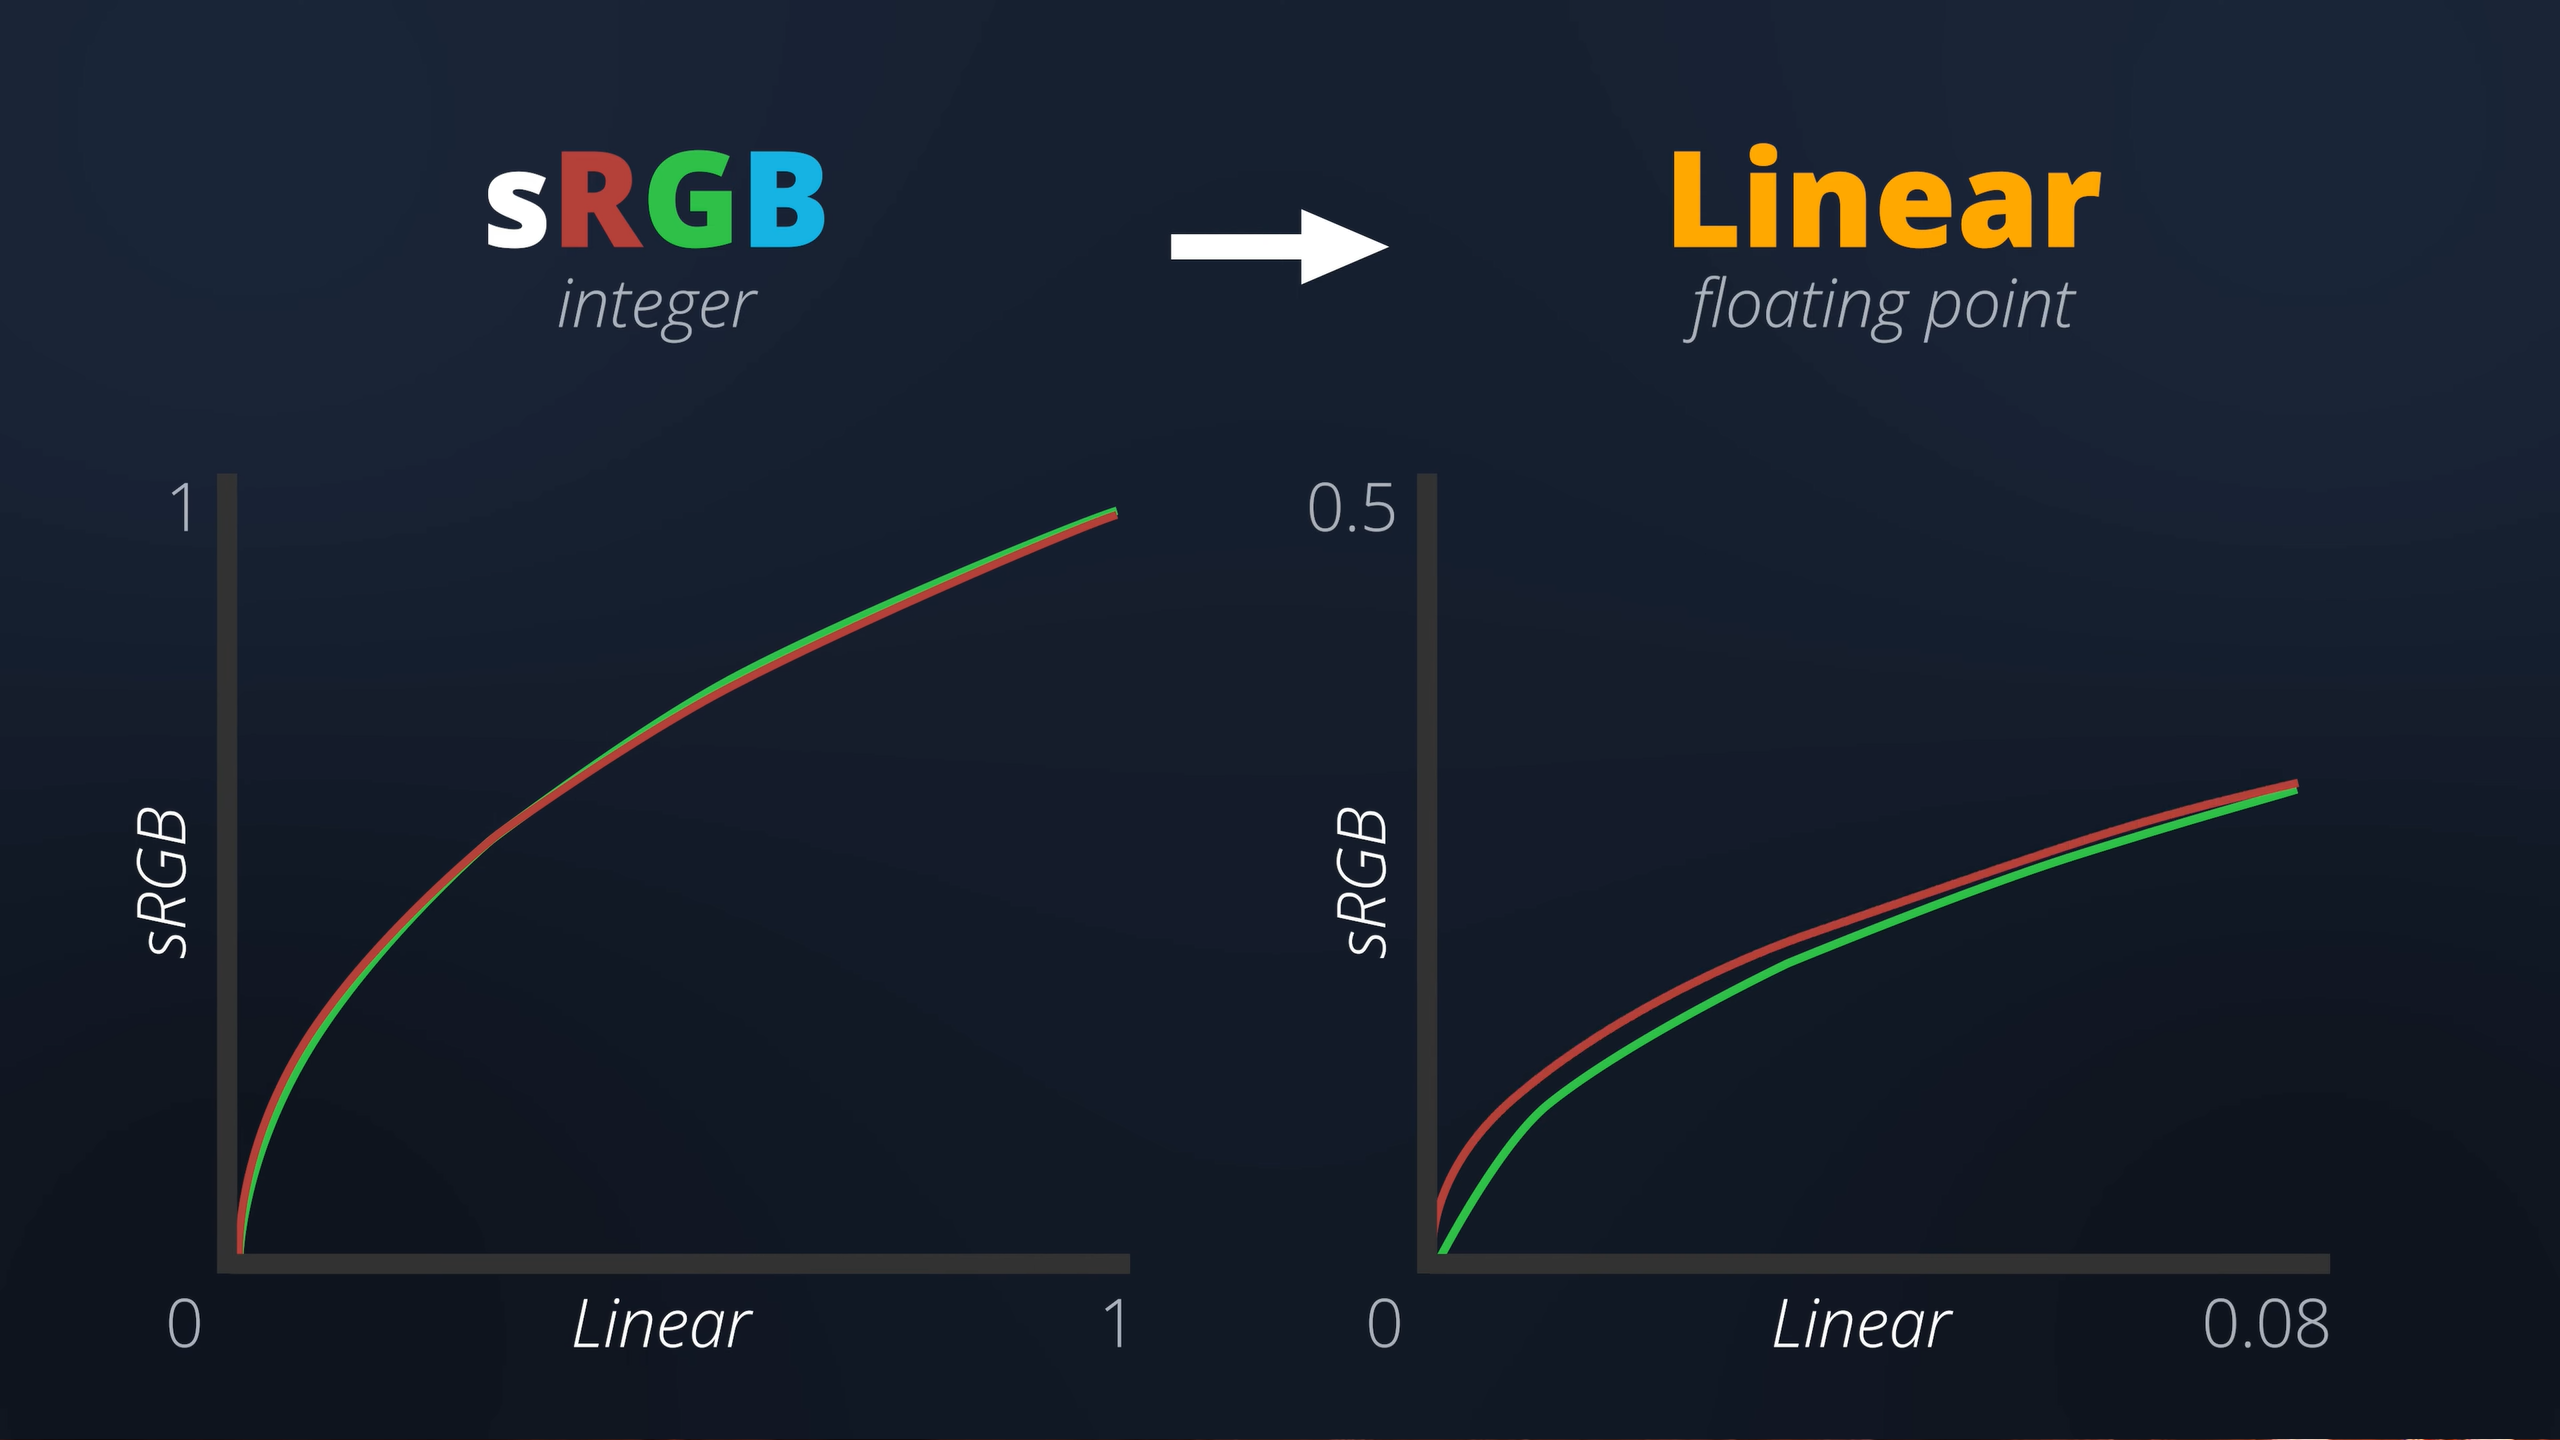
Rendering in a high dynamic range framebuffer allows for a wider brightness spectrum to be displayed on the screen. To benefit from this visual improvement, colour values have to be converted from sRGB into linear space.
A cheap and easy trick to achieve this is by using a gamma 2.2 curve. Unfortunately, it’s ultimately flawed due to being highly inaccurate for dark values. In fact, it’s mathematically incapable of producing a true black. Therefore, despite the added performance cost, converting to and from linear space should be done accurately.
Specular Anti-Aliasing
Another necessary adjustment is specular anti-aliasing. When working with low roughness values, especially on curved surfaces, the formation of firefly artefacts is quite likely.
These create jagged edges within reflective surfaces that hurt the quality of the final rendered result despite being mathematically correct. To solve this, extreme roughness values are adjusted based on the normal angle between a surface and the camera. The end result isn’t technically physically accurate. However, it produces a much nicer image.
Parallax Occlusion Mapping
To finish off surface rendering, a solution for displaying height maps is needed. And for the time being, I’ve decided to implement a Parallax Occlusion effect. Similar to a normal map, parallax occlusion gives the illusion of depth on flat surfaces.
This is a form of optical illusion where the UV coordinates used to sample a texture are adjusted based on the angle between a surface and the camera.
It’s generally quite a cheap calculation in terms of performance. Unfortunately, it also has its limitations, creating strange artefacts at certain angles or if the strength is too high. While artists can manipulate the strength of heightmaps, a better solution may be needed.
Tessellation
Tessellation is a bit complicated. But in oversimplified terms, it is the equivalent of subdividing a surface and repositioning vertices along their normal axis using data inside of a height map to create geometric depth.
Due to its higher performance cost, it’s often used sparingly in video games. But for the purposes of rendering a preview inside of Bright Life, the longer render time is insignificant, especially since it’s far more accurate than Parallax Occlusion with none of the unwanted artefacts.
Adding Material Modifiers & Lighting
Just like how artists can control the strength of a height map, the other PBR textures can also be modified. Various settings are in place to adjust each material to create a wider range of unique results. But in addition to material rendering, I added a basic directional light source.
Settings for the directional light, such as strength and colour, can be adjusted. And by holding down the shift key while left-clicking and dragging, the angle can also be changed. It’s a fairly basic setup. But, it allows artists to recreate a closer replication of the lighting environment within their games to generate a more accurate preview.
While the lighting is also based on approximated simulations of physical light, the final rendered result still looks a bit like clay.
Subsurface Scattering & Bloom
The cause of this is the absence of subsurface scattering. Every type of surface absorbs and scatters a certain level of light. In video games, having this detail is essential for photorealistic skin. But the same applies to plants, especially leaves.
For artists planning to make phosphorescent plants such as glow-in-the-dark mushrooms, adding a physically-based bloom effect will take the rendered preview to the next level. Therefore, just like tessellation, physically-based subsurface scattering and bloom will be introduced later down the line.
Optimising Rendering Architecture
Until now, each node contained a list of generated components which were looped through and drawn one by one. But now that materials have entered the picture, this rendering architecture is no longer viable. It’s perfectly possible to continue looping through these components and sending the necessary textures to the GPU for each one.
However, this will result in a significant number of texture bind operations. Therefore, instead of storing the generated components in the Node class, they’re now stored inside the smart materials.
During each render pass, Bright Life loops through each Smart Material that has components assigned to it, it binds the textures of this material, and then draws the components in the list.
This means that the textures of each material are only bound once per frame instead of once per component – a drastically faster way to draw meshes on screen. Another four texture binds per frame have been eliminated by standardising the texture slots.
As a quick crash course, only a certain number of textures can be bound for rendering at any time. By reserving the first four slots for the environment, pre-filter, and irradiance maps, as well as the BRDF look-up table, these textures only need to be bound once, outside of the render loop. These performance optimisations can even be taken further through mesh instancing.
Instead of drawing each component within each material one by one, the model matrix for each component can be sent in one giant batch. The GPU will then draw the same component mesh multiple times in multiple locations based on these model matrices. This reduces the number of mesh draw calls down to one per material rather than one per component.
What’s Next?
With the completion of the Asset Browser and the introduction of materials, Bright Life is getting close to reaching a minimum viable product. LODs and wind simulation are next on the to-do list. But even once Bright Life becomes feature-complete, a lot of work is still going to be needed to extend the number of plants it can generate as well as expand the material library.
The small collection of stylised materials featured in this dev log was kindly donated by Alex over at the Lowlypoly Store. He’s an expert at crafting high-quality, game-ready assets and has thousands of stylised materials available to buy right now. So, for those working on a stylised project, you can use the following Promo code ‘BRIGHTLIFE’ to get yourself a nice discount. There’s a link in the description below.
While artists will be able to import their own custom shapes and materials, having a diversified and extensive library of assets is essential. Unfortunately, this doesn’t come cheap. Photo scanning materials require a lot of fancy equipment, and creating stylised ones is a time-consuming process.
Therefore, to help fund this project, I’ve decided to launch a Patreon page.
You can support from just $1 a month. Those that do will be able to download Bright Life in its current state right now. As always, let me know your thoughts about the progress of this project in the comments below, and don’t forget to subscribe to secure your free copy of Bright Life once it’s finished.
Thank you for watching, and I’ll see you in the next one.

Bright Life Devlog - Instantly Generating 3D Plant Models In One Click!
NewsA complete breakdown of how Bright Life's 3D mesh generation system was built and the challenges that came up along the way.

Bright Life Devlog – Building a Node Editor in .NET
NewsComplete breakdown of how Bright Life's node editor was created using WinForms .NET and Telerik and the challenges along the way.

Bright Life Devlog – Getting Started with UI, OpenGL & PBR
NewsBright Life starts to take shape with a new user interface, integration of OpenGL, and the core of the PBR rendering pipeline.
Bright Life – The Ultimate 3D Flora Tool Announced!
NewsAnnouncement of the Bright Life project. Follow the development of a new 3D flora generation tool to put the speed back into SpeedTree.
Post a comment
Mod SDK & Community
Built a game for Bright Life and want to support mods? Try mod.io, a cross-platform mod SDK created by IndieDB which makes it easy to get a mod community up and running in-game. Currently seeking games to integrate and promote

X
Tags
Embed Buttons
Link to Bright Life by selecting a button and using the embed code provided more...


You may also like

RPG Maker MV
Commercial

GameMaker Studio 2
Commercial

SHMUP Creator
Commercial
![Drag[en]gine](https://media.indiedb.com/cache/images/engines/1/1/9/crop_120x90/banner_large.png)
Drag[en]gine
L-GPL

Dagon
Proprietary

OEngine
Commercial
Will it cost ??