Most plant creation technologies like SpeedTree utilise procedural generation. This technique creates 3D geometry according to specific mathematical equations with a wide variety of variables.
These algorithms can easily produce unique, high-quality assets far quicker than traditional modelling techniques. It’s a non-destructive workflow which makes future modifications and variations painless. And extra steps like UV unwrapping and vertex weighting for wind simulation are automated.
Needless to say, it's a powerful tool for artists, especially considering the importance of saving time during the game development cycle. However, there is one major downside - complexity.
With mathematical equations driving the shape of a generated mesh, understanding what each parameter does is important and necessary. But for new artists, this drastically steepens the learning curve, making the whole process far more daunting. This complexity also bleeds into the software development side.
A lot of study and research has been dedicated to the procedural generation of trees. In fact, that’s why there are so many alternatives to SpeedTree today. However, for other types of vegetation, hunting down usable algorithms becomes far more challenging.
As such, if I were to take the procedural generation route for Bright Life, most of my time would likely be spent in mathematical theory. Fortunately, there’s an alternative.
Introduction to Distorted Kitbashing
Kitbashing is a popular modelling method widely used throughout the game development and film industry. Artists use a library of pre-prepared component meshes and combine them together to create new models. While this is predominantly used for buildings, the concept can easily be applied to plants. The problem is the risk of repetition. After all, no one likes seeing the same assets being used across multiple projects, as it kills any sense of originality.
One solution is to have a wide variety of shapes to increase the number of potential combinations. For example, a mushroom made up of 5 parts with 15 possible shapes for each result in over 360,000 potential combinations, not including any of the other parameters. But that’s not enough. This is where Distortion enters the picture.
After a model has been assembled, a procedurally generated Perlin noise map can be applied to displace the generated geometry. This skews and stretches the vertices to produce a similar but ultimately unique plant shape that eliminates the limited combinations problem.
Distorted Kitbashing isn’t as fancy as Procedural Generation. And for hero assets, it’s likely unsuitable. But for game developers looking to populate their scene with background foliage, it’s a perfect fit. The software is far easier to learn. But most importantly, the time spent generating plants drops from minutes to seconds.

Laying the Groundwork
Before getting to work on the generator, I need to make some changes to the project’s code architecture. As I explained in the last devlog, each node tree is stored inside a list.
This enables Bright Life to have multiple projects open at the same time. However, to keep things tidy, I created a new Plant class. The Plant class now contains the node tree along with additional functions to generate and draw a plant model using the settings in the node tree. And the original list of node trees is now a list of Plant pointers.
Building a 3D Mushroom Generator
In the long run, Bright Life will be capable of generating countless types of plants. But to kick things off, I decided to start with mushrooms.
As foliage goes, these are relatively simple, consisting of five primary components. To represent these in the node tree, I repurposed the Stem node I made in the last video. I also added three additional nodes for the other mushroom components. After digging up an old copy of the Usborne Spotter Guide to Mushrooms and Fungi, I got to work making some primitive shapes for each fungus node that will be fed into the Distorted Kitbashing system.
This took a few days, but eventually, I finished creating a wide range of assets using the illustrations within the book as a reference. With a library of component shapes prepared, it’s time to crack on with the plant generation system, starting with the Seed node.
Calculating Random Plant Positions
As a reminder, the Seed Node is responsible for initial positioning, rotation, and scale. Most importantly, it determines how many plants should be generated across a specified area with minimum distances between each placement. That way, artists can generate entire patches of vegetation rather than just a single asset at a time.
Generating a random value for rotation and scale based on the minimum and maximum values set by the artist is simple enough. However, calculating placements is where things get more complicated.
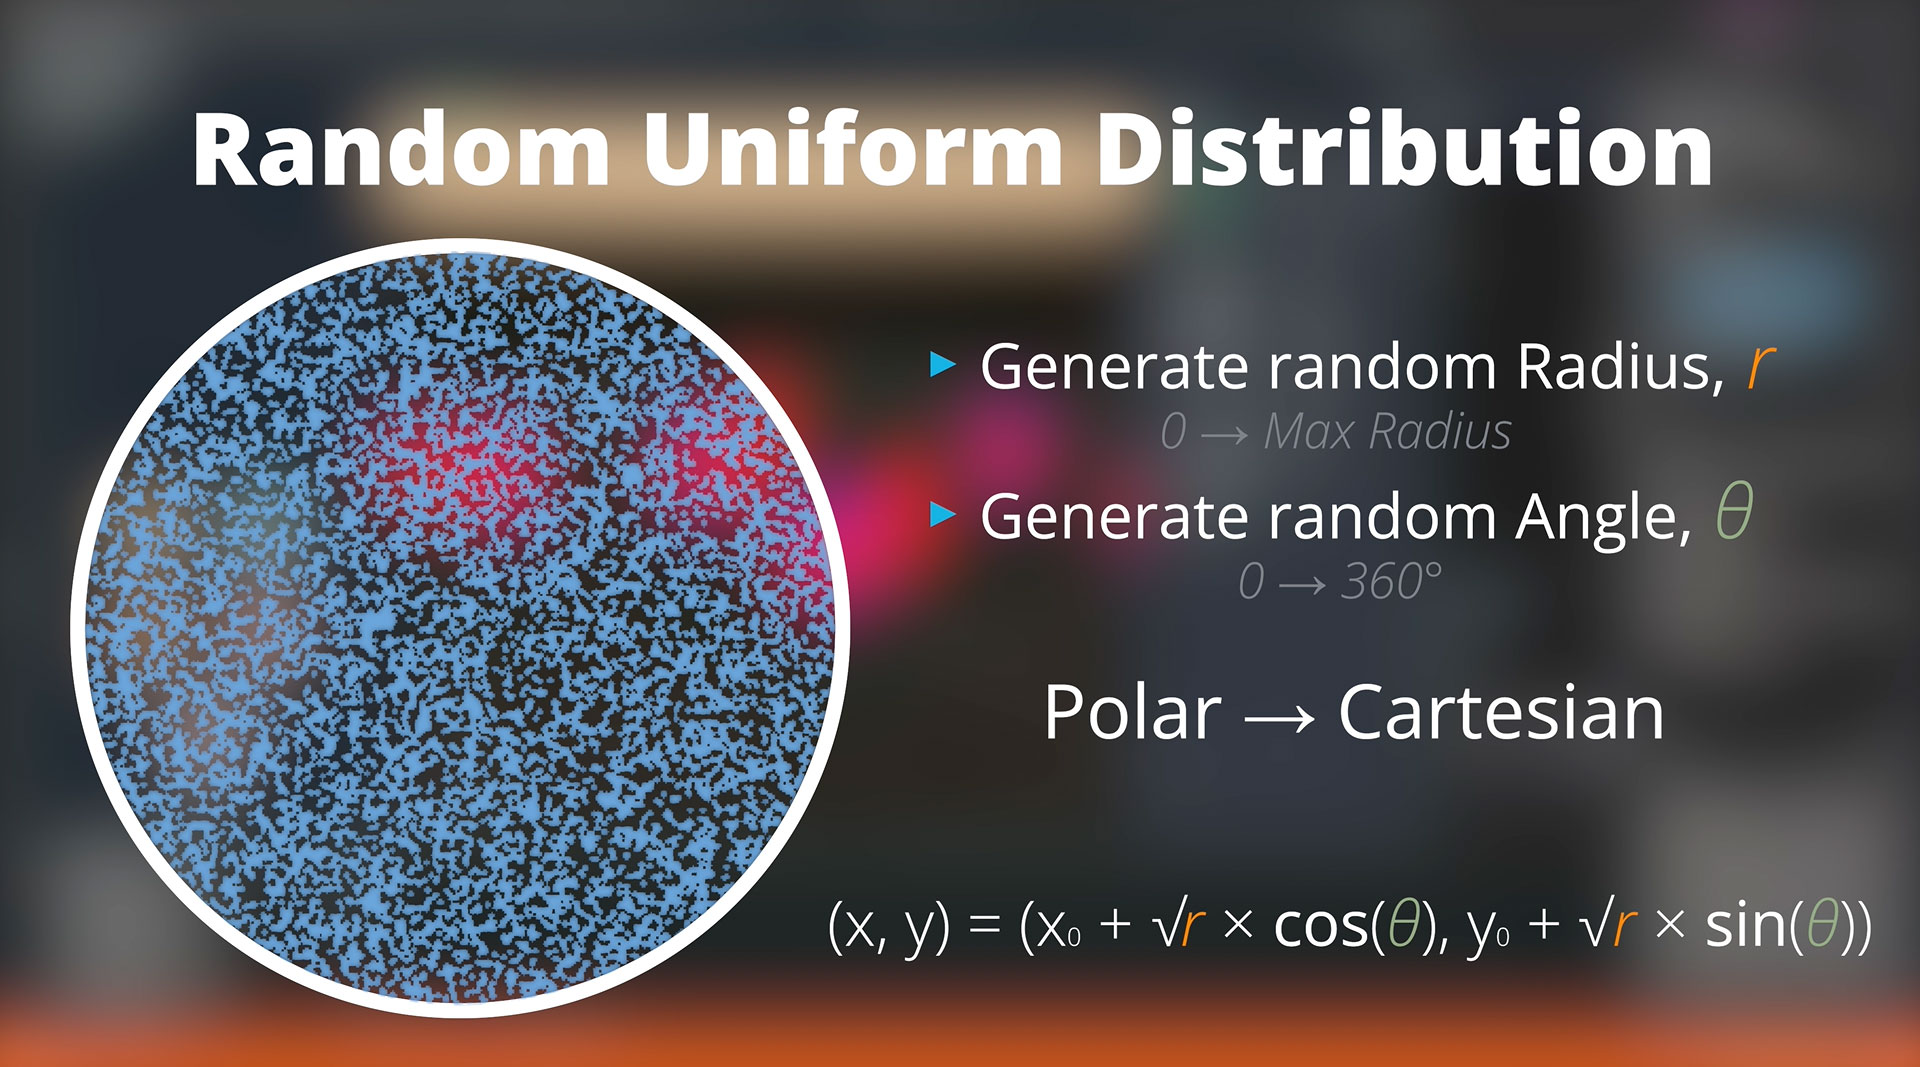
The area in which plants can be placed is a circle defined by a radius. To generate a random point within this circle, it may seem sensible to generate a random value between zero and the radius, along with a random angle between 0 and 360 degrees.
However, this approach won’t actually produce truly random results since most placements will be biased towards the central point. Instead, I want to generate a random uniform distribution and then convert the result from polar into cartesian coordinates. This can be a little tricky to work out for the first time, but at the end of the day, the math is relatively simple.
Adding Separation
With random positions sorted, it’s time to introduce separation. To stop two placements from being on top of each other, Bright Life cross-checks with other placements already calculated. If the distance between any existing placement falls outside of the specified separation range, the placement fails, and the software will then try again.
This brute force method obviously isn’t the most efficient, and in some instances, it may take some time for a viable placement to be found for dense foliage. After all, it’s the equivalent of throwing things at the wall to see what sticks. Therefore, after 5 attempts, if no placement has been found, Bright Life will simply give up and move on.
This is to prevent getting caught in an endless loop, and the software will output a warning to the artist to alert them the parameters set may be unviable. In the future, the number of attempts will be adjustable by the artist if I don’t find a better solution later down the line.
Storing Transformations
With the spawn transformations now calculated, they need to be stored in an accessible manner. To achieve this, I created a new Plant Component class.
Apart from having the individual values for each transformation, the Plant Component class also contains a pre-computed four-dimensional model matrix. This matrix contains the same transformation data but in a format that can be directly used by the GPU.
This does result in duplicate data being stored inside the class. However, the memory impact is negligible. And since the matrix is being calculated in the generation stage rather than in the render loop, the drawing speed is increased significantly.
Shape Selection
With a wide range of shape options for each node, artists need an intuitive way to select which ones they want to use. And after experimenting, I decided to use a drop-down checklist UI editor.
It took some finicking, but using one of Telerik’s controls, I was able to integrate this custom editor into the Property Grid system. Artists can now easily toggle which shapes they want to use as well as search for a specific one.
In the future, I plan to modify the editor further to include image tooltips to preview the geometry of each shape since that’s far more informative than just a label. After the artist selects which shapes they want, the plant generator randomly picks one from the selected list and stores a pointer to the model data inside a newly created Plant Component pointer along with all the calculated transformations.
Loading 3D Assets
With a wide range of shape options for each node, artists need an intuitive way to select which ones they want to use. And after experimenting, I decided to use a drop-down checklist UI editor.
It took some finicking, but using one of Telerik’s controls, I was able to integrate this custom editor into the Property Grid system. Artists can now easily toggle which shapes they want to use as well as search for a specific one.
In the future, I plan to modify the editor further to include image tooltips to preview the geometry of each shape since that’s far more informative than just a label. After the artist selects which shapes they want, the plant generator randomly picks one from the selected list and stores a pointer to the model data inside a newly created Plant Component pointer along with all the calculated transformations.
Stitching Components
The last step in the generation stage is to stitch all the individual component models together. My initial tactic was to use skeletal rigs. Unfortunately, this quickly proved problematic.
The Bright Engine SDK uses a reversed-engineered FBX importing system rather than the official Autodesk SDK. As such, it only loads a bone’s transformation matrix as an offset from its parent. For animation, this works perfectly. But for Bright Life, that’s less than ideal.
It’s possible to calculate the World Space coordinates by stepping through the skeletal rig and multiplying the matrices one by one. However, this isn’t particularly efficient and can lead to a confusing mess.
Using the official Autodesk SDK would easily solve this problem since it’s possible to access bone world space coordinates directly. But, the file format is proprietary. And while Autodesk has made this tool available for “free”, the recent scandal surrounding Unity serves as a perfect example of why creating products using someone else's technology can potentially create serious problems later down the line.
It’s also worth pointing out that storing skeletal rigs inside of model files can drastically increase the file size, causing longer loading times. So, instead, I created a simple custom metadata archive that stores the world space bone data for each component. This does create an extra step, but it keeps the model file sizes small, eliminates the need for third-party technology and simplifies the entire stitching code.
Making 3D Plants In One Click
Building a node tree doesn’t take long. However, the ultimate goal of this project is to allow artists to create 3D plant models instantly. And that’s where the Generate button enters the picture.
Bright Life will store a collection of template node trees for different plant types. Whenever creating a new project, the artist will be able to select which kind of plant they want to make from the drop-down list and then hit generate. The software will then instantly load up a template node tree with each variable randomised to create a unique design every time.
At this point, the Generate button will turn into a Randomise button. And clicking on it will randomise the settings of each node within the tree as many times as the artist wants. The idea is to create different-looking plant geometry quickly without having to adjust each setting one by one.
These template node trees are designed to provide completed assets. However, there’s nothing stopping users from adding or removing additional nodes to create weird and wonderful vegetation.
Of course, randomising variables can lead to some wacky results. And it will take time to find the ideal range of potential values for each variable. This is something that will require persistent testing before eventually producing consistently usable results.
Don’t forget to subscribe if you want a free copy of Bright Life once it’s finished, and as always, let me know your thoughts in the comments below. See you in the next one.