We now continue our conversion process by converting as many bsp brushes as we can get away with to static meshes, using the in-build options provided by the UDK.
1) Our next step is to convert as many brushes as we can to static meshes, this isn't just furniture etc, we're talking walls, windows everything we can get away with to make things easier.
2) There are four brush types we're interested in:
Semi-Solid (Pink)
Additive (Blue)
Additive with Subtractives (Blue & Yellow seperate brushes)
Zone Sheet/Non-Solids (Green).
We will deal with converting the Semi-Solids, Additive Solids (without any subtractives) and Non-Solids to begin with.
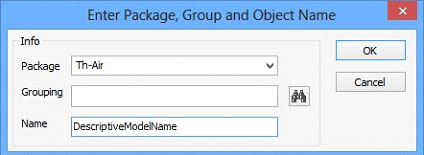
3) Right Click on the brush in wireframe mode, and select 'Convert' > 'Convert To Static Mesh' and then set the Package Name to that of the map name, and give the model an easy to recognise/understand name:
4) Now find the model in the content browser, and double click on it to open the Static Mesh Editor, then in the new window that appears go to View>Collision:
We need to do this because at the moment the static mesh has no collision on it, and people can walk through it.
Now go to the Collision menu, in this menu there are various options which can be used depending on the complecity of the model, a simple crate for example can use the top most one, while this chair is going to need the Auto Convex option. While clicking through these options, the collision will show in the 3d view, and so you can see how good the collision model actually is.
The Auto Convex Collision can be the most costly, but is required in alot of cases, it is wisest to save the map you are working on before using auto convex until you are skilled enough to know when it is most likely to crash unreal editor (frequently).
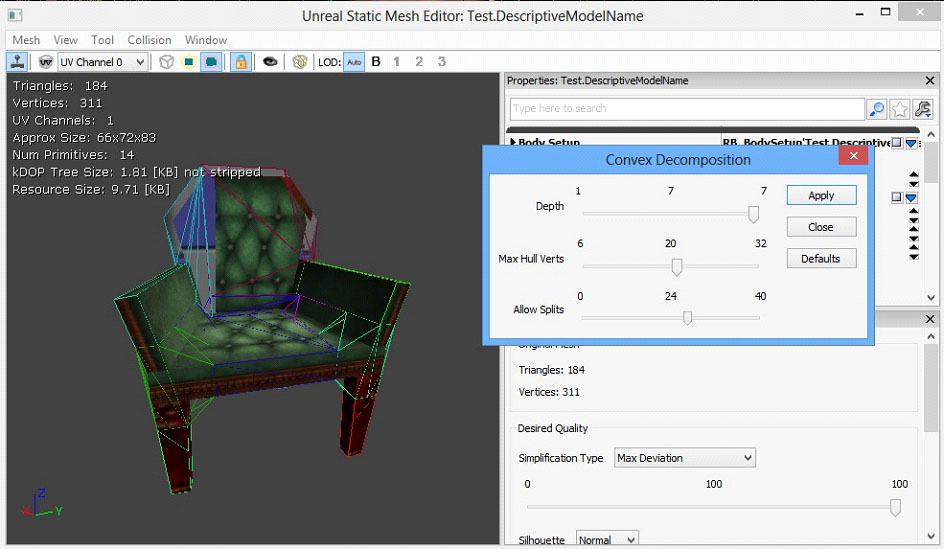
Here is a description:
Depth - How deep the engine should look at the model (the more complex the greater the depth needed for accurate collision results).
Max Hull Verts - *I think* this will be the maximum permitted vertices in any collision hull.
Allow splits - *I think* this is how many different sections of the collision model are allowed, as above you can see different coloured areas.
The result you're after is one that fits the models shape well, while keeping the Max Hull Verts and Allow Splits sliders as low as you can go for the required shape.
5) Once you are happy with the results save your map (which will save your mesh changes).
6) Then as replace the brush work with the static mesh actor, and position it as required.
If the brush is a green non-solid brush then having a collision won't make any difference, you will still fall through it if you were to step on it say. You can however use a very thin block volume over the static mesh (made from the non-solid brush) to give a collision to it.
Brushes which involve both subtractive (yellow) and additive (blue) brushes in their composition are dealt with in the next part of this tutorial series.


HOLY ***** my fav mod ever converted :D
*drolls*