Fully supports 2D and 3D game development;provide everything you need to build, animate, and render your 3D worlds and characters With LayaAir's unique UI system, you can visually create adaptive user interfaces or 2D games without the need for coding. It can handle complex 3D scenes and provide smooth animation effects, as well as having a comprehensive 3D editor. Graphics rendering API based on WebGL and WEBGPU, allowing your projects to run on a variety of operating systems and devices. Key features: The most open and powerful 3D engine based on the most powerful WEB graphics API. Modern rendering system to get maximum performance from GPU. A complete suite of development tools for 2D & 3D games. Full Platform Framework;Write once, run everywhere
Articles
1. Skeleton skinning animation
Only relatively simple animations can be produced in LayaAir. If you want complex animations, such as animations of characters running, you must create them in external software and import them into LayaAir for use. Usually we need to use 3dMax software to make models and animations, and export them to Fbx format files. The following will introduce how to import 3D models and animations.
1. Import model files
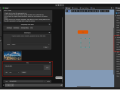
Put Fbx into the Assets directory

(figure 1)
Open LayaAir IDE. The IDE will recognize the Fbx file and can expand the Fbx file. You will see the file information in Figure 2. Take_001 is the skeleton skin animation file that comes with Fbx and is also its own standby animation.
Drag Fbx into the Scene3D scene, you can see the model, but there are no textures and animations. Let’s first introduce how to add materials and textures to LayaMonkey.

(figure 2)
2. Texture setting association
Place the texture file under Assets

(image 3)
You need to create a material file to configure textures and other information for the model.

(Figure 4)
Click on the newly created Material file. You can see a lot of configuration information on the right. Here we only need to drag the texture file into the material file.

(Figure 5)
Drag the material file into the Materials of LayaMonkey's SkinnedMeshRenderer component

(Figure 6)
You can see that the model already has texture effects

(Figure 7)
3. Import and use of skeleton skin animation
Here's how to add animation to LayaMonkey
When the Fbx file is dragged into the Scene3D scene, the Animator component will be automatically added. If not, you can add the Animator component yourself and ensure the AlwaysAnimate mode.

(Figure 8)
At this point, we need to create an AnimationController file, which is the 3D animation state machine

(Figure 9)
Drag the newly created Animation Controller file into the Animator component

(Figure 10)
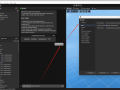
After double-clicking the AnimatorController, drag the Take_001 animation file into the Animator window

(Figure 11)
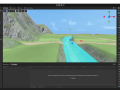
Click the Scene window again and click on the animation file preview below to see the animation effect.

(Figure 12)
When you run the IDE at this time, you can play LayaMonkey animations, or you can drag LayaMonkey into the Assets directory as a prefab for easy reuse or code implementation.

(Figure 13)
4. Use of multiple individual bone skinning animation files
In most cases, the Fbx file exported by a model containing animation will contain both mesh information and animation information, but there are also some cases where the Fbx file only needs to export animation information. For example, if there are many animations in the same model, only one mesh information is needed, and other animation information can be exported through separate model files (without mesh information). When making animations, you should consider the reuse of animations for similar models in the scene. For example, different humanoid characters might all use the same walking and running animations. Animations can be reused as long as the skeletal structure is kept consistent.
In Figure 14, taking girl as an example, we put the Fbx file without animation information and multiple Fbx files with only animation into Assets

(Figure 14)
After creating the AnimatorController, drag the standby and running animations into the Animator window to modify the animation name.

(Figure 15)
Note: The idle animation is the default animation at this time
As shown in Figure 16, we can preview the standby and running animations separately, and set whether to loop.

(Figure 16)
Multiple individual bone skinning files are set successfully, and individual animations can also be set to other models for reuse.
5. Code running example
With the following code, we can load the girl prefab in any scene, add it to the scene, and click the screen with the mouse to switch animations
import { MainBase } from "./Main.generated";
import KeyBoardManager = Laya.InputManager;
import Keyboard = Laya.Keyboard;
const { regClass, property } = Laya;

@regClass()
export class Main extends MainBase {

 private _animator: Laya.Animator;
 private _isRun: boolean;
 onAwake() {
     console.log("Game start");
     //Load the specified model prefab and add it to the Scene3D scene
     Laya.loader.load("girl/girl.lh").then(res => {
         let girl : Laya.Sprite3D = res.create();
         this.scene3D.addChild(girl);
         //Get Animator
         this._animator = girl.getComponent<Laya.Animator>(Laya.Animator);
     });
     this.on( Laya.Event.MOUSE_DOWN, this, this.switchAni );
 }

 switchAni(): void {
     if (this._isRun) {
      //Play the corresponding animation
         this._animator.play("idle");
     } else {
      this._animator.play("run");
     }
     this._isRun = !this._isRun;
 }
}
{ let girl : Laya.Sprite3D = res.create(); this.scene3D.addChild(girl); //获取动画师 this._animator = girl.getComponent(Laya.Animator);this.on( Laya.Event.MOUSE_DOWN, this, this.switchAni );} switchAni(): void { if (this._isRun) { //播放对应的动画 this._animator.play(“idle”); } else { this._animator.play(“run”); } this._isRun = !this._isRun; } }”tabindex=“0” role=“button” style=“box-sizing: border-box;位置:相对;显示: flex !important;填充:0px !important;字体大小:14px;字体粗细:var(--base-text-weight-medium, 500);行高:20px;空格:nowrap;垂直对齐:中间;cursor:指针;用户选择:无;边框:0px;边框半径:6px;外观:无;颜色: var(--fgColor-accent, var(--color-accent-fg));背景颜色:透明;box-shadow:无;过渡:彩色 80ms 立方贝塞尔(0.33, 1, 0.68, 1) 0s,背景色,框影,边框色;justify-content: center !important;align-items: center !important;margin: var(--base-size-8, 8px) !important;宽度:var(--control-small-size, 28px);高度:var(--control-small-size, 28px);”>
2.刚体动画
1. 导入 glTF 或 fbx 文件
将 glTF 放入 Assets 目录并打开 LayaAir IDE。IDE 将识别 glTF 文件并展开 glTF 文件。您将在图 17 中看到文件信息,其中 Animation_0 是 glTF 附带的刚体动画文件。

(图17)
将glTF拖拽到Scene3D场景中,可以看到模型,但没有动画。我们先来介绍一下如何使用动画。

(图18)
2. 动画的导入和使用
当 glTF 文件拖动到 Scene3D 场景中时,将自动添加 Animator 组件。如果没有,您可以自行添加 Animator 组件并确保 AlwaysAnimate 模式。

(图19)
此时,我们需要创建一个 AnimationController 文件,它是 3D 动画状态机

(图20)
将新创建的动画控制器文件拖到 Animator 组件中

(图21)
双击 AnimatorController 后,将Take_001动画文件拖动到 Animator 窗口中

(图22)
此时运行 IDE 时,可以播放刚体动画,也可以将 BoxAnimated 作为预制体拖到 Assets 目录中,以便于重用或实现代码。

(图23)
Post a comment
Mod SDK & Community
Built a game for LayaAir and want to support mods? Try mod.io, a cross-platform mod SDK created by IndieDB which makes it easy to get a mod community up and running in-game. Currently seeking games to integrate and promote

X
Tags
Embed Buttons
Link to LayaAir by selecting a button and using the embed code provided more...


You may also like

IW Engine
Commercial
Unreal Engine 2
Commercial
Chrome Engine 6
Proprietary
Dunia
Proprietary

ZDoom
Public Domain