When creating textures, sometimes its good to use pictures as a base to work from for your textures - and today we've got some of our lead organic artist, Valentin Wirth, advice on how to go about this. We hope that you find this useful when creating your own textures, and if you've got anything to add to this list, feel free to post it in the comments section.
This is primarily focused upon taking pictures of organics - by and large, the same things apply to objects.
(Originally written by Valentin Wirth)
Preparation
Shave and wash your skin. Here are some utensils you might want to take with you for the photo session:
- Camera with manual exposure settings
- Tripod
- A hand mirror
- Hair styling stuff
- Powder
- A big towel or piece of cloth.
Your eyes quickly get used to the environment lighting. To check images on your cameras display and controlling colors bring something to hide outside lighting.
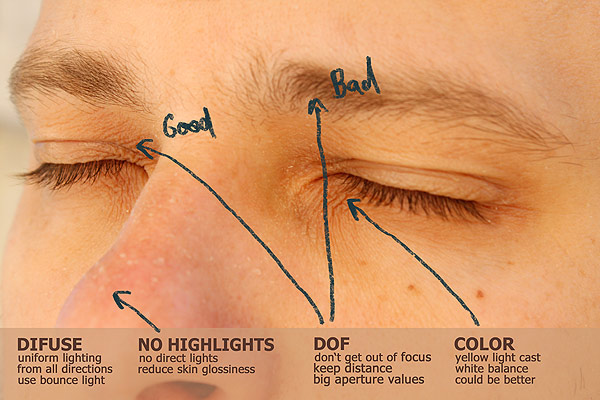
Diffuse Lighting
To get good pictures for texturing you need very diffuse uniform lighting. This means no small direct lights, they will get you shadows and highlights. Inside lighting usually is too dark. You want to use small ISO numbers to minimize grain in your images.
Big wall reflecting sunlight
A good idea is using a big wall hit by the sun as a reflector. Have the sun behind yourself so its direct light is not visible. Sometimes two big reflectors/walls coming from 45° front left and right (a corner) can work very well too. use the morning hours where the sun isn't to high up in the sky. Take lots of test pictures till you find a spot with very flat diffuse lighting.
Highlights
Since highlights move depending to your camera, you don't want them in your diffuse texture. By taking pictures using very diffuse soft lighting you should get minimal highlights only. You can use a little powder on the forehead and nose and cheek bones to reduce the glossiness. Check with some test pictures. No highlights and no powder visible is the way to go.
Color and white balance
The wall should not be colored because its color will tint your photos. In my example the wall had a slight beige color and tinted the entire image yellow. Don't have green grass below you. It will give you some nasty green light below your eyes, nose, mouth and chin. Use your cameras white balance to get close to white lighting. Take lots of test pictures.
Depth of field
For texturing you want the image to be as sharp as possible. This way you can see all the skin detail and pores. Don't take pictures from too close up. It will result in lots of depth of field and out of focus skin. Use big aperture numbers like f/8.0 or more. The smaller your aperture number the smaller your area of sharpness. Use your exposure time to control the image brightness. Use a tripod.
Constant Brightness and Color
Use your cameras manual mode and set it to a constant aperture, speed and ISO setting. You don't want the exposure of your image to change in order to be able to blend images together. Be careful with clouds darkening the sun. You want the image brightness to be as constant as possible. Better expose for a little darker than too bright. You don't want burned out spots in your red channel. Move your head not the camera to frame other detail. Keeping the camera static will get you more static lighting as well.
The more the better
Take lots of pictures from all kinds of angles. You don't want to be back home and notice you have missed to get a pictures of your ear, hair or below your chin. You will probably not be able to match the exact same lighting again.


awesome!
Great tutorial! These guidelines will come much in handy when I purchase a good enough camera! ;)
Thanks