In this article,by Kurt Jaegars,author of XNA 4.0 Game Development by Example: Beginner's Guide – Visual Basic Edition we will address these issues by:
- Animating the rotation of pieces, when manipulated by the player
- Gradually fading out pieces of completed scoring chains
- Animating the falling of pieces into place on the board
- Implementing the flooding of the dome and adding increasing difficulty levels
- Adding a SpriteFont to the game, and displaying the current level and score in their appropriate positions on the screen
XNA 4.0 Game Development by Example: Beginner's Guide – Visual Basic Edition

(Create your own exciting games with Visual Basic and Microsoft XNA 4.0 with this book and ebook )
All of these enhancements will give the player a better game experience, as well as give us the opportunity to learn more about how the SpriteBatch class can be used for animation and text display.
Animated pieces We will define three different types of animated pieces: rotating, falling, and fading. The animation for each of these types will be accomplished by altering the parameters of the SpriteBatch.Draw() call.
Classes for animated pieces
In order to represent the three types of animated pieces, we will create three new classes. Each of these classes will inherit from the GamePiece class, meaning they will contain all of the methods and members of the GamePiece class, but will add additional information to support the animation.
Child classes Child classes inherit all of their parent's members and methods. The RotatingPiece class can refer to the _pieceType and _pieceSuffix of the piece, without recreating them within RotatingPiece itself. Additionally, child classes can extend the functionality of their base class, adding new methods and properties, or overriding old ones. In fact, Game1 itself is a child of the Micrsoft.Xna.Game class, which is why all of the methods we use (Update(),Draw(),LoadContent(), and so on) are declared with the Overrides modifier.
Let's begin by creating the class we will use for rotating pieces.
Time for action – rotating pieces
- Open your existing Flood Control project in Visual Studio, if it is not already active.
- Add a new class to the project called RotatingPiece.
- Under the class declaration (Public Class RotatingPiece), add the following line:
Inherits GamePiece - Add the following declarations to the RotatingPiece class:
Public Clockwise As Boolean
Public Shared RotationRate As Single = (MathHelper.PiOver2/10)
Private _rotationAmount As Single
Public rotationTicksRemaining As Single = 10 - Add a property to retrieve the current RotationAmount:
Public ReadOnly Property RotationAmount As Single
Get
If Clockwise Then
Return _rotationAmount
Else
Return (MathHelper.Pi * 2) - _rotationAmount
End If
End Get
End Property - Add a constructor for the RotatingPiece class as follows:
Public Sub New(type As String, clockwise As Boolean)
MyBase.New(type)
Me.Clockwise = clockwise
End Sub - Add a method to update the piece as follows:
Public Sub UpdatePiece()
_rotationAmount += RotationRate
rotationTicksRemaining =
CInt(MathHelper.Max(0, rotationTicksRemaining - 1))
End Sub
What just happened?
In step 3, we modified the RotatingPiece class, by adding Inherits GamePiece on the line, after the class declaration. This indicates to Visual Basic that the RotatingPiece class is a child of the GamePiece class.
The Clockwise variable stores a true value, if the piece will be rotating clockwise, and false if the rotation is counter clockwise.
When a game piece is rotated, it will turn a total of 90 degrees (or pi/2 radians) over 10 animation frames. The MathHelper class provides a number of constants to represent commonly used numbers, with MathHelper.PiOver2 being equal to the number of radians in a 90 degree angle. We divide this constant by 10 and store the result as the rotationRate for use later. This number will be added to the _rotationAmount single, which will be referenced when the animated piece is drawn.
Working with radians All angular math is handled in radians in XNA. A complete (360 degree) circle contains 2*pi radians. In other words, one radian is equal to about 57.29 degrees. We tend to relate to circles more often in terms of degrees (a right angle being 90 degrees, for example), so if you prefer to work with degrees, you can use the MathHelper.ToRadians() method to convert your values, when supplying them to XNA classes and methods.
The final declaration, rotationTicksRemaining, is reduced by one, each time the piece is updated. When this counter reaches zero, the piece has finished animating.
When the piece is drawn, the RotationAmount property is referenced by a spriteBatch.Draw() call, and returns either the _rotationAmount variable (in the case of a clockwise rotation) or 2*pi (a full circle) minus the _rotationAmount, if the rotation is counter clockwise.
The constructor in step 6 illustrates how the parameters passed to a constructor can be forwarded to the class' parent constructor via the MyBase call. Since, the GamePiece class has a constructor that accepts a piece type, we can pass that information along to its constructor, while using the second parameter (clockwise) to update the clockwise member that does not exist in the GamePiece class. In this case, since both the Clockwise member variable and the clockwise parameter have identical names, we specify Me.Clockwise to refer to the clockwise member of the RotatingPiece class. Simply, clockwise in this scope refers only to the parameter passed to the constructor.
Me notation You can see that it is perfectly valid for Visual Basic code to have method parameter names that match the names of class variables, thus potentially hiding the class variables from being used in the method (since, referring to the name inside the method will be assumed to refer to the parameter). To ensure that you can always access your class variables even when a parameter name conflicts, you can preface the variable name with Me. when referring to the class variable. Me. indicates to Visual Basic that the variable you want to use is part of the class, and not a local method parameter. In C#, a similar type of notation is used, prefacing class-level members with this. to access a hidden variable.
Lastly, the UpdatePiece() method simply increases the _rotationAmount member, while decreasing the rotationTicksRemaining counter (using MathHelper.Max() to ensure that the value does not fall below zero).
Time for action – falling pieces
- Add a new class to the Flood Control project called FallingPiece.
- Add the Inherits line after the class declaration as follows:
Inherits GamePiece - Add the following declarations to the FallingPiece class:
Public VerticalOffset As Integer
Public Shared FallRate As Integer = 5 - Add a constructor for the FallingPiece class:
Public Sub New(type As String, verticalOffset As Integer)
MyBase.New(type)
Me.VerticalOffset = verticalOffset
End Sub - Add a method to update the piece:
Public Sub UpdatePiece()
VerticalOffset =
CInt(MathHelper.Max(0, VerticalOffset - FallRate))
End Sub
What just happened?
Simpler than a RotatingPiece, a FallingPiece is also a child of the GamePiece class. A FallingPiece has an offset (how high above its final destination it is currently located) and a falling speed (the number of pixels it will move per update).
As with a RotatingPiece, the constructor passes the type parameter to its base class constructor, and uses the verticalOffset parameter to set the VerticalOffset member. Again, we use the Me. notation to differentiate the two identifiers of the same name.
Lastly, the UpdatePiece() method subtracts FallRate from VerticalOffset, again using the MathHelper.Max() method to ensure that the offset does not fall below zero.
Time for action – fading pieces
- Add a new class to the Flood Control project called FadingPiece.
- Add the following line to indicate that FadingPiece also inherits from GamePiece:
Inherits GamePiece - Add the following declarations to the FadingPiece class:
Public AlphaLevel As Single = 1.0
Public Shared AlphaChangeRate As Single = 0.02 - Add a constructor for the FadingPiece class as follows:
Public Sub New(type As String, suffix As String)
MyBase.New(type, suffix)
End Sub - Add a method to update the piece:
Public Sub UpdatePiece()
AlphaLevel = MathHelper.Max(0, AlphaLevel - AlphaChangeRate)
End Sub
What just happened?
The simplest of our animated pieces, the FadingPiece only requires an alpha value (which always starts at 1.0f, or fully opaque) and a rate of change. The FadingPiece constructor simply passes the parameters along to the base constructor.
When a FadingPiece is updated, alphaLevel is reduced by alphaChangeRate, making the piece more transparent.
Managing animated pieces
Now that we can create animated pieces, it will be the responsibility of the GameBoard class to keep track of them. In order to do that, we will define a Dictionary object for each type of piece.
A Dictionary is a collection object similar to a List, except that instead of being organized by an index number, a Dictionary consists of a set of key and value pairs. In an array or a List, you might access an entity by referencing its index as in dataValues(2) = 12. With a Dictionary, the index is replaced with your desired key type. Most commonly, this will be a string value. This way, you can do something like fruitColors("Apple")="red".
Time for action – updating GameBoard to support animated pieces
- In the declarations section of the GameBoard class, add three Dictionaries, shown as follows:
Public FallingPieces As Dictionary(Of String, FallingPiece) =
New Dictionary(Of String, FallingPiece)
Public RotatingPieces As Dictionary(Of String, RotatingPiece) =
New Dictionary(Of String, RotatingPiece)
Public FadingPieces As Dictionary(Of String, FadingPiece) =
New Dictionary(Of String, FadingPiece) - Add methods to the GameBoard class to create new falling piece entries in the Dictionaries:
Public Sub AddFallingPiece(x As Integer, y As Integer,
type As String, verticalOffset As Integer)
FallingPieces.Add(
x.ToString() + "_" + y.ToString(),
New FallingPiece(type, verticalOffset))
End SubPublic Sub AddRotatingPiece(x As Integer, y As Integer,
type As String, clockwise As Boolean)
RotatingPieces.Add(
x.ToString() + "_" + y.ToString(),
New RotatingPiece(type, clockwise))
End SubPublic Sub AddFadingPiece(x As Integer, y As Integer, type As String)
FadingPieces.Add(
x.ToString() + "_" + y.ToString(),
New FadingPiece(type, "W"))
End Sub - Add the ArePiecesAnimating() method to the GameBoard class:
Public Function ArePiecesAnimating() As Boolean
If (FallingPieces.Count +
FadingPieces.Count +
RotatingPieces.Count) = 0 Then
Return False
Else
Return True
End If
End Function - Add the UpdateFadingPieces() method to the GameBoard class:
Public Sub UpdateFadingPieces()
Dim RemoveKeys As Queue(Of String) = New Queue(Of String)For Each thisKey As String In FadingPieces.Keys
FadingPieces(thisKey).UpdatePiece()
If FadingPieces(thisKey).AlphaLevel = 0 Then
RemoveKeys.Enqueue(thisKey)
End If
NextWhile RemoveKeys.Count > 0
FadingPieces.Remove(RemoveKeys.Dequeue())
End While
End Sub - Add the UpdateFallingPieces() method to the GameBoard class:
Public Sub UpdateFallingPieces()
Dim RemoveKeys As Queue(Of String) = New Queue(Of String)For Each thisKey As String In FallingPieces.Keys
FallingPieces(thisKey).UpdatePiece()
If FallingPieces(thisKey).VerticalOffset = 0 Then
RemoveKeys.Enqueue(thisKey)
End If
NextWhile RemoveKeys.Count > 0
FallingPieces.Remove(RemoveKeys.Dequeue())
End While
End Sub - Add the UpdateRotatingPieces() method to the GameBoard class as follows:
Public Sub UpdateRotatingPieces()
Dim RemoveKeys As Queue(Of String) = New Queue(Of String)For Each thisKey As String In RotatingPieces.Keys
RotatingPieces(thisKey).UpdatePiece()
If RotatingPieces(thisKey).rotationTicksRemaining = 0 Then
RemoveKeys.Enqueue(thisKey)
End If
NextWhile RemoveKeys.Count > 0
RotatingPieces.Remove(RemoveKeys.Dequeue())
End While
End Sub - Add the UpdateAnimatedPieces() method to the GameBoard class as follows:
Public Sub UpdateAnimatedPieces()
If (FadingPieces.Count = 0) Then
UpdateFallingPieces()
UpdateRotatingPieces()
Else
UpdateFadingPieces()
End If
End Sub
What just happened?
After declaring the three Dictionary objects, we have three methods used by the GameBoard class to create them when necessary. In each case, the key is built in the form X_Y, so an animated piece in column 5 on row 4 will have a key of 5_4. Each of the three Add... methods simply pass the parameters along to the constructor for the appropriate piece types, after determining the key to use.
When we begin drawing the animated pieces, we want to be sure that animations finish playing, before responding to other input or taking other game actions (like creating new pieces). The ArePiecesAnimating() method returns true, if any of the Dictionary objects contain entries. If they do, we will not process any more input or fill empty holes on the game board, until they have completed.
The UpdateAnimatedPieces() method will be called from the game's Update() method, and is responsible for calling the three different update methods previously (UpdateFadingPiece(), UpdateFallingPiece(), and UpdateRotatingPiece()) for any animated pieces, currently on the board. The first line in each of these methods declares a Queue object called RemoveKeys. We will need this, because Visual Basic does not allow you to modify a Dictionary (or List, or any of the similar generic collection objects), while a for each loop is processing them.
A Queue is yet another generic collection object that works like a line at the bank. People stand in a line and await their turn to be served. When a bank teller is available, the first person in the line transacts his/her business and leaves. The next person then steps forward. This type of processing is known as FIFO (First In, First Out).
Using the Enqueue() and Dequeue() methods of the Queue class, objects can be added to the Queue(Enqueue()), where they await processing. When we want to deal with an object, we Dequeue() the oldest object in the Queue, and handle it. Dequeue() returns the first object waiting to be processed, which is the oldest object added to the Queue.
Collection classes The .NET Framework provides a number of different collection classes, such as the Dictionary, Queue, List, and Stack objects. Each of these classes provide different ways to organize and reference the data in them. For information on the various collection classes and when to use each type, see the following MSDN entry:
Each of the update methods loops through all of the keys in its own Dictionary, and in turn calls the UpdatePiece() method for each key. Each piece is then checked to see if its animation has completed. If it has, its key is added to the RemoveKeys queue. After, all of the pieces in the Dictionary have been processed, any keys that were added to RemoveKeys are then removed from the Dictionary, eliminating those animated pieces.
If there are any FadingPieces currently active, those are the only animated pieces that UpdateAnimatedPieces() will update. When a row is completed, the scoring tiles fade out, the tiles above them fall into place, and new tiles fall in from above. We want all of the fading to finish before the other tiles start falling (or it would look strange as the new tiles pass through the fading old tiles).
Fading pieces
In the discussion of UpdateAnimatedPieces(), we stated that fading pieces are added to the board, whenever the player completes a scoring chain. Each piece in the chain is replaced with a fading piece.
Time for action – generating fading pieces
- In the Game1 class, modify the CheckScoringChain() method by adding the following call inside the for each loop, before the square is set to Empty:
_gameBoard.AddFadingPiece(
CInt(thisPipe.X),
CInt(thisPipe.Y),
_gameBoard.GetSquare(
CInt(thisPipe.X),
CInt(thisPipe.Y)))
What just happened?
Adding fading pieces is simply a matter of getting the type of piece currently occupying the square that we wish to remove (before it is replaced with an empty square), and adding it to the FadingPieces dictionary. We need to use the CInt typecasts, because the thisPipe variable is a Vector2 value, which stores its X and Y components as Singles.
Falling pieces
Falling pieces are added to the game board in two possible locations: From the FillFromAbove() method when a piece is being moved from one location on the board to another, and in the GenerateNewPieces() method, when a new piece falls in from the top of the game board.
Time for action – generating falling pieces
- Modify the FillFromAbove() method of the GameBoard class by adding a call to generate falling pieces right before the rowLookup = -1 line (inside the If block):
AddFallingPiece(x, y, GetSquare(x, y),
GamePiece.PieceHeight * (y - rowLookup)) - Update the GenerateNewPieces() method by adding the following call, right after the RandomPiece(x,y) line as follows:
AddFallingPiece(x, y, GetSquare(x, y),
GamePiece.PieceHeight * (GameBoardHeight + 1))
What just happened?
When FillFromAbove() moves a piece downward, we now create an entry in the FallingPieces dictionary that is equivalent to the newly moved piece. The vertical offset is set to the height of a piece (40 pixels) times the number of board squares the piece was moved. For example, if the empty space was at location 5, 5 on the board, and the piece above it (5, 4) is being moved down one block, the animated piece is created at 5, 5 with an offset of 40 pixels (5-4 = 1, times 40).
When new pieces are generated for the board, they are added with an offset equal to the height (in pixels) of the game board (recall that we specified the height as one less than the real height, to account for the allocation of the extra element in the boardSquares array), determined by multiplying the GamePiece.PieceHeight value by GameBoardHeight +1. This means, they will always start above the playing area and fall into it.
Rotating pieces
The last type of animated piece that we need to deal with adding, during the play is the rotation piece. This piece type is added, whenever the user clicks on a game piece.
Time for action – modify Game1 to generate rotating pieces
- Update the HandleMouseInput() method in the Game1 class to add rotating pieces to the board by adding the following inside the "if mouseInfo.LeftButton = ButtonState.Pressed" block, before _gameBoard.RotatePiece() is called:
_gameBoard.AddRotatingPiece(x, y,
_gameBoard.GetSquare(x, y), False) - Still in HandleMouseInput(), add the following in the same location inside the if block for the right-mouse button:
_gameBoard.AddRotatingPiece(x, y,
_gameBoard.GetSquare(x, y), True)
What just happened?
Recall that the only difference between a clockwise rotation and a counter-clockwise rotation (from the standpoint of the AddRotatingPiece() method) is a true or false in the final parameter. Depending on which button is clicked, we simply add the current square (before it gets rotated, otherwise the starting point for the animation would be the final position) and true for right-mouse clicks or false for left-mouse clicks.
Calling UpdateAnimatedPieces()
In order, for the UpdateAnimatedPieces() method of the GameBoard class to run, the game's Update() method needs to be modified to call it.
Time for action – updating Game1 to update animated pieces
- Modify the Update() method of the Game1 class by replacing the current case statement for the GameState.Playing state with the following:
Case GameStates.Playing
timeSinceLastInput +=
(CSng(gameTime.ElapsedGameTime.TotalSeconds))If _gameBoard.ArePiecesAnimating() Then
_gameBoard.UpdateAnimatedPieces()
Else
_gameBoard.ResetWater()
Dim y As Integer
For y = 0 To GameBoard.GameBoardHeight
CheckScoringChain(_gameBoard.GetWaterChain(y))
Next
_gameBoard.GenerateNewPieces(True)
If (timeSinceLastInput >= MinTimeSinceLastInput) Then
HandleMouseInput(Mouse.GetState())
End If
End If
What just happened?
This method is very similar to its previous incarnation. In this instance, we check to see if there are outstanding animated pieces to process. If there are, then UpdateAnimatedPieces() will run. If no animated pieces currently exist, the previous behavior of the GameStates.Playing case is executed.
Drawing animated pieces
Our animated pieces are almost completed. In fact, they all function right now, but you cannot see them because we have not yet updated Draw() to take them into account.
Time for action – update Game1 to draw animated pieces
- Add methods to the GameBoard class to draw each potential type of game piece (empty, animated, and non-animated):
Private Sub drawEmptyPiece(
spriteBatch As SpriteBatch,
pixelX As Integer, pixelY As Integer)spriteBatch.Draw(
playingPieces,
New Rectangle(pixelX, pixelY,
GamePiece.PieceWidth, GamePiece.PieceHeight),
EmptyPiece,
Color.White)
End SubPrivate Sub drawStandardPiece(
spriteBatch As SpriteBatch,
x As Integer, y As Integer,
pixelX As Integer, pixelY As Integer)spriteBatch.Draw(
playingPieces,
New Rectangle(pixelX, pixelY,
GamePiece.PieceWidth, GamePiece.PieceHeight),
GetSourceRect(x, y),
Color.White)
End SubPrivate Sub drawFallingPiece(
spriteBatch As SpriteBatch,
pixelX As Integer, pixelY As Integer,
position As String)
spriteBatch.Draw(
playingPieces,
New Rectangle(
pixelX,
pixelY - FallingPieces(position).VerticalOffset,
GamePiece.PieceWidth, GamePiece.PieceHeight),
FallingPieces(position).GetSourceRectangle(),
Color.White)
End SubPrivate Sub drawFadingPiece(
spriteBatch As SpriteBatch,
pixelX As Integer, pixelY As Integer,
position As String)spriteBatch.Draw(
playingPieces,
New Rectangle(pixelX, pixelY,
GamePiece.PieceWidth, GamePiece.PieceHeight),
FadingPieces(position).GetSourceRectangle(),
Color.White * FadingPieces(position).AlphaLevel)
End SubPrivate Sub drawRotatingPiece(
spriteBatch As SpriteBatch,
pixelX As Integer, pixelY As Integer,
position As String)spriteBatch.Draw(
playingPieces,
New Rectangle(
pixelX + (GamePiece.PieceWidth \ 2),
pixelY + (GamePiece.PieceHeight \ 2),
GamePiece.PieceWidth, GamePiece.PieceHeight),
RotatingPieces(position).GetSourceRectangle(),
Color.White,
RotatingPieces(position).RotationAmount,
New Vector2(GamePiece.PieceWidth / 2, GamePiece.PieceHeight / 2),
SpriteEffects.None,
0)
End Sub - Modify the Draw() method of the GameBoard class by replacing the for loop that currently draws the playing pieces with the following:
For x = 0 To GameBoard.GameBoardWidth
For y = 0 To GameBoard.GameBoardHeight
Dim pixelX As Integer =
CInt(DisplayOrigin.X +
(x * GamePiece.PieceWidth))
Dim pixelY As Integer =
CInt(DisplayOrigin.Y +
(y * GamePiece.PieceHeight))drawEmptyPiece(spriteBatch, pixelX, pixelY)
Dim pieceDrawn As Boolean = False
Dim position As String = x.ToString() + "_" + y.ToString
If RotatingPieces.ContainsKey(position) Then
drawRotatingPiece(spriteBatch, pixelX, pixelY, position)
pieceDrawn = True
End IfIf FadingPieces.ContainsKey(position) Then
drawFadingPiece(spriteBatch, pixelX, pixelY, position)
pieceDrawn = True
End IfIf FallingPieces.ContainsKey(position) Then
drawFallingPiece(spriteBatch, pixelX, pixelY, position)
pieceDrawn = True
End IfIf Not pieceDrawn Then
drawStandardPiece(spriteBatch, x, y, pixelX, pixelY)
End If
Next
Next - Try it out! Run your game and complete a few rows.
What just happened?
To keep things organized, we have split the drawing of each of the different potential piece types into its own small method. These methods (drawEmptyPiece(), drawStandardPiece(), drawFallingPiece(), drawFadingPiece(), and drawRotatingPiece()) each contain only a single statement to draw the piece.
Before we look at how each of the pieces is actually drawn, let's examine the way we determine which of these methods to call, when drawing a piece. The structure of the drawing loop is still the same as it was before we added animated pieces: each square on the board is looped through, with a blank square being drawn first in each position.
After the blank space, a new Boolean value called pieceDrawn is declared, and set to false. If an animated piece occupies a square, only the animated piece will be drawn, and not the underlying game piece.
The reason for this is that when the user clicks on the mouse button to rotate a piece, in memory the piece is rotated immediately. The animated piece that the user sees is inserted into the drawing process, so it looks like the piece is turning. If both the animated piece and the real underlying piece were to be drawn, the final rotation position would be visible overlaid on top of the rotating piece, while the rotation animation was playing.
The positionName string contains the dictionary key for the space, we are currently drawing (in X_Y format). We use this to check each of the animated piece dictionaries to see if they contain an entry for that key.
If they do, the animated piece is drawn, and the pieceDrawn variable is set to true. If the piece still has not been drawn after all of the dictionaries have been checked, the base piece is drawn just as it was before.
SpriteBatch overloads
Both falling and fading pieces are drawn, using the SpriteBatch.Draw() overload that we are already familiar with; where a Texture2D, destination Rectangle, source Rectangle, and Color are specified when drawing. By multiplying our base drawing color (white) by the alpha value for a fading piece, we cause the whole piece to be drawn partially transparent. As the time passes, the alpha value will reach zero, and the piece will be fully transparent.
However, rotated pieces need to use an overload of the SpriteBatch.Draw() method. The first four parameters are the same as our existing Draw() calls. To these parameters, we add a Single for the rotation amount, a Vector2 for the origin around which the rotation takes place, a SpriteEffects property (set to SpriteEffects.None in this case), and a sorting depth (set to 0, or the top-level).
When using a rotation with this form of the SpriteBatch.Draw() call, it is necessary to specify the point around which the sprite should be rotated. If we were to set the origin to Vector2.Zero (equivalent to 0, 0), the sprite would rotate around the upper-left corner of the image, swinging into the spaces of other tiles on the board. The center point of the sprite is specified in local sprite coordinates (as opposed to screen coordinates, or even coordinates within the texture, the sprite is being pulled from). The local coordinates of the sprite range from 0, 0 in the upper-left corner to the height and width of the sprite in the lower-right corner. In our case, the lower-right corner of the sprite is GamePiece.PieceWidth, GamePiece.PieceHeight, or 40, 40.
By specifying Vector2(GamePiece.PieceWidth/2, GamePiece.PieceHeight/2), we are setting the origin to the center of the sprite, meaning it will rotate in place as expected.
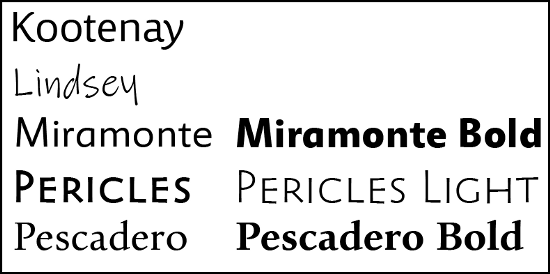
SpriteFonts Unlike a Windows Forms application, XNA cannot use the TrueType fonts that are installed on your computer. In order to use a font, it must first be converted into a SpriteFont, a bitmap-based representation of the font in a particular size that can be drawn with the SpriteBatch.DrawString() command.
Technically, any Windows font can be turned into a SpriteFont, but licensing restrictions on most fonts will prevent you from using them in your XNA games. Along with the other tools, the Windows Phone Developers Tools is a collection of fonts provided by Microsoft to address this problem, and give XNA developers a range of usable fonts that can be included in XNA games. Following are the samples of each of the redistributable fonts included:
Time for action – add SpriteFonts to Game1
- Right-click on the Fonts folder in the Content project in Solution Explorer, and select Add | New Item.
- From the Add New Item dialog, select SpriteFont.
- Name the font as Pericles36.spritefont. After adding the font, the SpriteFont file will open in the editor window.
- In the SpriteFont file, change Segoe UI Mono to Pericles.
- Change 14 to 36.
- Add the following declaration to the Game1 class:
Private pericles36Font as SpriteFont - Update the LoadContent() method of the Game1 class to load the SpriteFont, by adding the following:
pericles36Font = Content.Load(Of SpriteFont)("Fonts\Pericles36")
What just happened?
Adding a SpriteFont to your game is very similar to adding a texture image. Since, both are managed by the Content Pipeline, working with them is identical from a code standpoint. In fact, SpriteFonts are really just specialized sprite sheets, similar to what we used for our game pieces, and are drawn via the same SpriteBatch class, we use to draw our sprites.
The .spritefont file that gets added to your project is actually an XML document, containing information that the Content Pipeline uses to create the .XNB file that holds the bitmap information for the font, when you compile your code. The .spritefont file is copied from a template, so no matter what you call it, the XML will always default to 14 point Segoe UI Mono. In step 4 and step 5, we edited the XML to generate 36 point Pericles instead.
Just as with a Texture2D, we declare a variable (this time a SpriteFont) to hold the Pericles 36 point font. The Load() method of the Content object is used to load the font.
SpriteFonts and extended characters When a SpriteFont is built by the Content Processor, it actually generates bitmap images for each of the characters in the font. The range of characters generated is controlled by the section in the SpriteFont's XML description. If you attempt to output a character not covered by this range, your game will crash. You can avoid this by removing the HTML comment characters (<!--and -->) from around the definition in the XML file. Whenever an unknown character is the output, the character defined in will be used in its place. This is particularly important if you are allowing the user to input text, or displaying text from an outside source (such as the web), because you won't necessarily have control over what might be displayed.
Score display
Displaying the player's score with our new SpriteFont is simply a matter of calling the SpriteBatch.DrawString() method.
Time for action – drawing the score
- Add a new Vector2 to the declarations area of Game1 to store the screen location, where the score will be drawn:
Private scorePosition as Vector2 = new Vector2(605, 215) - In the Draw() method, remove Me.Window.Title = playerScore.ToString() and replace the line with the following:
spriteBatch.DrawString(pericles36Font,
playerScore.ToString(),
scorePosition,
Color.Black)
What just happened?
Using named vectors to store things like text positions allows you to easily move them around later, if you decide to modify the layout of your game screen. It also makes code more readable, as we have the name scorePosition, instead of a hardcoded vector value in the spriteBatch.DrawString() call. Since, our window size is set to 800 by 600 pixels, the location we have defined previously will place the score into the pre-defined score box on our background image texture.
The DrawString() method accepts a font to draw with (pericles36Font), a string to output (playerScore.ToString()), a Vector2 specifying the upper-left corner of the location to begin drawing (scorePosition), and a color for the text to be drawn in (Color.Black).
ScoreZooms
Simply, drawing the player's score is not very exciting, so let's add another use for our SpriteFont. In some puzzle games, when the player scores, the number of points earned is displayed in the center of the screen, rapidly growing larger and expanding until it flies off of the screen toward the player.
We will implement this functionality with a class called ScoreZoom that will handle scaling the font002E.
Time for action – creating the ScoreZoom class
- Add a new class file called ScoreZoom.vb to the Flood Control project.
- Add the following declarations to the ScoreZoom class:
Public Text As string
Public DrawColor As Color
Private displayCounter As Integer
Private maxDisplayCount As Integer = 30
Private _scale As Single = 0.4
Private lastScaleAmount As Single = 0.0
Private scaleAmount As Single = 0.4 - Add the Scale read-only property to the ScoreZoom class:
Public ReadOnly Property Scale as Single
Get
Return (scaleAmount * displayCounter)
End Get
End Property - Add a Boolean property to indicate when the ScoreZoom has finished displaying:
Public ReadOnly Property IsCompleted as Boolean
Get
Return (displayCounter > maxDisplayCount)
End Get
End Property - Create a constructor for the ScoreZoom class:
Public Sub New(displayText as String, fontColor as Color)
Text = displayText
DrawColor = fontColor
displayCounter = 0
End Sub - Add an Update() method to the ScoreZoom class:
Public Sub Update()
_scale += lastScaleAmount + scaleAmount
lastScaleAmount += scaleAmount
displayCounter += 1
End Sub
What just happened?
The ScoreZoom class holds some basic information about a piece of text and how it will be displayed to the screen. The number of frames the text will be drawn for are determined by displayCounter and maxDisplayCount.
To manage the scale, three variables are used: _scale contains the actual scale size that will be used, when drawing the text, lastScaleAmount holds the amount the scale was increased by during the previous frame, and scaleAmount determines the growth in the scale factor during each frame.
You can see how this is used in the Update() method. The current scale is increased by both the lastScaleAmount and scaleAmount. lastScaleAmount is then increased by the scaleAmount. This results in the scale growing in an exponential fashion, instead of increasing linearly by a scaleAmount for each frame. This will give the text a zooming effect as it starts growing slowly, and then speeds up rapidly to fill the screen.
Time for action – updating and displaying ScoreZooms
- Add a Queue object to the Game1 class to hold active ScoreZooms:
Private ScoreZooms as Queue(Of ScoreZoom) = new Queue(Of ScoreZoom)() - Add a new helper method to the Game1 class to update the ScoreZooms queue:
Private Sub UpdateScoreZooms()
Dim dequeueCounter as Integer = 0
For Each zoom as ScoreZoom in ScoreZooms
Zoom.Update()
If (zoom.IsCompleted) Then
dequeueCounter += 1
End If
Next
For d as Integer = 0 to dequeueCounter - 1
ScoreZooms.Dequeue()
Next
End Sub
- In the Update() method, inside the case section for GameState.Playing, add the call to update any active ScoreZooms. This can be placed right before the case's End Select statement:
UpdateScoreZooms() - Add the following to the CheckScoringChain() method to create a ScoreZoom, when the player scores. Add this right after the playerScore is increased:
ScoreZooms.Enqueue(new ScoreZoom("+" +
DetermineScore(WaterChain.Count).ToString(),
new Color(255, 0, 0) * 0.4)) - Modify the Draw() method of the Game1 class by adding the following, right after the SpriteBatch.DrawString() call, which draws the player's score:
For Each zoom as ScoreZoom in ScoreZooms
spriteBatch.DrawString(pericles36Font, zoom.Text,
new Vector2(CSng(Me.Window.ClientBounds.Width / 2),
CSng(Me.Window.ClientBounds.Height / 2)),
zoom.DrawColor, 0.0,
new Vector2(pericles36Font.MeasureString(zoom.Text).X / 2,
pericles36Font.MeasureString(zoom.Text).Y / 2),
zoom.Scale, SpriteEffects.None, 0.0)
Next
What just happened?
Since, all ScoreZoom objects live for the same amount of time, we can always be certain that the first one we create will finish before any created during a later loop. This allows us to use a simple Queue to hold ScoreZooms, since a Queue works in a first-in-first-out manner.
When UpdateScoreZooms() is executed, the dequeueCounter holds the number of ScoreZoom objects that have finished updating during this cycle. It starts at zero, and while the for each loop runs any ScoreZoom that has an IsCompleted property of true, increments the counter. When the for each has completed, ScoreZooms.Dequeue() is run a number of times equal to dequeueCounter.
Adding new ScoreZoom objects is accomplished in step 4, with the Enqueue() method. A new ScoreZoom object is passed to the Enqueue() method, which is constructed with a plus sign (+), and the score being added, followed by a red color multiplied by an alpha value of 0.4, making it a little more than halfway transparent.
Just as the SpriteBatch.Draw() method has multiple overloads, so does the SpriteBatch.DrawString() method, and in fact, they follow much the same pattern. This form of the DrawString() method accepts the SpriteFont (pericles36Font), the text to display, a location vector, and a draw color just like the previous call.
For the draw location in this case, we use Me.Window.ClientBounds to retrieve the width and height of the game window. By dividing each by two, we get the coordinates of the center of the screen.
The remaining parameters are the same as those of the extended Draw() call that we used to draw rotated pieces. After the color value is rotation, which we have set to 0. 0, followed by the origin point for that rotation. We have used the MeasureString() method of the SpriteFont class to determine both the height and width of the text that will display and divide the value by two to determine the center point of the text. Why do this when there is no rotation happening? Despite, what the order of the parameters might indicate, this origin also impacts the next parameter: the scale.
When the scale is applied, it sizes the text around the origin point. If we were to leave the origin at the default (0, 0), the upper-left corner of the text would remain in the center of the screen, and it would grow towards the bottom-right corner. By setting the origin to the center of the text, the scale is applied evenly in all directions, shown as follows:
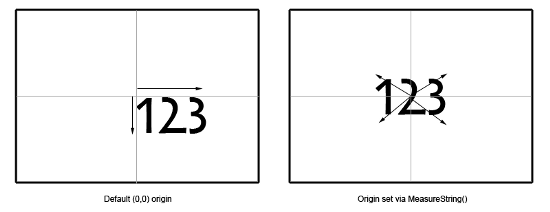
Just as with the extended Draw() method earlier, we will use SpriteEffects.None for the spriteEffects parameter, and 0. 0 for the layer depth, indicating that the text should be drawn on top of whatever has been drawn already.
Adding the GameOver game state
Now, that we can draw text, we can add a new game state in preparation for actually letting the game end, when the facility floods.
Time for action – game over
- Modify the declaration of the GameStates Enum in the Game1 class to include the GameOver state as follows:
Private Enum GameStates
TitleScreen
Playing
GameOver
End Enum - Add the following declarations to the Game1 class:
Private gameOverLocation as Vector2 = new Vector2(200, 260)
Private gameOverTimer as Single - Modify the Update() method of Game1 by adding a new case section for the GameState.GameOver state:
Case GameStates.GameOver
gameOverTimer -= CSng(gameTime.ElapsedGameTime.TotalSeconds)
If gameOverTimer <= 0 Then
gameState = GameStates.TitleScreen
End If - Modify the if statement in the Draw() method of Game1 for the GameState.Playing state from if (gameState = GameStates.Playing) Then to the following:
If (gameState = GameStates.Playing) Or
(gameState = GameStates.GameOver) Then - Add a new if statement for the GameState.GameOver state to the Draw() method, right before the call to MyBase.Draw(gameTime):
If (gameState = GameStates.GameOver) Then
spriteBatch.Begin()
spriteBatch.DrawString(pericles36Font,
"G A M E O V E R!",
gameOverLocation,
Color.Yellow)
spriteBatch.End()
End If
What just happened?
With the addition of GameOver, we now have a complete cycle of game states. When the program is started, the game begins in the TitleScreen state. Pressing the Space bar, switches from TitleScreen to Playing state. When the game ends, the state moves to GameOver.
The Update() method handles the GameOver state by decreasing the gameOverTimer value, until it reaches zero, at which point the state is set back to TitleScreen.
While the Update() method handles each of the game states in a mutually exclusive manner (the update code for Playing will never run, when in the GameOver state), the Draw() method handles things differently.
When in the GameOver state, we want to display the text G A M E O V E R! on top of the game board. The location of the text, defined as (200, 260) in our declarations area, places it in the upper half of the screen, covering the center horizontally. We need to execute the drawing code for the Playing state in both the Playing and GameOver states, as well as an additional section of code only for GameOver.
The flood The background story of the game centers on an underwater research laboratory that is slowly flooding, with the player trying to empty out the flood waters before the place fills up.
Up to this point, we do not have a representation of that flood in the game, or any incentive for the player to think quickly to find scoring chains.
Time for action – tracking the flood
- Add the following declarations to the Game1 class:
Private Const MaxFloodCounter As Single = 100.0
Private floodCount As Single = 0.0
Private timeSinceLastFloodIncrease As Single = 0.0
Private timeBetweenFloodIncreases As Single = 1.0
Private floodIncreaseAmount As Single = 0.5 - In the Update() method of Game1.vb, add the following code to keep track of the increasing flood waters, right after the timeSinceLastInput variable is updated in the GameState.Playing case section:
timeSinceLastFloodIncrease +=
CSng(gameTime.ElapsedGameTime.TotalSeconds)If timeSinceLastFloodIncrease >= timeBetweenFloodIncreases Then
floodCount += floodIncreaseAmount
timeSinceLastFloodIncrease = 0.0
If (floodCount >= MaxFloodCounter) Then
gameOverTimer = 8.0
gameState = GameStates.GameOver
End If
End If - Update the CheckScoringChain() method of the Game1 class by adding the following to decrease the flood counter, when the player scores. Place this code right after playerScore += DetermineScore(WaterChain.Count):
floodCount = MathHelper.Clamp(CSng(floodCount -
(DetermineScore(WaterChain.Count)/10)), 0.0, 100.0)
What just happened?
The flood itself is represented as a percentage. When the floodCount reaches 100 (MaxFloodCounter), the laboratory has completely flooded and the game is over. In addition to these two declarations, we also need to track how rapidly the flood increases (timeSinceLastFloodIncrease and timeBetweenFloodIncreases), and the rate at which the water rises (floodIncreaseAmount).
The timing on the flood increases, is handled the same way input pacing is handled: a timer is incremented, based on the elapsed game time, until it reaches a threshold value. When it does, the timer is reset, and the floodCount variable is increased by the floodIncreaseAmount value.
When this increase takes place, we check to see if the floodCount has reached MaxFloodCount, indicating that the facility is flooded. If it has, then an eight second timer is set for gameOverTimer, and the game state is set to GameOver. Recall that in the GameOver handler, the gameOverTimer determines how long the G A M E O V E R! text will be displayed, before the game switches back to the title screen.
Finally, in step 3, the floodCount variable needs to be decreased each time the player completes a scoring chain. MathHelper.Clamp() is used to subtract the score value (divided by 10) from the floodCount, while keeping the value between 0. 0 and 100. 0.
Displaying the flood
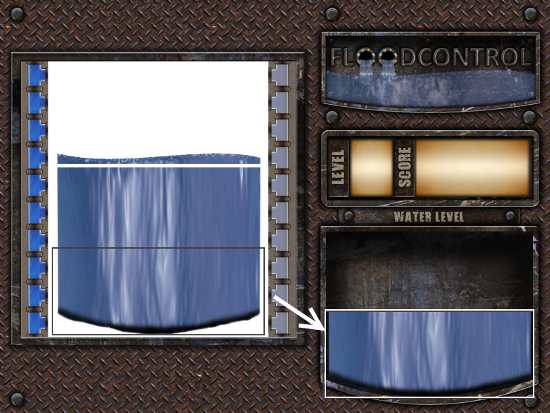
If you open the Background.png file in an image viewer, you will see that there is a full water tank floating inside the space on the playfield, where game pieces get displayed. Since, we always draw opaque game piece backgrounds over this area, so far we have not seen this portion of the image during game play.
We can use SpriteBatch.Draw() to cut out pieces of this full water tank and superimpose it over the empty tank on the right-side of the game screen as the facility fills with water. The deeper the water gets, the more of the hidden water tank image we transfer to the visible tank on the screen, working our way up from the bottom, as shown in the following image:
Time for action – displaying the flood
- Add the following declarations to the Game1 class:
Private Const MaxWaterHeight As Integer = 244
Private Const WaterWidth As Integer = 297Private waterOverlayStart As Vector2 = new Vector2(85, 245)
Private waterPosition As Vector2 = new Vector2(478, 338) - Modify the Draw() method of the Game1 class by adding the following, right after the SpriteBatch.DrawString() call that displays the player's score:
Dim waterHeight As IntegerwaterHeight = CInt(MaxWaterHeight * (floodCount / 100))
spriteBatch.Draw(background,
new Rectangle(
CInt(waterPosition.X),
CInt(waterPosition.Y + (MaxWaterHeight - waterHeight)),
WaterWidth,
waterHeight),
new Rectangle(
CInt(waterOverlayStart.X),
CInt(waterOverlayStart.Y + (MaxWaterHeight - waterHeight)),
WaterWidth,
waterHeight),
new Color(255, 255, 255, 180)) - 3. Try it out! You should now be able to watch the flood slowly increase in the flood tank. When it reaches the top, the game should switch to the GameOver state, and after an eight second delay, back to the title screen. You will not be able to play a second round, at this point however.
What just happened?
The two integer values, MaxWaterHeight and WaterWidth, refer to the size of the water image, hidden inside the game board. It is 297 pixels wide, and the full water image is 244 pixels high.
Two vectors are used to store the location of the filled water image (85, 245) and the location that it will be drawn to on the screen (478, 338).
In order to draw the water in the water tank, the MaxWaterHeight is multiplied by the percentage of water currently in the tank, and stored in the waterHeight variable. This results in the number of pixels of water that need to be drawn into the tank.
When determining the source and destination rectangles, the X coordinates are dependant only on the location of the overlay and the drawing position, since they will not change.
The Y coordinates must be modified to pull pixels from the bottom of the image and expand upwards. In order to accomplish this, the current waterHeight is subtracted from the MaxWaterHeight, and this value is added to the Y coordinate of both vectors.
Summary We have looked at the following:
- Creating classes that inherit from existing classes to extend their functionality
- Using the advanced overloads of the SpriteBatch.Draw() method to add basic animations to the Flood Control game
- Adding SpriteFonts to the project, and using them to draw text to the screen
- Expanding the basic Game State system Flood Control – Underwater Puzzling, to allow for a complete Title | Playing | Game Over cycle
XNA 4.0 Game Development by Example: Beginner's Guide – Visual Basic Edition
Create your own exciting games with Visual Basic and Microsoft XNA 4.0 with this book and ebook


Wow, this looks like It would teach a LOT about XNA. So much matter.
Thanks for posting
Thanks, helped me allot :D
This comment is currently awaiting admin approval, join now to view.