The Options Menu is fairly simple to understand once you know the basics.
There is a video tutorial that covers most of these issues here:
Screen Resolution
The Screen Resolution section allows you to change the window size and/or enter full screen mode. You should know what resolutions are supported by your monitor before changing these settings. If you want to change to full screen mode, as it is, this can be a little tricky. 
- Check your monitor's resolution options. Take note of the size you want to use, and also a smaller size option.
- Set your monitor to the largest size you want to use i.e. 1600 x 900.
- In Anomalies change the resolution in windowed mode to that smaller size option, i.e. 1360 x 768 and hit "Apply" (Don't go full screen yet) Your window should be 1360 x 768, on a 1600 x 900 monitor now.
- Now return to the video options and select "Fullscreen" and hit apply.
- Now your game should be full screen at 1360 x 768
- Now you can reset the resolution to your preferred size (1600 x 900) and hit apply. It should retain it's full-screen status
I know this is not how most games handle resolution. I would like to improve this, and it is something I have been working on in some of my other games. However, people still complain about this in those games too. Once I have a good, working model on how to accomplish this easily, I will come back and fix it in Anomalies as well.
Anomaly Settings
The section in the upper-right corner of the Options Menu controls how certain parameters will behave when you are playing the game. 
Max Segments
This controls how many segments an anomaly might have when you use the "Randomize" button. If you set this slider to, say, 300, then whenever you click on "Randomize" the anomaly being generated will be assigned a random value between 10 and 300. Note, you can still manually assign a different value in-game, by dragging the Max Segments slider in the Spawn Menu (the green menu that appears in the game window, in Creative Mode) to a higher value, then clicking "Respawn." This Max Segments slider in the Options Menu only effects what will occur randomly.
Max Particles
This works the same way as Max Segments above, but it effects the number of particle fountains that can appear in an anomaly randomly. As with Max Segments, you can manually set the number of particle fountains in the spawn menu and click Respawn.
Max Spawns
Spawns defines the number of origin points in an anomaly. If you have one Spawn, then you will see just one main branch forming. Like Max Segments, Max Spawns in the Options Menu will limit the number of Spawns that will form randomly.
Nebula Alpha
This describes how transparent or opaque you want nebulae to appear in-game.
Shader Settings
Below the Anomaly Settings, we have the Shader Settings. These are all locked by default, but they can be unlocked by clicking on the small circular button to the right of the sliders. Unlocking will cause these settings to behave like anomaly parameters, allowing them to be randomly set when you click on Randomize. I have them locked by default because I consider them to be game settings, not anomaly parameters, but I thought some users might enjoy the possibility of randomizing these settings. 
Use Real-Time Shadows
This setting activates real-time shadows in your game. This is set to off by default. Click the circular button to the left of the words "Use Real-Time Shadows" to activate this. On the right, you can set the transparency of the shadows with the slider. As a reminder, keep this setting locked unless you want shadows to appear and disappear with each use of the Randomize button.
Harmonious Sounds Only
Not exactly a shader, this will limit the sounds produced by an anomaly to those recognizable notes that most people tune musical instruments to. If you un-click this button, you will allow the game to generate custom musical scales, known as "Micro-Tones." This is a whole topic in itself, which I plan to cover in the upcoming Procedural Music Demo - Part 2. For now, know that micro-tones will most likely sound like the game is just out of tune for most users. As of the most recent update, this setting should be on by default.
To the right of this button, there is a slider with the words "Sound Type" above it. This effects what sound the in-game keyboard will make. To use the in-game keyboard, simply enter creative mode from the main menu, and use the number keys (the ones on you main keyboard, not the number pad) to play along with your anomaly. There are ten notes (1,2,3,4,5,6,7,8,9,0) and they should be harmonized to the same musical scale as your anomaly.
I cover more about the game's musical options and how they work in this Procedural Music Demo.
Activate ... Shader
The remaining four settings effect the visuals of the game. Bloom adds brightness and more vivid colors to the game. Blur will make the edges of anomaly segments fuzzy. Pixel Graphics allows you to customize the size of pixels on screen, and Outline gives the game a more cartoony appearance...
By default, bloom and outline are set to on. As with other settings in this menu, they are locked by default. If you want randomize to change these settings, unlock them by un-clicking the radio button to the immediate right of the slider.
Activate Advanced Spawn Menu
This is a setting for advanced users, and will be covered in a different tutorial. When it is ready, I plan to include a link to this tutorial here. 
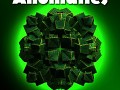
With knowledge of the Options Menu, you should be able to enjoy and understand most of the basic features of Anomalies. Here is one of my favorite Anomaly images. It utilizes the bloom and outline shaders, which are currently the game's default shaders.


good tutorial