
In this tutorial I will show you how to mod Rage Frenzy. In no time at all you will be creating your own zombie infested maps with custom zombies, props, pick-ups & weapons.
This tutorial is for people that would like to get an idea on how Raycasting Game Maker works and would like to make their own Rage Frenzy zombie standalone game.
**All assets in Rage Frenzy are free and open to everyone to use and publish!**
Link to Rage Frenzy Assets - Moddb.com
We start off by downloading Raycasting Game Maker engine here - Moddb.com
Install the engine to your computer.
Download Rage Frenzy 1.0 here - Moddb.com
Extract anywhere to your computer.
Open up Raycasting Game Maker. The first time it will post a warning about a default password. We will change that password now to open up Rage Frenzy. Click on "Settings" and select "Set GamePak Password" and change this password too "smallcombe" click ok once done .
.
Next click "World" and select "Import game.pak". Locate where Rage Frenzy was extracted to and open up file "game.pak", this will now import all of rage frenzy's levels and assets into the engine ready for you to mod!
It will start off in a plain untouched world. To open up the 5 different worlds select open "World-Load" which is located at the very top left of the screen, now you can choose a level between 1 & 5 to open up:
1- Building map
2- City Streets
3- Forrest
4- Mine
5- Village

For now I will show you how to set up your own basic map. Firstly select" World/New" and open up a new level.
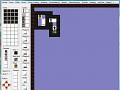
Here is a screen shot showing the layout of the engine.

1. This is the Main area where you will be going most of your work and all of your game assets will be dragged onto. This is a top down view of your map.
2. These arrows move around your top down map view or if you deselect your mouse on a blank area (right click) you can click on a blank map area hold down left click and move your mouse around.
3. Here is the selection of your pick-ups (Treasure) such as ammo, health and World Key. Simpley drag and click these assets into your world. Treasure can be edited by selecting In Game Items - Import Treasures. Here you can edit the texture and amount of points per pick up/type. You can edit the key, ammo and health by selecting In Game Items & then selecting its item name.
4. These are sprites which is a 2D image made up of 1 or more images to form a still prop image or when destroyed an animation event. These sprites can be edited in the sprite menu along the stop menus. Simply drag and click these objects into your world.
5. These are wall textures which will make up your geometry of your world. To import new wall textures click on the walls menu and import. You can also have animated walls (see wall road sign animation for example) to add these to you map click on the wall you would like and simply draw it onto your map.
6. This is the top menu bar. This is where most of your game editing of assets and game changes will occur. Notable ones include:
Sounds - here you can edit and all the sounds into the game.
World - this opens new game packs, saves and loads worlds (levels).
Tools - here you can edit the map walls fill the world with walls or change textures around more easily.
Floor+ Ceiling - here you can edit the floor and ceiling textures. You can only have 1 floor and 1 ceiling texture per world like with the doors!
Game Bitmaps - here you can edit game bitmaps such as game menus, weapons, bullets, Game & the Hud.
Settings - this is very important here you can change the password to open up game paks, and access a setting menu. In the Game Settings you can change the name of the game, Game controls, turn on or off Shader (which makes it dark or not). Most importantly the maximum amount of levels which tells the game how many worlds to save when game is made is also done in Settings.
Game- here you can choose the Game's .exe icon plus create the game and start it. You must save the world before you can create the game.
7. This area includes Zombies (Enemies), Door, Next Level Door and Player Spawn. To add these items simple click on the item and click in your world. To edit enemies click on the Enemies menu in the top menu bar, here you will be able to change and edit the zombie's sprites as well as edit there power, speed and health plus choose if they can shoot or not. Door 1 is that door for that world which opens sideways. You can only have 1 door texture per world to edit the door texture select from the top menu bar doors/ Import Door Textures. The Next Level item is the texture that the player needs to reach with the game key to finish the map. You can have multiple next level exits in your map to edit this texture select from the top menu Doors/ Import next level door texture. Next item is Player this is simply where the player will spawn when he starts this world.
If you need any more information please click on the "?" button in the top menu bar (far right) and click on help. Lots more useful information in there as well!
Ok now that we got basic understanding of the game engine out of the way let's build our first zombie standalone game which for now is 1 map.
Make sure you're in new map then press save as map 1 then in game Settings make sure Max levels is set to 1. Now with the hard part out of the way let's start mapping!
I will leave it up to you how you would like to design your map with the walls and props provided.
Once you are happy with your map design follow this check list
1. Are the walls surrounding the map borders (is a MUST)?
2. Player spawn put in?
3. Exit key put in?
4. Next level door put in?
5. Weapons, props, ammo, and health included?
6. Enemies included?
7. Have you set up you're floor and ceiling texture for that world?
8. Have you added doors into you map?
9. Have you made sure you're Game settings are correct, 1 world only?
10. Pick Up items included for players to find?
Once your are happy with those 10 points save you're world and select create game.

Now that the game is saved where you told it to save on your computer you can find it and open the exe or in the game engine select Game/execute Game to play!
Here is the tutorial map in game and in Engine

If you have any questions please feel free to comment I am here to help, also if you do make any mods with rage frenzy feel free into upload them to here - Moddb.com
SWEET