This Tutorial shows how to set up the IDE for using the Irrlicht Engine and how to write a simple HelloWorld program with it. The program will show how to use the basics of the VideoDriver, the GUIEnvironment, and the SceneManager. Microsoft Visual Studio is used as an IDE, but you will also be able to understand everything if you are using a different one or even another operating system than windows.
You have to include the header file <irrlicht.h> in order to use the engine. The header file can be found in the Irrlicht Engine SDK directory include. To let the compiler find this header file, the directory where it is located has to be specified. This is different for every IDE and compiler you use. Let's explain shortly how to do this in Microsoft Visual Studio:
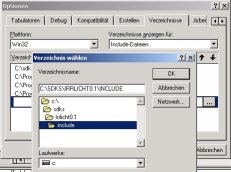
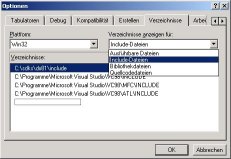
- If you use Version 6.0, select the Menu Extras -> Options. Select the directories tab, and select the 'Include' Item in the combo box. Add the include directory of the irrlicht engine folder to the list of directories. Now the compiler will find the Irrlicht.h header file. We also need the irrlicht.lib to be found, so stay in that dialog, select 'Libraries' in the combo box and add the lib/VisualStudio directory.
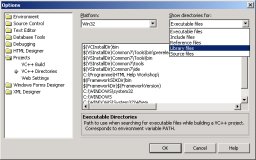
- If your IDE is Visual Studio .NET, select Tools -> Options. Select the projects entry and then select VC++ directories. Select 'show directories for include files' in the combo box, and add the include directory of the irrlicht engine folder to the list of directories. Now the compiler will find the Irrlicht.h header file. We also need the irrlicht.lib to be found, so stay in that dialog, select 'show directories for Library files' and add the lib/VisualStudio directory.
That's it. With your IDE set up like this, you will now be able to develop applications with the Irrlicht Engine.
Lets start!
After we have set up the IDE, the compiler will know where to find the Irrlicht Engine header files so we can include it now in our code.
#include <irrlicht.h>
In the Irrlicht Engine, everything can be found in the namespace 'irr'. So if you want to use a class of the engine, you have to write irr:: before the name of the class. For example to use the IrrlichtDevice write: irr::IrrlichtDevice. To get rid of the irr:: in front of the name of every class, we tell the compiler that we use that namespace from now on, and we will not have to write irr:: anymore. using namespace irr;
There are 5 sub namespaces in the Irrlicht Engine. Take a look at them, you can read a detailed description of them in the documentation by clicking on the top menu item 'Namespace List' or by using this link: Irrlicht.sourceforge.net Like the irr namespace, we do not want these 5 sub namespaces now, to keep this example simple. Hence, we tell the compiler again that we do not want always to write their names. using namespace core;
using namespace scene;
using namespace video;
using namespace io;
using namespace gui;
To be able to use the Irrlicht.DLL file, we need to link with the Irrlicht.lib. We could set this option in the project settings, but to make it easy, we use a pragma comment lib for VisualStudio. On Windows platforms, we have to get rid of the console window, which pops up when starting a program with main(). This is done by the second pragma. We could also use the WinMain method, though losing platform independence then. #ifdef _IRR_WINDOWS_
#pragma comment(lib, "Irrlicht.lib")
#pragma comment(linker, "/subsystem:windows /ENTRY:mainCRTStartup")
#endif
This is the main method. We can now use main() on every platform. int main()
{
The most important function of the engine is the createDevice() function. The IrrlichtDevice is created by it, which is the root object for doing anything with the engine. createDevice() has 7 parameters:
- deviceType: Type of the device. This can currently be the Null-device, one of the two software renderers, D3D8, D3D9, or OpenGL. In this example we use EDT_SOFTWARE, but to try out, you might want to change it to EDT_BURNINGSVIDEO, EDT_NULL, EDT_DIRECT3D8, EDT_DIRECT3D9, or EDT_OPENGL.
- windowSize: Size of the Window or screen in FullScreenMode to be created. In this example we use 640x480.
- bits: Amount of color bits per pixel. This should be 16 or 32. The parameter is often ignored when running in windowed mode.
- fullscreen: Specifies if we want the device to run in fullscreen mode or not.
- stencilbuffer: Specifies if we want to use the stencil buffer (for drawing shadows).
- vsync: Specifies if we want to have vsync enabled, this is only useful in fullscreen mode.
- eventReceiver: An object to receive events. We do not want to use this parameter here, and set it to 0.
Always check the return value to cope with unsupported drivers, dimensions, etc.
IrrlichtDevice *device =
#ifdef _IRR_OSX_PLATFORM_
createDevice( video::EDT_OPENGL, dimension2d(640, 480), 16,
false, false, false, 0);
#else
createDevice( video::EDT_SOFTWARE, dimension2d(640, 480), 16,
false, false, false, 0);
#endif
if (!device)
return 1;
Set the caption of the window to some nice text. Note that there is an 'L' in front of the string. The Irrlicht Engine uses wide character strings when displaying text. device->setWindowCaption(L"Hello World! - Irrlicht Engine Demo");
Get a pointer to the VideoDriver, the SceneManager and the graphical user interface environment, so that we do not always have to write device->getVideoDriver(), device->getSceneManager(), or device->getGUIEnvironment(). IVideoDriver* driver = device->getVideoDriver();
ISceneManager* smgr = device->getSceneManager();
IGUIEnvironment* guienv = device->getGUIEnvironment();
We add a hello world label to the window, using the GUI environment. The text is placed at the position (10,10) as top left corner and (260,22) as lower right corner. guienv->addStaticText(L"Hello World! This is the Irrlicht Software renderer!",
rect(10,10,260,22), true);
To show something interesting, we load a Quake 2 model and display it. We only have to get the Mesh from the Scene Manager with getMesh() and add a SceneNode to display the mesh with addAnimatedMeshSceneNode(). We check the return value of getMesh() to become aware of loading problems and other errors. Instead of writing the filename sydney.md2, it would also be possible to load a Maya object file (.obj), a complete Quake3 map (.bsp) or any other supported file format. By the way, that cool Quake 2 model called sydney was modelled by Brian Collins.
IAnimatedMesh* mesh = smgr->getMesh("../../media/sydney.md2");
if (!mesh)
return 1;
IAnimatedMeshSceneNode* node = smgr->addAnimatedMeshSceneNode( mesh );
To let the mesh look a little bit nicer, we change its material. We disable lighting because we do not have a dynamic light in here, and the mesh would be totally black otherwise. Then we set the frame loop, such that the predefined STAND animation is used. And last, we apply a texture to the mesh. Without it the mesh would be drawn using only a color. if (node)
{
node->setMaterialFlag(EMF_LIGHTING, false);
node->setMD2Animation(scene::EMAT_STAND);
node->setMaterialTexture( 0, driver->getTexture("../../media/sydney.bmp") );
}
To look at the mesh, we place a camera into 3d space at the position (0, 30, -40). The camera looks from there to (0,5,0), which is approximately the place where our md2 model is. smgr->addCameraSceneNode(0, vector3df(0,30,-40), vector3df(0,5,0));
Ok, now we have set up the scene, lets draw everything: We run the device in a while() loop, until the device does not want to run any more. This would be when the user closes the window or presses ALT+F4 (or whatever keycode closes a window). while(device->run())
{
Anything can be drawn between a beginScene() and an endScene() call. The beginScene() call clears the screen with a color and the depth buffer, if desired. Then we let the Scene Manager and the GUI Environment draw their content. With the endScene() call everything is presented on the screen. driver->beginScene(true, true, SColor(255,100,101,140));
smgr->drawAll();
guienv->drawAll();
driver->endScene();
}
After we are done with the render loop, we have to delete the Irrlicht Device created before with createDevice(). In the Irrlicht Engine, you have to delete all objects you created with a method or function which starts with 'create'. The object is simply deleted by calling ->drop(). See the documentation at irr::IReferenceCounted::drop() for more information. device->drop();
return 0;
}
That's it. Compile and run.