Animiks is a program for animating skeletal models. Files from Half-Life and the like. The types of processed files are * .smd, decompiled * .mdl.
Animiks was conceived as an addition to the MilkShape program, to simplify animation, but it can be used independently. In MilkShape, it’s quite convenient to snap the skeleton to the model points, but animating and working with frames is extremely inconvenient.
Website
How to get started
File upload
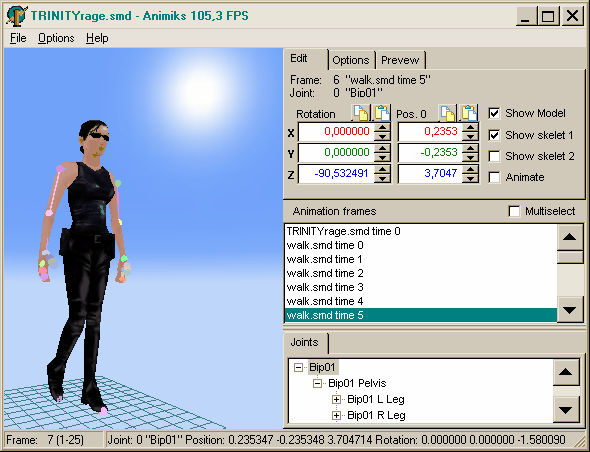
Select File-> Open in my menu (or press Ctrl + O). The file open menu appears. We go into the folder "Trinity" and select the file "TRINITYrage.smd" in it. The Trinity model appears on the left side of the window, on the right side of the screen, where it says "Animation frame", the only animation frame that appears in this file appears. And in the lower right corner, where it says "Joints" (Joints), a list of joints (hinges of the skeleton) of Trinity appears.
Joints are presented in the form of a tree-like list. Several other points can be attached to each joint. If we rotate or move a particular point, then all the points attached to it rotate and move with it. The display of the points can be controlled through three options in the upper right part of the screen. Namely:
Show model - shows / hides the model on the left side of the screen.
Show skelet 1 - shows / hides the skeleton in the form of multi-colored balls and sticks
Show skelet 2 - shows / hides the second skeleton displayed using white skyscrapers and lines.
Turn on the Show skelet 1 checkbox and click on the tree of points. As a result, axes will appear around the selected joint. You can select the points not only from the list, but simply by clicking on the colored balls with the right mouse button. The model on the left side of the program can be rotated with the left mouse button, or moved with the right mouse button, or scaled with the mouse wheel.
How to animate
Let us turn our attention to the "Animation frames" window. These are the frames (frames) of our animation. Rather, one single frame so far. To multiply it, click on it with the right mouse button and select the "Dublikate frame" item in the menu that appears, that is, duplicate the frame (you can simply press Ctrl + Insert). As a result, another frame appears in us. We perform this operation twice so that three frames appear in the window. The result was an animation of three frames (frames). But, only they will not be animated yet because they are all the same. Change the middle frame. Click on it with the mouse to select. Suppose we want to animate the movement of Trinity’s head. To do this, select the topmost model point. It is called the "Bip01 Head". (You can select by clicking on the corresponding ball, or in Joints. Selected points are highlighted by the axes.)
Now look at the top of the right side of the window. There where it says "Rotation". Here, in three windows located under each other, the angles at which the selected point is tilted are displayed. Change his tilt so that Trinity lowers her head down. To do this, increase the number in the bottom window. This can be done with the Up, Down, UpPage, DownPage buttons, by clicking on the up and down arrows, rotating the mouse wheel, or by typing a number by hand. After that, you can turn on the "Animate" checkbox and see how Trinity nods.
Adding smoothness
Trinity nods sharply. Because in our animation there are only two frames. For greater smoothness, you need to add intermediate frames. Manually do this inappropriately. It is enough to select the first frame, click on it with the right mouse button and select "Add middle frames" -> "1" in the menu that appears (add middle frames). As a result, a frame will be added, which is the middle between the one we selected and the next one. A nod becomes smoother. Let's do the same with the frame where Trinity lowered her head as much as possible, now we have the third one. We click on it, but now in the menu we select the item "Add middle frames" -> "7". This is to add not one intermediate frame, but seven at once. The more intermediate frames added, the smoother the movement.
The nodding animation is ready. It can be saved via the menu item "Save animation as ...". In principle, a nod is one of the simplest animations that can ever be. Considered only to understand the principle of animation. First, create some key positions of the skeleton, then add intermediate frames to them. To create key positions, you need the talent of a sculptor. Realistic arrangements are rather difficult to create.
View, download existing animations
Realistically animating some complex movements can be extremely difficult, because reputable firms record movements from real people. To view the available animations, you need to switch to the Preview tab, click on the "Choose dir" button (select packs) and select the folder in which the animations of this model are. If there are animations in the selected folder, they will appear in the "Animations" list. Click on them, and animations will be shown on the model. Please note that animations from one model may not be suitable for animations from another model. If you liked the selected animation, you can right-click on it and select "Add selected animation" from the menu that appears, and this animation will be added to the "Animations frames" where you can edit it.
When you add animation through the menu "File" -> "Add animations" or through "Preview", the question "fix translation?" Arises. It is due to the fact that some models from HalfLife can "run away" from the starting position. And in order to avoid this escape, the question must be answered positively.
Decompiling * .mdl models
Choose "Options" -> "mdl-decompiler" in the menu, and in the window that opens, specify a file of the type * .mdl. As a result, the file will be decompiled into the same folder in which the original mdl-file was located. The decompiler is taken from the MilkShape program, and if for some reason it does not work, then you can use it to decompile it.
* .Smd files are of two types. With models and animations. In order to understand after decompilation where, what, * .qc files are generated. The list of animations in this file is in the sequences section after the words "$ sequence". And the list of models in the sections of "$ bodygroup", after the word "studio"
More on controls
Window frames (Animation frames)
Window to support Drug and Drop. Frames can be dragged with the mouse up and down. You can, for example, load a walk animation and rearrange frames in it in the reverse order. Then get a walk back.
At the top of the frame window there is a checkmark "Multiselect" (multiselect). It is needed to work on the same joint, in several frames simultaneously. when the checkmark is on, you can select many frames at once, and all the rotations and movements that you will do will apply to all selected frames. For example, upload a walking animation. In it, Trinity's arms weigh along the body. Suppose we want her right hand to be stretched forward, as if holding a weapon. To do this, turn on the Multiselect checkbox, select all walking frames (Ctrl + A), mark the "Bip 01 R Arm" joint and unscrew it Rotation so that the hand looks forward. Uncheck the Multiselek, turn on the animation. Now, while walking, Trinity's arm is extended forward.
Why do I need Pos 0
In "Pos 0" are the coordinates of the model’s zero point in the selected frame. If you change them, the model will move up and down, left and right, back and forth. In the case of multi-select enabled, the changes are applied to all selected frames.
Mini undo
Before starting to rotate or move the points, you can save their rotation or position to the clipboard by clicking on the corresponding buttons next to the inscriptions "Rotation" and "Pos 0". And then, if desired, restore by inserting back.
Options Tab
You can figure out the options on the Options tab by typing. I think they are intuitive. Maybe I will describe in more detail later.

I can't wait to try this out.
This program creates endless errors when I open the glock and shotgun model