Eranthis
joined
I love to mod any game that allows it. I do textures, sounds, voices, maps, and more.
My Blogs
This will be a tutorial on how to make detailed, well made maps for Dawn of War and various mods. Know that the purpose of this guide is to focus more on the visual construction of maps rather than just covering the essentials for making maps. Dawn of War maps are incredibly easy to make which often leads to custom maps being cheaply made with barely any visual flare or personality put into it. This tutorial will help teach you the dos and don'ts when making maps from scratch.
You can find the Mission Editor in the Dawn of War Mod Tools for Dark Crusade which can be downloaded here. Note that this tutorial won't cover the installation process or how to get the program working so if there are issues with opening the program, I can't really help. Do make sure to install the tools to Dark Crusade and not Soulstorm as generally the tools are built around DC's files.
STARTING UP NEW MAP
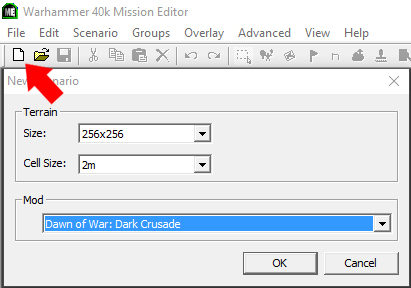
You can start a new map by clicking the blank icon to the top left of the program. The size will let you decide how big the map you want will be with some dimensions letting you choose from horizontally or vertically long maps. If you're thinking about making a UA map or other large scale mod, I would advise not choosing a 128 dimension size as it would be too small. I also recommend to always use a 2m cell size rather than 4m as it lets you have more precision in where you place terrain details like grass, concrete, snow and more. For Mod, leave the selection to Dawn of War: Dark Crusade. If you're wanting to make the map for Soulstorm, don't fret. Any map made in ME works for any version of Dawn of War.
Once your map loads in, it's time to learn two very important keyboard shortcuts that you'll use regularly when viewing your map: Ctrl + F and Ctrl + K. These toggle the viewing of the fog and skybox which will be active the moment you open a new session or load an existing map and will interfere with your map work if left on. Make sure to turn these off so you can scroll out and see the map in full.
DETAIL MAP EDITOR

Next thing to be accustomed to is the Detail Map Editor, represented by a blue checkerboard with a magnifying glass. This lets you pick and choose from a collection of cell textures for making the terrain of the map and are the building blocks of how your map will look overall. On top of being part of the map's visual foundation, certain textures like Z_GREEN and WHITE are also there as dev textures to help visually separate the cells into checkerboard patterns so you can easily plan ahead where starting locations and resources can go. After all, most Dawn of War maps are symmetrical and for good reason as it should be fair that every player or computer receives an equal chance of acquiring resources. Be sure to use these dev textures first before diving into making you map's visuals and figure out how your map will be laid out. Another feature built around the Detail Map Editor is-
TEXTURE STAMPING

The Texture Stamp is a neat feature, symbolized by the obvious stamp shape. This allows creators to paint the texture cells from the Detail Map Editor. It's a very useful tool and sadly goes ignored by new map makers who prefer easier and more messier methods to doing their terrain details (but we'll be going into that later on).
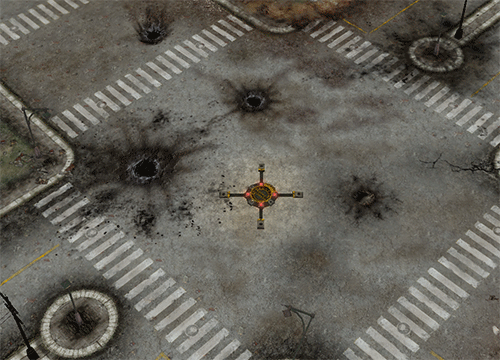
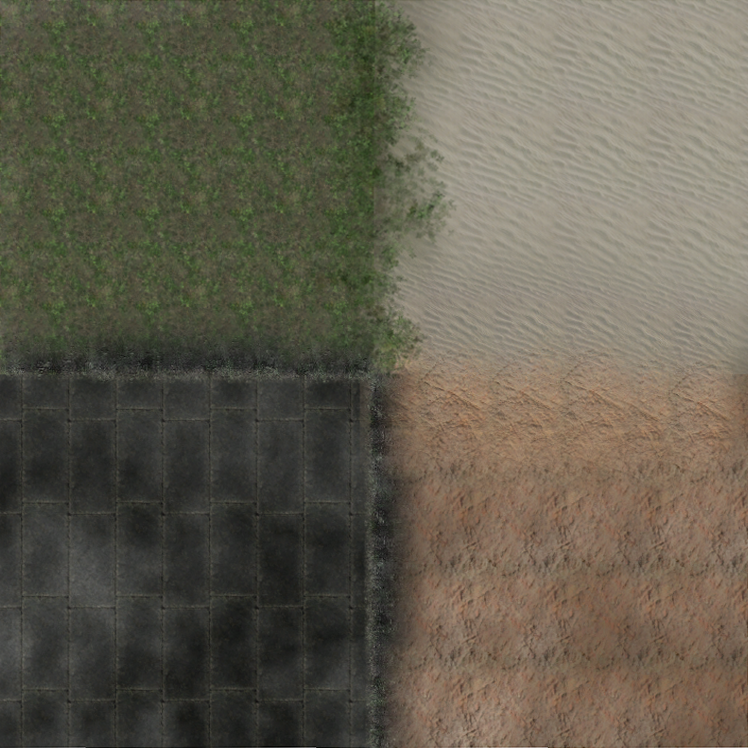
To give maps some visual appeal, colors can be painted into the terrain to help blend together the environment and make the scenery more attractive. The example above shows how these colors are used with brown splotches representing dirt, black carved around sidewalks to blend the decals into the road and green to depict grass, even if the cell isn't a grass texture. All of this is done on concrete alone which opens the possibilities for how map creators can craft their worlds. Once selecting this tool, the left side will carry different brush sizes and colors. Generally, I would stick with the BRUSH_SOFT presets as they have more control on how big the size of your brush will be rather than sticking to the colored brushes. You can always hand pick what colors you want by choosing the More Colours option.
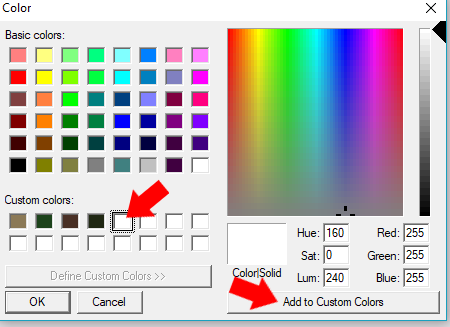
While developing a map, it's best to use reoccurring colors to paint your terrain. If you do choose a custom color, you can save it by selecting one of the white empty blocks under Custom colors, pick what color you want, and click Add to Custom Colors to save that color to your collection. This way, you don't have to keep guessing what color you used to paint with before.
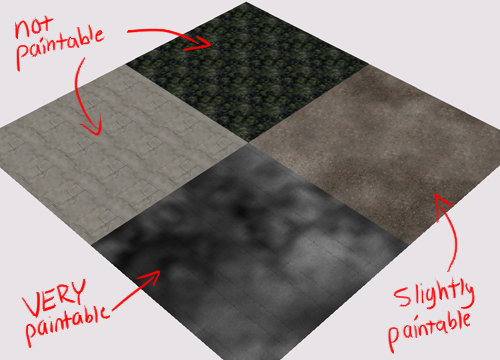
Keep in mind that not every cell texture is paintable. Each texture has its own alpha layer which defines what can be colored over the terrain. When making a new map, the terrain by default will generate a black and white splotchy pattern over all the cells to give creators some starting depth to the map, though you're free to paint over this with solid colors if you wish. This pattern is very handy with grey terrain cells like roads or concrete but not as complimenting when applied to dirt or grass. For those cells, use earthy colors like orange and green to give them depth and flair.
DECAL PLACEMENT

Decals are the last asset to terrain textures which you can find by the icon with the red slanted box. These are used to help beautify the surroundings and blend terrain cells together. They can also be used as visual barriers for where units cannot move to such as rubble, rock piles or foliage. You can hide decals by using Ctrl + D for when you want to work on the terrain cells.
The above example shows how decals are used to blend cells together.
There are a number of existing decals that are meant to be used this way.
Much like texture stamping where it's recommended to use a select palette of colors for your map, decals should also be themed and limited in a reoccurring fashion. Just because you have access to all the game's decal textures doesn't mean you should use them all for your map. I'll be going into more depth with decals later on as they often get misused in many ways.
(Tutorial will be continued later)
Profile
