CBgameDev
James joined
I'm James. I make bigger games with my friends and more compact games on my own.
My Blogs
I’m James, an indie game dev (@cbGameDev). I work on larger-scale projects with my friends, in a company that we built from the ground up and I make more compact games on my own in my spare time.
I spent a couple of weeks making a new game! I wanted to jam something new out for a couple of reasons:
- I want to get better in Unreal 5, my other games are all in UE4 and UE5 has so much cool new tech in it
- My main game Freerunners is taking forever to complete
- I have a backlog of little game ideas that I want to make
So I picked a simple idea, something I had been wanting to make for a while, that I thought had potential for fun and that I could make quickly, called…

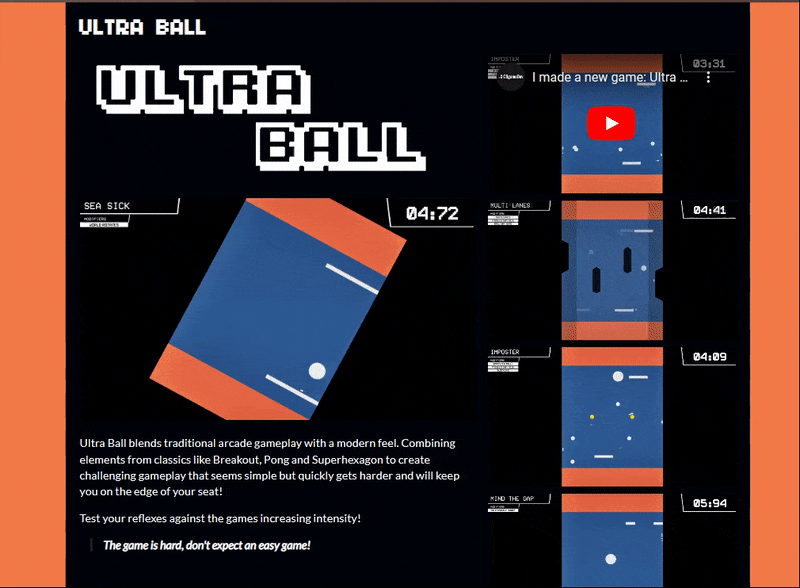
ULTRA BALL!
Ultra Ball blends traditional arcade gameplay with a modern feel. Combining elements from classics like Breakout, Pong and Superhexagon to create challenging gameplay that seems simple but quickly gets harder and will keep you on the edge of your seat!
Test your reflexes against the games increasing intensity!
Play for FREE on my itch.io HERE
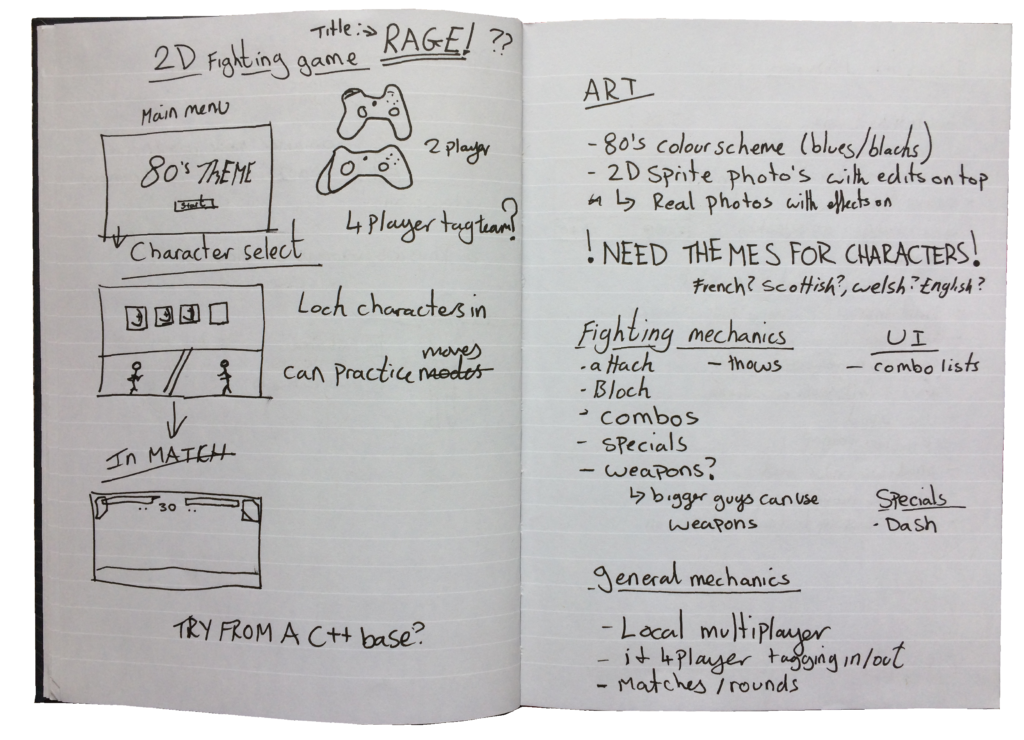
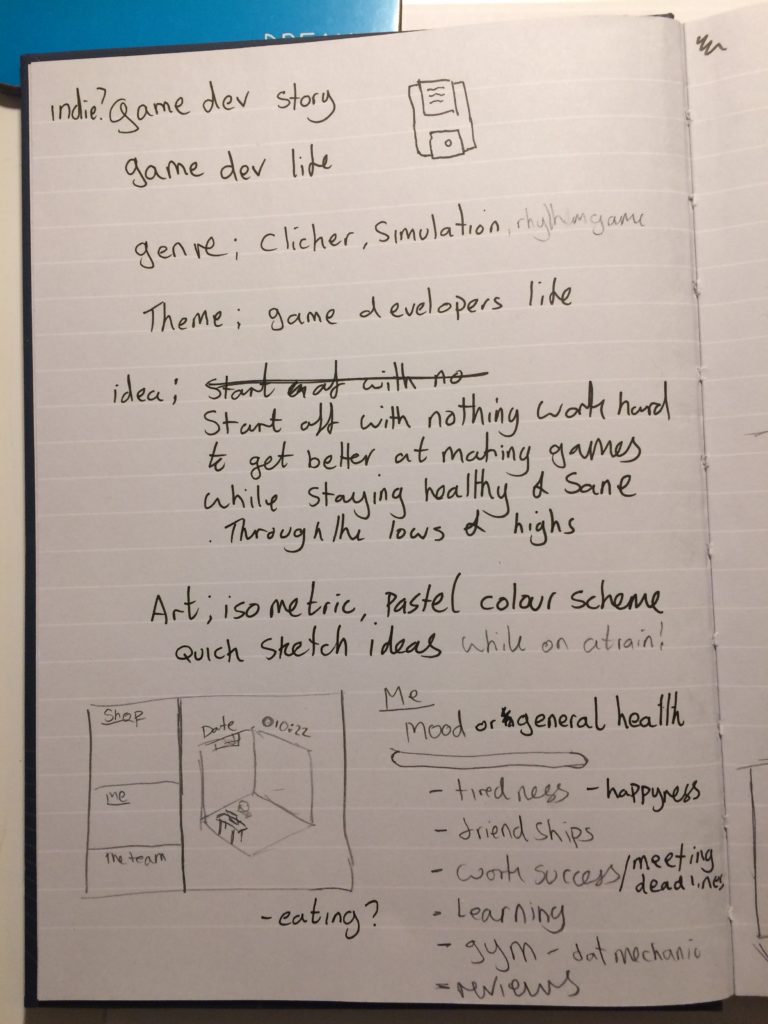
INITIAL IDEA:
I had the idea a good few years ago and just hadn’t had a chance to make it yet. Below you can see the initial design that I wrote down. Super simple concept, keep the ball bouncing for as long as possible. Hold the left mouse button to move the top paddle and hold the right mouse button to move the bottom paddle, with obstacles getting in your way to make it more difficult.
![]()
DEVIATING FROM THE IDEA:
However, when I came back to the idea and started actually thinking about making it, I quickly realised that holding a specific mouse button to move a specific paddle was going to make things over-complicated and wasn’t going to feel good. So I decided to deviate from my initial idea. I simplified the mechanic so no mouse clicking was needed. Instead, you only control the paddle in the direction the ball is moving. This created a nice focusing in feeling of attention just in front of the ball (almost how in vampire survivors you are just looking for that next place to move to and don’t have to worry about clicking buttons).
DEVELOPMENT PROGRESS:
I thought it be interesting to reflect on the progress of making the game. I didn’t track my time rigidly but I think making the game took around 20 hours, which was split across a few weeks. 25-ish hours total if you include stuff outside of the core development: making an itch store page, uploading the game, creating screenshots, a trailer and writing this blogpost about making the game. Below are rough chunks of how I spent my time and the progress I made:
CHUNK 1 : Around 5 hours
Kicking a project off is always exciting so I spent a bigger chunk of time here. I setup the project, starting from the Top-down Default Project Template but it would probably have been better starting off with a completely clean project because I ended up removing pretty much everything, only keeping some of the template meshes. I got a lot done here, my initial goal was to get the core game loop in as soon as possible, to test out if it would actually be fun. So I ended up getting in:
- The core bouncing ball mechanic and moving the paddles around
- Match states (Into, game in-progress and match over)
- Level data system and each level having a unique time to complete
- Save system to track best time got on each level
- A simple UI
- Making sure I could cook off a build (a little tip I found from doing game jams in the past)
I was very happy with the progress, it’s a simple game mechanic but I was getting that 1 more go feeling from it already.
CHUNK 2 : Around an hour
I got a lot more done here than I was expecting, I wanted to carry on getting the core mechanics in so I focused on the rest of the structure of the game, things like:
- Implementing the other core system of the game which would allow me to add “modifiers” to the level data to activate and deactivate obstacles and other modifiers e.g. changing the shape of the paddles
- Setting up placeholder level data for the 10 levels I had planned
- Making it so you could pick levels in the UI and see information about those levels
In the video, past 20 seconds, you will see how I am now able to change the paddles to be a different shape. This was a good proof of concept for the game.
CHUNK 3 : Around an hour
Next up I wanted to get some music in, to start solidifying the games feel. It took me agggeess to find something that I thought worked which in-turn made me feel like I wasn’t making a lot of progress. I used the Unreal Marketplace to find the music (£5) and also an 8-bit sound effect pack (£7.60). These were the only things I spent money on for the project: Totaling to £12.60. I implemented a simple music-switching system which you can hear in the video above, but ran out of time to implement any new sound effects.
CHUNK 4 & 5 : Around 1 hour total
I got busy in life and so work on Ultra Ball slowed down for a bit. I tried working on it but I only got like 30 min chunks of time to work on it. Which was making it hard to get into the flow of work and make meaningful progress. I did some misc stuff, adding a bit of juice to make the game feel better (paddles tilt when you move, ball scales on bouncing, on level start made the paddles scale in). I also changed the colour of the ball.
Design-wise I was finding it a bit hard to add juice to the game because the gameplay gets so fast. Camera shakes and sounds when the ball bounced seemed cool to start with, but ended up being constant when the ball sped up. So everything had to be very short and tight e.g. the bounce sounds had to have a very quick attack and release.
CHUNK 6 : Around an hour
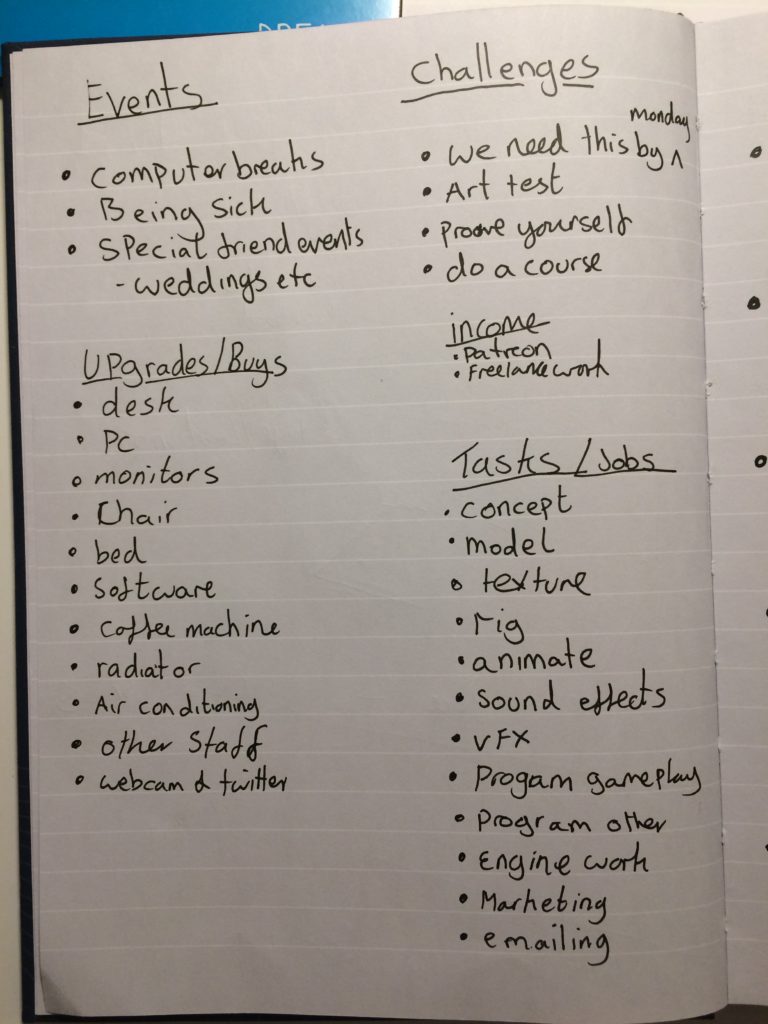
![]()
I was getting a bit annoyed at not making a lot of progress. The juice stuff I was doing was interesting but it felt like I was getting distracted from driving the game towards being finished. So I decided to focus in on what mattered most: the level designs. I felt like if I had the levels designs I would have something to aim towards even if I only had hour chunks of time. Above you can see my sketches of what I thought the levels could be. I first drew down the ideas and then tried to number them in order of difficulty (from the players’ perspective not development difficulty). I felt better about things after creating this plan of action.
CHUNK 7 : Around 4 hours
Things started to come together here. I think this was due to having the level design plan but also because of the longer chunk of time again, allowing me to get more into a flow state. Here I worked on:
- Blocking out most of the obstacle/modifier mechanics needed for the rest of the levels
- Improved the UI across the board and added some fun juice to it
- Fixed a bunch of misc bugs that had been building up
CHUNK 8 : Around 4 hours
I got another bigger chunk of time and put it to good use. As I was getting closer to finishing the game I wanted to start tying things up. So I made a pass on the art of the game. Art is by far my weakest area (I’m colourblind), but something I want to practice and improve on in making these little prototypes. I also worked through the last of the level designs and then made up a lock system to allow for actual progression in the game. I then gave things a balancing once over. I had to make some balancing tweaks to levels because some of them were just too hard:
-
I removed the Switcharoo level because it was so hard (inversed controls)
-
The spinning triangle obstacle in cooked builds seemed to spin faster than in-editor, making the level impossible, so I had to really slow them down
CHUNK 9, 10 : Around 2 hours total
Now I was on the path to finishing the game. I wanted to playtest the game and then wrap things up. I cooked off a build and gave it to a couple of people to play and get feedback on. They seemed to enjoy the game and I got a handful of bugs to fix, suggestions for opportunities to add more juice and some other general thoughts on the game. I playtested it myself and then acted on the feedback: fixing bugs, adding some more juice and then quickly added a couple of new things to the game:
- 3 new levels. One with multiple routes. One with pinball-style flappers (you can see in the video above) and lastly a level at the very end of the whole game called “The Impossible Lvl”. An intentionally super hard level (one I haven’t been able to beat yet). For this last level I reintroduced the inversed controls that I decided to remove earlier on in the project. I wanted to have a super hard challenge right at the end of the game.
- I also added a second-level complete timer to each level called “Ultra Time” that is harder to reach than completing the basic level complete time. I thought this fit the overall game and would add a little extra challenge to the player (plus it was an easy win development time-wise)
I could have continued working on the game, adding further levels and more juice, but I got to a point where I felt like I was just drawing out the whole process. The point was to have some fun, practice making games and then move on!
So that was it I called it finished!
CHUNK 11 : Around 5 hours
Did I say finished… well I meant almost finished. One thing I’ve learnt from making my bigger game Freerunners is that the marketing side of it is super important. Although I’m not planning on marketing Ultra Ball fully, there are still some basics that I can do and practice to build up pipelines for marketing any games I make in the future. Funnily enough, this stuff took me much longer than I planned for at almost a fifth of my total development time! Making up gifs and recording footage always take a while and are fiddly but there are also a bunch of little things and steps that I always forget about. Like needing to create a custom thumbnail for the Youtube trailer video. Here is a list of the broad things I did that I will build on for future game:
- itch store page setup
- Media, GIFs, trailer, videos for store page and social media etc
- This postmortem blog
- Social media posts
- Updating my website with the game
- Post on IndieDB.com
And the I really was FINISHED!
Below is the quick trailer I made for the game
OVERALL THOUGHTS AND LEARNINGS:
-
Bigger chunks of time can help you be creative: I struggled to make meaningful progress when working for an hour or less, bigger chunks of time were more useful for getting into a flow and being creative
-
Taking breaks from your game can help: 20 hours of development split across several weeks was far better than 20 hours of solid work. It gave me time to passively think about the game in-between and come back with fresh ideas and perspectives
-
Make a plan: When I felt like I wasn’t making much progress making a plan of action helped a lot. Splitting bigger tasks into more manageable pieces for the time chunks I had available
-
Always Playtest: Getting people to playtest the game is always useful as people will see things that you are completely blind to
-
Get the ideas out of your head fast: Some ideas in your head don’t actually work when you try to put them into practice (for example my deviation from the initial idea)
-
Watch out for ‘Scope Creep’: I started to extend the project, adding more juice and further levels. Luckily I caught myself doing this and forced myself to just finish it. Remembering the goal here is to make lots of tight fun prototypes, not to make full games
-
Marketing should be part of the process: Uploading and doing some basic marketing (store page, marketing trailer/screen shots) is all part of the progress and I didn’t account for this when I was estimating how long the game was going to take to make. There are so many little bits and like I said further up it ended up being like a fifth of my whole time used (roughly 5 hours). Marketing is one of the areas that I’d like to improve on, so this is something I’ll need to consider when making future prototypes/jams.
FINAL THOUGHTS:
I’m happy with how Ultra Ball turned out. I think the game is fun and pretty tight. I can see ways that I could extend it further, but for now I’m content with leaving it as is. I feel more comfortable using Unreal Engine 5 and I am looking forward to prototyping out some other game ideas I’ve had on the backburner!
If you enjoyed this go play ULTRA BALL HERE and let me know what you thought!
I’m James, an indie game dev (@cbGameDev). I work on larger scale projects with my friends, in a company that we built from the ground up and I make more compact games on my own in my spare time. I took part in the December 2020 Epic MegaJam and I wanted to write up a postmortem as I thought it could be interesting to others and useful for myself to reflect on the experience.
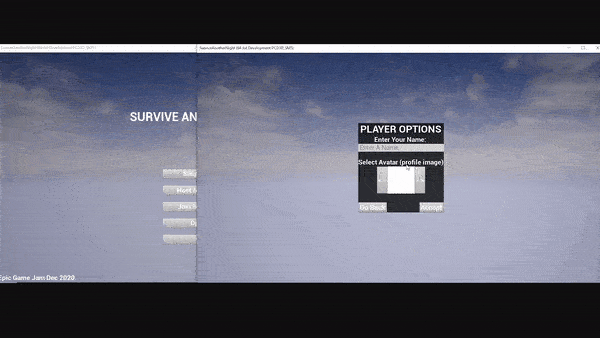
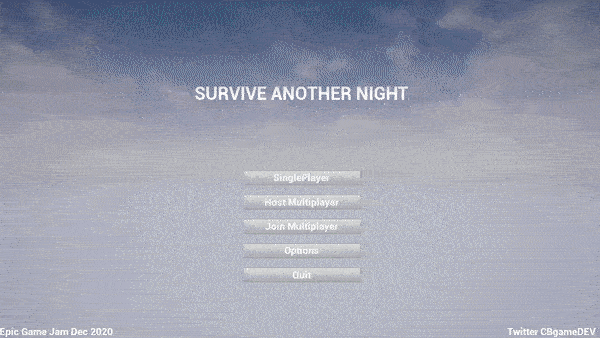
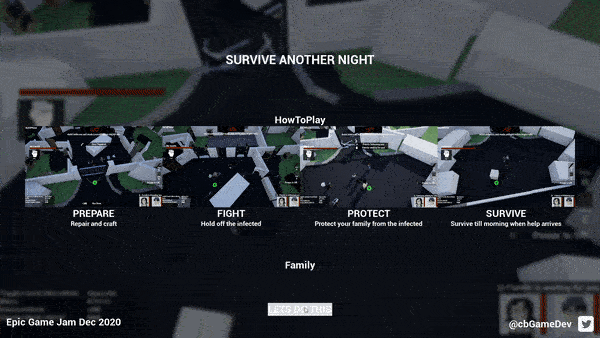
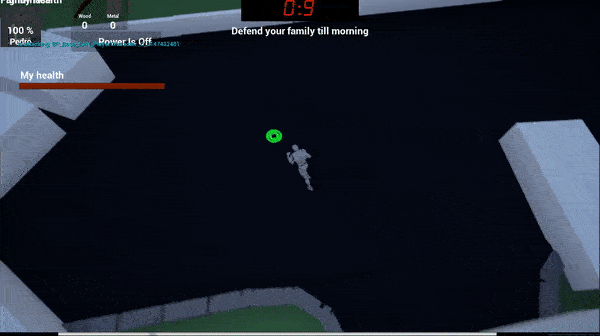
SURVIVE ANOTHER NIGHT
The game I made for the Epic MegaJam 2020 is free to play on my itch.io here!

I’d wanted to do a game jam this year but hadn't made time for one yet, so when I saw the Epic jam was coming up I thought I’d get involved. It was a 7-day jam and the theme ended up being: “It’s been a long time, but we’re not done yet.”
THE GAMES CONCEPT
I’m a big fan of zombie stuff so I decided to make a game about a zombie apocalypse. You play a character trying to protect their family for one last night before help arrives. The initial design was inspired by a mix of Original COD zombies and Overcooked style gameplay and the film The Road. I wanted it to be a top-down game with two main stages: prepare and fight. I also wanted to make it multiplayer (more on that later) and thought adding procedural elements could add replayability. Before I started any actual deving I wrote down the core of my idea into a single sentence which I wanted to guide the development direction over the jam.

I’LL MAKE IT MULTIPLAYER…
As this was a slightly longer jam I thought I should have a go at making the game multiplayer. Not any multiplayer mind you, cross PC non LAN multiplayer... that was a mistake.
I burnt a bunch of time following networking tutorials and trying to get stuff working only to realise that it wasn't going to work/be practical. It made me laugh when I realised that I’d spent the first day and a half making a game that wasn't actually a game. I hadn't made any gameplay mechanics. Instead, over that time I’d managed to get multiple players joining into a lobby then joining into a match but the further I was getting the more problems it was looking like I was going to have with ports and tunnelling. In the end, I decided a game jam probably wasn’t the right time to try and work all this out so I decided to cut scope and keep it a single-player game instead.
In hindsight, if I had spent that beginning period making the actual game, I probably would have found more free time to add polish/juice and even to try a simple local multiplayer (Spawning a second local player who could control using a gamepad) instead of the more elaborate one I tried for.
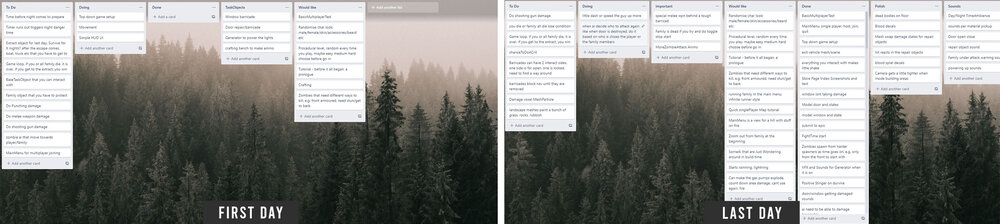
PLANNING & TRACKING
For planning, I used good old pen and paper, Google Sheets and Trello. They each served a different purpose. I didn’t use any version control, I just made sure to back things up every day.
Pen and Paper: Mainly used for quickly capturing ideas, sketching designs etc. I really like to have an analogue way to plan.
Google Sheets: Always super useful, I used it for a few different things. Firstly making an overarching plan for how I wanted the week to go on a day to day basis. Secondly for any more permanent notes (aka non-development tasks) that I wanted to keep e.g. jam deadline, premade assets I’d used etc. Lastly to roughly track my progress, by writing quick, short-hand notes about how each day went. This was predominantly for writing this postmortem and looking back at how the jam went as a whole.

Trello: For task organisation I normally use HackNplan but I thought it would be interesting to try Trello for a change. As I was making the game by myself I wrote very loose and shorthand task titles. My board started off nice and clean and got progressively more messy toward the end as I kept adding more lists. I’m 50/50 on Trello. It did the job (although the website went down for me on Monday) but I’m not a super fan of its layout. I think it’s probably okay for short projects but in the future I think I’ll stick with HackNplan or try something new again.
HOW THE GAME PROGRESSED
Saturday was my only full free day as we were busy in the office. I split making my game into two chunks per day: before work and after work. Interestingly this gave me time to passively think about my games progress while at work. I tried to cook builds off often, cooking one at the end of each session of work (e.g. in the morning/in the evening). To make enough time to make my game I ended up getting up early, going to bed late and drinking a bit too much coffee.
KICK-OFF FRIDAY:
I didn’t do anything on kick-off Friday. I knew the jam had started but I needed to finish off some work and thought I would take a first look at the theme Saturday morning when I was feeling fresh.
SATURDAY:
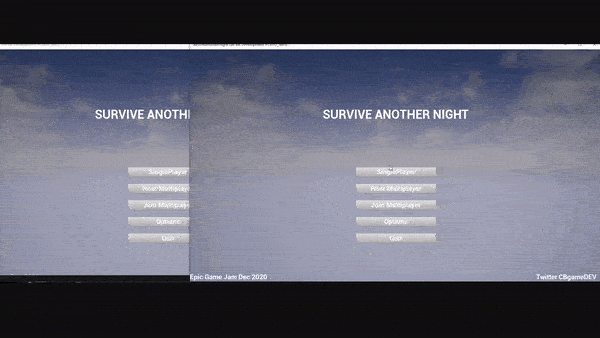
I sat down Saturday morning with some coffee, looked up the theme and started scribbling ideas down until I got to my zombie idea. I started a project from the Top Down Template, made a Trello board and started following a tutorial series for setting up a multiplayer framework. By the end of the day, I had a main menu leading to a lobby which then led into a map. I’d made good progress and learnt a lot but it had taken me the whole day and I technically spent the day not actually making the game.
SUNDAY:
Morning: I finished off the multiplayer tutorials I was following then had a think and realised that it was all getting a bit out of hand. Here is when I decided to cut scope and just focus on making a single-player game instead.
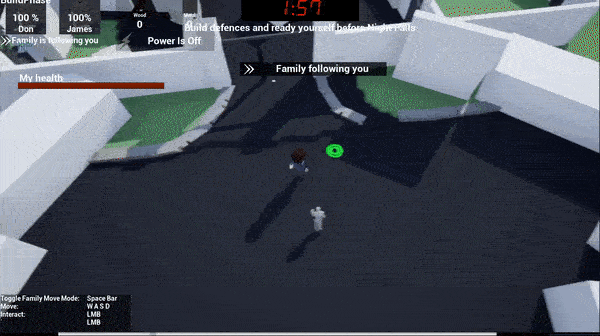
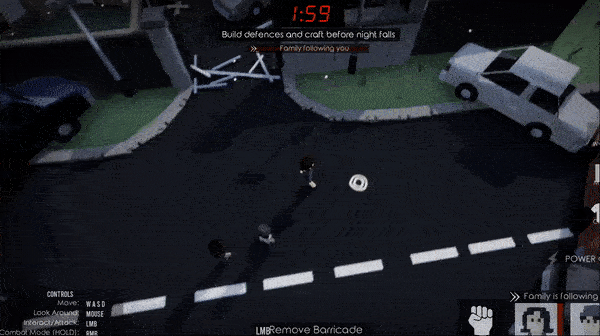
Evening: I went to work for a bit and when I came home I started work on the single-player version. I fleshed out the basic game loop (pre-mode, build mode, fight mode and win/lose states) and got creating a bunch of the base mechanics: family spawning, AI spawning, Ai movement, AI attacking, HUD menus, escape actor, simple barricade you build/interact with and player movement. I felt like I made so much progress in a short period of time.
MONDAY:
My original Monday plan had been to get all the mechanics fleshed out. I didn't manage to achieve it but I did make a bunch of progress. However, even though I had my game loop in it wasn't feeling like a game yet, more like a bunch of random game mechanics.
Morning: Before work, I got lootables and pickups working, made a resource system and started adding more UI to the HUD.
Evening: After work, I spent more time working on the barricades adding a new window type. I also worked more on the UI, made it so the player could attack the AI, made the AI attack doors and family members and also got family members taking damage. You can see the Ai shoot off when they die, which still makes me laugh when I see it now!
TUESDAY:
Originally I had planned to get most of the art done today; environment art, making the characters, rigging/animating them as well as adding simple post effects. However, things didn't go to plan.
Morning: I struggled in the morning and felt like I wasn't making much progress. I think I was tired from the previous days and work. I tried to get a pipeline for voxel art but it was taking too long (see the art section) so I switched to level design instead. Then I started having a bunch of problems getting the level to feel good (see the game design section). In the end, I made a small amount of art progress and had a messy level design to come back to later.
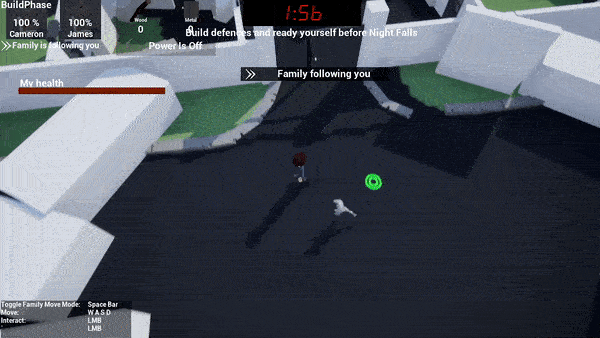
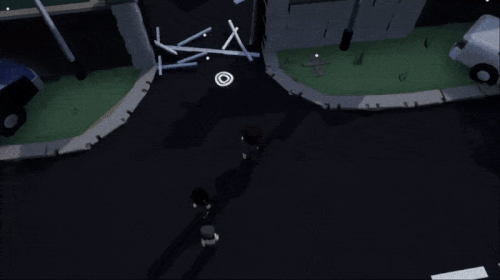
Evening: After work I felt more energized and decided to leave the art for now, instead focusing on the level design and mechanics. I worked on getting the family to follow you and stop when you tell them to. Turning a generator on “turned the power on”, activating lights in the level. I added billboard dots on interactable objects to make it easier to see what you could interact with. I also worked on zombie waves so they now spawned in rounds, increasing in numbers as well as spawning from a larger range of spawners as time passed. The last thing I did for the day was adding a new character mesh and a few animations for the player. By the end of the day things started to feel like they were coming together a bit, a big change from how I had felt in the morning.
WEDNESDAY:
At this point, I had greatly deviated from my original overarching plan. Because I was behind instead of working on Ai, level design bugs and juice, I decided to try and finish off the remaining gameplay mechanics.
Morning: I got melee weapons and weapon pickups working, made a new type of ai that was already in the world, who stands still until you get close then attacks. I also made the crafting table require power before you could use it. I felt like I didn't get as much done as I wanted to before I headed off to work.
Evening: After work I got character meshes and animations in for the Ai and the family members, which I felt like it helped a lot in making it feel like a game. I also worked on UI and made progress on the crafting system, making it so you could craft armour for yourself and your family.
THURSDAY:
Originally Thursday was supposed to be a day just for adding juice, balancing and bug fixing but I still hadn’t made enough progress on the mechanics and I was very behind on the art side, as in I hadn't done any of the level art. So I had to again cut scope (see the scope section), removing the main menu, as well as reducing the size of the play area of the level.
Morning: I did a HUD intro with instructions on how to play, added damage states for windows and doors and then cooked off a build to show a couple of friends to get some feedback. Even though a lot of stuff was broken/not finished (a bug could stop the AI from doing damage), it was very useful to see someone else play. Apart from the obvious stuff, it was clear to see that the game lacked a lot of feedback.
Evening: When I got home I started by finishing and fixing things that had stood out as being buggy and problems that stopped the core gameplay loop. Including making things actually cost resources to repair/craft. I looked at what I had left to do and decided to cut scope again. I spent the rest of the evening tightening up the game flow, trying to remove jank and working on transitions between gameplay sections, trying to smooth out the experience. I was in two minds about this because it wasn't actually making the gameplay any better but in hindsight I think it was the right choice. Although I still had a lot to fix and finish, it felt like it was starting to pull the game together and it had some fun to it.
DEADLINE FRIDAY:
I had a lot to do so I woke up early (with a bit too little sleep). As this was the last day and I decided to spend the day working on my game and then head into the office after the jam had ended (luckily, I have the advantage of setting my own work hours).
I scope cut the gun mechanic as I hadn’t even begun on it yet. Instead, replacing it in the crafting table with a spiked baseball bat melee weapon. I added a bunch of juice to everything you could interact with as well as when fighting. I finished off the level design and made up a quick vehicle escape sequence. I played through the game a bunch of times and tried to do some quick balancing. I picked some music, a calm one for the pre-mode and a faster-paced one for the fight stage. I then spent pretty much the rest of my time up until the end of the jam working on the games art. The game really came together in the last few hours.
I had a mini heart attack about two hours from the deadline when I tried to cook the game off and it failed with a random error with little info as to what was causing it. I hadn't done any cooking that day, I thought because I was doing mostly art it shouldn't really cause any problems...I was wrong.
I definitely started to feel the pressure when I ended up juggling setting up my itch.io project, writing my description/making screenshots/videos and trying to work out what was causing the error. Randomly after a few more cooks and tweaking stuff to try and work out what was wrong, the error started popping up in the editor. I’m so glad this happened as I was able to fix it straight away. The problem was the engine didn't like me trying to call a function from my pickup parent class on a newly spawned child pickup actor. To fix it I had to cast back to the parent pickup class first to call the function, which doesn't make any sense to me but it fixed the problem, so I decided to leave the plaster on.
After fixing the cook error I carefully did a few more builds, playing through and fixing major bugs and adding a few quick polish wins until it started getting real close to the deadline and I thought I should upload and submit before I break something. I was cutting it a little close but I got it in 38 min from the deadline!
ART
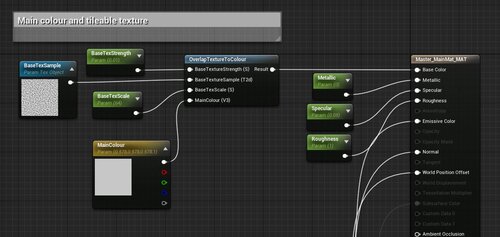
Art is not my strong point (I’m colourblind), so adding that to making a game by myself was a tough combo and probably why I put off the art till the end. I tried a few things to make development easier and save time. Firstly, making the game top down meant that I could get away with adding less detail to my models and use a voxel/low poly style. I used dynamic lighting instead of baked so I wouldn't have to cook my lightmaps as well as allowing me to do a dynamic day/night transition. For texturing, I used an overlap texture to colour node in my master material, which basically overlays a solid colour and a texture. I like to do this as you can add a slight bit of underlying detail to a material. I find that the single colour overlay is useful for me being colourblind as well because I can generally just colour pick a single colour from a real-world material. I tried to keep most of my colours quite desaturated to match The Road style mood of the game.
I had wanted to do a voxel art style using MagicaVoxel. On Tuesday I did an initial test making some paving slab corners for the road. I thought it had potential to look cool but I realised it was going to be too time-consuming per asset. So although I really wanted to do it I decided to ditch it, cut scope and go for a more simple poly style. I’d already made the assets so I decided to still use them in the game. The top image is the paving slab tests in MagicaVoxel, the bottom is them in use in Unreal.

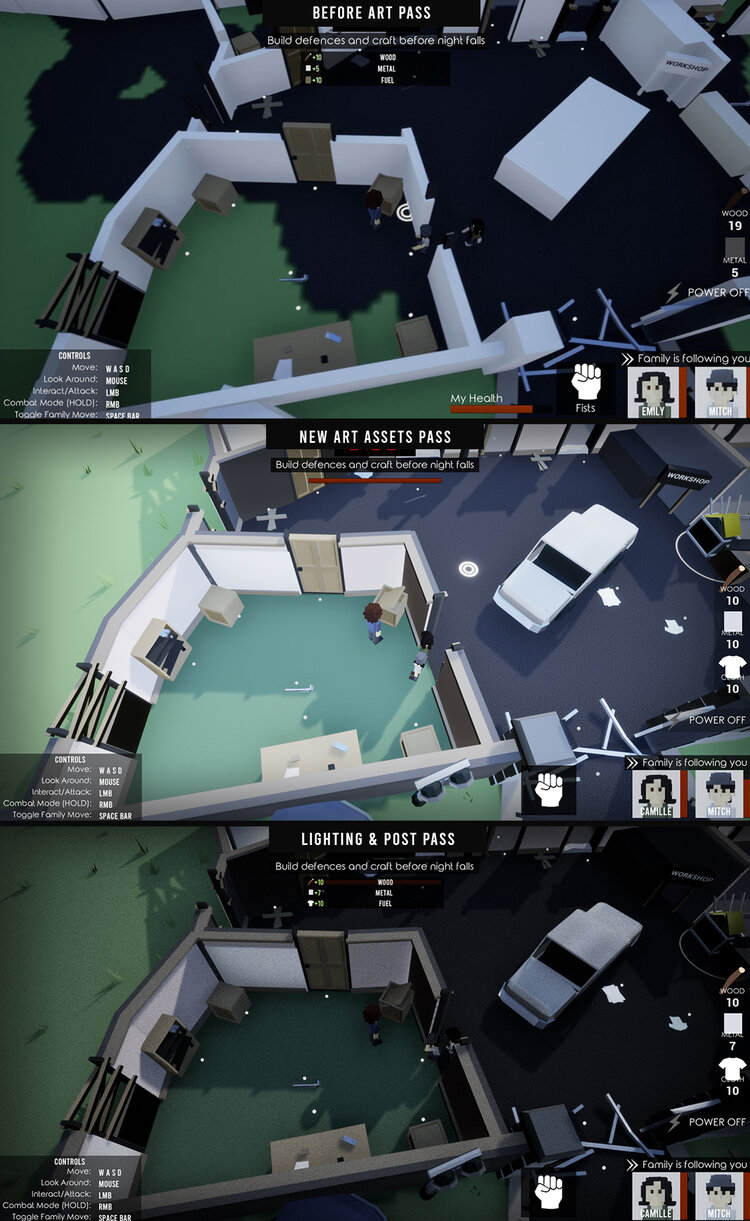
I stayed in the art blockout stages until very late in the project, in fact it was one of the last things I did. I blasted through making a bunch of simple poly assets and getting them in the level. However, as you can see from the middle image below, it didn’t look right yet. It wasn’t until I tweaked the lighting and added some post effects that it really came together. For the post process I desaturated the colours, added a grain effect and increased the ambient occlusion. At that point I decided to stop on art as I was running out of time. In fact if you look closely in the final build I submitted you can see that I missed deleting a few white blockout walls because I was pressed for time.
DESIGN
The game's core loop never changed from my initial plan but I went through a bunch of additional design changes elsewhere. Below are a few of the more interesting ones:
Level Design
Originally I wanted to make an open area petrol station level with a central building to defend and a series of smaller buildings dotted around outside. The idea was you would need to go to these outer buildings to get supplies, activate the generator and use the crafting bench. Straight away I found a design problem as I needed to have a reason to have an edge wall to keep the player contained which didn’t gel well with a petrol station theme, so I scrapped that concept.
My next idea was to have an industrial compound with high walls around it with much the same idea, building in the center with extra buildings around. However, I then ran into a problem where having large open spaces mixed with a top-down camera didn’t feel right. I think this is because of the restricted view. If you can't see the next interesting thing to go towards then it makes it harder to decide where you should go. I felt like players might never find out that there was a generator that you could use to turn the power on etc.
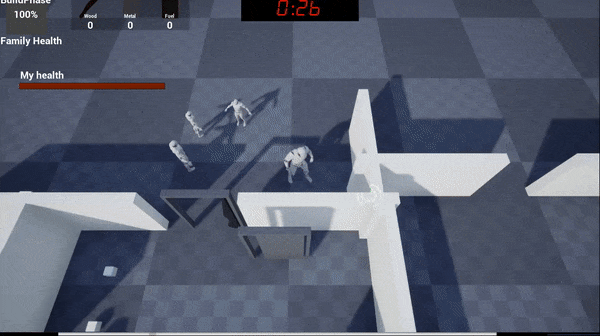
I decided to reduce the distance between the buildings and after doing this I noticed a new problem. With the top-down camera, it felt more natural to go upwards, which was counter to my current level design which progressed downwards. This is possibly because of the slight off camera angle. So I played around with rotating the player camera until I got what you can see in the Gif below. It felt so much more natural to work your way upwards.
The map still felt too big so I iterated on it and kept reducing it until it felt better. I focused on trying to make tighter more dense areas. I think this helped a lot in the overall game design as it meant that the player could see objects of importance quicker (e.g. generator and crafting table) as well as helping to funnel the zombie ai, making it easier to get surrounded.
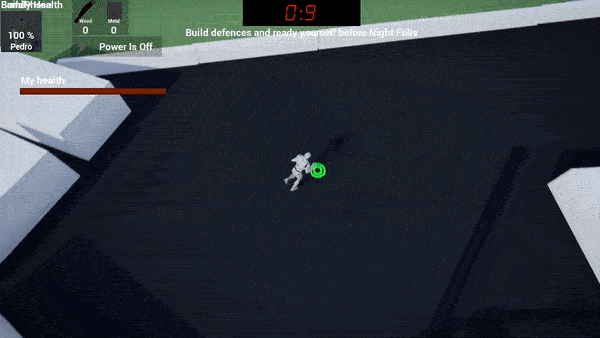
Ai Zombie In Build Stage
Originally I wanted to have the day time completely clear of zombies and only have them spawn during the night fight stage. However while doing some testing where I needed a punching bag zombie, I realised it felt good to have a single zombie as soon as you got into the compound. I ended up keeping it in and I think it benefited the overall game design. It gave new players a taste of what’s to come, allowing them to learn how to fight a single zombie in a less pressure intense situation as well as letting them know why they are repairing and preparing.
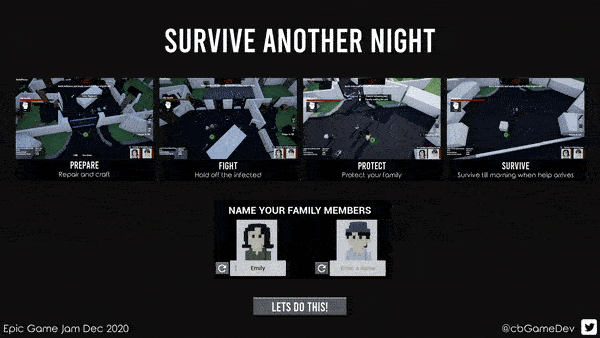
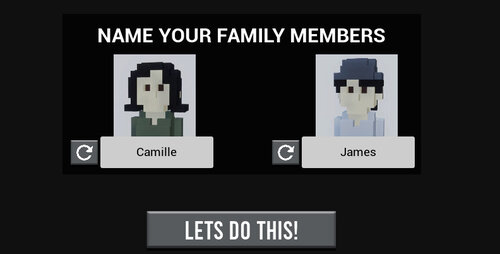
Naming Your Family
This is something I wanted to incorporate from the start. I really like naming my crew/team in games like FTL, Organ Trail (zombie one), Rimworld etc after my friends, family and myself. I thought if you could name them after people you know, it could really help to add attachment and roleplay where you actually want to protect them. I made sure to add a random button for anyone who didn’t really care for that sort of stuff.
End/Fail State
I always wanted it so that if you died it was game over but I was split for a long time over whether if your family members died it would cause a fail game over. In the end, I thought it would be more impactful and encourage replayability if even if the family died you could finish. This caused there to be three endings: all survive, both family members die, one family member dies.

SOUND EFFECTS
I had a lot of fun making the sound effects. Originally I wanted to make all the sounds myself (minus the music), however, towards the end of the project I was running out of time and had to get a few extra sounds from AudioJungle to get things finished.
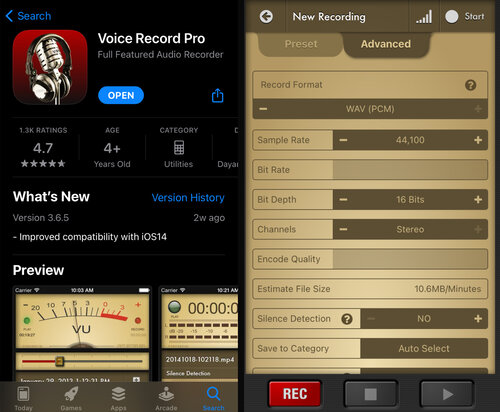
I found the app I normally use on my phone to record sounds was broken. So I had to come up with a new pipeline, which ended up working better than my original. I had a quick look around for a new sound recording app and found “Voice Record Pro” for iPhone (which is free). It was nice and simple to use, I was able to record directly into .wav format and could quickly email it to myself.
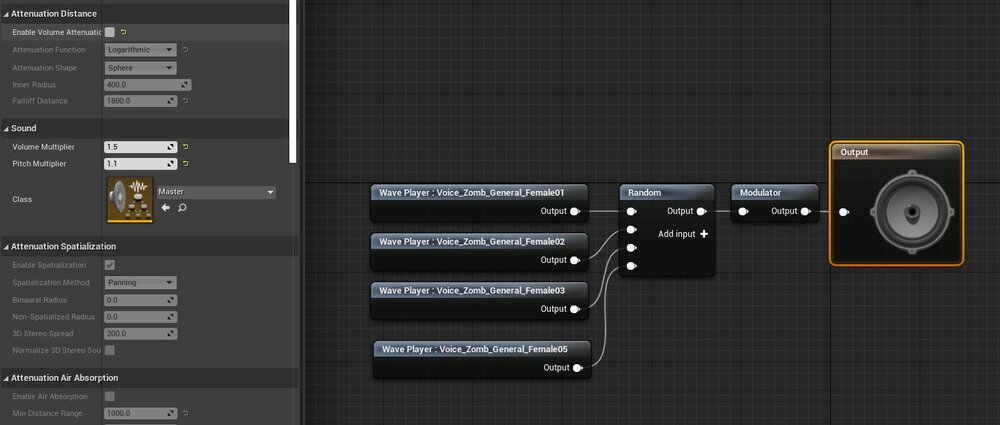
In terms of audio editing, I stuck the long audio file into Audacity to cut it up into individual sound clips. Initially, I was cutting the sounds and adding a fade in/out to the clips but as I got closer to the deadline I stopped adding fades to save time. Instead, just very roughly cutting them and exporting them for import into the engine. I ended up making around 80 ish sounds for the jam. In the Sound Cues in Unreal I used the modulator node as well as adjusting the overall pitch and volume to try and squeeze out even more variety from the sounds. Below is an example of my female zombie sound cue:
SCOPE CUTTING!
It wouldn't be a game jam if you didn't have to cut scope and I had to constantly throughout the project! I think it was the right thing to do as it made a tighter game and most importantly, I managed to finish. Here are some of the major ones:
Cut Multiplayer: I bit off more than I could chew trying to get over the internet multiplayer to work. It would have been great to get in but I'm sure the game would have suffered greatly if I had even been able to finish it. In hindsight, a better use of my time would have been to make the game as a whole first and then try to add in a second player locally if I had time. But I have no regrets as I’m happy with how the game turned out and I did learn a chunk of interesting networking stuff as well, which I'm sure will be helpful in future projects.
Cut Voxel Art Style: I really didn't want to cut this. If I had been in a team I would have pushed to keep it, but doing things alone meant making up assets would eat away at the time that I needed to create the rest of the game. I think I made the right choice by going extra simple poly meshes instead, but I would definitely like to experiment with a voxel art style in the future.
Cut Map Design/Levels: I quickly cut the procedural element of the level design to buy time to focus on implementing the games core mechanics. Instead, I replaced it with the idea of three separate levels of different difficulty: easy, middle and hard. Not long after I cut the scope again to one level with three difficulty modes. Then the next day I cut scope further down to just one level with one difficulty as time was running out. I’m glad I made these cuts, although I would have liked to have got a minimal amount of procedural ness in. For example, I think it would have been quite easy to randomise the spawn location of pickups based on a series of predefined spawn locations.
Goodbye Main Menu: I really didn't want to cut this because I really liked the idea of doing a kind of Call of Duty Modern Warfare main menu. I wanted to have the player's character and the family members walking on the spot while the environment moved around them (like how an infinite runner works). But as cool as it was in my head it didn't add anything to the gameplay so it had to go. Instead, I loaded the player directly into the gameplay level.
Cut Guns: One of the last major cuts that I made was removing guns. Originally the best weapon in the game was going to be a handgun (which takes a lot of resources to craft). However, by the last day of the jam I still hadn’t worked on the shooting mechanic so I decided to cut it. Instead replacing it with a craftable spiked baseball bat. I think this was a blessing in disguise because looking back I really like the fact you have to get up close and personal with the zombies, it adds to the grittiness of it all. Allowing the player to create distance between themself and the zombies through bullets could have detracted from this feeling.
Extra Juice: I only cut this because I completely ran out of time, otherwise I would have carried on adding camera shakes, sounds, VFX, UI, animations etc to the game. VFX was the main juice that suffered. If you look closely you will see the only VFX is a mesh-based particle that I use for blood when the player gets hit. The frustrating thing is that this would have been very easy to add to a bunch of other situations (looting, door and window damage etc) by simply duplicating, changing the colour and spawn amounts, I just didn't have the time left.
TAKEAWAYS
Here are my biggest takeaways from this game jam:
-
Try not to overscope and if you find you have, try to cut scope quickly. I think I could have added more juice to my game if I had cut multiplayer sooner.
-
Cook-off builds of your game more often! I was pretty good about it but I slipped up on the last day when it mattered most.
-
Get people to play your game. It’s very useful to see how others interact with the game. Maybe something you thought was obvious makes no sense, maybe there is a glaring bug that you missed because of the way you play the game.
-
Prepare your supporting submission materials as early as possible. E.g. itch.io project page, description, screenshots/videos, premade assets list etc. This is so if like me, you end up having last-minute build issues, you can be less stressed and concentrate on fixing things instead of having to multitask.
-
Try mini devlogs during the jam. After the jam I noticed other devs had been doing daily development posts on their itch page. This is cool and I don't think it would have taken much more effort to do as I had already been roughly tracking my daily progress.
-
Using the post process to desaturate the colours worked out well for me being colourblind. I get a bunch of colours mixed up, so desaturating worked well for me as I was able to concentrate more on value ranges instead of worrying if a specific colour was wrong.
-
Have a bunch of easy, ready to eat food for the deadline day. I got so swept up in the jam on the last day that I kept putting off eating because cooking would take up the time I had left. So next jam I’m going to make sure I have a bunch of snacks and easy to cook food ready!
CONCLUSION
I’m super glad I entered the jam. Although it was real intense I learnt a lot, had a lot of fun and came out with a cool game. After the jam is fully over, I’m going to go back to the project to tidy up a few bugs that slipped in and add a bit of the polish that I didn’t have time for!
If you want to see more about the games I make and get general tips on using Unreal you can follow me on Twitter HERE.
I hope you enjoyed reading about my experience, good luck on your own jams.
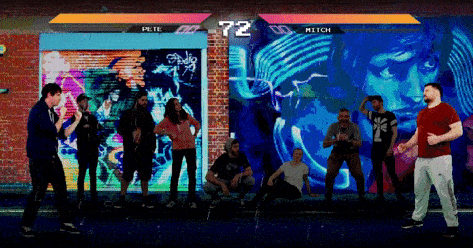
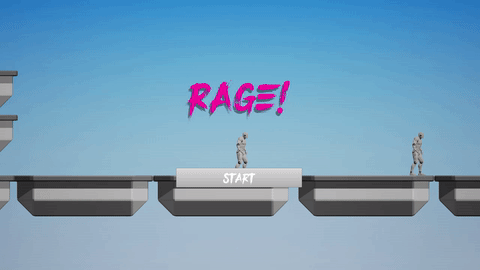
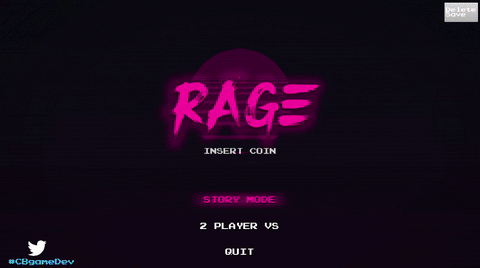
Decided to make up a short trailer for my game RAGE, which is an 80s style fighting game with my friends and me as the characters!
Finally got around to making a trailer for ‘Indie Dev Story’! Been putting it off for a while but just decided to sit down and do it, Hope you like it.
RAGE POSTMORTEM
I’m James, an indie game developer (@cbGameDev). I make bigger games with my friends, in a studio I helped start up and make smaller games on my own in my spare time! I enjoy the challenge of working in a team on big scale games and use the smaller games to learn, have some fun and stay motivated through shorter development cycles. This is a postmortem about making “Rage”, I thought it could be interesting to others and useful for myself to reflect on the process.
View the games itch.io page here!
WHAT IS RAGE?
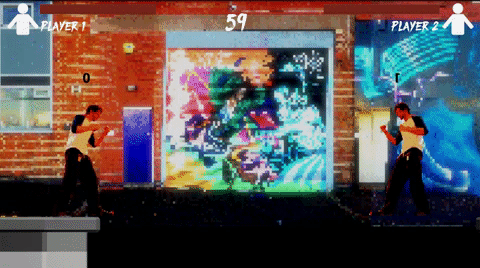
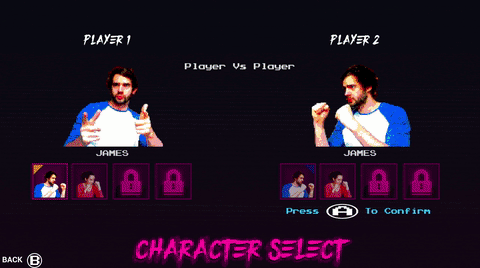
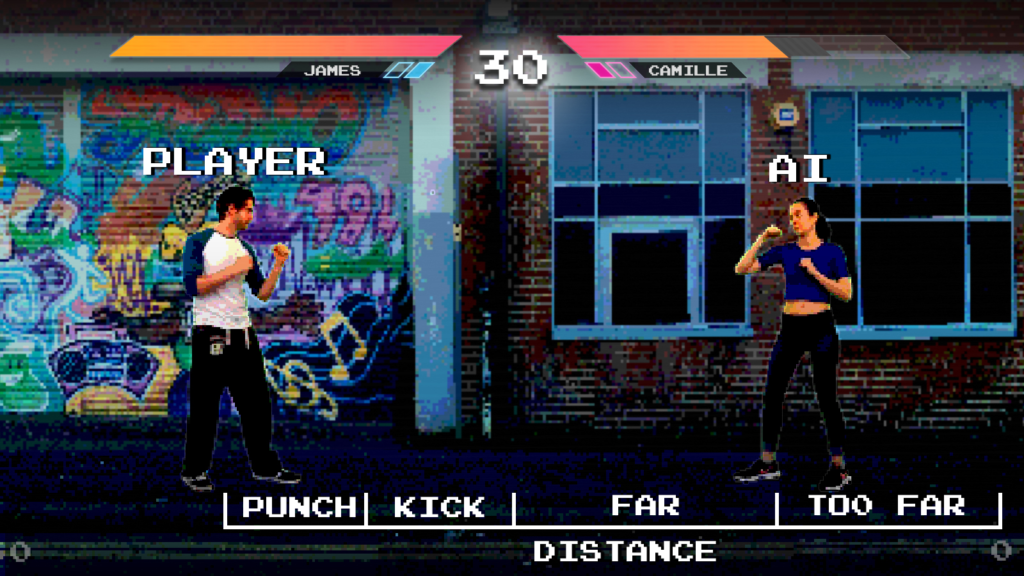
Rage is an 80s style beat-em-up, inspired by Street Fighter, Marvel Vs Capcom and Mortal Kombat. It has a single-player game mode in which you play against AI, unlocking new playable characters as well as a Player Vs Player game mode. The characters in the game are made up of me and my mates.
WHY MAKE THIS GAME?
Before I started Rage I knew little about the mechanics of fighting games. At that time we had started playing a lot of Marvel Vs Capcom in the office and I was interested in how the game seemed simple on the surface but was hiding lots of complexities behind the scenes. I thought it would be a good challenge to try to make my own fighting game and I wanted to have me and my mates as the characters in it. Below is my initial rough idea:
MOTIVATION
The highs and the lows
Originally I planned to make Rage in my evenings over three months, keeping to my short dev cycle……but this didn’t happen. Instead, the game took close to six months due to a mix of expanding the game’s features, a time-consuming art style as well as being busy with big updates at the office. Many times I was tempted to stop working on the game; I didn’t like it anymore, it was taking too long or I wanted to start a new and exciting idea instead. However, my personal philosophy is to stick to it until the end, as finishing a game itself is a skill that needs to be worked on and now I am glad that I did push through to finish it. This tweet was posted by @GameDevLeague, while I was making Rage and sums up perfectly how I feel.

During a project, I write down all the other new ideas I have and while I continue to develop that project, a sort of game ideas natural selection happens. I end up dropping some ideas, others mature and some join together to create new ideas, leaving me with more interesting more refined ideas.
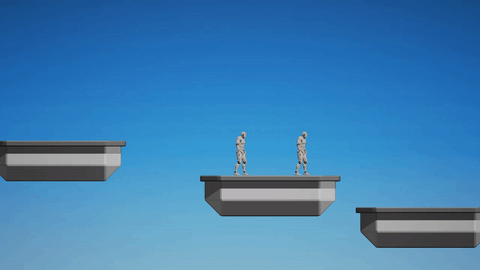
Below are gifs from the different builds I cooked off, showing the game’s progression:


GAMEPLAY
Early on I found the video Concepts Every 2D Fighting Game Player Should Know by YouTuber GuileWinQuote. This was really useful to help me understand the mechanics of fighting games. I thought it was important to understand them if I didn’t include them all. Modern fighting games are getting more and more complex behind the scenes, they look and feel great but replicating this by myself would have taken far longer than I wanted. Instead, I chose to make the gameplay in Rage a more realistic street fighting style, no double jumps, flying or super fancy specials. This worked well with the 80’s theme and meant that it would not be too complex to develop. I thought having a single punch and kick would give too little variety to make the combat interesting. So I created a simple combo system to add a layer of complexity; with fast light attacks, normal attacks and slow heavy attacks. I carried this across to the three attack types I had; punches, kicks and crouching punches. The player also had a single special move. This took each character’s attack move count from 2 to 10, each with their own speed and damage. I talk about the technical side of this in the Code/Blueprint section later on.
Responsiveness is key
One of the key things I learnt from making the combat was that responsiveness is key. As soon as the player touches a button the character needs to begin their attack. It is the same for when a character returns to their idle pose after a move has finished, they need to snap back quickly else it will feel unresponsive. There is little time for anticipation in the initial build up or for overlap on returning to idle. To give other players opportunities to attack, I would pause the character at the end of their swing for a fraction of time, before the return to idle begins, almost as if a cooldown. This seemed to work, making players feel as if it was their fault if they got hit, rather than the game being unresponsive.
Expanding gameplay features
Initially, I was only going to make a player Vs player game mode but early on in development it felt like some sort of overarching progression was missing, so I decided to add in a single-player tournament mode. I locked the PVP mode and all but one character, instead players would have to unlock them by completing tournaments (as Super Smash Bros does). This felt much better, giving a challenge to overcome but at the same it time increased my workload as I then needed Ai, new UI and a progress saving system.
Balancing
Balancing the game took time as there were a lot of values to play with across multiple characters. There were simple things such as health, speed as well as more fiddly elements such as the number of frames, damage and playrate for each individual move. Even small frame addition/subtraction seemed to have a big influence on responsiveness and ease of attacking. I tried to start balancing the game early on as I thought it would be a very iterative process, taking time to find good values that worked. As testing was the only real way to gauge if tweaks to values were making a positive impact on the gameplay, I tried to test/balancing each time I opened up the editor to work on the game. I would make notes then make changes and then play again with those changes. Another really useful method was to ask my friends to play it while I took a step back and made notes. This helped to not only refine the UI and flow of the game but for balancing it allowed me to see flaws in the combat; over powered/underpowered moves, dodgy collision, damage trace problems etc. For balancing the AI, I kept their health, speed and moves exactly the same as their player counterpart. Instead, I balanced them through their difficulty settings which you can read about later on.
ART
I knew I wanted to have an 80s theme from the get-go and I also thought this would be a great opportunity to try using photos/images of my friends and treating them in photoshop to create 2D characters sprites (a style I had wanted to try for a while). This also allowed me to play with a slightly choppy animation style. When first thinking about the art of the game, I gathered a few images to use as key reference. This art summed up the direction that I wanted to go, in terms of colour palette, shape language etc, which you can see below:

General game look
Initially, I placeholdered all art (from characters to UI) while concentrating on the game mechanics. However, when the mechanics were more solidified, I returned to thinking about the visuals. I decided to make a style sheet and a visual gameplay mockup to help keep/consolidate the art direction that I wanted to follow. After gathering more reference images I set about trying to create something. I found this tough, especially the colour choices (as I’m colourblind), but I pulled something together which I thought would work well. This is the first time on a personal project I did this and it really helped, especially later on when it came to adding new unplanned UI elements. I will definitely do this from now on as soon as I know the game mechanics will work. Below are the style sheet and the gameplay mockup:


Character sprites
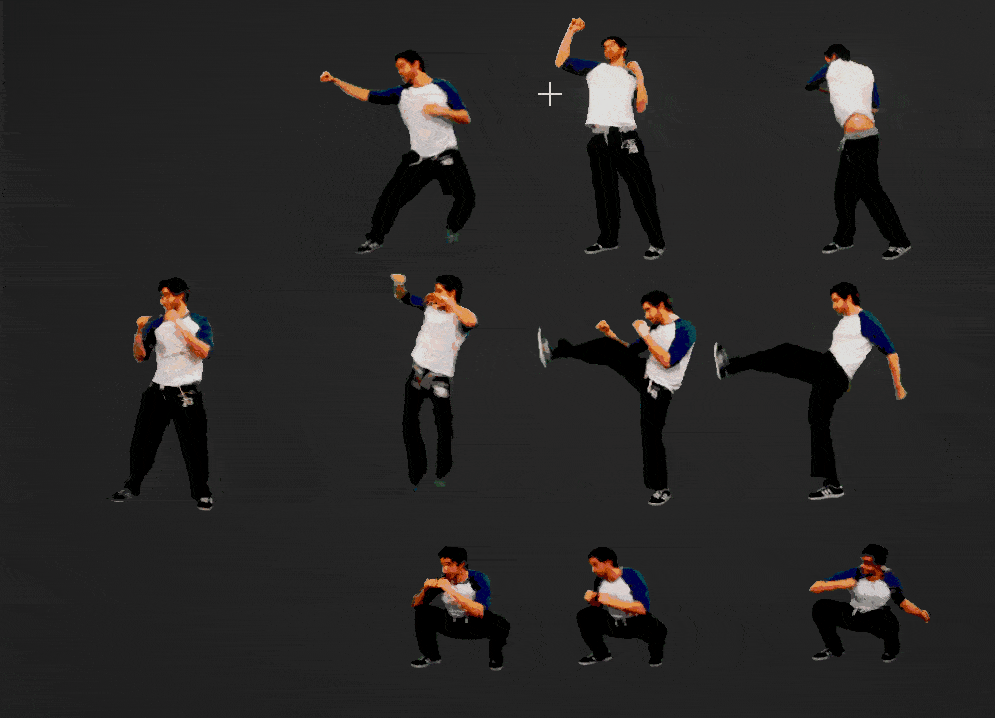
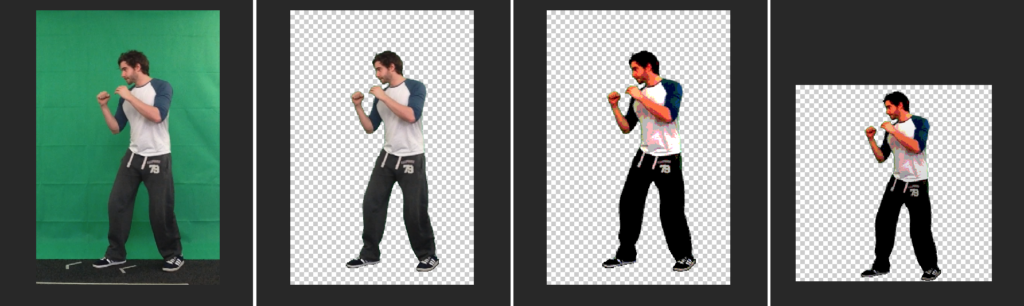
Rage’s game flow and mechanics were completed relatively quickly, however, the art style for the characters is certainly one of the reasons the game took longer than expected. At the end of the project, there were just over 3,500 character sprites (including background characters). With each main character having 40 actions/moves; walk forward, jumping, hit reacts, combat moves etc. Even with a green screen and Photoshop actions to help automate the process, I still had to hand adjust each texture, which was very time-consuming. I did a test early on trying to decide how pixelated the characters should look. I liked the idea of them being pixelated but at the same time I wanted to be able to make out details, otherwise, there was no point in having me and my friends be the characters. Below are some of the iterations that I went through:

Styling the characters
Here is my end process for the characters:
First I used an iPad on a stand to video record a person doing a movement from a flat angle against a green screen. Then I loaded that video up in Quicktime on my PC and selected a range of frames that I liked, cutting away extra unneeded footage. I then batch exported each frame as a separate image.
After that, I made a new Photoshop file and brought in every fourth frame image (to get the slightly choppy animation style). I then had a pipeline with separate stages as I wanted to make a nondestructive process, in case I needed to revisit/touch up stuff. Firstly I grouped these images into a folder called “Clean”, carefully cropping and deleting, as much of the canvas as possible, to save on hard drive space.
Then the time-consuming part started. I duplicated the clean folder to a ‘Masked’ folder and then from each frame masked out the background. In early placeholder tests (before the green screen), I used the quick select tool, which was a long and arduous process. I ordered a green screen off Amazon and instead used ‘Select-> colour range’ to remove the green from the image. I automated this with a Photoshop action but it still took time. I had to go through each frame afterwards and double check as even a single pixel outside of the characters area would auto generate collision in engine and mess with the gameplay.
Once happy with the masking I duplicated the folder to an ‘Edit’ folder and ran an action to add the crunched 80s style effects. This consisted of:
- Adjusting the levels to create greater contrast
- Using posterise to reduce the overall amount of colours
- Transforming the image to 50% of its size (with nearest neighbour interpolation on)
- Then returning it to its original size 200%
After that, I duplicated the group one last time, adjusted the canvas to be a power of 2 (e.g. 512×512) and scaled and positioned the character in the images ready for importing into engine. I also added a low opacity gradient going from the feet to the head, making the feet darker and drawing attention to the characters face. I then exported each frame as a PNG and they were ready for the engine.
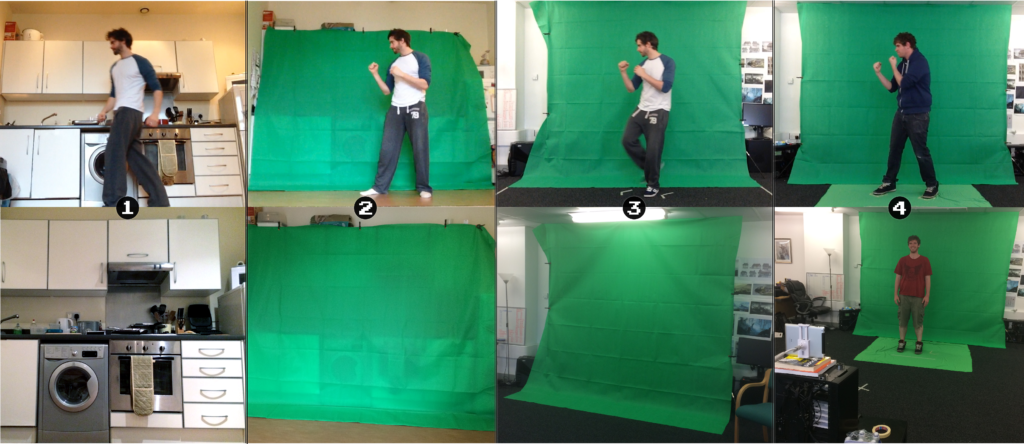
Evolution of recording
I adjusted the way I recorded the characters as I progressed through the project. Initially, I recorded footage in my kitchen (1), but this made it very time-consuming to mask out the background so I bought the green screen (2). I then realised that I needed a fixed flat angle and more space to record in, so I borrowed my friend’s iPad stand and changed filming location (3). The green screen was working well but was a touch too short so I got hold of another one to cover the feet area(4). Overall this was a slow iterative process. I wish I had the end setup from the very beginning as it would have saved me so much time and helped to keep everything looking consistent, but live and learn!
Best practices
As I progressed through development I ended up with inconsistencies between characters because I was learning and improving with each character I put in. This can be seen in the differences between Camille’s and Mitch’s characters. Below are some of the core things I learnt:
- Use a power of 2 texture size. This will allow you to compress the texture in engine reducing its memory cost dramatically and making the difference between a game running or not at all (In Rage Example being 350kb down to 85kb)
- Bring the images in at a good texture size, you can always mip it down in the engine (In Rage I brought images in as 512×512 and mipped them down by 1)
- You can set the pivot location in editor per sprite. So if a character’s hand goes out of frame, rather than increasing the texture sheet size to fit it, instead move them over in the texture space and use the in engine pivot to line it up with other frames
- Make sure there aren’t any pixels outside of your character, even a single pixel would get collision, messing with players hit box area (I was auto generating shrink wrap collision per sprite)
- My Photoshop actions deleted themselves mid development, so make sure you back them up by saving them to your hard drive (found out this is quite a common problem)
- Use a green screen if you are going to mask a large number of images from their background. Also, use a flat angle and try to film under the same lighting setup if you have to split filming into separate sessions
- Personally, I found it easier to work in batches. For example, with each character I would Quicktimeselect and export the frames I wanted, then I would do all the Photoshop work in one and finally do all the engine work in one. This won’t be for everyone but I found I managed to get into more of a workflow like this
CODE/BLUEPRINTS
I used the Unreal Engine 4 for Rage and I wanted to push myself to learn and use C++ instead of only Blueprints. I started off with good intentions, setting up a project from a C++ base and opening the engine but that was about as far as I got, haha. I went to set up key inputs in C++, but I had no idea how to do it, I started searching but gave up shortly after as I knew it would only take two seconds to do in Blueprints. In the end, I stuck to Blueprints and I think it’s a good thing I did otherwise the project would have taken even longer! I’m still adamant that I want to make a game using C++, but I think it will be more of a natural learning curve. For example, I know some localisation functionality can’t be accessed by Blueprints alone so I would have to use C++.
Blueprint Library
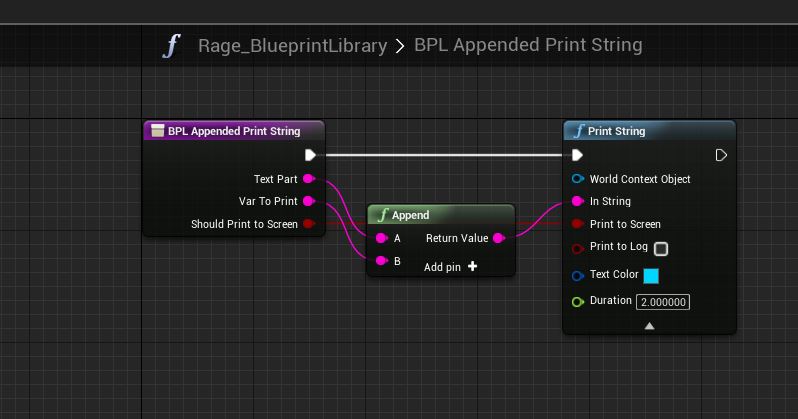
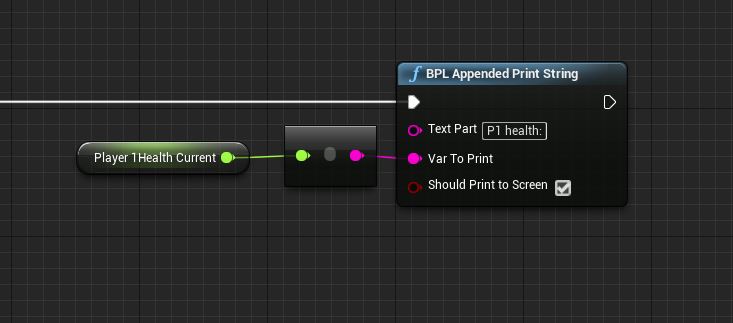
A useful new thing I did for this project was utilising the ‘Blueprint Library’ to make a more informative print to screen. Blueprint Library functions can be accessed from any Blueprint. With my game’s more advanced game mechanics I left in prints until the game was closer to being finished (e.g. the combo system). If you forget where the variable value (such as a non-informative float or int value) is coming from it can be annoying to find. So in the Blueprint Library, to save me time from repeatedly making it in different Blueprints I made this simple function, which allows you to give a little bit more context to your prints.
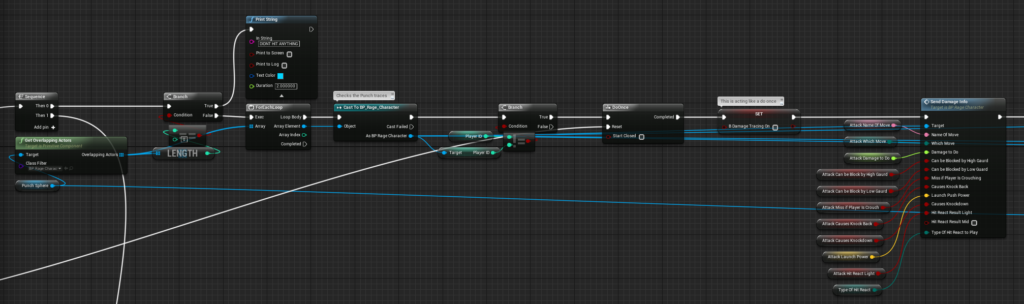
The combo system
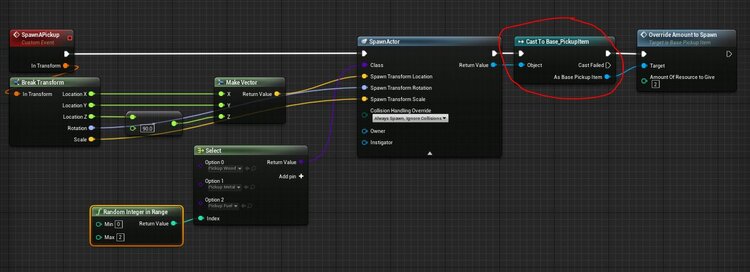
Here is a quick run through of the logic I used to develop the combo system. Before I could perform any moves I needed to know what the actual moves were; which sprite sheet they would trigger, how much damage they would do etc. To do this I created an Object called player_move to store information about each move (see image below). These now hold some redundant information such as “which move” but a lot of it is still relevant such as; “MovesNeededRevers”, “B is crouch move”, “Damage to do” etc. I stored a list of each player’s available moves in an array in their respective player characters Blueprint so that I could access it later.
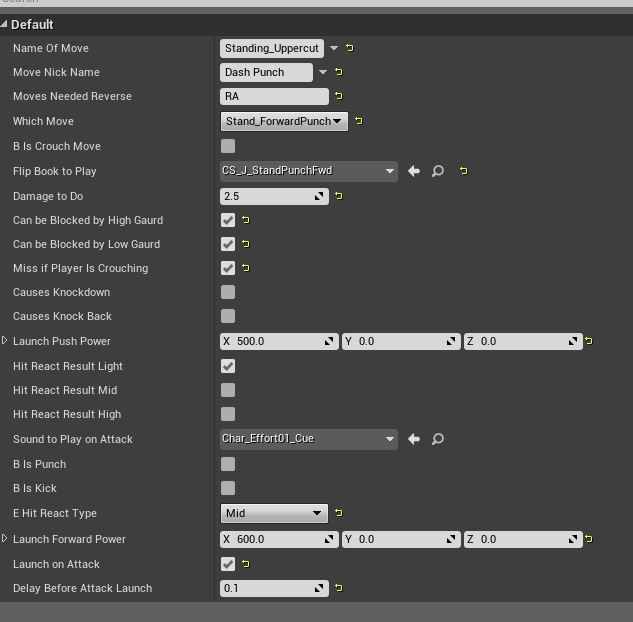
The next step was to find out and record which input the player had pressed. Off each input action, I performed checks to see if an input was allowed, if it was I ran a function to record the input that had been pressed.

This Input Pressed Record function took the input that was fed into it, turned it into a predetermined string value and then added that to an Array of last moves, unless the moves array length was above three. In that case, it would delete the 1st array entry (the oldest move that had been performed). Once this had all been complete I ran a function to determine what move should be performed, if any.

This function was called check move list for attacks and it did exactly what it says on the tin. It would then check the Array of last moves against the list of moves available in the player character. If an entry matched I would pull the information I needed from the move to be used later on, set the sprite to play and activate the damage traces.

I also set a looping function to delete the current move array and current move. This allowed for more responsiveness in the move detection.
![]()
For the damage tracing, I had two sockets on the player that followed the punch and the kick motion. These were set individually through the sprite sheets. When the damage traces were activated they would run the function below on tick, until the move was over or they hit the enemy player. Each tick they would check for an overlapping actor of type player_character. If successfully overlapping they would check it was another player (not self) and if it was it would turn tracing off and send the previously stored move data to that other players take damage function. The player who was hit would then calculate their health loss based on if they were blocking, crouching etc. This system definitely has its floors but it seemed to work okay for what I wanted.
AI that fights
I realised if I was going to have a single-player mode I was going to need an AI to fight back. The AI didn’t need to be super complex and I wanted to keep them clean and simple so I decided to keep the logic in the Ai_Character Blueprint instead of using Unreal Engines AI tools (behaviour trees etc). Rather than starting from scratch, I created a child from the main character for the base of the AI. This meant that I could use all the work I had already done in terms of the health logic, sprite playing, combat moves etc.
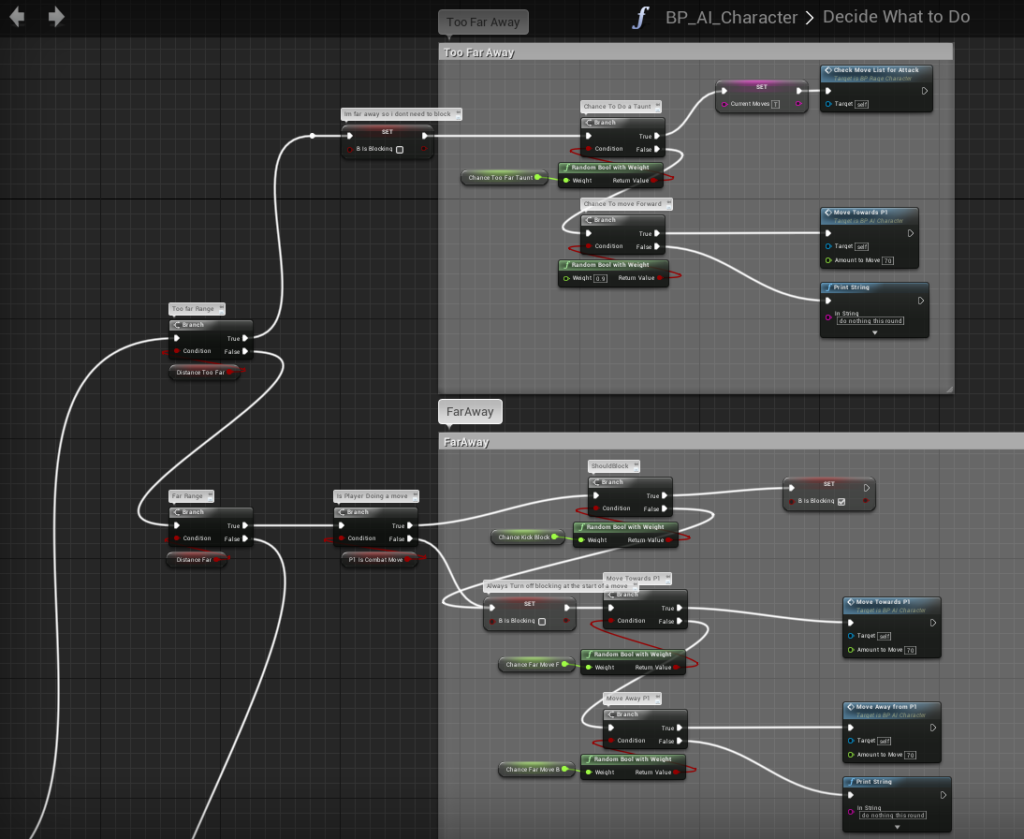
The AI needed to be constantly aware of what was happening in the fight, regardless of if they actually reacted to it. So firstly I setup a function in the Ai_character, off tick that would check certain variables in the human player: is crouching, is attacking, Location etc (Off tick was greedy but as not much was happening in the scene, I hoped I could get away with it). Later on, I would make use of this information.

External to the ai_character I made an ai_difficulty object, storing float variables which I could use to drive the difficulty e.g. chance to block, chance to move toward or away, chance to taunt etc. The most important value here is the AI thinking speed. An example of the Tournament 1 AI settings:

When the AI spawns in it checks and sets its settings from its assigned ai_difficulty object. Then when its Event Begin Play is triggered it kicks off a looping timed function. I used this as a base level for the AI difficulty. The quicker the timer the faster the AI can think and make decisions; should I block, should I attacketc.

Next, comes the decision making part. When the make decision function is run (from the timed looping function above) the AI calculates the distance to the player and then decides what to do on a case by case basis. I made four distance ranges: punching range, kicking range, far and too far. Each of these has a set of moves that can be carried out, for example too far has either taunt, move forward or do nothing. Whereas at a kicking distance the AI can choose from move forward, backwards, kick or block. Within these different ranges, I used a random float chance to drive bool branches based on the setting from the ai_difficulty object fed in on its creation. I found that with only a handful of variables I was able to create interesting and difficult AI. This system was easy to expand on, as I could just add in another branch check, as I did when I got the AI to perform specials moves.
THINGS THAT DIDNT MAKE IT/DIDNT WORK OUT
The idea with my smaller games is that I use shorter development cycle to stay motivated. Rage was taking a lot longer than I wanted, so in order to get it finished, I decided to drop/not explore some features that I thought could add to the game.
Move buffering
At the moment I clear the player’s current move list (list of their most recent inputs) on a regular basis (o.8 of a second). However, even so, there can be slight pauses and a chance to miss players input in-between clears. If I really wanted to make gameplay run smoothly, I would like to look into implementing move buffering: Storing the player’s next move during their current move. Move buffering is a common mechanic in fighting games and can be used to great effect to create fluid gameplay.
More advanced AI
In the end, the AI worked out okay. I could get enough variety out of how they fight to make them interesting, nowhere near as interesting as fighting a real player but good enough for this project. If I was to expand on them in the future, I would like to make the AI remember the moves players had made. Then use this information to catch patterns and adapt to how the player fights. E.g if a player repeatedly attacks with one move, using that information to affect the weighting in the AI’s decisions as to what attack they should use. However, this would not be simple and it would mean reworking and building upon the system that is in place. For this, I might use Unreal Engines AI tools instead but for now, it is a bigger job than I wanted to do.
Stamina bar
I toiled with the idea of having a recharging stamina bar with each move removing a set amount of stamina. This is something that I have not seen in a fighting game before, instead it is more commonplace in the survival genre. In the end, I decided to leave this idea for another time as the project was already running long and I wasn’t sure it would work. As pausing to recharge your stamina bar could break the fluid flow of gameplay.
Cutting attack moves
For each character I actually video recorded a jump kick, jump punch and simple grapple/throw move. In an attempt to finish the game I cut these attack moves as I would have had to implement new systems to get them working. In the future the grapple/throw might be something I think about putting in the game to combat too much blocking E.g. you can successfully grapple and throw if another player is blocking.
Four player mode
I thought it could be interesting to have a tag team style gameplay 2 Vs 2 players game mode, with recharging health when not in the match, like in Marvel vs Capcom. However, I initially built the game with 1 Vs 1 in mind and was going to add in the extra player functionality at a later date. In the end, I dropped this as I left it too late in development meaning I would have to rework a lot of systems, spawning, UI etc. If I had built the game up from day 1 with this 4 player gameplay in mind, it would have been less hassle than reworking a bunch of system at the end of the project.
CONCLUSION
Although my motivation for making this game went up and down, I’m glad that I pushed through to finish it and now I have even more respect for fighting games, especially things like Injustice Gods Among Us 2 which is so fluid and polished. If I was to make the game again I would make sure to use a green screen from day one and I would also think more about the characters’ clothing choices, making them more 80s-themed. However, even though I have a good pipeline down now, I would think twice about making a game with this art style again, simply because of its time consuming-ness. Overall I had fun, learnt a lot, my friends at the office enjoyed the game and I hope other people will do too.
On to the next game!
My name is James, I’m an indie game developer (@cbGameDev). I make bigger games with my friends in a studio I helped start up and make smaller games on my own in my spare time! I enjoy the challenge of working on big scale games in a team and I use the smaller games to have some fun, learn and stay motivated through shorter development cycles. This is my first postmortem, I thought it could be interesting to others and useful for myself to reflect on the process.
Play the game here: bit.ly/2fZcWSI
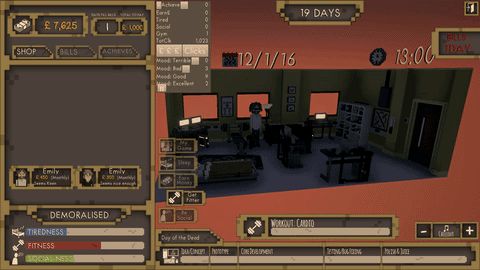
What Is Indie Dev Story?
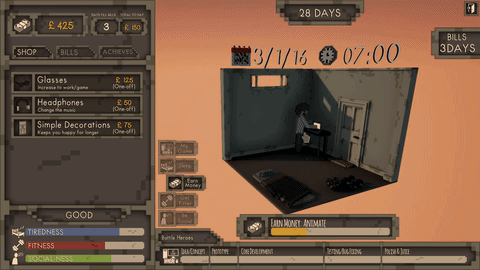
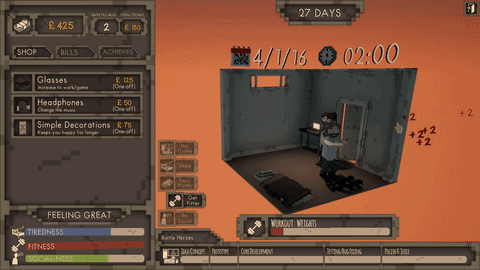
Indie Dev Story is an Indie Developer Clicker Adventure. It’s like a biography of some of the things myself and the other guys have been through, from sleeping on the floor in a basement flat to getting an office space and releasing a game to Steam. The characters in the game are based on the team I work with and the items that you buy are all things relevant to my journey!

Why The Clicker Genre?
I wanted to capture that frantic feeling of being indie and trying to balance everything; working on your game, paying bills, sleeping enough, staying fit and keeping up being social. I had played Cookie Clicker and Clicker Heros before and I liked their intensity but noticed that as you get further into the game interest can fade. I wanted to make Indie Dev Story a short and sweet playthrough, aiming for roughly 8 min from starting in the basement to releasing your game.

Timeframe
I aimed to make the game in a month, but things got pretty hectic at work and often I wasn’t leaving work till 10/11pm 7 days a week. In the end, I made the game over roughly 2 months, making it in 1 or 2-hour chunks in the evenings/early mornings before going to sleep. This was a bit tough as I was tired and sometimes you need more than a few hours to get into something properly. However, at the same time, I think it was beneficial in other ways. Every time I started up the editor, I would play through the game and make notes with fresh eyes on things that would make the game better across the board (sound, UI, animations etc). I usually did a few of these smaller changes straight away as a fun way to warm up before hitting some of the bigger more time-consuming things, like adding a new mechanic.
Below is the original idea that I wrote down while on a train journey:
Engine & Art Style
I used the Unreal Engine 4 as I know it quite well now, it’s powerful and blueprints are perfect for someone who doesn’t know C++! For the art style, I wanted to try something new. I went with a voxel style because I thought its clean simple look would complement the simple gameplay (2 buttons).
Below is some of the key reference that I used:

Modeling
I looked into voxel programs and in the end went with Magicavoxel (Voxel.codeplex.com). I modelled in Magicavoxel and exported the meshes out as obj’s, then imported them into 3DS Max so that I could tweak them slightly. There I turned them into editable polys, welded the vertices together and applied a harsh angle smoothing group. I set polys with different material ID’s where I wanted different colours to be. I found I could use UVW unwrap to select groups of polys based on their UV position, then collapsing the UVW modifier and hitting poly selection, the selection from the unwrap would still be there (This was a quicker than hand selecting each poly). Then setting the material ID number from there. Then I imported the mesh into Unreal and coloured it in engine using materials. I created a simple master material, which had a parameter for changing the base colour and then created material instances off of this. I used this method to colour ever mesh in-game with solid colour without having to do any unwrapping. This was great because it allowed me to change colours on the fly in engine, rather than reimporting and taking the time to texture uniquely. I thought about adding a low opacity paper texture with the base colour, but in the end decided against it as I would have had to unwrap everything to another UV channel.

Animation
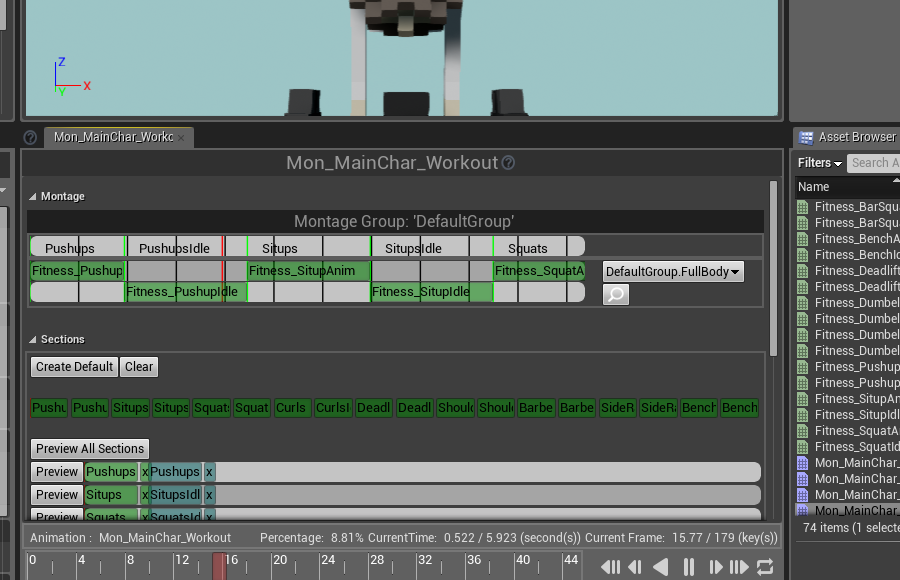
The characters were made in much the same way. Modeled in Magicavoxel, rigged up with biped in max and animated with a few keyframes. Generally, I did 3 or 4 keys over 10 frames. Frame 1 and 10 were the same for looping, then depending on the animation, a key around frame 4 or 6. I tried adding keys for overlap and anticipation but the animation just got lost as everything was so quick. In some animations I held poses for a few frames to try to emphasise the movement, like with the weightlifting fitness animations. Without the hold it didn’t look like it was a struggle. I also tried stepped interpolation of keys but preferred the movement of auto spline curve with a few tweaks here and there.

I used biped layers to try to keep the animation cleanly and in one max file. First creating a layer which was the idle pose e.g. “FitnessIdle01”, exporting that, then creating another layer on top, adding simple keys over the top for the actual movement e.g. “FitnessAnim01”. When complete, I turned the visibility off on those layers and started the process again for a new set. I made the two seperate animations because of the way I wanted to play the animations in engine. In Unreal I did the moving around animation through the animation blueprint, using a 1 Dimensional Blend Space, going from an idle to a looping moving animation. I could have done the task animations through the animation blueprint state machines as well but I thought it would get messy so I instead used Montages. I would play the animation and then have it feed into a looping idle for that animation.
Example of 1 dimensional blend space (Left), Montage setup (Right):

Unreal Blueprints
In terms of the coding of the game, I used Unreal’s blueprints system (like a visual code). Although it can get pretty messy looking, it is fantastic for people like me who don’t know C++. It’s tough to show the code because it is across multiple places and functions making it hard to fit into a few image, so instead I’m going to try to explain roughly how/where I did certain functionality and some of the things I found useful. The core places I had code were: the Player Controller, the Player Character, the Hud Widget, the Buyable Widget, the End Screen Widget and the Ai_Character in the world.
The Player Controller
The Player Controller is the most important, it held all the time/date controlled functionality and this is where I stored most of my more important variables. It controlled the meat of the game; the game state, UI shop refreshing, lights turning on and off, freelancers coming and going, rent bills, achievement checking and more.
The Player Character
I used the Player Character to handle anything tied to the controls; filling the task bar values telling the AI characters in the world which animation to play (through montages). Generally, the Player Character sent information back to the Player Controller to be stored or would send information directly to the HUD to be shown.
Hud Widget & End Screen Widget
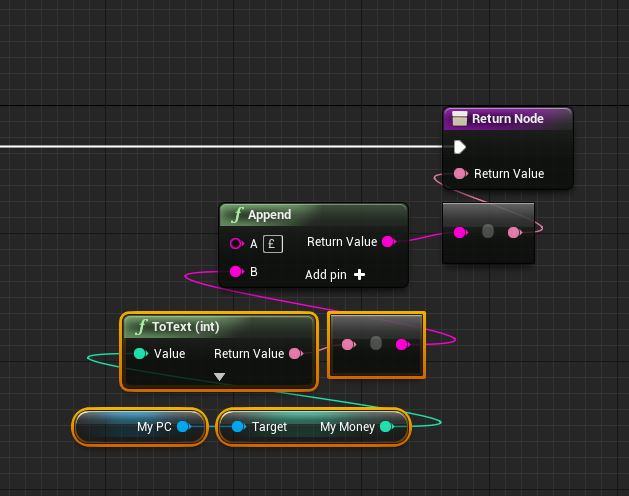
The Hud Widget is another important place for BP code as it is the front end and what the player directly interacts with. A lot of information travels back and forth between it, the Player Controller and the Player Character. I try to limit the functionality in here, instead making it more about manipulating the data to make things clear for the player. An example of this is using Append, to join values together to make them more explanatory, for example adding a ‘£’ to the money as you can see below (note you can only call Append on strings). The End Screen Widget, has a slight more functionality in it. On construction (its creation) it grabs the values it needs from the Player Controller and Player Character and calculates the end scores and shows it there and then. I’m not sure, but I think this might be bad practice. If it was in the Player Controller it would be easier to access if I needed to, but as it was only going to be used this one time I thought it would be okay.
The Buyable Widget
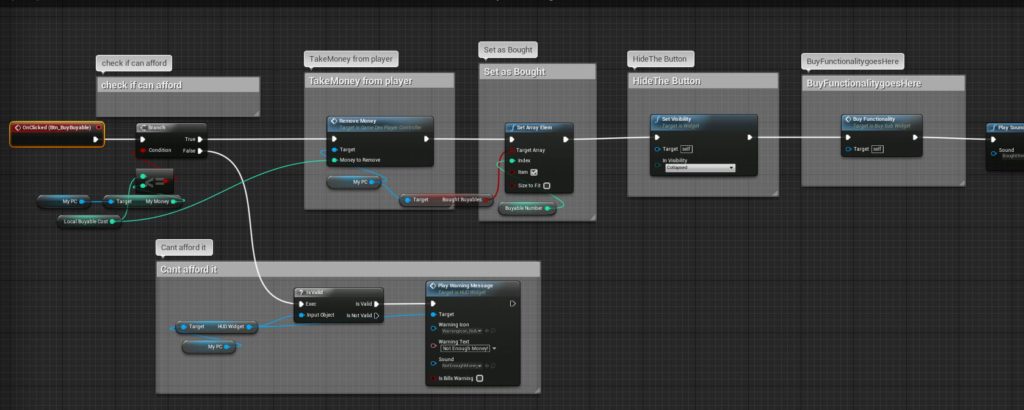
As a separate widget is needed for each buyable item in the game, if I was to hand make a widget for each buyable item it would have been a nightmare anytime I change something. A trick that I use all the time in the office is whenever I have a widget that is going to be used more than twice I make a “sub widget”. These can be complex to set up initially but are fantastic when they are working as it means you only have to change the master widget and it will affect all the instances of it! In the Buyable Widget I create an int variable that can be set externally (by clicking the eye icon on). Then use this value to drive the functionality inside the widget. Off construction I set up the look of the widget using a switch by int. Then off the button press I do the same thing, running a switch by int to feed the correct functionality, first performing a simple check to see if you have enough money.
Make a new widget with what you want:
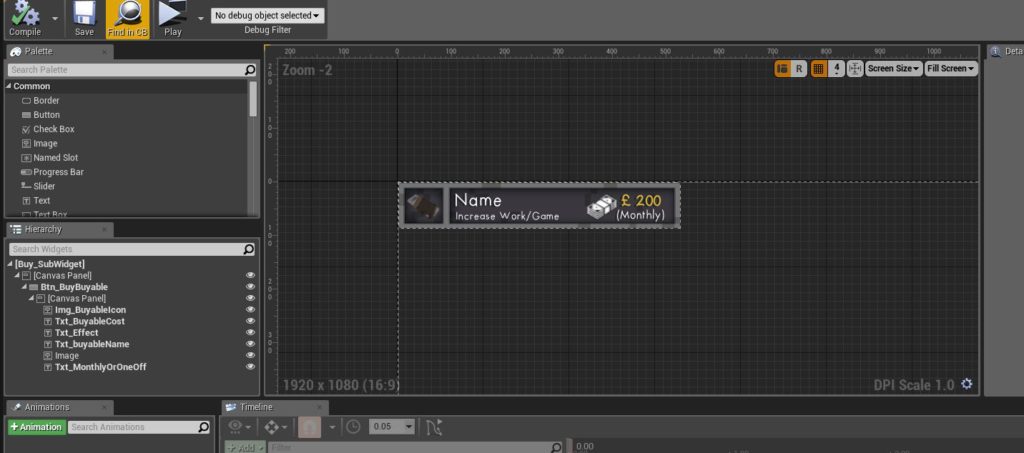
Add a int variable that you can set externally (the eye icon). Then off construction set up the look of your widget based off of that:

Use the same int to switch functionality off of the button click (I have a switch on int my buy functionality function):
The Ai Characters
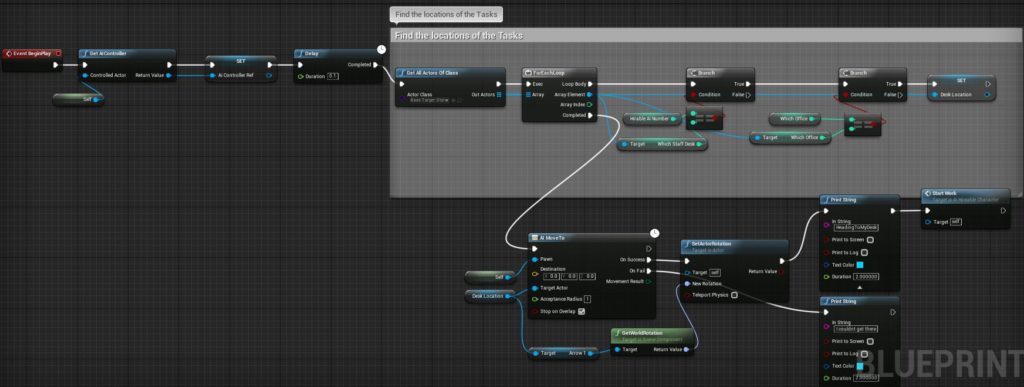
The main player, friends and the freelancers all work in pretty much the same way, although the main player is slightly more complex. I didn’t use any behaviour trees only the Ai Move To node. The friends and the freelancers are told to spawn by the Player Controller. I use their event begin play to drive most of their functionality. They grab the appropriate location in the world and then use the AI Move To node to navigate there. On success, I rotate them to the correct direction and then kick off their functionality and looping animations. When it’s time for them to leave, the Player Controller does a check for all currently in the world and tell them to finish work. They return to the start position and on success destroy themselves.
Example of the Ai Characters functionality:
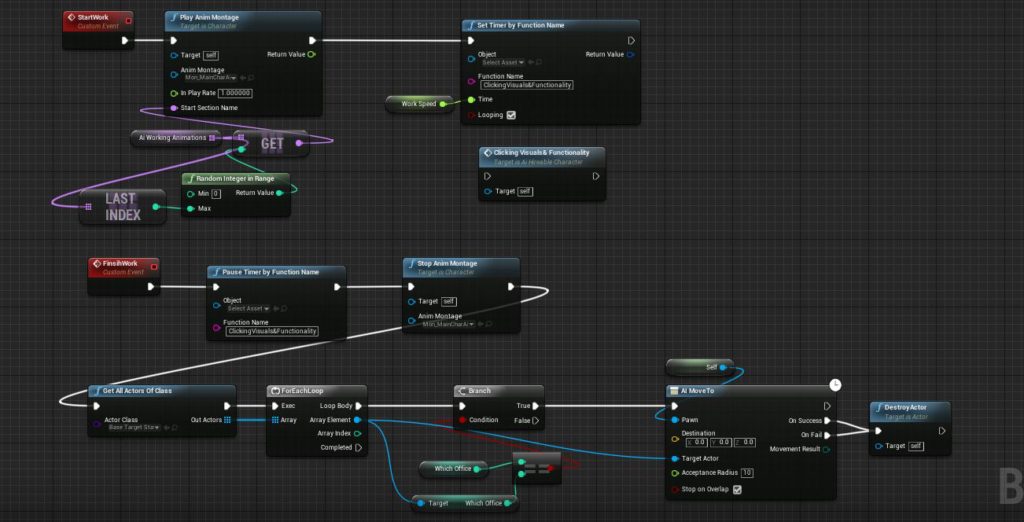
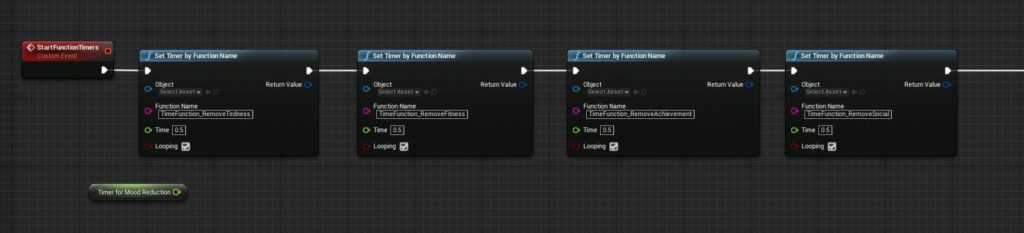
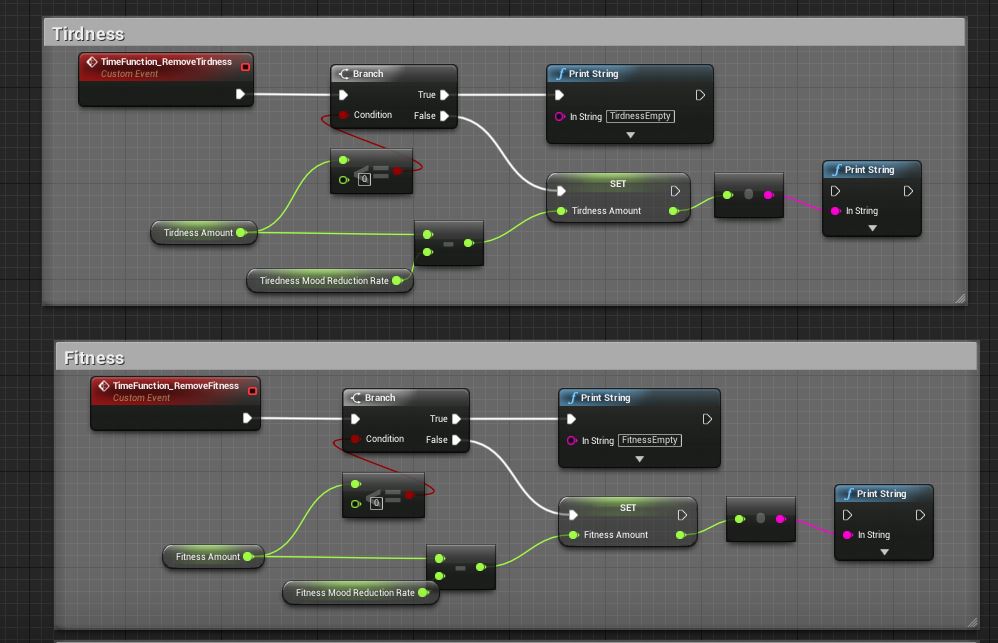
Timer By Function
One cool thing I discovered and ended up using a lot was Timer By Function (https://docs.unrealengine.com/latest/INT/Gameplay/HowTo/UseTimers/Blueprints/). Originally I used tick, bools and do-onces to run looping functionality, however I read in lots of places that using tick should be avoided where possible as it’s greedy. With the Timer By Function you can set it to call a custom event (looping if you want) after X amount of time, making it a lot more efficient. I used it in many places across the game, an example being the player mood bars in the bottom left. I set these off my begin play to loop continuously. You can pause these timers as well which is useful. The only problem I found was that you couldn’t feed variables through them, but in cases where I needed this, I would just pull the information instead of feeding it directly into the custom event.
Example of the Timer by functions setup for the player mood:
Example of the custom events that I would call:
First Steps
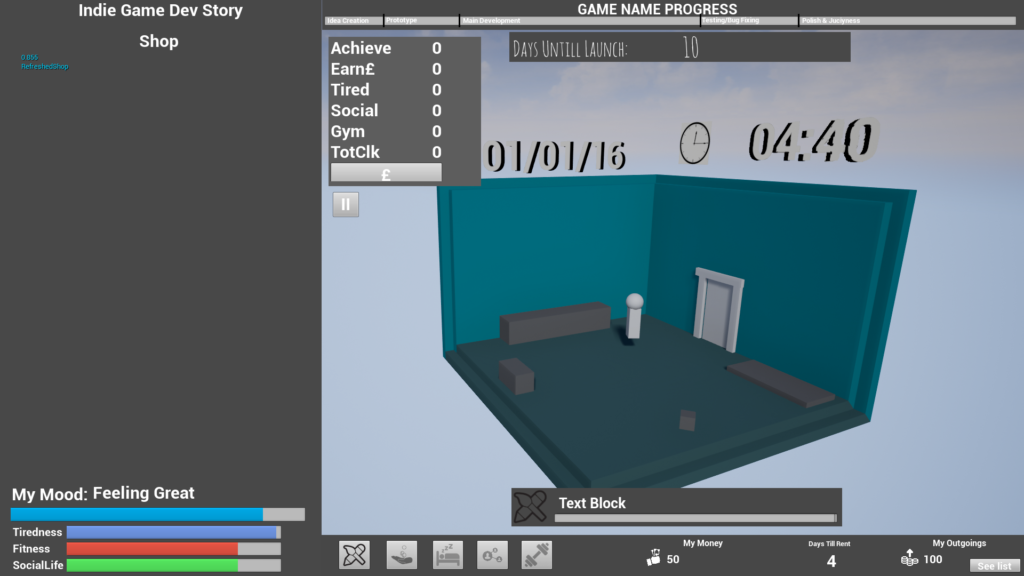
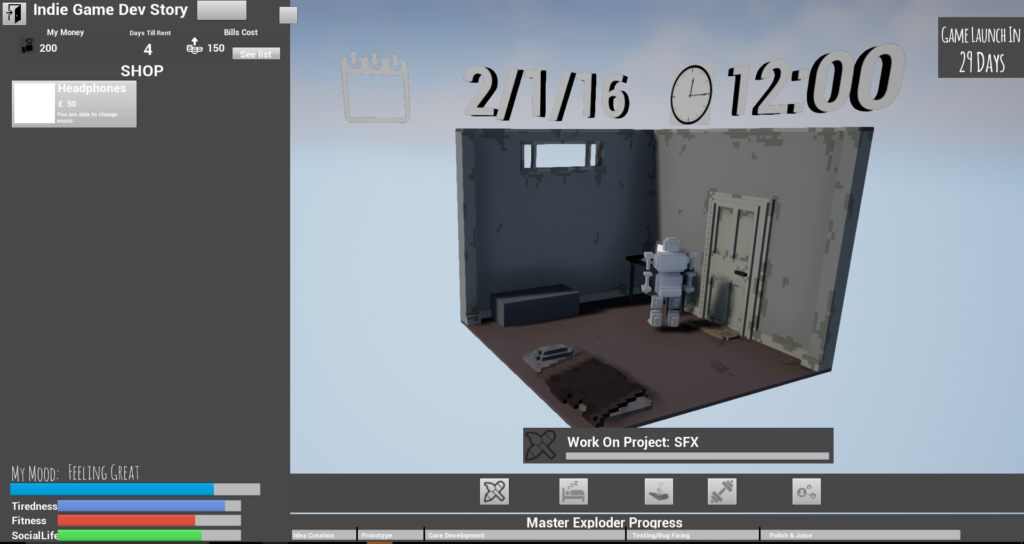
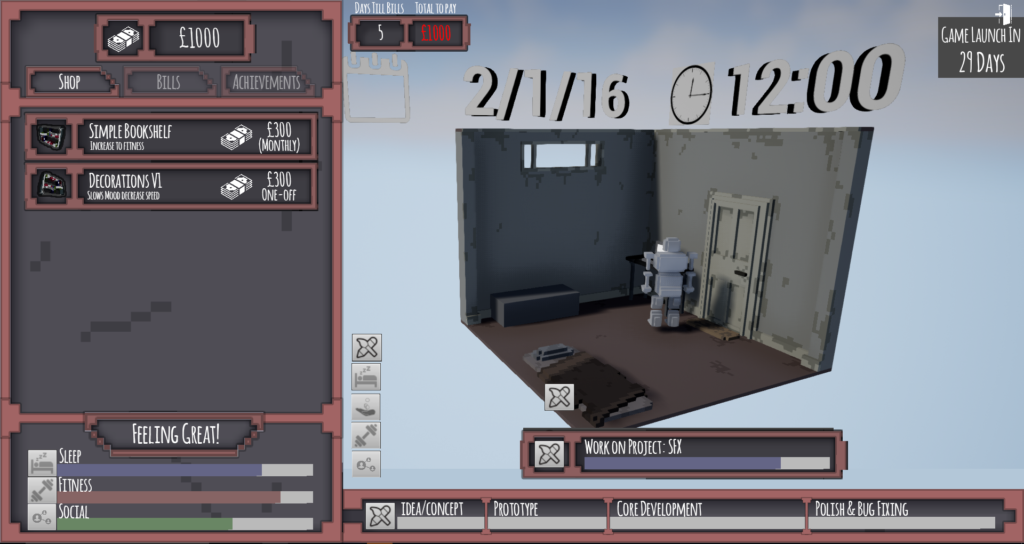
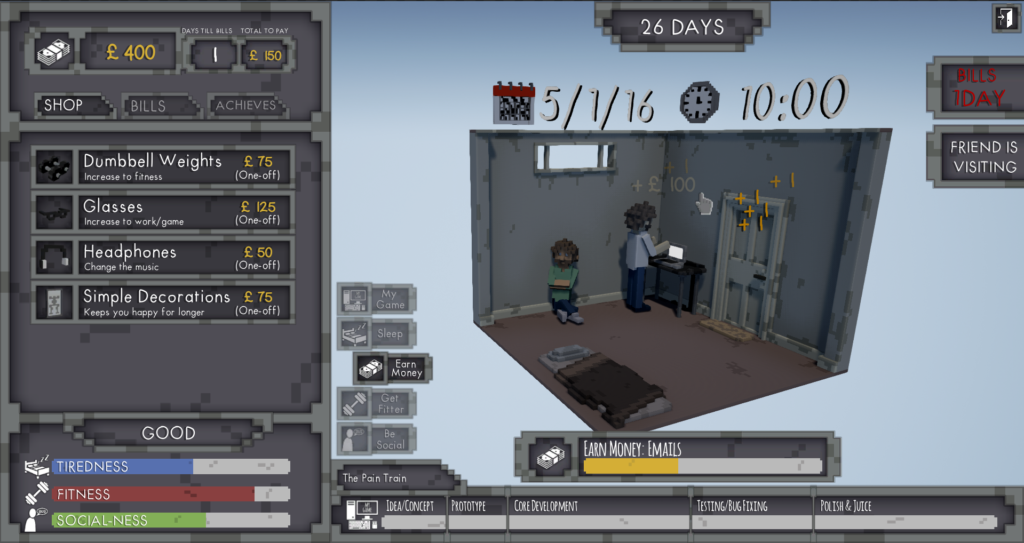
I started off getting a basic menu flow together and setting up the core controls and functionality; left click – performing task, right click – switching task. Then moved onto tying this functionality into the visual bars and getting an AI character to move around the world depending on the current task. From then on I slowly added new mechanics and tied them into the UI as I went along. Examples of the other mechanics were: time until launch, bills, fail game state, buyables, hiring freelancers, friends visiting, achievements, tutorial etc.
Below are some gifs from builds I cooked off as I made the game:


Hitting An Art Wall
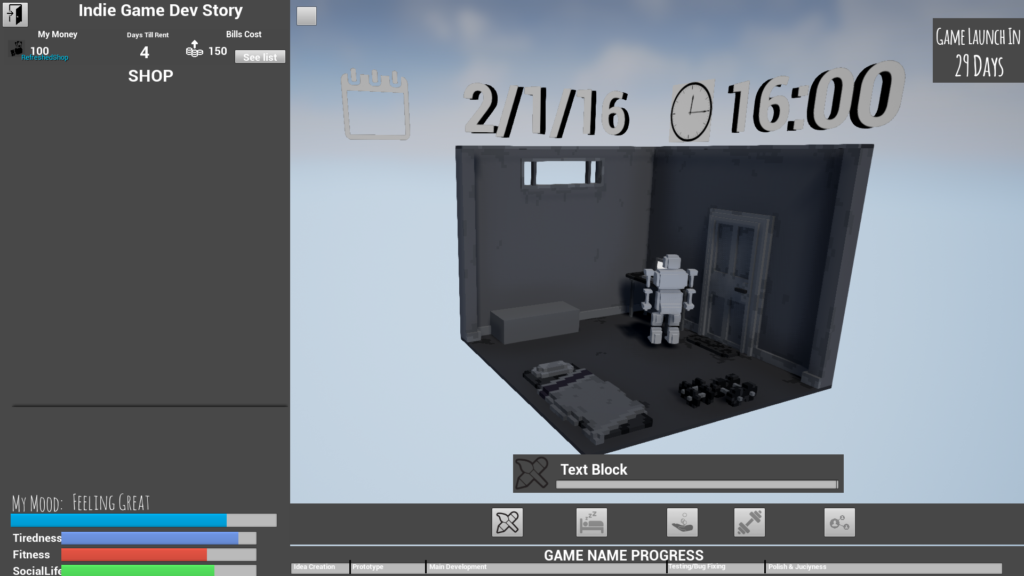
After a while, I got to a point where I had a bunch of the mechanics working but the game wasn’t really feeling fun anymore. Without the art, everything was feeling a bit rubbish. UI, models, characters, animations etc, everything was placeholders at this point. So I started on a first pass of the art; making a more detailed room, a bed, weights and a voxel placeholder character with some basic animations. As soon as I got these in the game started to feel fun again!
Putting Off Making The End Game
I had the game fail state in early on and I knew roughly what I wanted the end game win condition to be (releasing your game and getting a score) but for some reason I put off making it for ages. Bad development I know right?! I’m still not quite sure why I put it off so long, maybe I thought I needed more than a 2 hour period to make it. Next game I will definitely get the end game in earlier as it made it a lot harder to get a proper feel of the game.
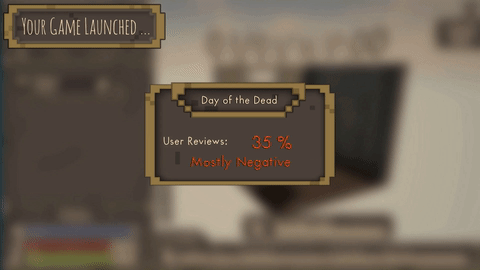
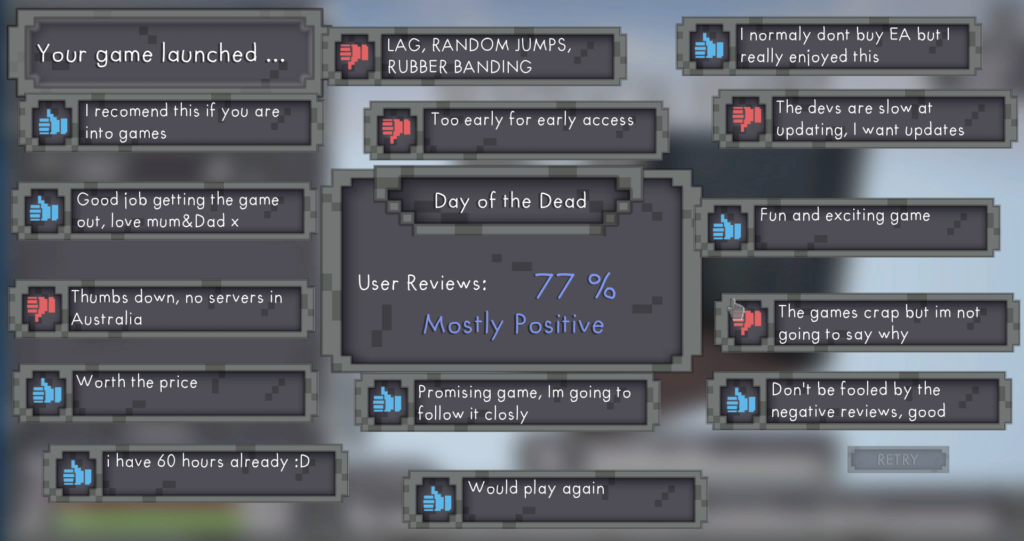
At the end of the Indie Dev Story, you release your game and watch your steam game rating go up. To calculate this score, firstly I gave the player a value based on how far through development they got, then applied a random “market mood” value (0 to -10). Finally, I calculated your mood over the entire game and combined all the values together (if you had neglected your tiredness, fitness and socialness you would lose some score) and filled the comments based on how well you did. If you did badly you would get negative comments, if you did well then you get positive comments about yourself and your game. I looked at real steam comments for a bunch of them and used some actual ones that got on our game as well.
Getting A UI Look Was Tough
About three-quarters of the way through the project I hit another wall where I felt something was missing, the UI. I had been tweaking the UI constantly, but it was still all placeholder art and it needed a boost. So I started concepting out a new UI look. I found this hard as nails and it took me a few evenings but I eventually came up with what you can see in the examples below. I tried to make the UI look match the world, voxels with dirt and grime. As the player continues through the game and moves to better office spaces, I wanted the UI to look cleaner as well. I made three versions of each UI asset; Dirty, Mid and Clean swapping between them when the player switches offices. This was time-consuming as I had to grab a reference to each UI element in the HUD and end/fail screens and switch them to the correct version. I made one function in my HUD Widget so that I didn’t have to set this up multiple times.
Zoomed out version of the change Full UI Look function:

The easiest way I found to get the look was to quickly model the shapes I needed in Magicavoxel, then render them out with transparent backgrounds. Bringing them into photoshop I then had a little pipeline of effects layers and dirt effects that I added on for each version needed; Dirty, Mid and Clean.
Placeholder UI:
Concept of new UI look, in photoshop:
Final look UI:
An example of the three UI looks (as you switch offices):

Development Problems
Below is a list of the biggest problems I encountered and things that I think I could have done better:
Cooking Error Due To A Corrupt Struct
One night while trying to cook my game off it failed repeatedly because of a problem with one of my structs. I googled around and a few other people had this problem, I got around it by creating a new struct, replacing the references and swapping any references to the struct in blueprint to the new one. In my case I was using a struct array that held 2D texture references. I was using this so I could grab the defaults of a certain entry to fill the buyable image in in the UI. It corrupted twice so maybe I was doing something wrong doing it this way?
Issues With The Way I Calculate/Count Days
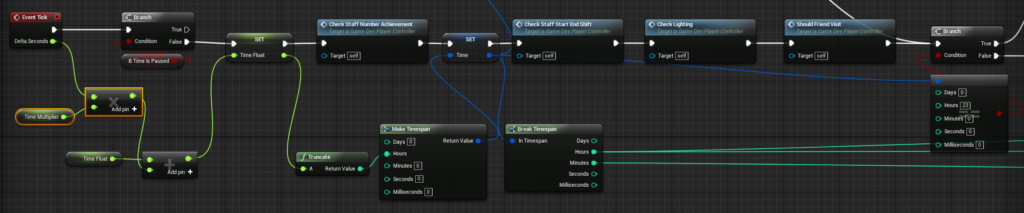
I used tick in the Player Controller to calculate the time of day and run a lot of the gameplay functionality. Tick runs into a timespan variable which stores the time in hours then I did a branch check to see if it is 11pm (23:00), if it was, I considered it a new day and run all the needed functionality. However, by the end of the project I found that this was not the best way of doing things. If you have a lag spike or are running lots of programs on your computer this method can easily fall out of sync and will continue to tick but will stop counting days as if 11pm doesn’t exist. If I was to make this game again I would definitely look into other ways to do this. Possibly putting in a second-time check or remove the value from tick and instead run a looping timed function off of begin play.
Balancing Issues
Originally it always took the same amount of clicks to fill the taskbar which I found destroyed the pace and flow of the game, I completely didn’t think about this when I came up with the idea. Luckily about the same time in our bigger game at the office, we came across custom curves (trying to expose XP requirement amounts to blueprint, rather than C++ to allow for easier balancing). I thought this was cool and tried it in my game to increase difficulty over time. It worked really well, X was clicks and Y was the amount each click filled the task bar. So as you got further into the game it would take a larger amount of clicks to fill the bar, meaning the player would have to buy items in order to fill the bar up more easily again. I ended up making multiple curves to be able to balance the tasks differently.
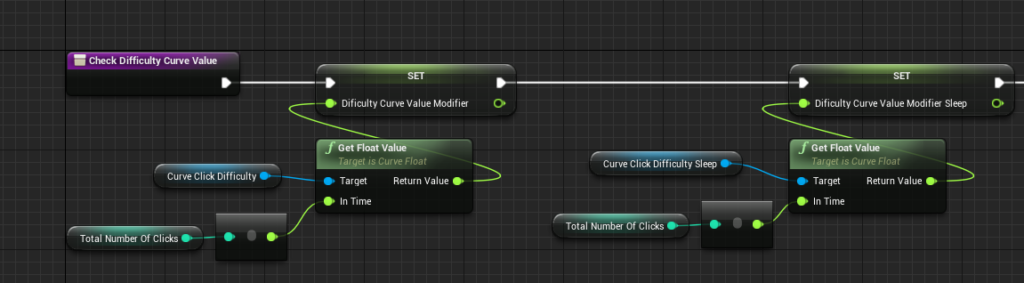
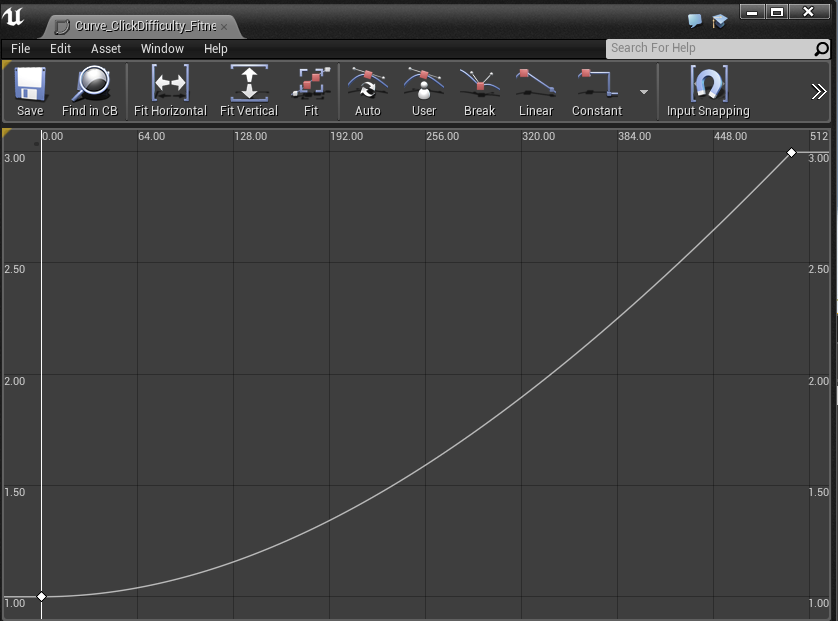
Difference Between Editor & Cooked Builds
We get this in the office on the bigger game I work on as well. The cooked version of the game sometimes acts differently from the editor version. For example in the editor when you finish a task your character will remain in the previous animations idle pose until you start a new task however on the cooked development builds the character stands back up into his default pose. In this case I think it’s something to do with cooked version running faster than the editor version because it doesn’t have to run the weight of the engine at the same time. The best practice I found was to cook builds off often, just to make sure nothing has completely broken.
Start Video Wouldn’t Play On Shipping Builds
This was a random problem. The start video, my CbGamedev logo, wouldn’t play on a shipping build unless I turned on: “wait for movie to complete”. Also, there was talk on the forums that only 1280×720 mp4 25fps videos work (for windows), in case you run into similar issues.
Being Lazy, Easily Missed Optimisations
The game runs at an okay framerate but I know there are a bunch of places that I was being lazy and I could have made more optimised. For example in the UI I used a lot of UMG binds; tying variables directly to a UI element meaning it gets called/refreshed every tick. Instead, I should have created functions that would have refreshed these elements only when they needed to be. Also in some places I used Get All Actors Of Class and Get All Widgets Of Class a lot, when I should have used them then once and stored the results in an array, so that I didn’t have to run the search again and again. I learnt my lesson and next time I will try to be more efficient.
Colours & Being Colourblind
Being colourblind (mostly red-green), colours were always going to be a problem for me. I used a few different techniques to try to and help myself out; Firstly, the Art Style I went for I used solid fill colours. Also I would find ref with a colour that I wanted, load it into photoshop and colour pick to get the HEX values and then use that value in engine and tweak it. Similarly, I would google HEX values for things such as “Gold Hex values”. Then finally I would get my friends and girlfriend to double check my colours make sure I didn’t have any glaringly obvious problems!
Wrist Pain From Testing The Game
This makes me laugh when I think about it now, but when I was near the end of the project, trying to balance the game, my wrist started to hurt from all the intense clicking to get a good score. I have no idea how the Clicker Heros team manage to test their game ha!
Things That Didn’t Make It/Didn’t Work Out
The idea with my smaller games is that I have fun, learn new stuff and use the smaller development cycle to stay motivated. This project started to take longer than I wanted so I decided to tie it up and move on. I might come back in the future but for now, I decided to leave out the following:
Events/Challenges
This was one of the bigger things I wanted to include but didn’t get around to. Events were going to be time limited (e.g. 1 day). If you completed them you would either get a bonus or not suffer a negative effect. Ideas for event types were;
- Computer setting on fire – You can’t use it till you fix it
- Investment opportunity – If successful, you get a money boost
- Do a course – If you complete the course, you get a boost to money earned
- Being sick – You are unable to do anything till you recover
A Boyfriend/Girlfriend Mechanic
This is something I thought could be really cool but in the end I replaced it with the friends visiting mechanic. Socialness while being indie in general can be where many people take a hit (myself included). I thought it could be interesting to have a mechanic where at the beginning of the game you have a boyfriend/girlfriend and if you don’t spend enough time with them over the course of the project then they break up with you, making the late game harder to restore your social bar. In the end I decided to not include it as I thought it would involve pausing the game to show text for the player which would break the flow of the game. However, I tried to keep the becoming less social aspect. It’s quite subtle, but if you don’t spend time with people when they come to visit you, the chance of a friend coming to visit you is reduced.
Team Morale
Originally, when you hired people to work with you I wanted to create a Team Morale/Team Mood mechanic, much like the player has (bottom left of the screen). The higher team morale, the better the work output. In the end I decided against it as the game was too short to make proper use of it and I thought it would make the UI too busy and wouldn’t really add anything. If I ever revisited the game and made it longer this is definitely something that I would reconsider putting in.
Misc Stuff
- Controller Support – The main controls would be easy as they are only 2 buttons but I wasn’t sure how navigating menus would work and didn’t want to spend too much more time on it
- More Animations – I would like to have made more unique animations for the buyables upgrade stages. Like with the fitness buyables, each stage adding unique animations as I think they add a lot of character to the player
- More Shinys – Across the board adding more, UI transitions, sounds, polish etc
- Html 5 Version – I know Unreal can cook to Html 5, but I have no idea if it would work. It could be cool but I would have to look into it
Conclusion
Now that the game is finished I can see a bunch of ways it could have been improved, optimised and made more quickly, but overall I’m happy with how it turned out. I had fun making it, learnt a lot and my friends I work with enjoyed it! I think it would be easy to carry on improving and expanding the game, but for now I want to move onto something new! One last thing, I made sure that I backed up my project files and my source files to a dropbox account often so I had a backup. I hope you found this helpful in some way!
Profile
