Louard
joined
Game developper from Ottawa, Canada currently based in Caracas, Venezuela. I've been a professional artist in the games industry for over ten years working for different studios on a huge variety of games for a number of different platforms including PC, mobile and consoles. I've been making video games and board games independently as a hobby for roughly twenty years. I love to surround myself with smart and insightful individuals from the worlds of both video game and board game design. I've recently left the bosom of gainful employment in order to work on my own projects full time from my new home base in sunny Caracas.
My Blogs (0 - 10 of 13)

What makes a good first level? What sets my first level apart from every other level in my game? If your game follows a mostly linear structure, its first level will need to be designed around very different goals than the other levels. In this Lessons from Suzy Cube article, we will break down those goals as they apply to Suzy Cube and how the game's first level strives to achieve them.
The Goals of a Game's First Level
Before jumping into the particularities of Suzy Cube, I want to explore some of the common goals shared by the first levels in many games.
A first level is the player's introduction to your game. It shapes the player's first impression and will frame the rest of the game experience. Often, your first level will serve as an introduction to your game's story and its gameplay mechanisms. You may use the opportunity to reinforce lessons learned in the game's tutorial or use the level itself as a platform for teaching basic skills.
In addition to serving as an introduction, your first level also sets expectations and gives a taste of what's to come. Players may make up their minds about your game as early as the first level, so put your best foot forward.
Not Your Average Level
In order to better understand what sets Suzy Cube's first level apart from the game's other levels, it's important to understand the goals of a typical level.
A typical Suzy Cube level is built on the idea of introducing a gameplay concept, building upon that concept, then challenging the player on their mastery of that concept. This structure is explored in closer detail in this level breakdown from a previous article.
Though not all levels in the game adhere quite so closely to this structure, they are all built around a concept, a design pillar if you will, which makes the level unique. What makes the game's first level different is that it is not built around a singular concept or gameplay hook but, instead, around the idea of teaching players while drawing them in.
Suzy Cube, Level 1-1
Suzy Cube is not a story driven game. The flimsy premise is totally incidental, so the first level concentrates on being an introduction to what makes Suzy Cube fun, its gameplay. In broad terms, the overarching goal of Level 1-1 is to give players a feel for the fun they can look forward to throughout the game's five upcoming worlds.

The opening moments of the game
The game opens with Suzy, the player character, standing on a small stone riser. Notice how the slight angle of the camera, the guardrails to the left, the line of coins to the right and framing Suzy such that more of the path ahead of her is visible all work together to give players a sense that their adventure awaits, to the right.

The start area offers a lot of room to explore
The goal of the level's opening area is to allow players to experiment and familiarize themselves with the controls and the feel of the character. Though players must move to the right in order to progress, they are given a lot of room to explore widthwise and are rewarded with coins. Players, thus, have an opportunity to learn how to control Suzy while learning the value of venturing off the main path.

Gift Boxes often contain Power-Ups
Progressing to the right, players will come across the game's first Gift Box. There are a fixture of Suzy Cube and can contain a variety of prizes. This one contains the game's most basic Power-Up, the Heart Hat. Gift Boxes are opened by jumping on, or "bopping", them. The coin, suspended above this gift box, helps to entice players to attempt this rather than simply avoiding the Gift Box altogether.

The game's first challenge
Next up are the game's first two challenges. First is a floating platform meant to test players on their ability to jump. They will have to jump onto the platform then across in order to proceed. What awaits them on the other side are a pair of Skulls, the most basic enemies in Suzy Cube. Here, players can learn to avoid them, bop them or even learn that the Heart Hat can allow Suzy to be hit once without dying.

A reward for the curious
For players who decide to explore what lies at the bottom of the hole next to the Gift Box an optional path leads to a Star, an important pick-up for progressing to later levels. Notice how the blue stairs leading back up to the main path but do not lead to the other side of the floating platform pit. There's no way around the floating platform challenge ensuring players learn to jump.

More rewards for the currious
Exploration is further rewarded in the Skulls area. Though the grass path at the top of the image clearly denotes the way forward, a short jump up and to the right will reward players with an Extra Life!

A trickier jumping challenge
Beyond the encounter with the Skulls, players are then forced to move northwards to proceed. So far, they've only had to move sideways to do so. This reinforces that they are playing a 3D platformer and that their perspective on the action may vary throughout the game. This section also presents a new challenge: Moving platforms. Players will have to time their jumps to get across. Though falling may yield its own rewards.

What have we here?
The bottom of the pit leads to some coins and a teleporter. Thus introducing teleporters and...

What indeed?
A bonus area! This timed challenge will earn players another Star if completed. This will, hopefully, teach them to expect the unexpected and look forward to what other surprises the game may have in store.
So far, none of the level's jumping challenges have asked players to jump over bottomless pits. Remember, your players are still learning. Your first level should be very easy, in fact all the World 1 levels in Suzy Cube skew to the easy side of the scale.

Where could this lead?
Moving on, players may be tempted by this break in the guardrail to attempt this treacherous looking jump.

A sneaky trick
Brave players are caught by these yellow blocks which appear in the nick of time. Their reward? A secondary path leading to more coins and another Extra Life!

A nice place to stop
Moving along, players have a chance to take a moment and enjoy the view.

Know where you are heading
In fact, stepping onto the lookout gives a view of the level's goal. This isn't just to rip off Super Mario 3D Land, sprinkling in these unexpected touches helps to surprise players and surprises keep them engaged.

Giving Suzy a boost
As players make their way to the end of the level, they will be faced with a more aggressive variant of the Skulls as well as a plateau which can only be surmounted by use of the Jump Pad. Notice how the column of coins hints at the Jump Pad's function. Incidentally, the Jump Pad also foreshadows the second level's core concept.

And down to the goal
After a quick climb up a set of rocks, players will find themselves face to face with the level's last challenge as a Star hangs in the air. Players who fail to get the Star when jumping down will still be able to reach the goal, but a deft jump is justly rewarded.
Let's Wrap This Up
As you can see, Suzy Cube's first level is not based on a singular concept. Your game's first level is not the time for gimmicks. It should, instead be a preview of what's to come. In a previous article on variety, I wrote about the value of making each of your game levels distinct rather than filling each of them with a smorgasbord of gameplay mechanisms. This is not the case with your first level. It should give players a sense of what they are in for, what they can look forward to.
So, to recap.
- Give players a space to learn and get a feel for the controls and introduce basic gameplay concepts.
- Give players a taste of the variety the can expect from the rest of the game.
- Surprise your players! Surprises lead to player engagement and should cause players to wonder about what other surprises the game may have in store.
- Your first level should be easy. Your players are still learning, it's not the time for harsh punishment. Players who give up on your first level are lost forever.
In Suzy Cube, Level 1-1 acts as a setup for the whole game. In a way, it's the game's most important level. It must engage new players and entice them to keep playing. This is true of any game's first level, so don't neglect it.
As a side note, when I started work on designing levels, I chose to tackle this one first, but there's an argument to be made for leaving it to the very end of development. I wanted to make sure it received the most opportunities for iteration, but it can certainly be worthwhile to leave the design of your opening level to the end of the project when you've got all the experience from designing the rest of the game's levels to apply to this unique and uniquely important level.
Originally posted on louardongames.blogspot.com

Welcome to the third and final article in a series examining the camera system used in Suzy Cube. This series dives into several aspects of the game’s camera system with each describing a particular set of features. These articles also follow the chronological order in which the features have been implemented into the camera system.
In the first instalment, we covered the initial functionality of the camera system as well as familiarizing ourselves with the camera rig used in Suzy Cube. In the second we looked into a couple of ways the system was extended to offer an even better experience to players and finally, in this article we will cover three more additions that were made to further round out the robustness of the camera system and ensure a top notch gameplay experience.
Camera Limit Trigger Volumes
The first of these additions is a new kind of trigger volume. Much like the Camera Manipulation Triggers introduced in the first article in the series, these are activated when entered by Suzy though their effect is much simpler. All these triggers do is bar the camera from moving along a particular axis while Suzy is within the trigger volume. This, for example, allows the camera to stop following Suzy as she reaches the outer limits of a level. This has the subtle effect of helping players feel the edge of the level intuitively, thus subconsciously guiding them to the right path. Compare these two examples:

The camera follows Suzy all the way to the edge.

The camera stops before Suzy reaches the edge.
In the second example, you can probably imagine how the camera not following all the way to the edge might act as a hint that the level does not, in fact, keep going beyond the drop.
Rules, though, can be broken for the right reasons, which is why these triggers can also be made narrow enough so Suzy can emerge on the other side at which point the camera will start following her again. This kind of functionality can be perfect for hiding secret paths which, at first blush could seem to be outside the bounds of the level.
Speed Based Camera Trucking
The next new piece of functionality which was recently added, along with Suzy’s new ability to break into a sprint, is Speed Based Camera Trucking. This is an extra bit of of trucking (forward and backward motion) which is added to the camera based on Suzy’s speed. Now, as she speeds up, the camera pulls back.
As Suzy's speed increases, so does the camera distance.
With increased speed, players have less time to avoid dangers, by pulling the camera back, they are given a wider view of the play field which helps in avoiding those dangers. As a side benefit, it also helps to add an extra sense of dynamism to the camera’s behaviour.
Fall Based Camera Pitch
And the final addition to the camera system is another piece of reactive behaviour meant to help players land long drops, especially when using the Double Jump power-up’s short gliding ability. This new functionality works using an internal timer which counts up as long as Suzy is falling and resets whenever she isn’t. Based on this timer, an additional amount of downward pitch is added to the camera to better show what is under Suzy and help players land those long jumps and drops.
Camera pitches downward as Suzy falls.
Some limits are, of course imposed so that the camera won’t exceed a certain pitch, especially if it’s already pitched downward quite heavily due to a Camera Manipulation Trigger set in the level. This is, simply, another way the camera tries to work in the player’s favour as much as possible.
So, there you have it, the many pieces of functionality which come together to form the camera system in Suzy Cube. One of the main lessons I continue to learn and relearn is that looking beyond the simple, naive approach to solving problems is often what separates an okay implementation from a great one. I’m not saying the camera work in Suzy Cube is, necessarily, great but I’m proud to say I’ve taken many steps to try and get it there.
Originally posted on louardongames.blogspot.com

Welcome to the second of three articles in a series examining the camera system used in Suzy Cube. This series dives into several aspects of the game’s camera system with each describing a particular set of features. These articles also follow the chronological order in which the features have been implemented into the camera system.
In the first article, we looked at the basic setup for the camera rig used in Suzy Cube and went over its core functionality. In this article, we begin to look at those less obvious features which help the camera be more responsive, less intrusive and more helpful for the gameplay, overall.
Reacting to Jumping
Suzy Cube is a platforming game and, as such, involves a lot of jumping. In the previous article, I described the way the camera moves around to follow the player character, Suzy around the level. This is true, along the X and Z axes, parallel to the ground, but when jumping, some special rules come into play. So, why special rules only when along this one axis, wouldn’t simply keeping up with Suzy be good enough? For those who are curious, that would look something like this:

Side view diagram of the camera, parented to the blue diamond, following Suzy up and down perfectly as she jumps.
Yes, this would be serviceable, and was, indeed, how my first implementation worked. It was, unfortunately, prone to two problems: First, it made it hard to see where Suzy might land as the ground would often fall out of view of the camera during high jumps, and second, during short hops, it made the camera too jumpy and made things less pleasant to play as small hops translated into a lot of fast screen movement.
The solution was to intelligently focus the camera’s up and down motion not on Suzy herself, but relative to a point halfway between Suzy’s feet and the ground. In this example, that point is visualized as the green X.
Side view example of the camera following a point between Suzy and the ground.
The camera’s motion in this example is considerably less pronounced than that of Suzy. This less pronounced motion helps to minimize camera motion during small hops and keeps more of the ground in the frame during high jumps. As you can see in the example, however, as Suzy gets farther and farther from the ground, there runs a risk of her rising right out of frame, to keep this from happening, the average between Suzy and the ground is never allowed to be any farther than 3 m. below Suzy.
Camera Relative Controls
In a game like Suzy Cube, it’s common that the player character moves based on what are called, camera relative inputs. This means that a player’s inputs are compared to the angle of the camera so that pressing, say, right on the joystick will invariably cause the character to move toward the right of the screen even if the camera has been rotated a full 180 degrees around the character. Again, a system like this works great, it’s intuitive and common and takes virtually no time for players to get used to. The problem I encountered in Suzy Cube was that of trying to help players “keep to a line” if you will. In 3D platforming games in general, and even more so in a platforming game meant to be played on a touch screen, a frequent issue involves missing landing on small targets like enemies or platforms because of subtle, off axis movements. In order to greatly help reduce these issues, Suzy’s movements are artificially snapped to fewer direction rather than a full analogue circle of 360 degrees. This makes it much less likely that a player might find themselves accidentally running off the side of a narrow platform because they weren’t holding exactly forward on their joystick. With camera relative controls, though, this introduces a bit of a problem.
Say a player is holding right on their joystick but the camera is a at a slight angle, since the controls are relative to the angle of the camera, this means Suzy would actually be running, also, at a slight angle. So, to alleviate this problem, the controls in Suzy Cube aren’t actually relative to the camera’s angle but that of a child object whose rotation is snapped to 45 degree increments.

The blue diamond represents the camera's parent object smoothly rotating and the arrow represents the snapped angle.
This set up means that even though the camera can be rotated to slight angles, the player’s controls will remain snapped to nice, grid aligned angles. Compare the results of a slightly rotated camera with and without the snapped relative controls.
Comparison of the effect of the camera's rotation on Suzy's running direction with and without snapping.
It’s easy to see that, without snapping the relative angle of the controls, Suzy risks running right off the side of this bridge of blocks. The combination of the snapped inputs and snapped relative controls makes Suzy Cube much more playable on all platforms but especially on a touch screens.
In the third and final article looking at the game’s camera system, we’ll be having a look at the latest additions to the camera’s behaviour which further help to show players more of what they need to see when it’s most important. So check back next week for the conclusion of our three part series.
Originally posted on louardongames.blogspot.com

Welcome to the first or three articles in a series examining the camera system used in Suzy Cube. This series will dive into several aspects of the game’s camera system with each describing a particular set of features. These articles will also follow the chronological order in which the features have been implemented into the camera system.
The work I’ve put into Suzy Cube’s camera system is especially important to me because it was, actually, the catalyst for the entire project. Before Suzy Cube was a game, it was simply an experimental project for me to attempt to recreate the interesting camera work seen in Super Mario 3D Land for the Nintendo 3DS. For those of you unfamiliar with the game, it is a third person platforming game which, unlike many other 3D action titles, does not allow the player to control the camera. Instead, as the levels are generally a linear set of challenges, the camera automatically switches perspectives as the player moves about the game world in order to best frame the action for the upcoming challenge. This was exactly what I found so great about the game’s camera work and set out to emulate.
So, as I started work on my camera rig, I knew the camera was going to have to be able to perform certain basic movements:
- Translating - Moving the camera either up, down or side to side.
- Orbiting - Rotating the camera around the player, parallel to the ground.
- Pitching - Rotating the camera to look up and down.
- And Trucking - Moving the camera closer or farther away from the player.
To achieve all of this, I built a hierarchy of objects. For those of you unfamiliar with this concept, in such a hierarchal structure, moving a parent object will move all of its children accordingly, while moving a child will have no effect of its parent. This way, it was possible for me to build a rig which allowed some actions to be applied to all objects in the hierarchy and others to be isolated to only certain parts.
The Camera Rig
Here is a breakdown of the camera rig:

The camera rig hierarchy
The rig consists of a Root object which is the parent of the Pitch object which is, in turn the parent of the actual Camera object. By splitting up the rig this way, it’s much easier to apply the aforementioned camera movements in isolation as each part of the rig handles particular movements.
The Root Object
The Root object is what actually follows Suzy around as she is moved by the player. Since it is the parent object, all others, including the camera, move around accordingly.
![]()
Top down view of the Root object following Suzy as she moves. The rest of the camera rig follows along.
Since Suzy is quite responsive and her movements can be quite quick, the camera’s position constantly interpolates toward her current position to smooth out the camera’s movements.
The task of orbiting also falls on the Root object. By rotating it parallel to the ground, the camera can be made to orbit around Suzy. As a rule, the Root object is only ever rotated along this one axis, its Y or Up axis. This way it is always kept parallel to the ground plane and all changes to the camera’s orbit only ever affect the Root object’s Y axis of rotation.
Rotation of the Root object causing the camera to orbit around Suzy.
By using the Root object, centred on Suzy as the pivot for our rotation, it allows the camera to maintain a constant distance and trace a nice arc around the focal point as it orbits.
Comparison between rotating the Root object versus moving and rotating the camera directly.
Compare this to a situation in which the camera’s position and rotation are simply interpolated from point to point. Notice how the the camera rotating around the Root object traces a nice circular arc while the linearly interpolated camera traces a straight line, causing it, in fact, to get much closer to Suzy midway through its motion. So, the Root object allows the camera, by extension, to orbit smoothly around the player character while following along as she runs around the level.
The Pitch Object
As the name implies, the Pitch object has one job and one job only, to control the camera’s pitch, which is to mean rotating it to look up or down. The Pitch object is centred directly on the Root object and so is also, always at the camera’s focal point, which is, usually Suzy herself. By rotating the Pitch object along its local X axis, upward and downward, in turn causes the camera to swing up and down as the Pitch object is its direct parent.
Side view of camera pitch change by rotating the Pitch object.
This does not necessarily need to be handled by a whole different object, but doing so ensures that the camera never finds itself at a strange angle whenever a camera move affects both the pitch and the orbit of the camera. Another advantage of the Pitch object being a child of the Root object is that only the Pitch object’s X rotation axis ever changes. As camera’s orbit is entirely handled on the Root object, rotating the Pitch object along its local X axis will always only cause the camera to pitch up or down and never inadvertently tilt or roll because of a strange combination of angular inputs even when interpolating between rotations.
The Camera
And finally, we have the Camera itself, which represents the view from which the scene is rendered. Since it simply moves along with its parent, the Pitch object, which subsequently moves around with its parent, the Root object, the camera can simply be moved forward and backward along its local Z or Forward axis to move it closer to or farther from Suzy.
Trucking the camera in and out.
Though, the Camera is normally centred on the Root object, it is also possible to offset its position along its local X and Y axes. This allows the camera to show more of what’s coming ahead of the player for example, or can otherwise be used to adjust Suzy’s position on screen. Since these movements are also made in the camera’s local space, they will stay consistent as far as how they affect the player character’s position on screen regardless of the rig’s current pitch or orbit settings.
Controlling It All
So, how are these various camera movements all controlled during gameplay if not by the player? The answer comes in the form of Camera Manipulation Trigger Volumes. These are generally set up as trigger boxes that, when entered by Suzy, will trigger a change to any number of camera settings including the ones discussed above.
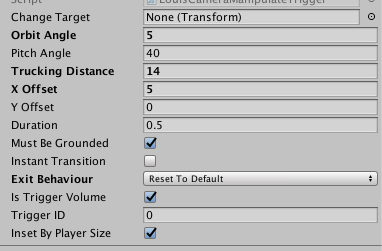
Example of the settings panel of a Camera Manipulation Trigger.
This panel shows all of the camera settings which can be changed when entering the trigger including the ability to define a different target for the camera instead of Suzy if this better serves the gameplay in a particular part of a level. By mindfully placing these Camera Manipulation Triggers along a level, I’m able to ensure the camera always shows players exactly what I want them to see.
The Basics Covered
So, these were the first bits of functionality I set up way before even having a real character running around and form the foundation for the camera work in the game. Even with no more that these controls. If I had stopped here, things would have been in pretty good shape, but not necessarily all that great, so please, check back again next week to catch the next part in the series as I start explaining some of the subtler things implemented into the camera system to help it on the road from a good camera system to a great one.
Originally posted on louardongames.blogspot.com
Lessons From Suzy Cube: Reinforcing Behaviours, A Look at Two Levels
Boss levels should be a cinematic way to test your player's skill. But what happens when your boss level is too hard and its goals unclear? This Lessons From Suzy Cube article will compare the design of two boss levels from the game in order to illustrate the difference between a level which adequately uses behaviour reinforcement to prepare players for the battle ahead and one which fails to do so.
I would like to preface this article with a notice that Suzy Cube is (at the time of this writing) still in development and that some details touched upon in this article may change before release. The lesson as a whole, however, still holds true.
Cut From the Same Cloth
The levels we will be studying here are Level 2-B, the boss level for World 2 and Level 4-B, the boss level for World 4. There are 5 regular boss levels in Suzy Cube, so what makes these two a fair comparison? Unlike the other three, which primarily ask players to dodge incoming attacks while waiting for the boss to expose itself to a counter attack, as with the biting behaviour seen below, the levels we will be studying require a different approach.
After a missed bite attack, the player has an opportunity to jump on the boss' head.
The World 2 and World 4 boss fights, are designed to require the use of power-ups in order to defeat the boss. The Double Jump and Ground Pound, respectively. So, unlike the other boss fights, onus is on players to attack the boss or create an opening rather than simply waiting for such an opening to present itself. This creates a different design challenge as players need to be made to realize they need to leverage the abilities bestowed by the power-up found in the level to defeat the boss.
The Goal
So, in order to ensure that players can puzzle out the tactics necessary for completing the boss encounter, it's important that we reinforce the behaviour necessary for defeating the boss. Examples must be used throughout the level leading up to the final fight to ensure players realize what is asked of them when face to face with the enemy.
Level 2-B: Doing it Poorly
This level does it poorly. For that reason, what I'm presenting here is likely to be very different to what will find its way into the final product. But before I tear the level apart to rebuild it, let's use it as a perfect example of poor behaviour reinforcement.
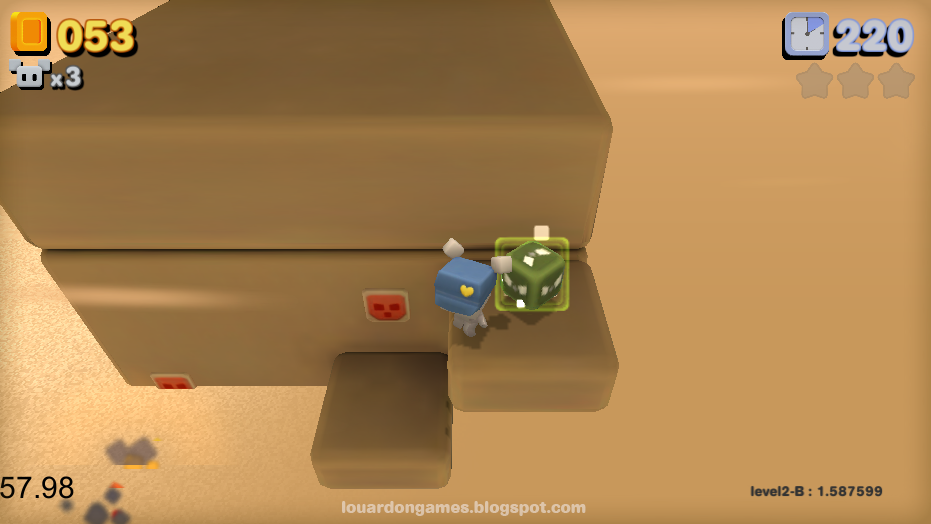
As previously mentioned, the boss fight revolves around having to use the Double Jump power-up to defeat the boss. This means the boss never brings its head down to the player's level forcing the player to, insead, Double Jump onto the boss' head to deal damage.
The problems with this are two fold. First, nothing about the level leading up to the encounter serves as a clue as to how to defeat the boss, and nothing about the boss' behaviour serves as a clue as to how to defeat it either.
Overview of Level 2-B
Here is a view of the entirety of Level 2-B leading up to the boss fight. Players must climb the tower to face off against their foe at the top, all the while being chased by a rising plane of deadly quicksand. Nowhere along this entire tower climb do players encounter a Double Jump power-up. In fact, the tight placement of the dark moving platforms makes it very likely that players will continuously be bumping their heads when attempting to use the Double Jump to aid in their ascent.
The Double Jump power-up is finally found.
Only at the very top of the tower, will players find the very power-up needed during the fight.
Suzy and the boss, mid fight.
Notice, also, that there is nothing about the boss' placement or body language which beckons players to even try to jump on its head. This is the enemy's regular idle pose. The previous boss encounter has taught players, if anything, that it is a bad time to try and attack the boss.
Ultimately, the level is much too difficult as the game's second boss level and does an extremely poor job of educating the player as to how to defeat the boss at the end of it.
Level 4-B: Doing it Well
Some time after designing Level 2-B, I got around to designing Level 4-B and having already noticed some of the issues mentioned above in playtests of Level 2-B, I took a much more mindful approach to the design of this next boss level.
First, there's the level itself. Unlike Level 2-B, Level 4-B misses no opportunity to both give, and require the use of the Ground Pound power-up. Players are constantly forced to use the power-up to progress.
Overview of Level 4-B.
The start of the level has players facing a gift box containing the Ground Pound power-up followed by a metal switch which must be pounded to activate a bridge of floating blocks to get across a large gap.

The level opens on a use for the Ground Pound.
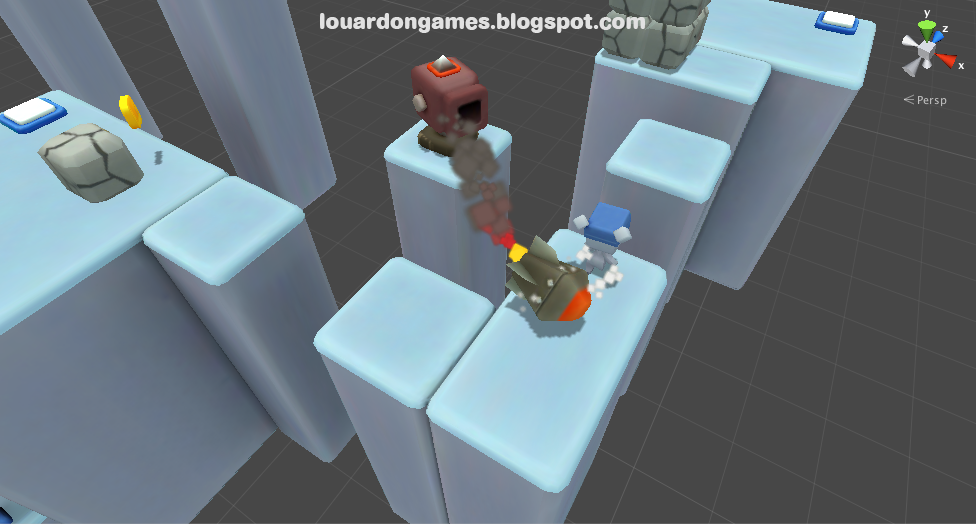
Use of the Ground Pound ability is required frequently as players climb up to meet their opponent. There are jump pads which lack the force to boost players as high as they need to go without the extra oomph afforded by pounding onto them, rock blocks which can be broken open to reveal goodies and several uses of the Ground Pound switches to enable progress up the tower.
Most important amongst these is probably the wall of explosives, which players must clear by activating one of the side cannons using one of a pair of metal Ground Pound switches.

Teaching players to use switches to activate cannons.
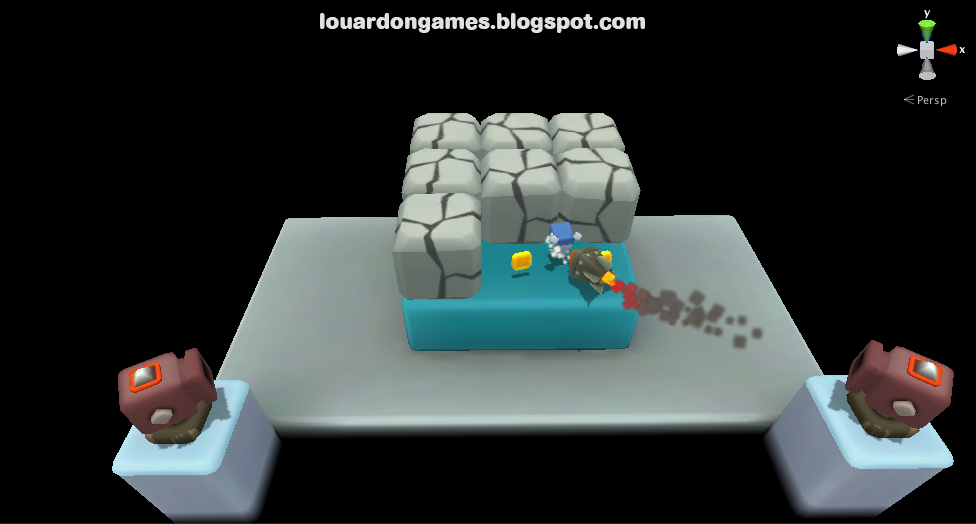
This situation is meant to mirror that which faces players during the boss fight.
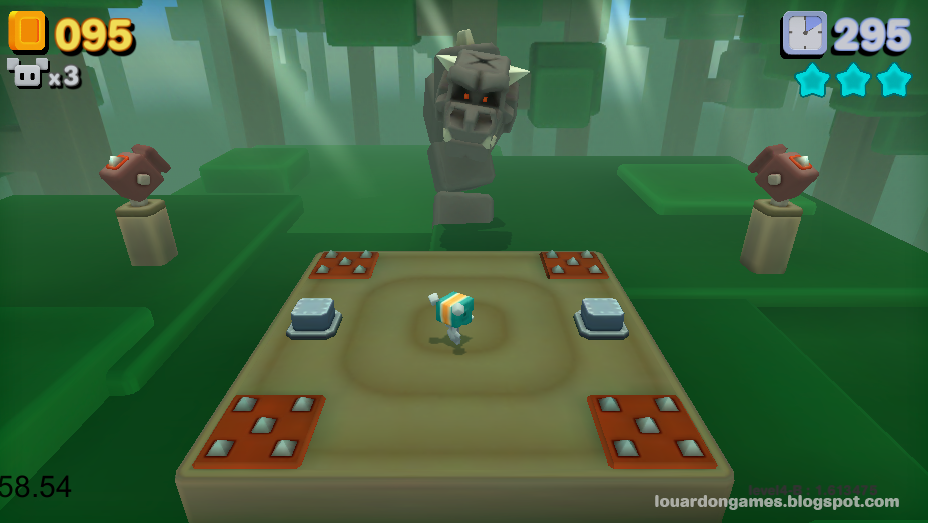
A similar set up awaits the player at the top of the level.
By this point, players will, hopefully, have concluded that launching rockets using the Ground Pound switches will be an important part of the fight.
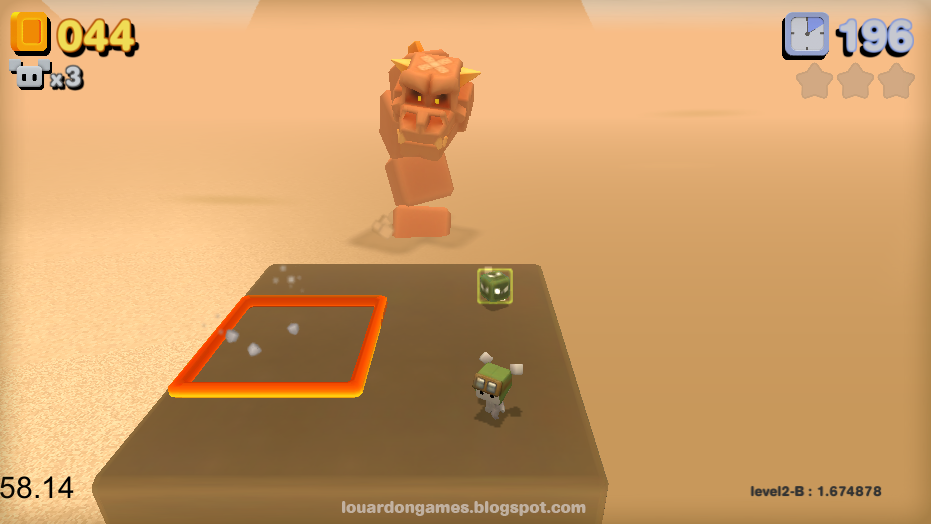
Indeed, the rockets play a vital role in the boss fight since a direct hit from one of the rockets will cause the boss to fall to the center platform, vulnerable to attack.
Once hit by a rocket, the boss becomes temporarily vulnerable.
In order to damage the boss, players are then asked to, once again, use the Ground Pound as the boss' rocky head is impervious to simply being jump onto. This fact is reinforced throughout the encounter as the boss summons Rock Skull enemies who must also be Ground Pounded to be defeated. Contrary to the situation in Level 2-B, it's obvious when the boss is open to attack. There is little doubt as it lays their, eyes spinning, as to whether it is vulnerable or not.
Conclusion
Level 2-B isn't a complete disaster, of course. Making liberal use of shockwave style attacks during the boss fight reinforces the use of the Double Jump ability, for instance. But it is much too difficult and in order to make it the best it can be, several shortcomings must be addressed.
Nothing about the level currently educates players about having to make use of a power-up to defeat the boss. The Double Jump power-up must be introduced at the very beginning of the level and be central to progressing up to the boss fight. Moreover, the boss' body language does not beckon players to try to jump on its head using the Double Jump, and even doing so successfully almost feels like a glitch because the margins for landing the hit are so tight. The boss itself should adopt a different pose, making itself more available to attack periodically to entice players to attempt the manoeuvre.
This has been a real-world lesson in behaviour reinforcement. In the case of these two boss fights, which stray farther from the formula established by other boss fights in the game, it's imperative that the technique necessary for defeating the boss (use of a particular power-up) be required and reinforced throughout the entire level leading up to the fight.
So when you are faced with a similar design challenge and need to teach your players to do things a little differently, think of those situations leading up to the trouble spot and how they can serve to reinforce the new behaviour you are demanding of your player.
Have you ever come across really great examples of behaviour reinforcement in one of your favourite games? If so, share it in the comments.
Originally posted on louardongames.blogspot.com

Ah, the palate cleanser, that bit where a game throws you a curveball for the sake of variety and to keep you from getting bored.
In this post, I want to discuss what I think makes a good palate cleanser versus a bad one mostly by contrasting the shoot-em-up inspired sections of Rayman Origins (2011) to those of Rayman Legends (2013).
Let's Get Our Terms in Order
First things first. What do we mean when we talk about palate cleansers in games? I first heard the term used by Gears of War lead designer Cliff Bleszinski to describe those sections of a game wherein players are asked to do things which aren't part of the usual set of actions required by the core gameplay. Many first-person-shooters, for instance, ask players to put aside the usual running and gunning to partake in the occasional genre-ubiquitous "vehicle section". The goal of these, so called, palate cleansers is to fight player fatigue by offering up a different activity for a while before returning to the game's core mechanisms and gameplay.
The Good and the Bad
I, personally, have a strong preference for variety within a game's core mechanisms rather than asking players to, essentially, put aside the game they've been enjoying to play what is essentially a different game for a bit. For example, both the Halo games and the Call of Duty games are first-person-shooters and both series include the ability, at times, to drive vehicles. The big difference between the way these "vehicle sections" are handled serve as a perfect example and counterexample of my prefered approach to variety in games.
Vehicles in Halo, especially the original trilogy, are part of the larger gameplay sandbox, as it were. Players are free to hop in or out of any available vehicle at their leisure and the spaces in which players are given access to these vehicles are generally open battlefields which promote tactical thinking and allow for all sorts of chaos to ensue. On the other hand, Call of Duty style vehicle sections tend to be heavily scripted cinematic sequences in which the player is given little freedom as to where they can or can't go and generally involve some sort of dressed up obstacle course meets shooting gallery.
Halo's approach to controlling the vehicles also contributes to them feeling like they are part of the same game rather than a temporary switch over to a driving game. Many shooters which allow you to pilot vehicles will switch up your control scheme significantly. The Halo games on the other hand try to keep your control scheme as unified as possible throughout the experience. Wherein, while at the wheel in some games, you might be asked to treat your controller's trigger buttons as an accelerator and brake pedal while using your left thumbstick to steer, Halo has you using your left stick to control going forward or backward while you use your right stick to look around, with your vehicle steering itself to align with your view. You see, Halo isn't trying to simulate the controls of the vehicle you are piloting, it's trying to keep to the same controls you use to manoeuvre on foot and map them to the same intents while at the wheel.
A Tale of Two Raymans
So, this finally brings us to Rayman Origins and Rayman Legends. Both are, by the way, great games that any platformer fan should check out, but there is definitely something that Legends handles much better than its prequel and that is it's shoot-em-up style levels.

Flying on mosquitos
In Rayman Origins, these levels have you mounting a giant mosquito which can shoot projectiles out of its proboscis. The levels play extremely similarly to side scrolling shoot-em-up games like the classic R-Type. Your left thumbstick or d-pad are used to move you freely around the screen while your jump button gets reassigned to shooting. The types of challenges you face in these levels are also straight out of the shoot-em-up genre, as you are tasked with taking out enemy formations while attempting to dodge hazards which float at you in patterns which become increasingly hard to negotiate.
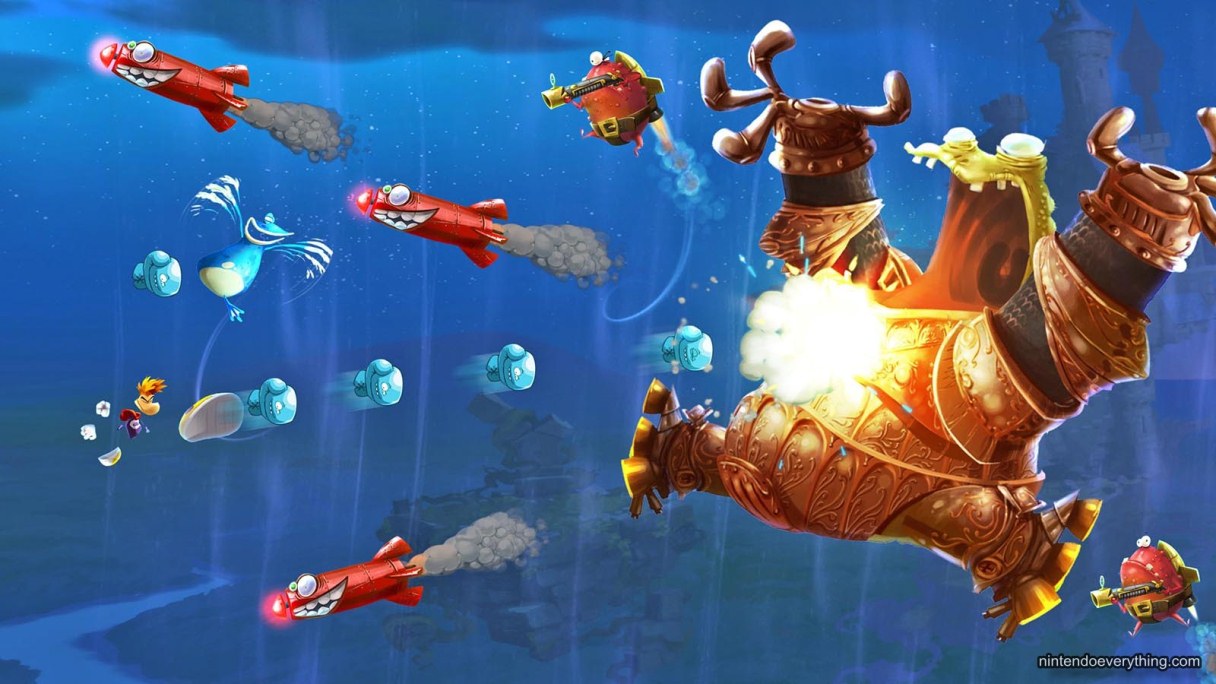
Riding the air currents
Many of the boss levels in Rayman Legends offer a very similar experience involving flight, shooting and precise dodging. The major difference between the two is the way these are weaved into normal gameplay in Rayman Legends. You see, whereas Origins has you hopping on a mosquito and asking you to rethink your controls, Legends will grant you a powerup which essentially extends your normal attack to also shoot out flaming boxing gloves and has you flying not on a mount but on currents of air using the jump button leveraging the hovering ability you normally have available to you.
In both cases, you're given a break from the usual running and jumping gameplay of the regular levels, but in the latter, it's done in a way that feels less like you're being asked to play an entirely different game for a level. Both games take the same premise of using shoot-em-up style gameplay as a palate cleanser but while one simply has you play a shoot-em-up for the duration of a level, the other weaves that gameplay into the rules already established by the core experience.
The Spice of Life
Variety is important in games. Repetition is boring and games are meant to entertain, so keeping things fresh is important. I, however, commend designers for keeping things fresh without pulling me out of the game's core experience.
What Rayman Legends gets so right is that it's full of surprises and widely varied but you are inarguably playing Rayman the whole time. You have the same set of actions available to you throughout the game and the variety comes in the form of the challenges you are asked to surmount using them.

In this Lessons from Suzy Cube article, we are going to look at a section by section breakdown of one level currently in development for the game. Let's dive in!
When I first started studying the levels from Super Mario 3D Land, something quickly became apparent: Each level is a self contained collection of challenges focused around a particular game play mechanism which is mostly unique to that level.
Upon closer inspection, I began to notice a pattern emerging from level to level. It seemed to me that each level started by introducing the player to the particular mechanism that formed the core challenge of the level by presenting the player with a fairly simple and safe task, followed by one or two progressively more difficult and dangerous versions of the task.
The Narrative Structure of a Level
One of the ideas I've learned from working closely with level designers throughout my career is that a good level should be structured like a good story. In scrutinizing the levels in Super Mario 3D Land, the structure I thought I saw emerging reminded me of the narrative structure I learned in a college script writing class based on Syd Field's Paradigm:
The Syd Field Paradigm of narrative structure
This paradigm follows a traditional western narrative three act structure. The basic idea is that at the beginning of the first act, the author introduces the setting, the characters and gets the story going. By the end of the first act, we hit the first plot point in which something happens to set the main plot in motion. During act two, the story is developed through the main struggle or confrontation, it is the meat of the action. By the mid point, tensions are high and as the second act draws to a close, a second plot point reorients the story and sets things up for the conclusion. Finally, act three is when the story culminates to its climax before the author can take us down through the conclusion, hopefully, tying up the last few loose ends in the plot.
The way I had mapped the structure of Super Mario 3D Land levels onto this paradigm looked something like this:
- Act 1
- Introduce the setting of the level. Introduce the level's core mechanism with a safe and easy challenge. (e.g. safe from falls)
- Act 2
- Bring back the core mechanism with a similar challenge but with added danger. (e.g. over bottomless pit)
- Act 3
- One last challenge, ramp up the complexity and add even more danger. (e.g. added enemies to navigate around). This last challenge leads to the end of the level.
It turns out, the designers behind the game were, indeed, inspired by narrative structure, I was simply mistaken about which structure inspired them.
Four Acts are Better than Three?
According to this interview with the game's producer, Koichi Hayashida, the structure used to guide the design of the levels in Super Mario 3D Land is actually based on oriental four act narrative structure known, in Japan, as kishoutenketsu. It is the structure used, for example, in Japanese four panel comic strips and is comprised of the Introduction, Development, Twistand Conclusion. In the game, this breakdown can be used to describe a level like so:
- Introduction
- Set up a situation early in the level which forces the player to interact with the level's core mechanism without any danger.
- Development (challenge 1)
- Set up a tougher challenge centred around the core mechanism. This challenge also includes an element of danger, forcing the player to gain some mastery over the challenge or fail.
- Twist (challenge 2)
- A new challenge now faces the player. The core mechanism is the same but it's either used in a new way or in conjunction with new elements to mix things up.
- Conclusion
- One last use of the core mechanism to set up a challenge that should, at this point be pretty easy for the player, leaving them with a sense of accomplishment before reaching the end of the level.
Let's Apply What We've Learned
As I design levels for Suzy Cube, I try my best to keep this structure in mind. Some of my designs lean more toward the three act paradigm making use of two main challenge areas though I do try my best to think in terms of the kishoutenketsu or four act structure. So, let's have a closer look at a level from Suzy Cube and see how the different parts fit into this four act structure.
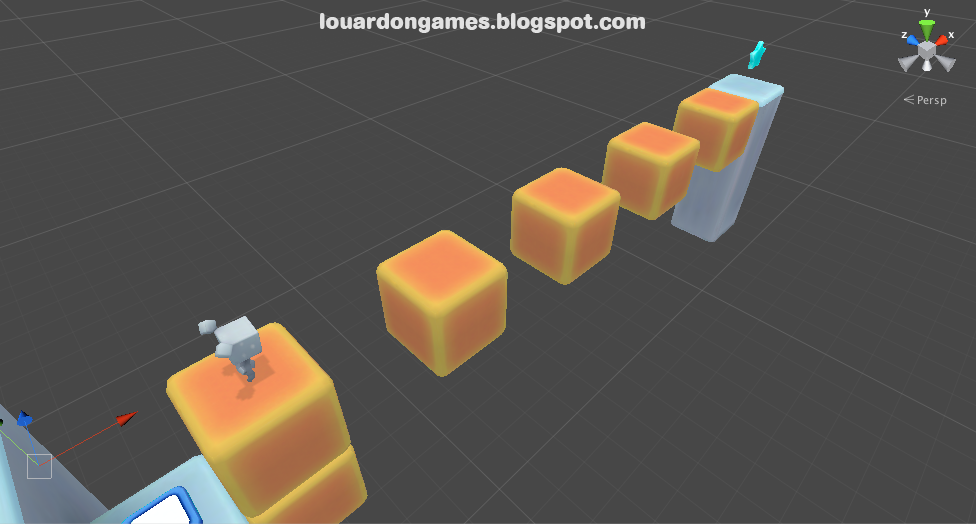
Map of Level 1-4
This is Level 1-4, it is a snow themed level centred around button activated temporary blocks and cannon which fire player seeking rockets. Roughly speaking, the layout of the level can be split into four parts like so: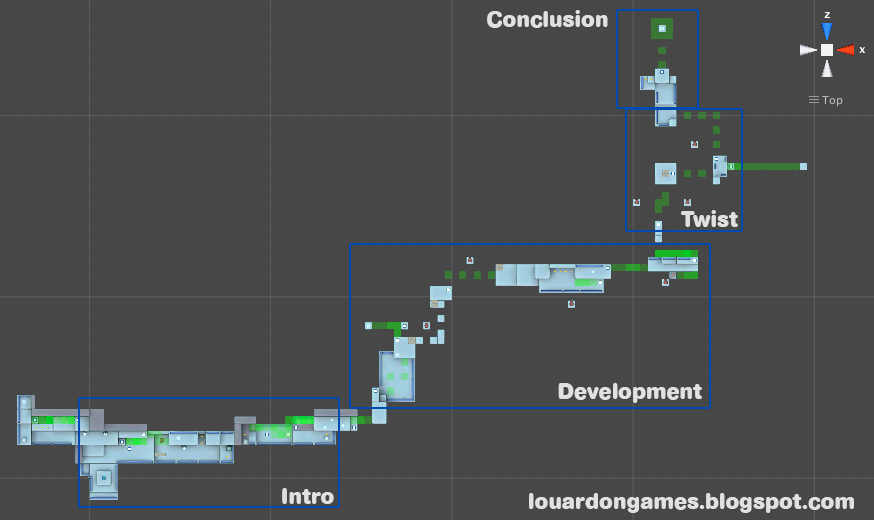
Level 1-4 split into four parts
Let's dive deeper and look at each of these parts and how I try to make sure that each part prepares the player for what they will have to face later in the level.
Going in for a Closer Look

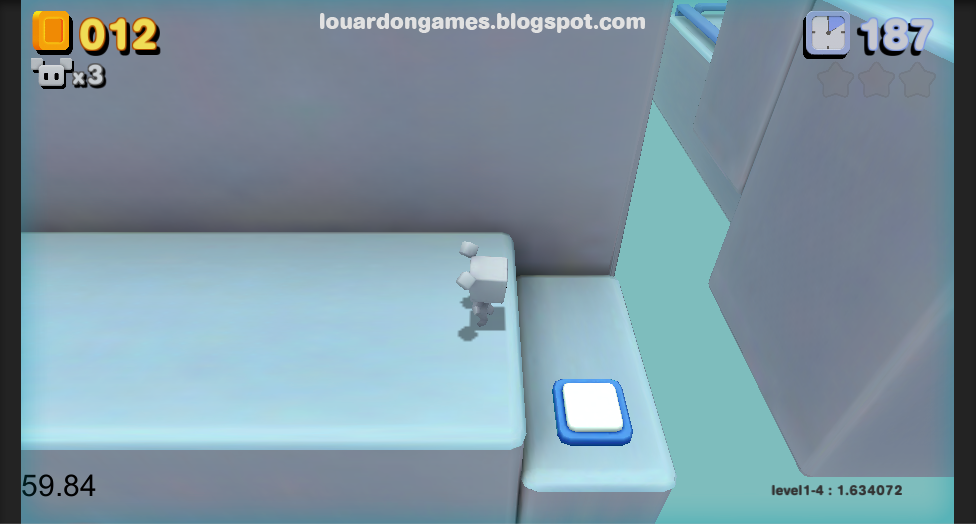
You start Level 1-4 surrounded by guardrails, hopefully, making it obvious which way to go. To the left you can see a snake enemy guarding some hidden coins. This enemy simply goes around on a set path and poses no threat to you unless you engage with it. To the right, a button on the floor is visible.
By approaching the button, you are likely to come within range of the level's first cannon. This cannon will periodically fire player seeking rockets however, the fact the cannon is in a sunken recess means the rockets will simply hit the ledge, introducing cannons without actually threatening the player.
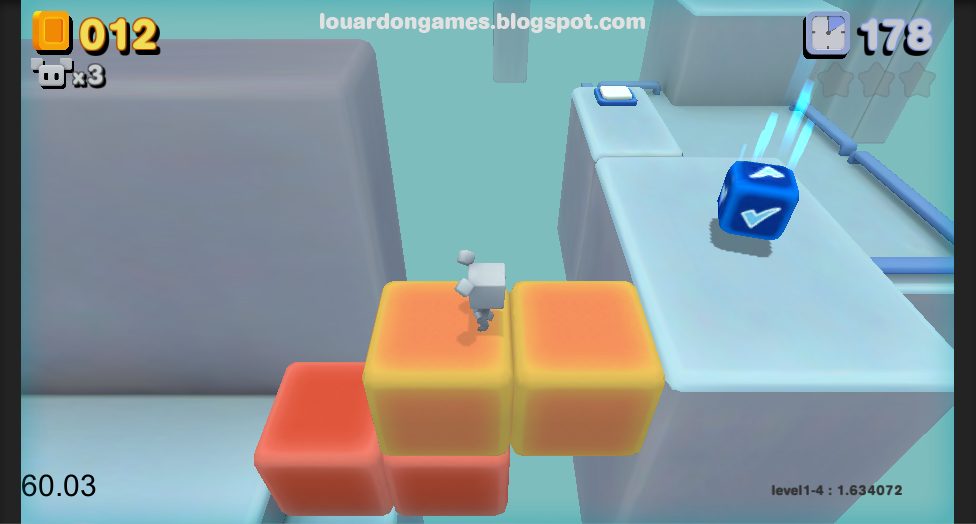
If you're curious about the cannon, you may continue to the right. There, you will find some conveniently placed rock blocks to shield you from the rockets.

If you do use these rock blocks to protect yourself, you'll find out a couple of things: 1. Rock blocks explode when hit by a rocket, and 2. Rock blocks can contain goodies. In this case, two coins and a Heart Hat. For the curious, wearing a Heart Hat allows Suzy to take a single hit from a hazard or enemy without dying. She, instead, loses the hat.

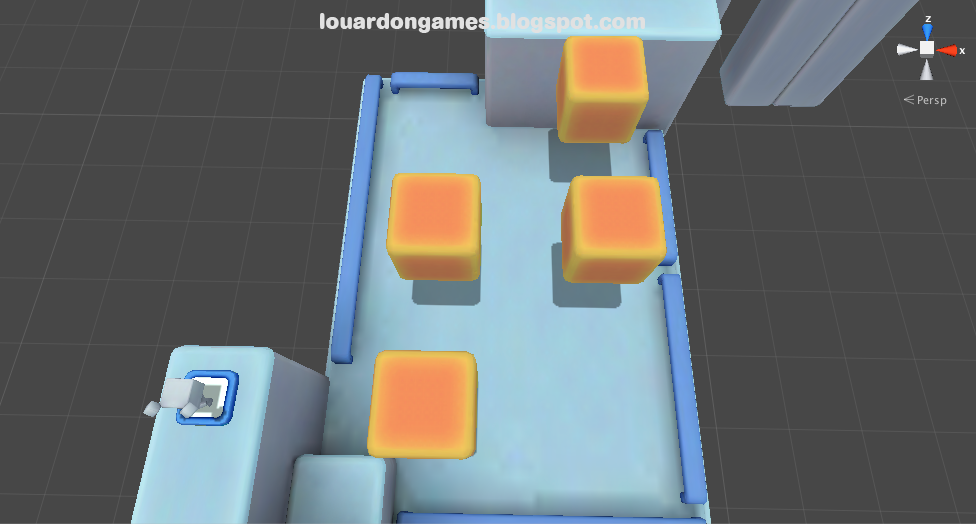
Now back to our button from earlier. In order to progress through the level, you will have to press the button, which can be done simply by walking onto it. The will cause a series of temporary blocks to appear. You have now been introduced to the two main mechanisms of the level, player seeking rockets and button activated temporary blocks.
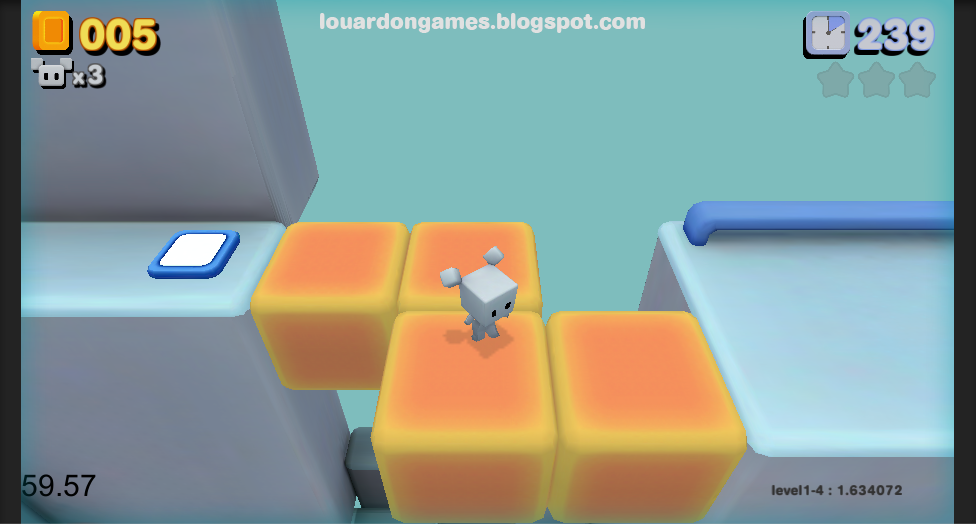
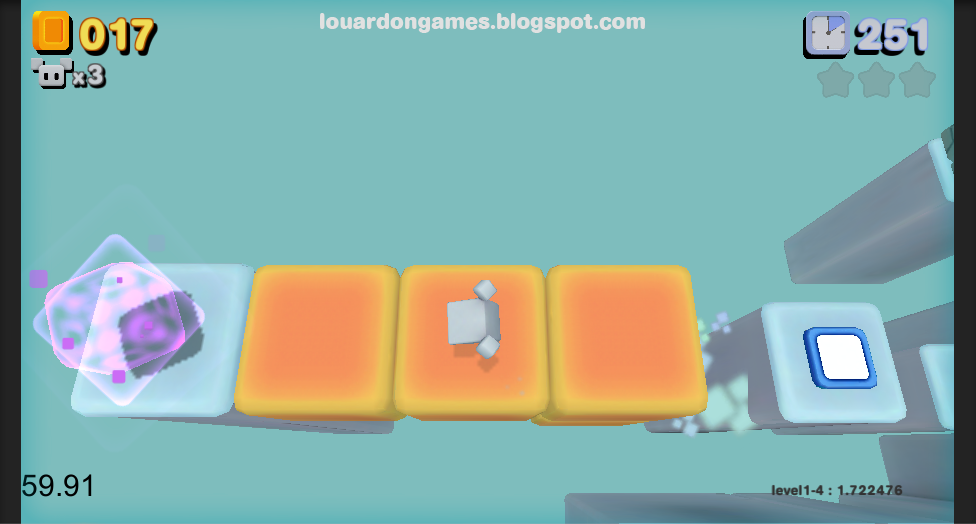
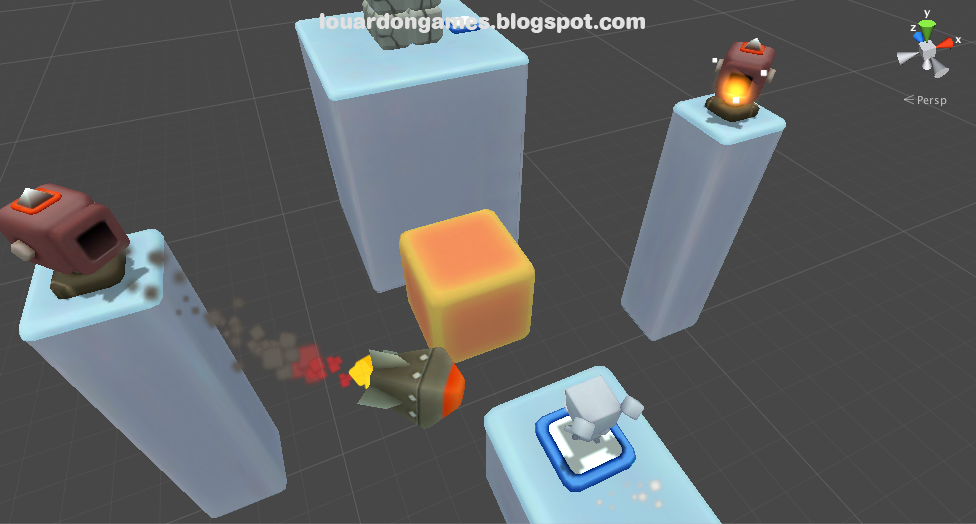
Example behaviour of the temporary blocks
These temporary blocks appear in sequence and, after a few seconds, turn red and disappear. Notice how, in this introductory set up, there is no danger of Suzy falling to her death.
The first set of temporary blocks simply lead to a second button which activates another set of blocks which lead up to a landing, allowing you to proceed.
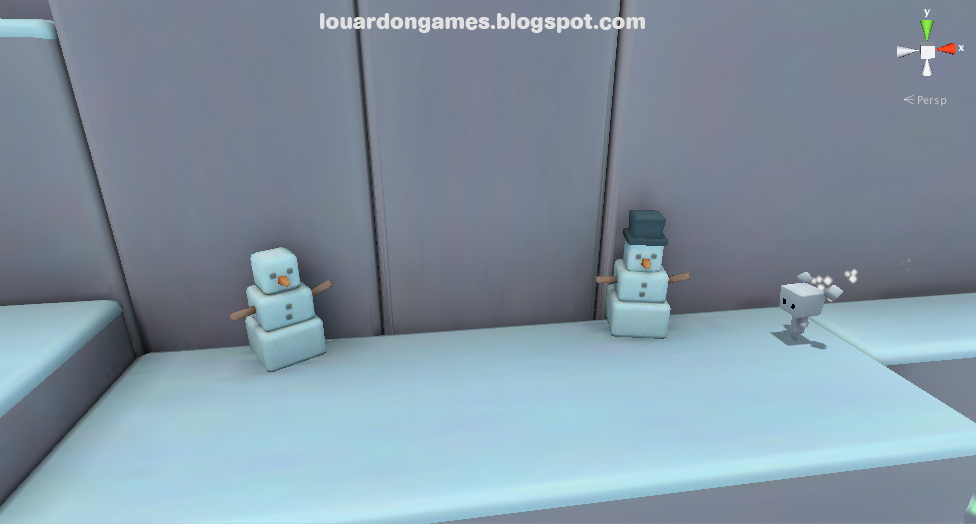
Once you get up, you may decide to proceed to the right using the button or go exploring to the left, where you'll be met by a couple of snowmen...
...Whose heads come to life and attack you! The snowmen are just there as a nice surprise. Remember, when designing levels, always include a few surprises to delight and capture the attention of your players. Every time you are able to surprise your players you plant a question in their mind: "What other surprises await me?" This question can be a powerful motivator for them to continue playing!

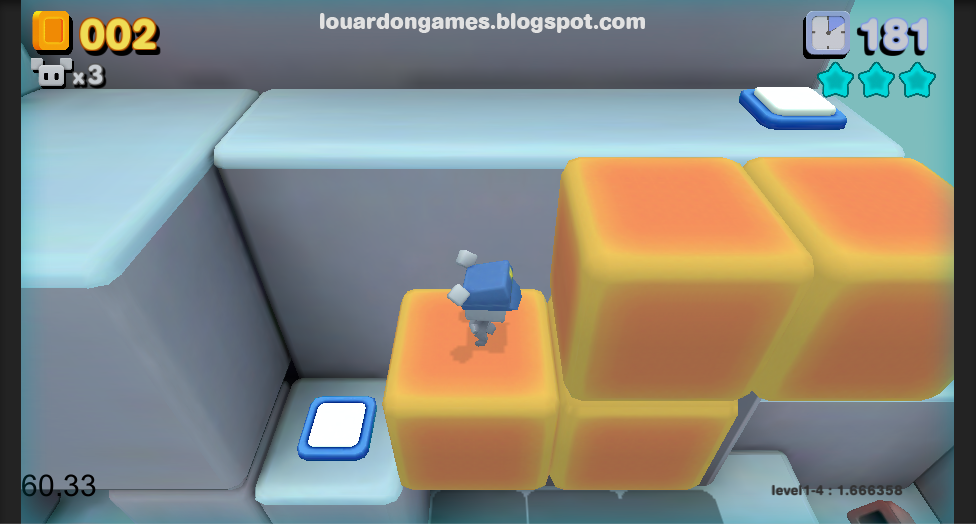
Continuing past the snowmen will lead you to a simple timing puzzle. If you hit the upper button, you won't see its effect, but if you continue to the right...
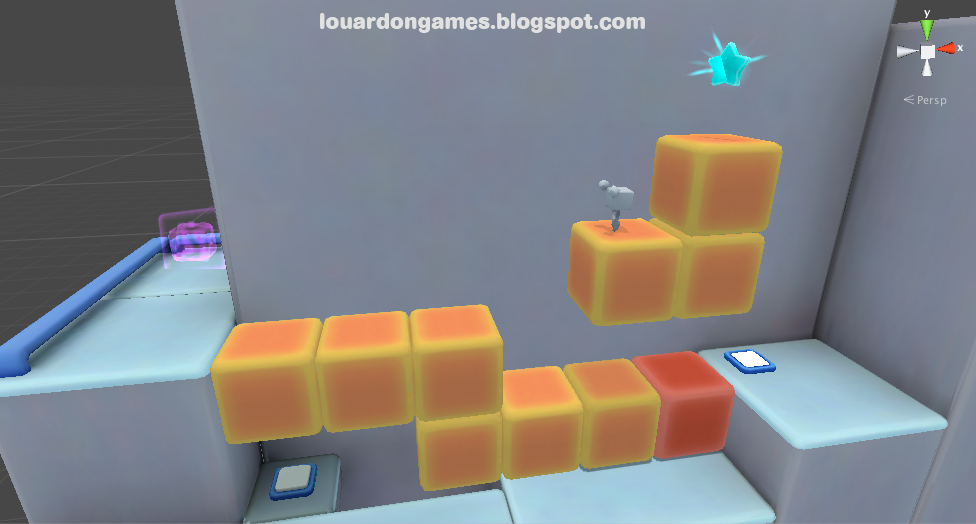
...you may just find that it produces the three blocks which give you access to the first of three stars hidden in the level. You'll have to be quick to grab it before the blocks disappear, though. Once you grab the star, you can make your way to the teleporter to the upper left. Stars in Suzy Cube are used to unlock boss levels and special levels and are, generally, either hard to find or hard to get, or sometimes, as in this case, a little of both.
Now back to the main path. Remember the first two sets of blocks? Well, they lead to this button which creates an S shaped path to proceed. This is significant for a couple of reasons: 1. It looks nicer than a straight line and 2. If you simply runs to the right expecting the third block to appear there, you will find yourself falling down to the area with the cannon and having to make your way back up. The lesson here is: Block bridges may not always take on the shape you expect.

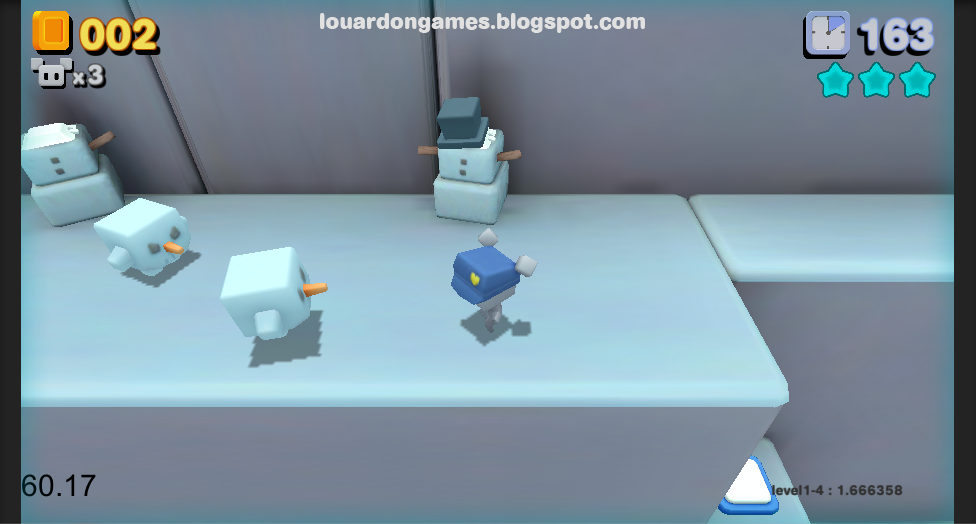
Pressing on, you'll find two more sets of buttons with blocks leading up to a simple confrontation with three snowman heads. Still nothing inherently dangerous, just getting you used to the blocks and buttons. The flat bit with the enemies is there as a sort of rest stop for you to get some extra coins and feel powerful by disposing of the enemies.
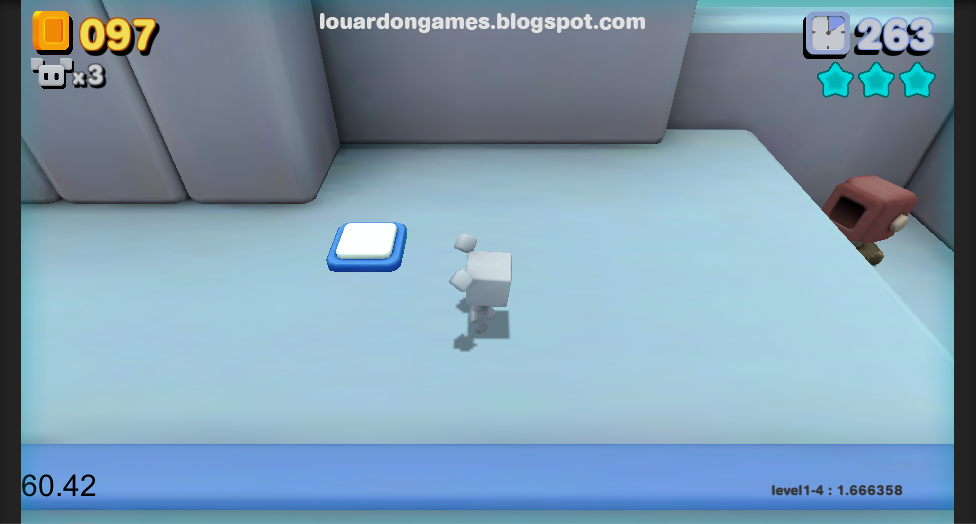
Another button, of course. This time, there's no safety net so you must watch your step!
You have, truly progressed past the Introduction at this point and are rewarded for it with a checkpoint.
As you enter the first true challenge of the level, the Development, there's one more lesson for you which is that button activated blocks don't always appear next to each other. This simple challenge teaches you this while still making it safe to fall and try again.
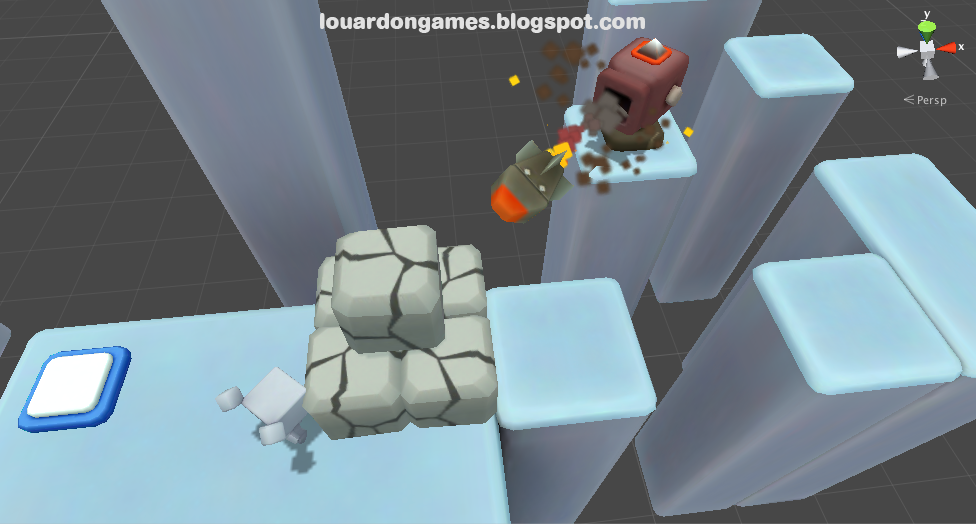
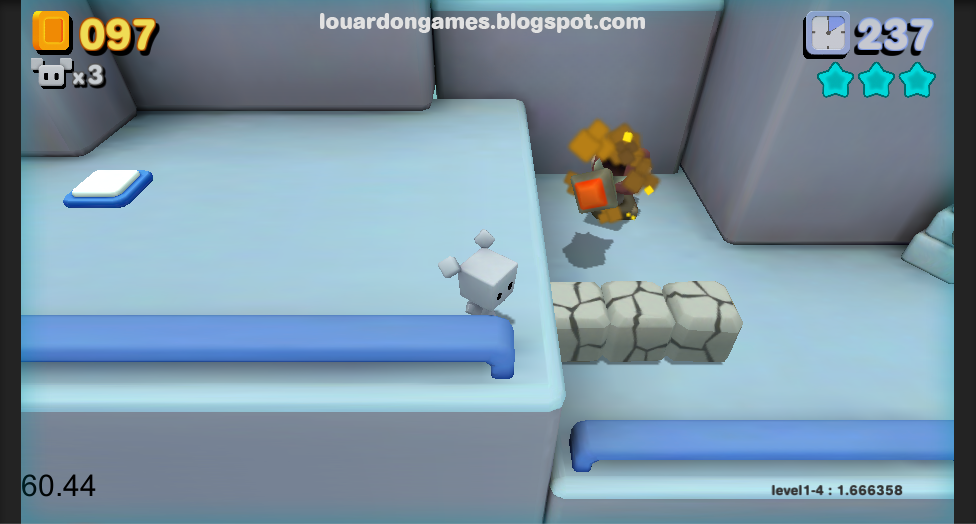
By advancing a bit more, you'll activate a nearby cannon. If you chose to avoid the cannon at the start of the level, you should get a quick lesson in rockets and rock blocks at this point.
To reiterate: They blow up, and they can hide stuff. Like another Heart Hat!
If you're curious what the switch to the left does, activating it will create a way to a teleporter which will transport you to a timed challenge area where you can find the second star.
In here, you have twenty seconds to use the rockets from the two cannons to destroy the blocks in order to find the star hidden within them. This kind of change of pace is important from time to time to mix things up and keep the experience from getting stale. Notice, though, how the challenge is totally in line with one of the core mechanisms of the level. It's different but not out of place.
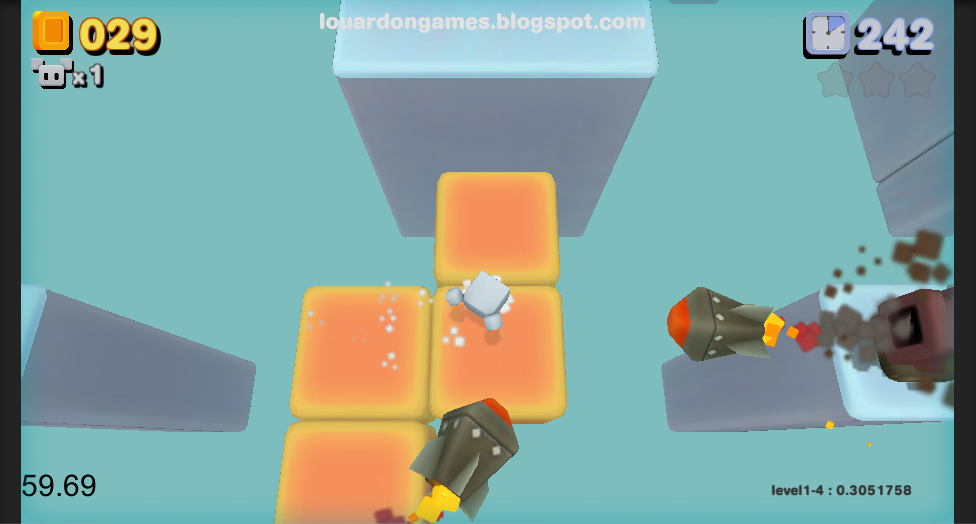
After completing the star challenge, or choosing to ignore it, you must proceed around the cannon across narrow platforms. This section is all about dealing with the rockets chasing you. The platforms atop which you are running are the same size as the temporary blocks, but will, of course, stick around as long as you need. the only pressure is from the cannon firing rockets. Once you get to the other side, you'll be able to use that hunk of rock blocks, near the top right, to dispose of any rocket still chasing you.
Hopefully, you're now well prepared to make it across this bridge of temporary blocks while another cannon fires on you. You've learned to jump over gaps between blocks, you've learned to avoid a rocket while doing it over permanent platforms, not put it together and don't get hit!

After the rather nerve wracking proposition to jump across gaps of blocks that disappear under you while getting chased by rockets, you're offered a slight break. A break from falling anyway. In this section you're given some coins to collect as a cannon fires on you. You need to press the button to proceed upward, which actually sets up a fun gag: If you're being chased by a rocket from the left, it's almost guaranteed that hitting the switch will cause a block to appear right between you and the rocket making for a great and narrow escape.

After this, you can use the blocks to climb up where you'll be faced with another similar section which is currently being redesigned. This then leads us to the Twist!
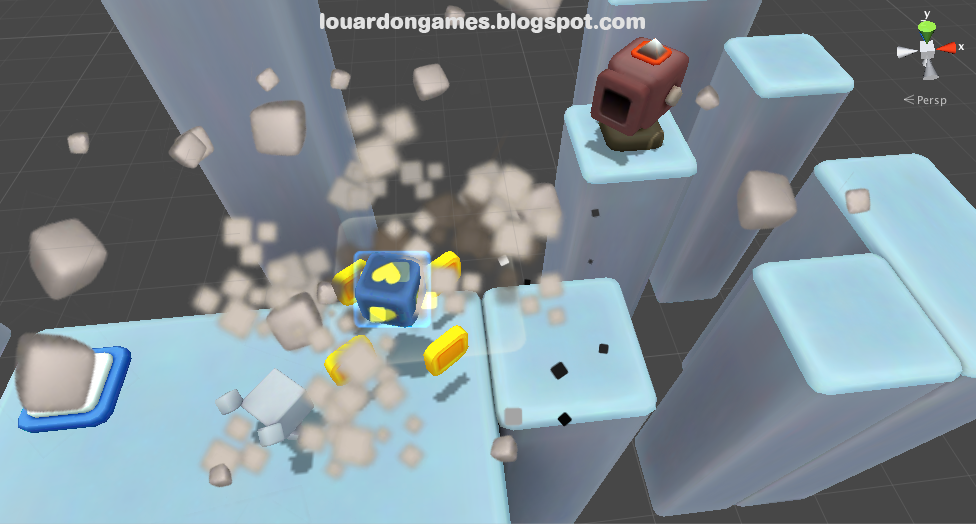
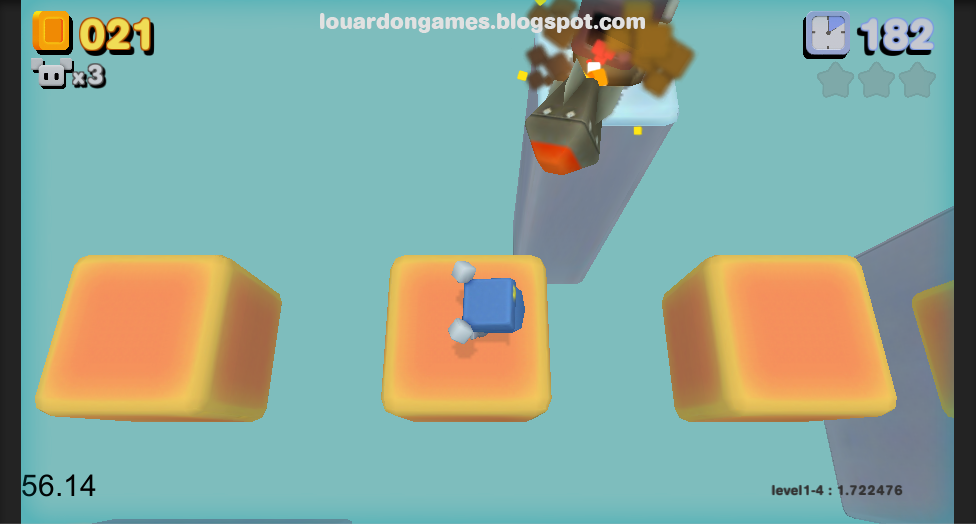
The Twist comes in the form of a section comprised of a number of challenges involving temporary blocks with gaps to avoid while being chased by rockets from, at least, two cannons at once at any particular moment.
Notice the callback to the early S shaped bridge of blocks? But do you also notice the gaps at either end of the bridge? In the previous image, you can also see how the resting platform before the next button also has a set of protective rock blocks on it but unlike the ones in theDevelopment section of the level, these are placed in the middle of the pillar structure. Even staying safe is tougher in the Twist. Since rockets are now coming at you from multiple cannons at once, you'll have to run around and use the rock blocks more deftly to protect yourself.
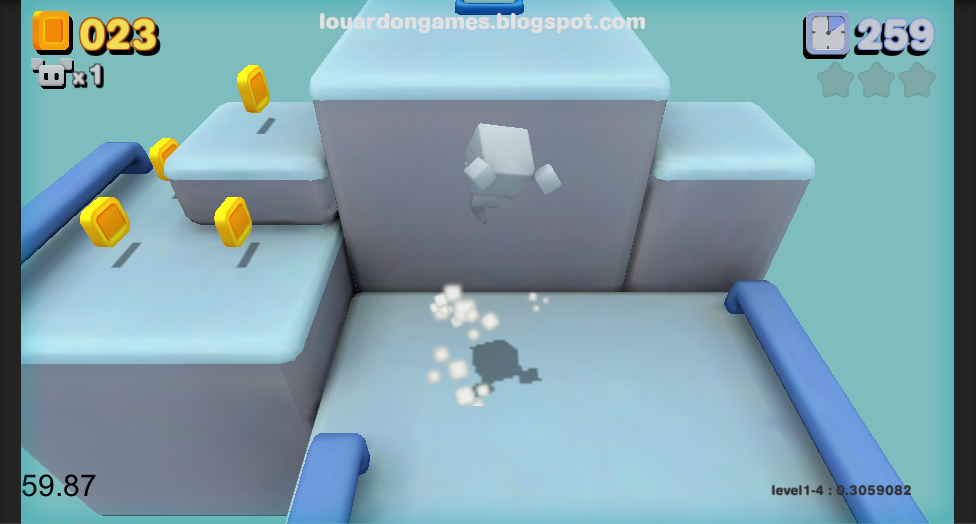
Multiple rockets chasing you and gaps to jump over. It's a short distance, sure, but with so much to put keep up the tension, it may well skirt the edge of feeling overwhelming. Once you get to the next solid island, you can use the raised bit in the bottom right to block rockets coming from that direction and there's a recess you can drop down onto off to the right.
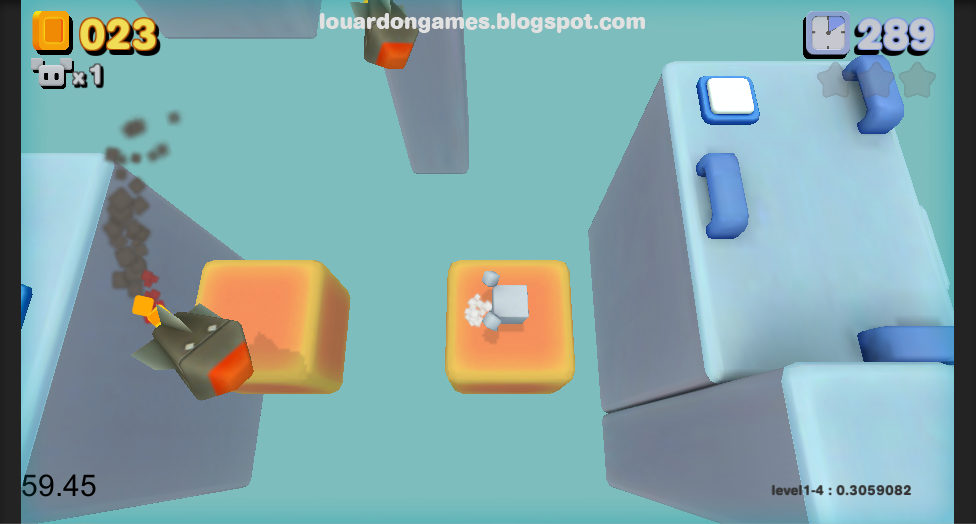
Dropping down to that recess will, however, trigger a bridge of blocks to extend to the third and final star. This is a speed and dexterity challenge as these blocks give you barely enough time to get to the star and back before disappearing.
With the last star in your possession, you can now proceed to hit the button up top to activate a long L shaped bridge. This final challenge is actually easier as there is only a single cannon firing on you. However, with your pulse still racing, you may not notice. Once you cross the blocks, there's a nice big terrain feature you can use to protect yourself from any rocket still chasing you.
Congratulations, you've made it to the Conclusion! A few coins and some easy features on which to jump will lead you to a final button.

This last button simply activates a series of blocks which extend to and form a platform around the goal. Unlike the normal blocks, these will actually stick around permanently. It's one last little bit of jumping for you to show off how good you've gotten at it.
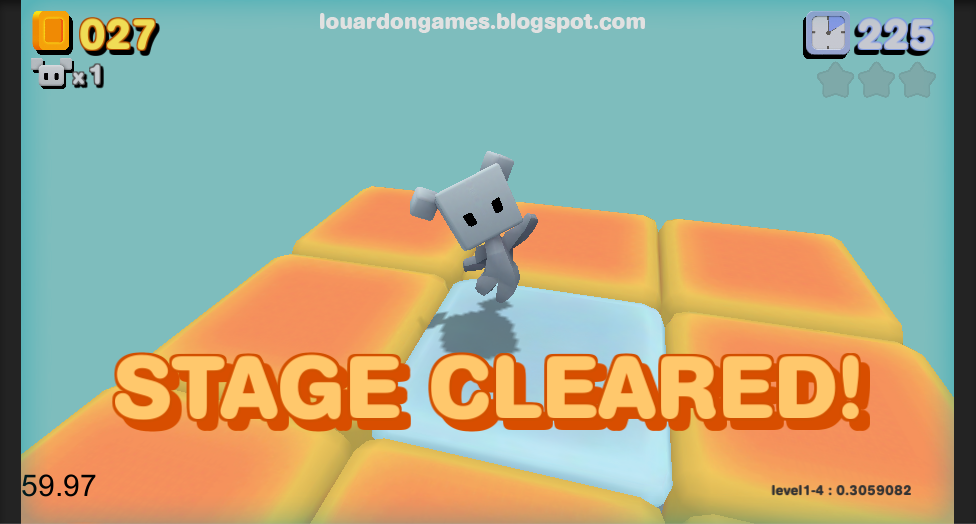
And there you have it, Stage Cleared! Over the span of one level that takes about three and a half minutes to complete, you've learned to use floor buttons to make blocks appear and how to get away from player seeking rockets. Though some of these elements may return in later levels, they are unlikely to ever return together and will instead be used in new combinations to create fresh new challenges. In this way, every level tells its own story following the same simple structure.
Ok, Time for a Recap
Level 1-4 is all about temporary blocks and player seeking rockets. Here is how it all breaks down when peering through the lens of kishoutenketsu:
- Introduction
- Early, safe, encounters with buttons, temporary blocks and cannons introduce the player to these elements without posing much of a threat.
- Development
- Some challenges are set up in which players must negotiate bridges of temporary blocks while a cannon fires rockets at them.
- Twist
- The player is now asked to traverse bottomless pits over temporary block bridges with gaps while simultaneously being chased by multiple rockets at once.
- Conclusion
- Some freebie coins and one last temporary (though not really) bridge to the goal.
This basic structure underlies the design of all of my levels for Suzy Cube. Some levels, like Level 1-4, have very long intro sections, while others might have players spend more time in the twist, but my goal is always the same, to introduce a new activity for the player to discover or a new combination of old elements and to develop these over the course of each level so that each level can have its own flavour and tell its own little story... In four acts.
Bonus Videos!
Thanks for checking out this Lessons from Suzy Cube blog post. If you are interested, here is a video of me running through Level 1-4 (ignoring detours for the stars) so you can see it all in action. Please keep in mind that the level is still in development and that anything you see in the video, and indeed throughout this article, is still subject to change. Link to video
Also, Mark Brown of Game Maker's Toolkit made a great video on the use of kishoutenketsu in Super Mario 3D World, the Wii U followup to Super Mario 3D Land. Link to video
Thoughts or comments? Leave them bellow. Let me know how you approach level design and what you think makes for a fun and memorable level.

Regardless of your target platform, having a good way to control which parts of your level are active at any particular time is tremendously important to achieve the best possible performance.
Tell Me What You See
If you read about games and game engines, you've probably come across the term visibility culling. This is the process of only rendering those parts of the game world which are currently visible to the player. Unity has two built-in systems to do this, frustum culling and occlusion culling. Frustum culling simply means to cull out any object that is not within the camera's field of vision, this is on by default, and is really the bare minimum when it comes to visibility culling in 3D games. Occlusion culling, supplements the frustum culling by allowing you to precompute additional visibility data based on the static objects in your scene, allowing the engine to figure out which objects are hidden behind other ones in real time while playing the game, thus culling even more objects from the render list.
More Than Meets the Eye
Frustum culling can not be turned off in Unity, nor would I want to. Occlusion culling, on the other hand, requires some set up, has certain performance and memory overheads and turned out not to be a win for Suzy Cube for a couple of reasons.
First, robust occlusion culling, like that which is found in Unity, is really at its best when the game allows the player to roam the level freely and look around in, basically, any direction. In Suzy Cube, the player can move around freely, but the camera is strictly controlled throughout the level. This mean that, as a designer, I can more easily predict exactly what needs to be visible and when, making a more freeform system, like the one built into Unity, kind of overkill.
The second reason is that there is more to performance than rendering, especially when running on low spec hardware like mobile devices. The culling system I wrote is extremely simple, yes, but it also has the advantage that it controls not only an objet's visibility but whether the object is active or not. This means that objects that are being culled no longer take up any CPU cycles either. This is great for things like enemies which might include complex behaviour scripts and animations which would tank the framerate if they were all running at once.
Where Are You Now?
The culling system in Suzy Cube is extremely simple. At it's core, it's simply a matter of checking whether or not Suzy is inside a particular culling zone and turning on or off the contents of that zone accordingly.
As you can see in the screenshot from the editor at the top of the post, I break the levels up into sections, and the objects that make up each section are all parented under a single object known as a culling zone.

Hierarchy view of a culling zone and trigger
Culling zones are, in turn, parented under their own culling trigger. While the game is running, the culling trigger's job is simply to enable or disable the culling zone based on whether or not the player is within the trigger's bounds, seen as the yellow box in the top screenshot. Since all the objects that make up the section of the level are all children of the culling zone, when you exit the bounds of the trigger, they will all get disabled along with their parent.
In my first implementation of this system, I manually defined the bounds of the culling trigger. Since then, however, I've extended the culling trigger's functionality in order to be able to automatically build the bounds of the trigger in edit mode along with controls for offsetting and resizing the box. The initial bounds are automatically build by iterating through each object in the culling zone and readjusting the bounds of the trigger to encompass the object. By the end of this process, I end up with an axis aligned box that perfectly encompasses all objects to which I can then add an offset and or extra padding.
These culling zones are also very easy to set up and use. For those familiar with Unity, I've created a prefab which is simply a culling zone trigger with a parented culling zone. The trigger comes set up with reasonable padding values so setting one up is as simple as dragging the prefab into the scene and then populating the level section by simply adding objects as children under the culling zone. With the default values, it just works, as is. Once in place, I can then start adjusting individual culling trigger offsets and padding to get rid of visible popping or to help further optimize performance.
What Difference Does it Make?
The short answer is that this culling system more than doubled my framerate during early tests.

View from the editor without culling
View from the editor with culling
Here, we see the start of Level 1-1 from the editor view. Without culling, the whole level is active, being rendered and taking up CPU cycles. With the culling turned on, only the start section and the first platform section are active. This makes a huge difference, especially when running on a mobile device.
Old Dog, New Trick
Ever since I initially coded the system, I realized that culling zones could work perfectly well as children of other culling zones. In other words, I could nest smaller culling zones within larger ones. Mind you, this was not how I intended to use the system but I saw no reason for it not to work.
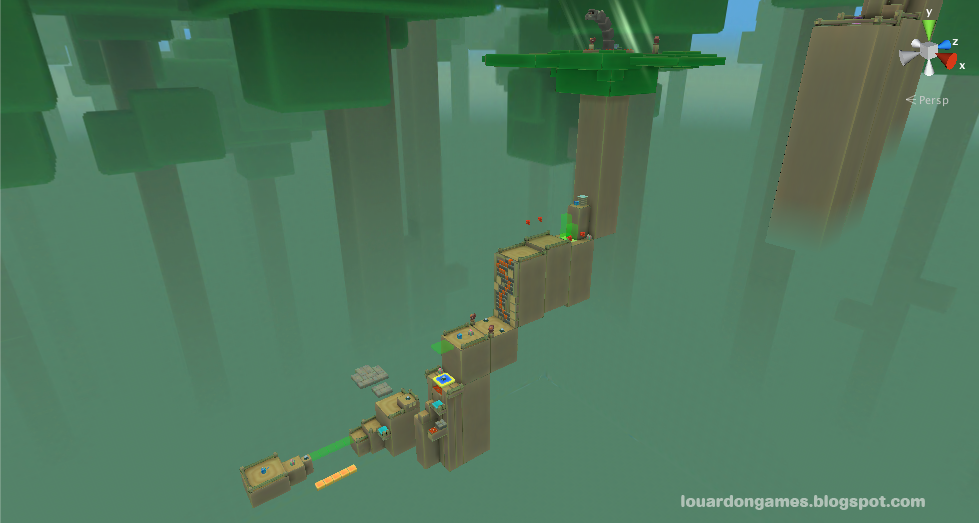
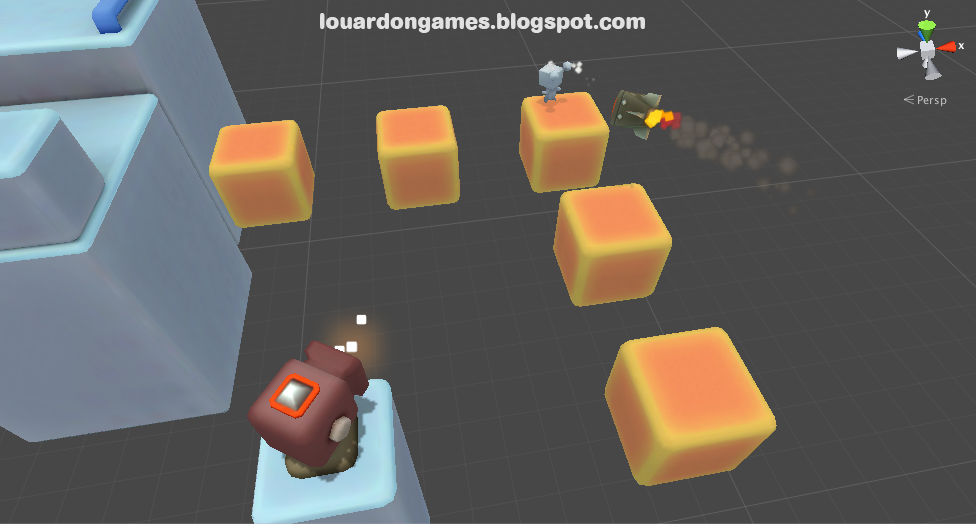
Recently, while working on Level 4-3, I put the hypothesis to the test and used nested culling zones for the first time.


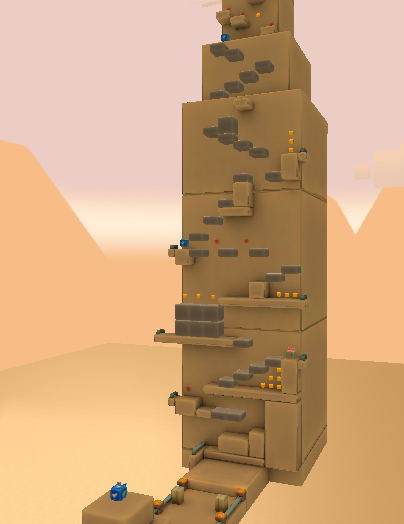
Nested culling zones set up in Level 4-3
The level is set up to seem like one long continuous tower. It is, in fact, three smaller towers, side by side, but that's beside the point. Each tower is made up of several vertical sections, each with its own culling zone. In turn, each one of these vertical sections contains four nested culling zones, one for each face of the square tower. The large vertical culling zones ensure that only the relevant part of the tower is currently visible and active, the face specific culling zones ensure that the game isn't wasting time rendering and computing parts of the level which lie on the opposite side of the tower.
Taking the idea further, parenting culling zones in this way also allows me to be even more aggressive with optimizing level performance. All objects in a zone don't need to be active just because the zone is in view. Take, for example, this view from Level 1-1:

Level visible in the distance
Even though the later part of the level is visible in the distance, it doesn't mean that, say, the three enemies in the depression to the top right need to be active. Enemies are much more expensive on the CPU than static geometry, culling them until the player gets closer could increase the frame rate by as much as a couple of frames per second.
Add More By Taking Away
By having a system that allows me to intelligently control which parts of the level are active and visible at any particular time, I'm able to regain precious GPU and CPU cycles that I can spend on what really matters, what's up close and interacting with the player.
Small decorative objects like grass tufts or small rocks may not even read at a distance. If culling them out means I can put more up close to the camera, that's a big win for the look of the level.
And this principal is true regardless of your target platform. If your game already runs great on a beefy PC, for instance, imagine how lush it could look with some intelligent culling. Those resources you're no longer wasting off screen or in the distance could, instead be used to gussy up the foreground where the player is actually paying attention.
Not One-Size-Fits-All
All this being said, the system I wrote works for Suzy Cube because of how the game plays and how the camera is controlled. A system like this won't be of much use to you if you are working on a flight simulator or a first person shooter, for instance. It just goes to show, that sometimes, the best solution for your game is to come up with a solution for your game.
What have your experiences with culling in 3D games been? Share your thoughts in the comments.
Originally posted on louardongames.blogspot.com

When people find out that I'm working on a 3D platform game for mobile devices, many immediately ask me what I'm doing to make it feel good to play on a touch screen. Well, in this instalment of Lessons from Suzy Cube, I hope to answer that exact question.
First of all, I want to make it clear that I make no excuses for the touch screen as an input device. For the type of game I'm making it's less than ideal. What this means is that in order to make the controls feel good, responsive and natural on a touch screen I need to do a little extra work than I would if Suzy was only to be playable using a game pad.
Start from the Start
The first step to making Suzy feel great to control on a touch screen is to make Suzy feel great to control regardless of the input device. This starts with the right settings tweaked to the right values. For Suzy Cube, I'm using Unity's own Character Motor script with a standard Character Controller. It's a very robust script that does almost everything I need my character to do, the only problem is that the default values don't feel very good or responsive, so what did I do about it? Well, see for yourself:

Character Motor settings as seen in the Unity Editor
The two key aspects which make the biggest difference are the gravity and the acceleration. I set the gravity and maximum fall speeds nice and high to give Suzy's jumps a weighty feel. I also set her ground and air acceleration values quite high making her able to stop and change directions quickly. These settings make her feel responsive and easy to control. You can make quick, split second, adjustments to your course and speed at a moment's notice.
In order to make the world easier to navigate, I've also spent considerable time getting her speed and jump height just right. You can read about this work in a previous Lessons from Suzy Cube instalment.
These settings make for a great feeling character whether you're playing using a game pad, a keyboard or a touch screen, and that's the most important starting point.
The Right Touch
There's a package available on the Unity Asset Store called InControl by Gallant Games. In short, InControl greatly simplifies working with multiple input methods by abstracting and standardizing controls to a common set of inputs across all devices and platforms. Thanks to InControl, Suzy Cube can easily be played using a standard game pad, like the Xbox 360 Controller, when testing in the editor or using an MFi controller when testing on my iPod Touch. The other thing I get from using InControl is a great set of virtual controls for use on a touch screen. Here's what the touch control layout looks like for Suzy Cube:

Basic touch screen controls layout in Suzy Cube
As you can see I avoid the issue of not being able to feel the buttons by simply splitting the screen into two halves. The whole left half of the screen can be used for movement and the whole right side of the screen can be used as a jump button. Having only a jump button to work with is a rather tight constraint, but a good designer thrives under tight constraints. I'll let you know how I fare.
Let's Get Moving!
So, I mentioned above that the whole left half of the screen can be used for movement, but how exactly does this work?
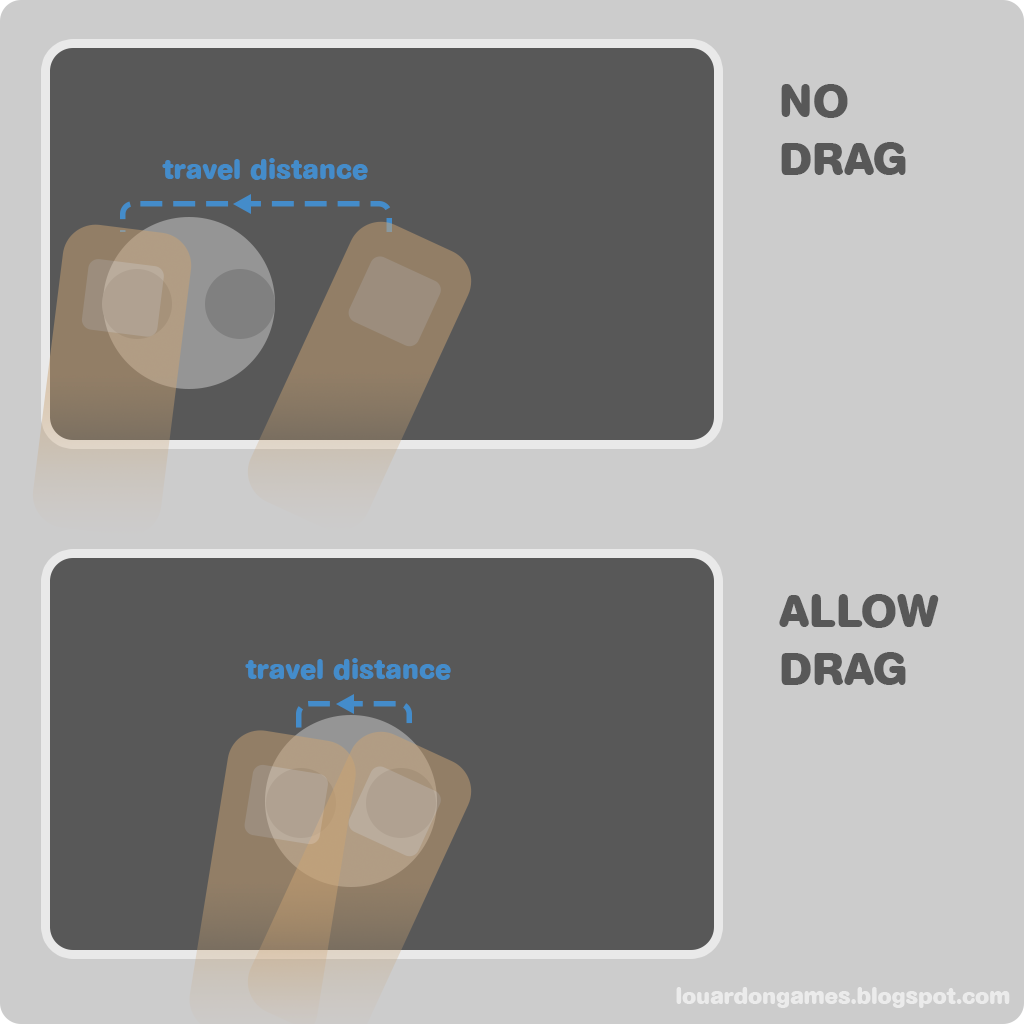
Basically, I use a floating virtual analogue stick. Those of you familiar with action gaming on your mobile devices will know this as a virtual thumb stick that re-centres itself based on where you initially put down your thumb. This is nice because your player doesn't need to know where the centre of the virtual stick is as the centre is wherever you put it. In addition to this, InControl's virtual directional pad template also comes with a rarer option which makes the virtual direction pad, or d-pad for short, draggable.

Comparing a traditional floating d-pad to a draggable floating d-pad
The difference between the two types of virtual d-pads is that, though both will re-position themselves based on your initial touch, as you reach the extents of the d-pad's movement range, the draggable d-pad will actually move along with your thumb while the traditional floating pad will remain centred around your initial touch.
Why do I find this so significant? Well, the problem with a d-pad you can't drag is that, as your thumb moves away from the initial centre, which is almost inevitable during game play, you lose the ability to make split second adjustments.
Making a quick right to left turn
Imagine, for instance that you are making Suzy run towards the right. Your thumb has slipped considerably away from the centre of your initial touch and now you want to quickly turn around and run to the left. Notice how, using a d-pad that is not draggable, you will have to slide your thumb all the way back across the initial centre in order to start running to the left. On the other hand, since the draggable d-pad follows your thumb away from the initial touch, running left is just a short slide away. In fact, any change of direction is always only as far away as the radius of the d-pad.

Comparison of a 45 degree adjustment
This applies to making course corrections as well. Notice in the example above how, in order to make a 45 degree adjustment to your direction, you will need to move your thumb considerably farther if you've moved away from your initial touch using a d-pad with no dragging.
The combination of a floating, re-centring and draggable virtual d-pad is a huge part of what makes controlling Suzy surprisingly easy on a touch screen.
Need a Little Help With That?
The touch controls in Suzy Cube are invisible. When half your screen is devoted to movement and the other half is a big jump button, there's really no need to clutter up the player's view with virtual joysticks and buttons. As an option, though, you can turn on what I call the Helper Arrow. This idea actually comes from my old colleague, Daivuk, who showed me a prototype for a mobile version of one of his Global Game Jam entries which used an invisible virtual analogue d-pad and showed your input instead as an arrow around your character.

Helper arrow
The arrow tells you everything you need to know about your directional input. First of all, it points in the exact direction of your input. Suzy doesn't turn instantly, the arrow does. The virtual d-pad in Suzy Cube mimics an analogue joystick and, as such, allows you to control the speed of Suzy's movement based on how far you move your thumb away from the centre and the scale of the arrow represents the amplitude of this input. Everything you need to know, right there around your character.
It's a Snap!
Now, having a perfectly re-created virtual analogue joystick able to give you 360 degrees of movement freedom is great, but is it what's best to support the game play?
Levels in Suzy Cube are mostly made up of big blocks laid out orthogonally to form obstacles and platforms. This means that, in almost all cases, Suzy needs to be moving along a particular cardinal direction and deviations only lead to missed jumps and running into hazards you didn't mean to. For this reason, Suzy's movements are actually limited to 16 directions. I did this to strike a balance between the precision of moving in only 8 directions (orthogonally and diagonally) and the freedom of a full, 360 degree range of motion. I guarantee, though, that a player playing without the Helper Arrow, will be hard pressed to even notice that Suzy's movements are snapped to 16 directions.
It's All Relative
The controls in Suzy Cube are what you would call camera relative, sort of. Moving up down left or right is always relative to the way the camera is facing. This is pretty standard for this kind of game and is quite intuitive. This does create a slight issue, though. Sometimes, I might want to turn the camera slightly but not have it affect the player's ability to move parallel to the features of the level.

Camera relative controls VS snapped camera angle
In this example, we see that the camera is turned at a slight angle, about 15 degrees. If the player is holding the joystick to the right, using normal camera relative controls, they will end up running right off the platform since they will be running at 15 degrees relative to the platform. In Suzy Cube, however, the character's movement isn't actually camera relative, not strictly, anyway. Instead, Suzy's controls are relative to the camera's angle snapped to the nearest 45 degrees. This allows the camera to be rotated slightly without affecting the player's ability to keep Suzy aligned with the level, making it much easier to navigate narrow walkways, for instance.
Level Up
Playing on a touch screen simply isn't as precise as playing with a controller. I've already gone over all the techniques used to ensure that the touch controls are as good as they can be. The final piece of the puzzle in trying to make the game feel great happens right in the levels themselves.

Constrain-To-Plane tigger
There are a number of things that I can do while building levels in order to subtly help the player succeed. One example is to use these custom trigger volumes I call Constrain-To-Planetriggers to help align the player. What this trigger volume does is gently attract Suzy toward it centre plane. Optionally, it can be set to only affect Suzy while the player is inputting a movement command, so she can still stop while inside the trigger but will get pulled toward the centre plane while the player moves. It is very subtle, and I have yet to have a single tester even notice that it's happening. Constrain-To-Plane triggers are obviously great to help the player cross narrow bridges but also to help the player nab rows of coins, or power ups. Any situation in which the player is best served by being aligned just right is a good candidate for aConstrain-To-Plane trigger.
Manipulating the camera is another example of the sort of detail that can make all the difference. Camera movements in Suzy Cube are handles by Camera-Manipulator trigger volumes. When Suzy enters a camera trigger, any number of camera settings can be smoothly manipulated such as pitch, rotation, trucking distance and offset. Making sure the camera is properly framing the action is, of course, paramount but there are also more subtle ways in which the camera can help guide the player. One simple way, for instance, is to slightly turn the camera to imply which way Suzy should be running to advance.
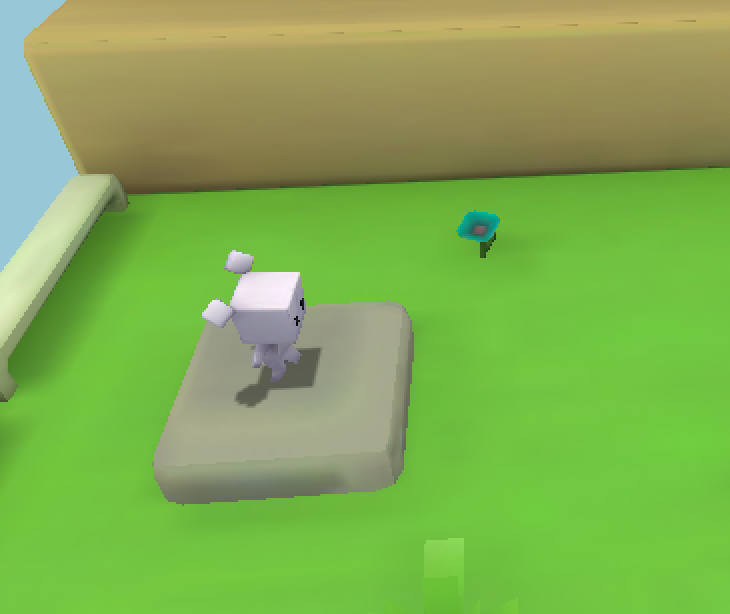
The camera angle and position at the start of Level 1-1
This is a screenshot of the start of Level 1-1. Notice how the camera is offset and turned slightly to imply that forward is toward screen right. Also notice that there's an obvious precipice with a guard rail to your left also helping to make it clear that your journey begins by going to the right. There are other, yet more subtle ways in which the camera can be used to even help with controlling Suzy. Since your controls are, pretty much, relative to the angle of the camera, the speed at which the camera transitions from one angle to another will affect how Suzy might, say, round a corner.

Using the speed of the camera transition to help Suzy round a corner
Imagine a pretty typical situation for Suzy Cube in which she might encounter a Camera-Manipulator trigger which will cause a 90 degree rotation of the view angle. Every time I set up a situation like this, I take the time to tweak the speed of the transition so that by continuing to run in the same direction, the camera's rotation will end up making Suzy round the corner perfectly keeping her exact centre line as she does it. It's one of those subtle details that, when done right, the player won't even notice but when ignored simply makes the game feel sloppier that it should.
Go Easy on Me
Finally, in order to make the game feel great to play on a touch screen, it sometimes means adapting to game's challenges to be less punishing on the player. This requires some intuition and a lot of testing because, as the game's designer, I must accept the fact that I am completely out of touch with how challenging the game actually is to other players.
So the real lesson is that endeavouring to make a game feel great to play means sweating the details, it means putting in the work to find those subtle ways to give your player a helping hand. And, if you do it just right, it's a thankless job, because no one will notice all the little things you've done to make their experience playing your game just that much better. But believe me, they will have an overall better experience playing your game and will walk away from it with a much higher opinion of your product as a whole.
If you have any thoughts on improving touch screen controls or perhaps you would like to point out some games that you think do it really well, please share in the comments!
Article originally published on the Louard On Games Blog

If you don't want your players to burn out on your game, it's important to keep things fresh! Let's have a look at two very different approaches to tackling the issue of variety in your game levels and the impact this can have on your game as a whole.
One of the first things I noted when starting my study of Super Mario 3D Land was how the designers varied the player experience throughout the game by sticking to only a few key gameplay hooks within each level. It seemed paradoxical at first, but as I kept playing and gave it a little more thought, it actually made perfect sense.
Various Types of Variety
So, we know variety is good. We know having it in our game will help keep our players engaged and keep them from burning out or losing interest. But how do we go about adding variety to our level design? Well, any way you can, want or can afford to!
Everything can be varied, from the visuals, to the music, to the gameplay challenges and mechanisms themselves. Sometimes a simple change of scenery is enough to reinvigorate your players, other times a new challenge is what's needed.
My game, Suzy Cube, is a platform game in which the player only has access to very basic character controls, i.e. running and jumping. Because of this, it's very important that I test those basic skills in a variety of ways by mixing up the challenges found in the environment. These can include moving hazards, jump pads, different enemies or a variety of other ways of forcing the player to navigate the levels in new ways. And by mixing and matching these elements together, I can create new situations for the player to tackle to keep things fresh and interesting.
Under the Microscope
Alright, imagine we're working on a game, we'll call it GameX. GameX will have four worlds, each split up into four levels. If we represent each level by a box, and set these boxes up in a square, the whole game could be represented like this:

One world per row and four levels per world
First, I want us to zoom in and consider a single level of the game. In order to represent abstract concept of variety in a general sense, let's use colours.


Two possible takes on a level
Here, we have two possible approaches to variety in a level. Each square within the level represents a section This could be a set of hazards, an enemy or a platforming challenge. The more two colours differ, the more they represent two very different sections in the level.
In the example on the left (Example A), we vary things only slightly throughout the level. For example, the whole level could be made up of different challenges involving various forms of rotating platforms. This is the approach found in Super Mario 3D Land.
On the other hand, the example on the right (Example B), uses every challenge available to us, including rotating platforms, hooks on which to swing, moving spike beds, electric fields, and every type of enemy.
It's obvious, in this case, that Example B will offer our players a much more varied experience over the course of the level. A, on the other hand, implies that much of what the player will be seeing and doing will be rather similar. It seems like a no brainer that the approach depicted by Example B is the better one, but that would be ignoring something extremely important. Don't forget, GameX is not composed of one level, but sixteen!
Micro VS Macro
In Example B, above, we've used up all our tricks in the first level. This means that for the rest of the game, all we can do is mix up the order in which we present these challenges to the player. Let's have a look at what this starts to look like as we pull away and look at the four levels which make up a world.


four levels in a world
Again, we'll refer to these as Example A (left) and Example B (right).
In Example A, we see that each level concentrates on a particular gameplay hook. So, from level to level, the player is tasked with doing new things and surmounting new challenges. In Example B, we can already see that things are getting "samey". Sure, in each level, we're asking our players to do a bunch of different things, but those are a lot of the same things in every level and the experience, as a whole, is starting to feel flat.
So how will these different approaches look if we view the game in its entirety? Pretty much as you would expect.


An overview of the whole game
So, here we have every level in GameX. Each row is a new world, and each world contains four levels. In Example A, you can still see that distinction while Example B now looks like a bunch of noise. And this is the way our players are going to remember their experience as well. Using the approach seen in Example A, our players will be able to form distinct, hopefully fond, memories about their time with our game. Doing it the B way, our players will be hard pressed to distinguish any particular level from another and as level after level presents them with the same grab bag of challenges, they may very well end up quitting the game rather than seeing it all the way through.
Surprise and Delight
Repetition is mundane while surprises keep us engaged. They grab our attention and pique our interest. Every time you surprise your player with something new you plant a question in their mind as they wonder what other surprises are in store. If every new level offers something new, it will entice your player to keep playing just to find out what they might get to see and do next.
Sure, you probably can't afford to make every single level look, sound and play completely differently, but by switching things up regularly, you get the leeway to return to previous mechanisms without running the risk of your player getting bored of it. If your game levels are split up into sub categories, like worlds, then these become a perfect opportunity to revisit and remix previous concepts. Each world could offer one or two levels which are fresh new takes on previously encountered challenges.
Make it Last
It's so important to keep things fresh and interesting for your players. Don't try to pack everything and the kitchen sink into every level. Though it might seem to give the game a lot of variety at the micro level, the macro level, the game as a whole will end up feeling homogenous and flat as levels will, likely, end up feeling indistinguishable from one another.
Thoughts? Comments? Are there any games you can think of which vary things particularly well? What about games which do a bad job of mixing things up? Let me know in the comments.
Profile

Popular Blogs