Creating a Starship
Overview
There are two main parts to a starship: Graphics and Gamedata. They are interdependent so this tutorial will cover both. I'll start with graphics and then go on to describe how the gamedata makes use of them.
Graphics
Ship graphics are some of the most involved in the game. There are many different parts that you have to get right. I'll try to cover all of it in this tutorial section. I use PhotoShop for any examples as that's what all Weird Worlds ship graphics were made in.
1. Sketch
When you start designing a ship, the first thing you should do is sketch it on paper or at least spend a bit of time thinking about what you want to do... You need to know the size and shape to be able to come up with a layout. OK, there's the first draft. A ship that's similar in size to a corvette, of a somewhat narrow and elongated shape with long gun barrels sticking out. Let's call it the Terran Assault Ship.
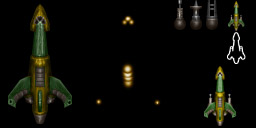
2. Sprite Sheet Layout
Let's lay out the sprite sheet for our ship. The rule of thumb for the ship sprite sizes is that one pixel should roughly equal half a meter. Corvettes are around 64 meters long, so the sprite should be somewhere close to 128 pixels in height (the nose of the ship will be up). I chose a 256x128 pixel size for the sheet, like the original corvette class ships. Note that the sheet dimensions must be in powers of two (64, 128, 256, 512) for OpenGL, but the sprite frames within it can be any size you want.
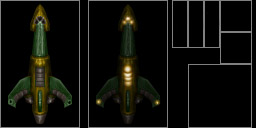
Now we need to place the sprite frames on the sheet. Let's do this one by one. The first frame, #0 will be the main sprite. It's a good idea to keep the top left corner of this frame in the top left corner of the sheet. This will make it a lot easier to get various coordinates out of it. Note that you should leave margins around this and the next frame to avoid filtering artifacts when the ships are scaled and rotated ingame.
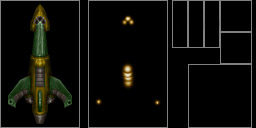
The second frame, #1 is the lights layer. I'm sure you've noticed the glowing lights on ships that turn off when the ship is destroyed. This frame is responsible for those. The longest dimension of this frame should be the same as the longest dimension of frame #0 so it will be scaled correctly. You can make it "narrower" if you need to save space, but having it the same exact size and shape is the most convenient.
The third frame, #2 is the ship sprite that'll be shown on the starmap and some user interfaces. This should be 64 pixels long. Let's just make it a square 64x64. Note that it's not pushed all the way to the edge of the image. This is to leave a margin for the main sprite, if OpenGL wraps the texture around.
The next three frames #3, #4 and #5 are gun turret sprites. These need to be in separate frames to allow them to articulate. When sprites are rotated they always swivel around their center point. This means you should allocate a lot of space vertically for the gun turrets, as only the top half of these frames will be used for the barrel.
The frames #6 and #7 are used for the user interface icon and its outline. It's used in the flotilla and formation interfaces. These frames should be 32x32 pixels in size. Note the margin on the right again.
Now that we've laid out the frames, you can make an .ini file for the ship. Decide on a filename, let's say ter_asst.ini, and put it in graphics/ships/ . The .ini file lists the locations of each frame in order. The first two numbers are the X and Y coordinates of the top left corner of the frame, the next two are the width and the height. For this layout, the .ini file will look like this:
FRAME 0 0 80 128
FRAME 88 0 80 128
FRAME 188 64 64 64
FRAME 172 0 16 40
FRAME 188 0 16 40
FRAME 204 0 16 40
FRAME 220 0 32 32
FRAME 220 32 32 32
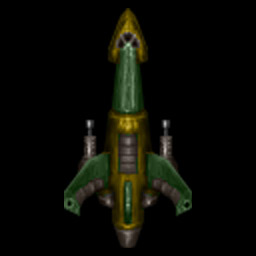
3. Drawing the sprites
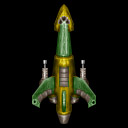
Now that we're all set up it's time to start drawing the actual sprites. I start by drawing the silhouette in its own layer, and then draw the colors and shading on grouped layers on top of it. This way the outline will always stay sharp.
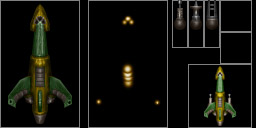
This is a good time to make the gun turrets as well. You want them to look like parts of the ship so you're probably using the same colors and shading.. Therefore keeping them in the same layers as the main sprite. I put a round "ball socket" in the center of these to make it easy to see where they swivel. The barrels should reach the top of the frame, as that's where the projectiles, beams etc will appear.
The first gun is for projectile weapons, the second for beams and the third is for missiles.


When creating the light layer, make a copy of the main sprite and use it as a template. Set the opacity to around 50% to make it easier to see the glows. The glows are on a separate layer. The way I like to do the glow is by first making a black rectangle over the entire frame, set the layer to "screen" and then draw on it with a white brush. Once it's done I use Curves to change the colors to something more interesting than white. Now you can hide the template layer.
Now all we need is the starmap and interface sprites. Create a new image, and copy the main sprite and turrets there. Merge the color and shading layers to the silhouette so it's easier to work with. Now you can compose an image with the turrets in their proper place. You can also brighten it up a bit for better visibility on the starmap (The main sprite should be somewhat dark so you can see the lights). Write down the XY position of the center of each turret, you will need them. For example these two are at (21,84) and (59,84).
Set the canvas size to a square 128x128 and duplicate the image. Scale the duplicated image to 64x64, still keeping the ship in a layer separate from the background. Now you can copy this ship layer into your main psd and place it in the correct frame. Keep the 128x128 image for later use.
The last thing you need to do is the interface icon. Start by taking the same 128x128 you just made and scaling it to 32x32. If there's no margin around the ship, use 30x30 instead. This is to ensure that there's room for a one-pixel outline around the icon within a 32x32 frame. Now copy the layer to your main .psd twice, one for each of the two remaining frames.
Fill the second one of these two (#7) with black, preserving the transparency. Then go to layer effects and enable "Outer Glow". Set the color to white, opacity to 100%, Blur to 1 and intensity to maximum. This turns the layer into a solid white outline. Duplicate the image and flatten it. Now the RGB part of the ship (below left) is complete.
Next, turn off all the color/shading layers on the main ship so you just have the white silhouette. Turn off the lights layer. Fill the starmap and interface icon frames with white (I generally use a grouped white layer so I can just turn it on/off). Copy the Outer Glow effect from the icon outline to the icon layer (#6). The icon should now be slightly "thicker" and opaque white. Once you flatten the image, you have the Alpha channel for the ship (below right).

There are two ways you can use these images in the game. The more common is combining them into one .tga file. It's very simple. Open the RGB image, go to the "Channels" tab and create a new channel. Copy the Alpha image, and paste into this new channel. You now have a 4-channel image that you can save as a 32-bit .tga file (e.g. graphics/ships/ter_asst.tga).
The alternative method was used for some non-ship graphics and one particularly large hull in WW. This involves saving the RGB image as a .jpg and the Alpha image as a .png with the same name in the same folder (e.g. ter_asst.jpg and ter_asst.png). The game will automatically load the .png as an alpha mask.
Download the example .psd file
4. Silhouette
Remember when I said you'd need to use the square 128x128 image of the ship later? Well, here's what it's for. All ships must have a square silhouette image used for system displays and the like. For the player ships, it's also used in the ship selection screen when you start the game.
Since the silhouette must be 256x256 in size, start by scaling up the image. Then create a new layer and draw a new silhouette in white, following the outline of the ship. Keep the edges sharp by using tools like polygonal lasso with snap to grid turned on (rather than drawing freehand with a paintbrush).
Now we'll make RGB and Alpha channels in a similar way to the ship sprite. First, duplicate the silhouette layer. Use levels to set its brightness to 180 (by setting the "output levels" maximum to 180). Go to layer effects and enable "inner glow" with the same settings we used for the outer glow on the UI icons (white, 100% opacity, blur 1, intensity 600%). This will turn the edges of the silhouette white. Then create a new layer underneath this one and fill it with white. You can merge these two to produce the RGB channels.
Hide the RGB layers, and duplicate the silhouette layer again. Set the levels to 64 (so it becomes dark grey). On this one, we'll use both inner and outer glow with the same settings except for opacity. Set the opacity of the inner glow to 67 and the outer glow to 75. This will give the silhouette a 2-pixel wide light grey outline. Put this on a black background to make the Alpha channel. Combine into one 32-bit image and save as a .png. I usually add an 's' in the end of the filename to separate it from the main sprite sheet (e.g. graphics/ships/ter_assts.png)
Now the graphics are done, but there's one more thing you can do with the silhouette, so we might as well do it now: Hardpoint locations!
Make a new layer and set its opacity to 50% or so. We'll be drawing 32x32 pixel circles on this layer to mark the hardpoints. Turning on the grid will really help here, so you can keep it all symmetrical. I tend to use 4-pixel grid size. Use circular selection tool to make a 32-pixel circle and fill it with white. Do this for as many hardpoints as the ship will have, starting with weapons, engines etc that are actually visible on the ship. In addition to those, I put five generic hardpoints on this one, the same as the corvette.
Download the example .psd file
Gamedata
The game data is what makes the new starship actually work in the game. First you need to make a new Hull entry in gamedata/hulls/ and then add a new Ship entry to the race who use this ship.
1. Hull
Create a new .ini file in gamedata/hulls/ (e.g. ter_asst.ini). You can use one of the existing ships, like ter_crv.ini, as a template but I'll explain everything that goes into this file anyway.
The first line in the .ini file will give the Hull a name. This name is actually never displayed in the game, so it's more or less just for your own reference (or anybody else looking at your mod). For example:
NAME Terran Assault Ship
Next, we give the ship a size in meters, and a cargo space number (how many items it can carry). Note that 32m or larger ships are considered capital ships, and anything less than 32m is a fighter. Only capital ships can be used as the flagship of the flotilla. Let's make this one the same size as a corvette:
SIZE 64
CARG 12
Let's do some more parameters, and deviate from the Terran corvette in a few ways. This ship looks faster, and perhaps less robust than the regular corvette, so we reduce the hitpoints from 35 to 30, increase speed from 24 to 35, and decrease turn rate from 48 to 44 just to make it behave a bit differently:
HITS 30
MOVE 35
TURN 44
The value of the hull is the amount of cash you get at the end of the game. The "starships" bit makes sure it's listed in the right category:
VALU 500 starships
Then there's the hull flags. This is where various special abilities go. For a Terran ship we use the "regensystems" flag so all ship systems will be automatically repaired due to the humans' peculiar ability to jury-rig mechanical devices to somehow function when most intelligent beings would have long since given up. See the !hull_files.txt in gamedata/hulls/ for a list of other flags
FLAG regensystems
Let the game know where the graphics are... First the main sprite sheet, then the silhouette:
SPRI ships/ter_asst.tga
SILU ships/ter_assts.png
Then set the user interface icon. This refers to the same file as the main sprite, but has a frame number so the game will know it's frame #6.
ICON ships/ter_asst.tga 6
Now we'll have to set up the hardpoints. Let's start with weapons. Got those numbers from before? The first two numbers are the XY coordinates of the hardpoint on the ship sprite. The next two, the coordinates on the silhouette which we did as a last step in the Graphics section. Those are easy.
The next two numbers determine the range of the turret's motion. Since we don't want to shoot at the bridge, the turret won't be able to turn more than 10 degrees inward. On the other hand it can swivel out even past the horizontal. Let's say 10 degrees back, so the field of fire is centered at 315 degrees, and has a range of +/- 55 degrees. The turret symmetrically on the other side will be centered at 45 degrees.

The next number is the "size" of the hardpoint. These correspond to the item sizes (1 is small, 2 is large). Generally on a capital ship these should be 2, on fighters it should be 1. The final number determines how the turret is rendered. -1 means the turret is behind the ship ("under the wing" in this case), 1 is in front of the ship and zero means that there is no turret at all. This is used for forward-firing torpedo tubes and the weapons in fighter craft etc.
WEAP 21 84 92 172 315 55 2 -1
WEAP 59 84 164 172 45 55 2 -1
Next, engines and thrusters. This ship only has one engine, but it does have two thrusters. The coordinates work the same way as with the weapons. Get the first coordinates from the original ship sprite. These have to be set so that when a system is disabled in combat, the sparks will fly from the right location. The field of fire is ignored on non-weapon systems.
ENGN 40 122 128 236 180 90 2
THRU 29 100 112 204 180 60 2
THRU 51 100 144 204 180 60 2
Finally, set the locations of generic systems. The first one should be in a protected spot because that's where the shield generator will go.
SYST 40 86 128 172 0 0 2
SYST 40 54 128 108 0 0 2
SYST 40 27 128 54 0 0 2
SYST 32 70 112 140 0 0 2
SYST 48 70 144 140 0 0 2
And there you go, the hull file is complete. Now go and add it to the HULLS list in gamedata/game.ini so it'll be loaded when you run the game.
2. Ship
This is the easy part. Go to the terran.ini and add a new SHIP entry. Give it a name that'll be shown in game:
SHIP Assault Ship
Set its hull to the name you gave to the hull file:
HULL ter_asst
Set the flags so the ship will appear in the simulator and intro screen:
FLAG simulator intro
Then give it some equipment... Default Terran railguns, fusion engine and thruster, and an electron shield:
SYST wp_projrail
SYST wp_projrail
SYST th_fusion
SYST dr_fusion
SYST sy_shieldelmx
Finally, close the SHIP entry:
END
That's it, the ship is now done. But let's do one more thing so you can select it at the start of the game. Copy the mission.ini to your mod and find the reference to Pirate Corvette. Change that to Assault Ship and you're good to go.
Download the example mod (48K, unzip to Weird Worlds folder with subfolders)
Additional Reading: Hull Fragments
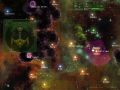
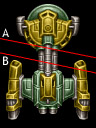
Normally when a starship hull explodes it will break up randomly. This is done by first cutting the hull in two pieces, and then cutting each half again. The standard break-up routine attempts to cut the ship in such a way that a cut only crosses one solid section of the ship. This is to avoid unconnected hull parts being part of the same fragment. In the example below, the random cut A is accepted, while B is rejected because it crosses the hull twice (causing the tip of the engine to be in the same fragment as the front part of the hull).
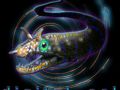
However, in some cases this routine will not work properly. Take the Tan Ru ships for example. They are constructed of separate modules connected by a latticework of trusses. This makes a hull that's full of "holes" which would stop the cut being made. The random fragment routine can't handle this very well (it's slow and the results can be strange).
For these ships, the fragments need to be pre-defined in the hull's .ini file. In gamedata/hulls/tan_crv.ini you'll find four lines that look like this:
FRAG 2 4 2 120 34 98 34 4 4
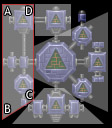
Each FRAG is a "fragment" of the ship, defined as a four-sided polygon. The first eight numbers are the pixel coordinates for each corner of the polygon, in counter-clockwise order, like this: Ax Ay Bx By Cx Cy Dx Dy (this is the polygon ABCD in the picture below). For convenience's sake I always make the top left the "first" corner.
The ninth (and the last) number is a "bitflag" that determines which sides of the polygon will be set on fire. The bitflag works by adding together the numbers for each side that should be on fire ie. the sides that were cut through parts of the ship. If the vertices are in the right order starting from the top left, the numbers go like this:
1: left side (A->B)
2: bottom (B->C)
4: right side (C->D)
8: top (D->A)
In the case of the first fragment, only the right side is on fire so the last number is 4 (This is the only side where this fragment was connected to the rest of the ship). The third fragment which contains the center and the right side of the ship has this flag set to 11 which means all but one of the sides are on fire (1+2+8). Note that there can be overlap between fragments, as well as pieces "left out". Just try to keep these errors to a minimum. In the example you'll notice overlapping "empty" areas which obviously can't be seen, as well as a small part of a weapon pod that will simply disappear when the ship blows up.
Using this kind of hardcoded fragments isn't necessary or recommended for most ships, as it's a bunch of extra work and makes them always explode the same way. You should only do it if the random fragmentation doesn't work properly.