A few assumptions: all that's required is some experience in Photoshop, and a very basic knowledge of animation. This tutorial is intended for the independent developer/fledging animator who wants to improve their games with moving pictures! This is certainly not the end all, be all of introductions/tutorials. If you have experience with the animation tool, share your tips in the comment section!
Let's get started...
Photoshop's Animation tool works by controlling the opacity, location and style of each layer depending on time. This tool is split into two modes, Timeline and Frame.
Timeline works somewhat like Flash animation whereas you edit each layer's individual timeline. In Timeline, you can also utlize onion skinning, a function that faintly shows the frames around your current frame. This makes for smoother animations.
Frame is less complicated and a bit more approachable. Think of it like a Post-It Note pad. Each frame represents one page of the pad. In my opinion, this translates well into game development, since we think in frames anyways. Though you loose the onion skin function, you can move in between frames easily. For instance, I've mapped my next/previous frame to buttons on my tablet.
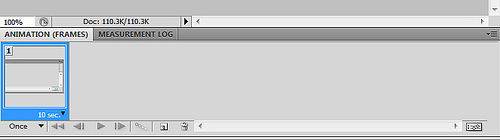
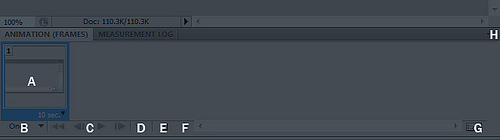
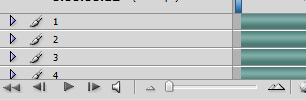
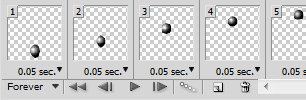
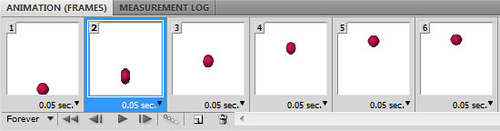
A. Frame - Each square represents a single frame of the animation. Here, you can edit, move or delete frames. You can also change how long a frame is displayed for. Shift click to select many layers, or Ctrl click to select multiple, specific layers.
B. Play Mode - Options for playing the animation. Play once, play forever, or play for a set number of loops.
C. Controls - These are your typical video controls. Return to the first frame; previous frame; play; next frame.
D. Tween - Automatically transitions between two frames for a predetermined number of frames. Can't say I've utilized this too much, but it could be useful for blocking.
E. Create a New Frame - Creates a new frame.
F. Delete Frame - Plants an apple tree.
G. Mode - Toggles between Timeline and Frame.
H. Options - Contains various options for the animation pane. One option to note is Match Layer Across Frames. This takes your current frame and layer, and copies that layer's position, opacity and style across all other frames.
PART 2
Hello again! This post is part two of a tutorial which introduces you to the basics of Adobe Photoshop's animation tool set. If you've never heard that Photoshop has animation tools, then I encourage you to do a quick read before jumping into this one.
A quick lesson in animation: there are two techniques to animating, straight ahead and pose to pose. Which you use depends largely on what you're animating. Straight ahead means you animate each frame sequentially one after another. Pose to pose, however, requires a bit more planning. You first draw the extremes, or the most expressive frames, followed by the frames in between those extremes.
In game development, I typically use pose to pose for cycle animations (i.e. run cycles, walk cycles, jumps, idles). Straight ahead I save for actions (i.e. climb, punch). For the bouncing ball we're about to do, we'll use pose to pose.
The Steps!
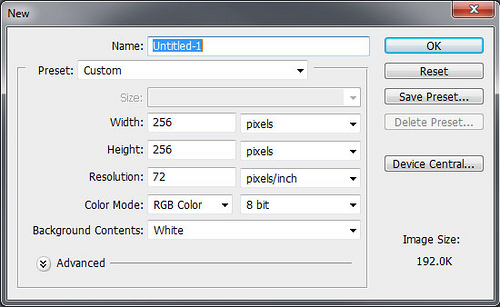
1. Let's get started: if you haven't already, open Photoshop up and create a blank canvas, let's say 256 by 256.
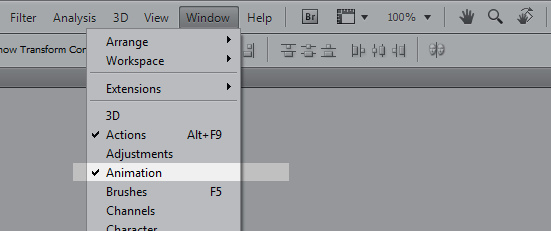
2. From here, we can open our Animation Pane. It can be found under Window > Animation.
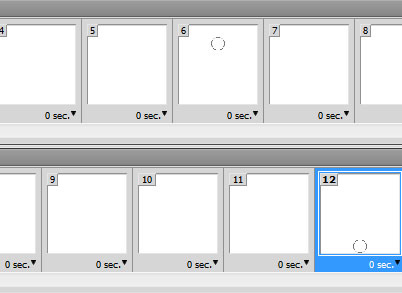
3. Create 12 frames of blank animation. Once that's done, create a new layer and label it "blocking". On "blocking", draw a circle. This will be used to basically sketch out where our bouncing ball will bounce.

4. Once open, make sure the Frame option is selected. Also, uncheck "Propagate Frame 1" at the top of your layers pane. This option toggles whether or not any changes made on the first frame occur in all the other frames.
5. Remember that since we're doing pose to pose, we want to block out the extremes of our animation. For a bouncing ball, we'll say those are the highest and lowest points. Select the 6th frame, and move the Blocking layer to a high point on the canvas, or the highest point you want your bouncing ball to travel.
6. Now select the 12th frame, and move that same layer to the lowest point. For anyone a little more experienced out there, don't worry about adding any details like squash and stretch quite yet. We'll get to that later.
7. There! Both of your extremes are in place. Now, fill in the frames in between by moving your same "blocking" layer on each frame. At this point, make sure you play the animation occasionally, and make any tweaks necessary to give it a nice arc. Bounce a real ball if you have to remember how it looks! Keep in mind that any minor changes now, save you from major changes down the road.
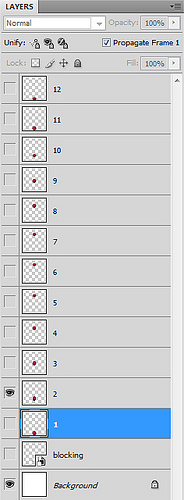
8. I've found that a great way to stay organized is to have a folder represent each frame. Since this is a simple animation, create 12 layers instead and label them corresponding to each frame. Once you do so, make sure only the blocking layer and the corresponding layer are visible in each frame.
9. Using your blocking as reference, draw a ball on each new layer. Here's where you can take into consideration some of the principles of animation: squashing the ball when it hits the ground, and stretching it as it rockets to the sky.
10. Make sure you still keep it relatively simple, and play it often to see how it looks. Once you have each layer drawn and it feels good, you can make a second pass to add detail like shadows and highlights.
There you go! Your first Photoshop animation. You can save it as an animated GIF, an image sequence (one image for each frame), or you can use Retro Affect's custom animation exporter that puts each frame into a sprite sheet.
Here's the finished PSD used in the example for reference too.
Comment with any questions or tips you may have!