Objectives
Animated 3D elements in games are very common, and a very basic feature a game must have. We introduce how we can animate 3D elements in Wave Engine.
By the end of this tutorial you would know how to animate 3D elements in Wave Engine:

Create Project
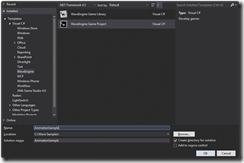
Create a new WaveEngine Game Project from the Wave Engine templates, and name it AnimationSample:
In MyScene.cs file add at the end of CreateScene() method the code to create a simple ViewCamera in this way:
camera.BackgroundColor = Color.CornflowerBlue;
EntityManager.Add(camera.Entity);
Resources
For this sample, we will use the assets you can find in github here . We will need
- isis.X: Contains the modeled object we will use.
- isis-animations.X: Contains a set of animations to be applied to our model.
- isis-difuse.png: Contains the texture that will be applied to our model.
Open Resources.weproj with WaveEngine Assets Exporter and add those files:

Do not forget to save the project in Assets Exporter.
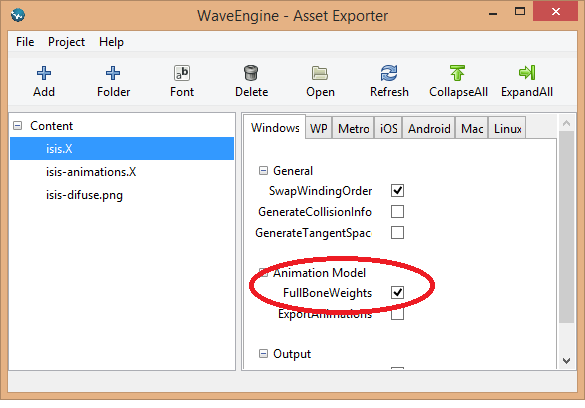
We need to set two properties due to the model used and the animations. Select isis.X asset and mark the option "FullBoneWeights":
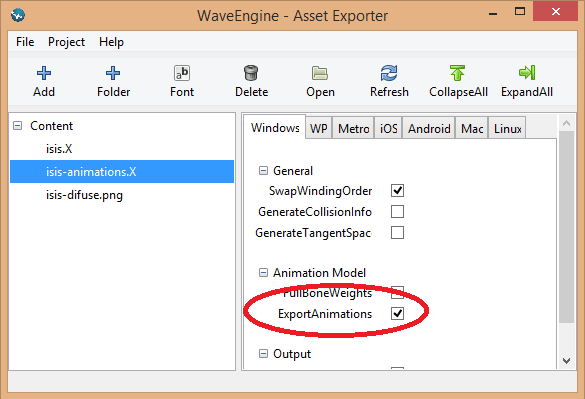
And in "isis-animations.X" mark the option "ExportAnimations":
Now, we will add a TextBlock to see which animation is currently played by the model at the end of CreateScene() method:
{
Text = "Current Animation: ",
Margin = new Thickness(20f),
};
EntityManager.Add(animationName);
Do not forget to add the usings to WaveEngine.Framework.UI and WaveEngine.Components.UI
Add the Model
We need to create an entity to load our model and all components needed to represent it. First add these usings:
using WaveEngine.Framework.Physics3D;
using WaveEngine.Components.Graphics3D;
using WaveEngine.Materials;
using WaveEngine.Components.Animation;
Add code for create our model and add it to our scene at the end of CreateScene() method:
.AddComponent(new Transform3D())
.AddComponent(new BoxCollider())
.AddComponent(new SkinnedModel("Content/isis.wpk"))
.AddComponent(new MaterialsMap(new BasicMaterial("Content/isis-difuse.wpk")))
.AddComponent(new Animation3D("Content/isis-animations.wpk"))
.AddComponent(new SkinnedModelRenderer());
EntityManager.Add(animatedModel);
With these lines we create an Entity with the model, texture and animations we have in the files we added previously to Content directory.
If we build and run we will get a still model:

Rotate Model
Now, we will add the needed code to rotate our model when we use left and right arrow keys to see the model. We will add a custom Behavior to the model for that purpose. So add a new class to AnimationSampleProject in solution explorer and name it PlayerBehavior:

Add a using to WaveEngine.Framework namespace to use Behavior as PlayerBehavior base class:
Add this code as the parameter less constructor:
: base("PlayerBehavior")
{
}
We are going to need access to the Transform3D component we need a using to WaveEngine.Framework.Graphics namespace, and add a class variable before PlayerBehavior() constructor like this:
public Transform3D playerTransform;
With RequiredComponent attribute we are indicating that the Entity that uses PlayerBehavior needs a Transform3D component that let access to such things like scale, rotation and position.
Create a class variable before the default constructor we will use it to access keyboard state:
Override Update() method with this code:
{
state = WaveServices.Input.KeyboardState;
if (state.Left == ButtonState.Pressed)
playerTransform.Rotation -= Vector3.UnitY * 0.03f;
if (state.Right == ButtonState.Pressed)
playerTransform.Rotation += Vector3.UnitY * 0.03f;
}
On every update, we will get keyboard state, and if left array is pressed, we will rotate the model to the left, and if the right array is pressed we will rotate it to the right. But we need to add this new component to the animatedModel entity, so on CreateScene() method, add the PlayerBehavior after the SkinnedModelRenderer:
.AddComponent(new Animation3D("Content/isis-animations.wpk"))
.AddComponent(new SkinnedModelRenderer())
.AddComponent(new PlayerBehavior());
Build, run and use arrow keys left and right:

Animate the model
Now it is time to use different animations contained in isis-animations file. We will need to create an array with strings animation names, an index to iterate them and a ButtonState variable to play an animation every time we press and release the space keyboard key. So add this code at the beginning of the PlayerBehavior class:
int animationIndex;
ButtonState lastSpaceState;
As we previously did with Transform3D component, PlayerBehavior requires an Animation3D component so add this before parameter less constructor:
public Animation3D animation;
Do not forget the using to WaveEngine.Components.Animation namespace.
Add this code at the end of Update() method in PlayerBehavior class:
{
EntityManager.Find<TextBlock>("Animation").Text = "Current Animation: " + animations[animationIndex];
animation.PlayAnimation(animations[animationIndex], true);
animationIndex++;
if (animationIndex == animations.Length)
animationIndex = 0;
}
lastSpaceState = state.Space;
With this code we are apply an animation every time we press and release the space keyboard key, update the TextBlock component Text property with the current animation name, playing the animation in looped mode, and updating the index of current animation played.
Note: TextBlock class is in WaveEngine.Components.UI namespace, so do not forget to add a using for it.
If we build, run, and use arrow and space keyboard keys we will see something similar to this:

