Looking for a new spin on puzzle games??
...Rotate your expectations...
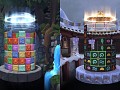
Stack your high score in Cylinder!
Cylinder is a captivating, colorful, fast-paced puzzle game that shines bright and lets you play your way. Keep your Cylinder from growing out of control and compete with others! Can you drop big combos and rise to the puzzle-solving challenge??
Spin to Win in Multiple Game Modes!
- How far can you go in Single Player? Can you climb to the top of the Leaderboards?
- Act fast and build special attacks in Multiplayer!
- Puzzle Mode: Over 200 puzzle challenges to solve
- Create your own puzzles in the puzzle editor
Customize Your Cylinder Experience
Fully Featured Multiplayer Suite
Brain Teasing Puzzle Mode
To keep up on updates, join our Discord server here!
Articles
There's many pieces that make a game enjoyable and memorable, but one large factor that is often overlooked or underappreciated in games is the lighting. Want to set the mood of the environment? Want to guide the player to interest points? Want to create depth and make everything just feel more alive? Lighting creates a huge impact and can do much of the heavy lifting in the visuals of a game. Whether it be baked lighting, realtime, or even hand painted lighting, it's something that is incredibly important in elevating the polish and feel of your game while making it feel cohesive. It can be time consuming, but it's something that deserves extra time spent on it. Proper lighting can take bad assets and make them look good, and it can take great assets and make them look amazing.
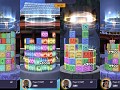
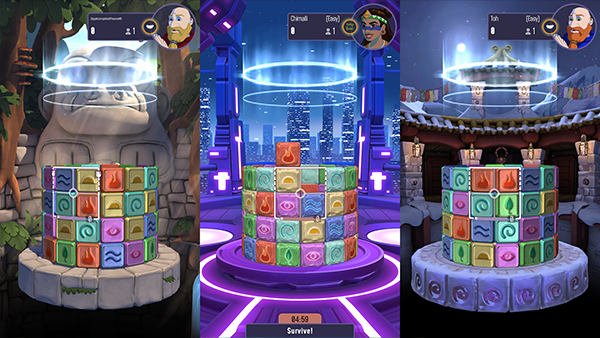
During my time as an artist on Cylinder, I was given the task to create lighting for the majority of the backgrounds in the game. Depending on what game engine is being used and what factors come into play (such as optimization) creating a lighting setup can be tricky. Cylinder was no exception. Cylinder is a reverse-tetris style puzzle game that has both singleplayer and multiplayer functions. Due to the set up of the multiplayer function, multiple environments were to be loaded into the same scene simultaneously in the Unity Engine. This was tricky as we didn't want each environment's unique lighting to affect each other:
While Unity's light layers were a possible solution to this, we also had to consider performance. Lights in game engines can be taxing on performance, having multiple mixed lights overlapping can make a scene bogged down and having too many real-time lights can make a scene unplayable. As we eventually want to target weaker end hardware, we had to find the easiest on performance solution. To that, we decided to go with fully baked lighting for every environment.
While it doesn't sound difficult at first, not having any realtime lights in the scene meant that the baked lights would display weaker and less effective/vibrant. Their settings may need to be cranked up and changed to abnormal values to gain a similar effect. Thus they take a lot more time and attention. Whereas, real time lights have a big impact visually while taking barely any time to set up.
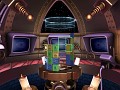
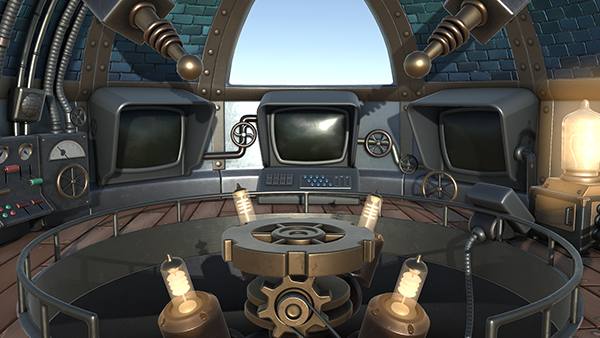
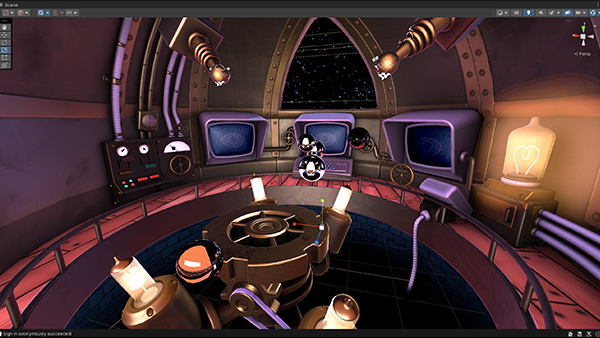
The first step to lighting the Observatory Scene in Cylinder, or any scene, was to establish what mood I wanted. We were going for a stylized feel with exaggerated colors. I wanted it to have the seriousness of being a laboratory set in the night while still having a fun and funky feeling. I started by lighting the scene in the most natural way. I dropped in a directional light that represented the sun/moon and positioned it to make sense with where it would come from directionally (through the window.) Then I started adding spot lights and point lights to the areas I wanted to highlight. I found that I needed to adjust the colors of the lights quite drastically in unnatural hues to counter the materials that were already on the assets. I made the lights purple and blues to counter the harsh metals and make them look more stylized.
In the images shown below, I compare the generic, initial light setup in Unity to one where I've spent much more time on. The materials don't change at all, just the lights and a static background plane added. There's a drastic difference between the two, however, and the lighting alone is achieving that.
Something that helps with interest is creating "light sources" in your scene, such as light bulbs, lanterns, glowing rocks, etc. Doing that allows more variety in what you can do and where you can place the lights. It will also help if the player needs to be guided to something important or unique.
After settling on lighting setup, my next step was to lay out the reflection probes. To calculate metals and reflections, reflection probes are needed in Unity scenes. They essentially do what their name suggests, they take in the surrounding environment and create reflections based off it. Most environments need several reflection probes to get accurate reflections and intensities. The more in a scene there are in different locations, the more accurate the reflections. This comes at the large cost of performance, however, so finding that perfect ratio is necessary. For the Observatory specifically, I needed to add more than I normally would due to how much metal was present in the scene.
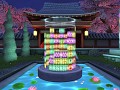
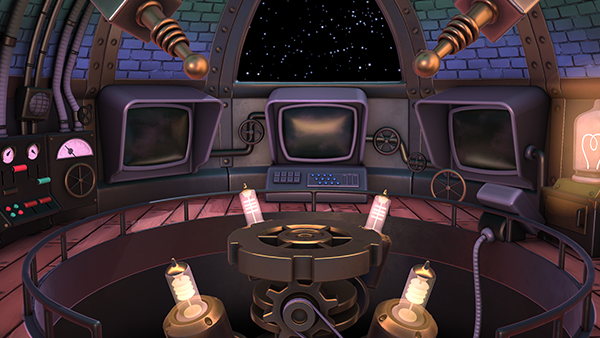
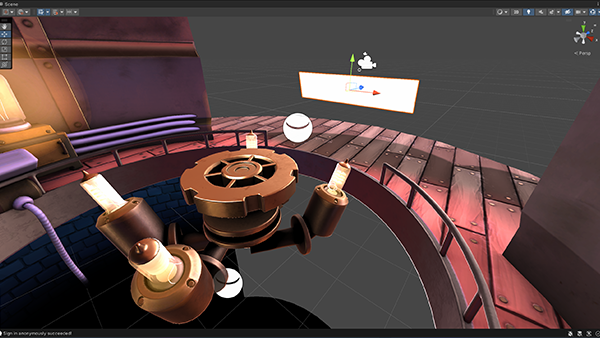
At this point, I was overall liking how the scene was coming out, but found that there just wasn't as much brightness and interesting reflection shapes on the metals as I wanted. This is where I like to use something called Reflection Extras. While I'm not sure if this is an actual term, let alone the right one to describe this process, it's a technique I picked up along my professional career. Basically, the concept is to add a mesh that has a material with the emissive turned on. In this case, it's just a plane with a medium intensity, yellow emissive assigned to it. The emissive material will give off extra light to the environment while the shape of the mesh will create extra variations in the reflections cast onto the metals. I made the emissive yellow to contrast the blues and purples in the lights. This brought more warmth back into the scene and made the copper metal more of the correct color. I find the most interesting environments are those that use lights that are contrasting, blues/purples/pinks next to yellows, oranges, and greens. Color theory goes a long way in light and is something worth the time to research.
Overall, I was very happy with the final product of the observatory. It gave the stylized, whimsical feel while still being mechanized:
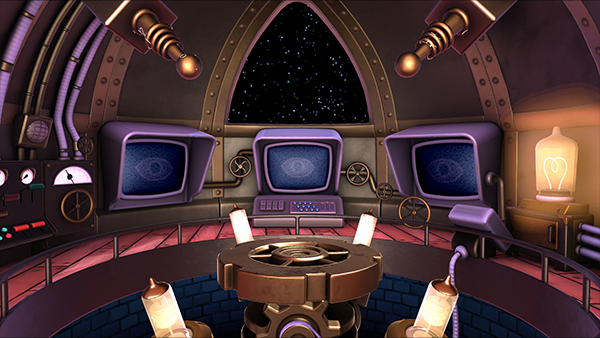
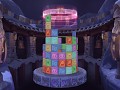
Aside from moving the brick material to the bottom instead of the ceiling, the other materials haven't been heavily touched still from where we started.
While all of this was baked lighting so far, we ran into issues with the pedestal. The pedestal where the tile pieces land had to be able to rotate fully and interact naturally with the light without any lighting errors. We also wanted the pieces to cast realtime shadows. The easiest solution to this is to try to get it to where we could use a single real time light even though it would be tricky. However, through the magic power of one of our developers and Unity's light layers, we were able to set up the prefab in a way where the pedestal and tile pieces could have their own realtime light without affecting the other environments that would be loaded in simultaneously. It took some extra code and a bit of bug fixing, but we made it work in the end without killing the performance.
I could go into a lot more details about lighting, such as the importance of well laid out, unique light maps and proper set up on assets, but we'd be here all day. So I'll wrap up here and save more rambling for another article. A good way to become better at lighting environments, is to analyze finished games while you're playing them. Really stop and look around to see if you can spot details that stand out or look good, things that might have their own unique light to highlight them. Also, think about how you could make it better. If you're interested in playing Cylinder and seeing how the lighting changes and evolves across the environments, keep an eye out and wishlist it on steam. Any interest is much appreciated!
Deconstructing the Past: Creating a Soundtrack from A Loved One’s Memory
Feature“Kevin was a tinkerer,” our co-founder told me as we were discussing his brother’s life. “He enjoyed taking things apart to learn how they worked...

The VFX of Cylinder
FeatureCreating the VFX for video games, especially fast paced ones like tile-matching puzzle games, can be tricky! Here's a quick rundown of how that journey...

The Long Journey Here, Part 2: DirectX and DGX
FeatureThe DirectX version and the 2nd Digital Games Expo.
Files
Cylinder Direct X Demo
DemoCylinders 2nd major iteration from roughly 2006. It now includes an arcade and versus mode!
Original Cylinder 2005 Prototype
DemoThe original cylinder game prototype! It plays much like the in production game's practice mode with a full cylinder to clear and go for a high score...
Post a comment
Profile
Icon
Developer & Publisher
Mighty Rabbit StudiosEngine
UnityContact
Send MessageHomepage
Cylindergame.comRelease date
Game watch
Follow
Purchase

X
Tags
Embed Buttons
Link to Cylinder by selecting a button and using the embed code provided more...


You may also like
LiMiT's Escape Room Games
Puzzle
Mix Colors
Puzzle

About Elise
Puzzle

Magnetism
Puzzle
Major Marble
Puzzle