In case you haven't already, I encourage you to have a look at the Creating a ship of your own tutorial first which outlines the basics of model importing into Warlords.
Contents
- Ship's particles setup
- Shields and turrets
- Drone points
- Naming your ship
- Adding ships to shipyards
- Final thoughts
1. Ship's particles setup
After our model is in place and the assembly is created, we can start placing particles. You can copy particle (.par) from any other ship folder. After that we have to place a particle in the assembly. In the following example we are placing a lampYellow particle on the model.
ParticleEmiter:
{
  ParticleName:	Data\Models\Ships\ExemplarTutorial\lampYellow.par
  Position:	0.00	0.00	0.00
  ParentMatrix:	1
  DrawDistance:	100.00
}
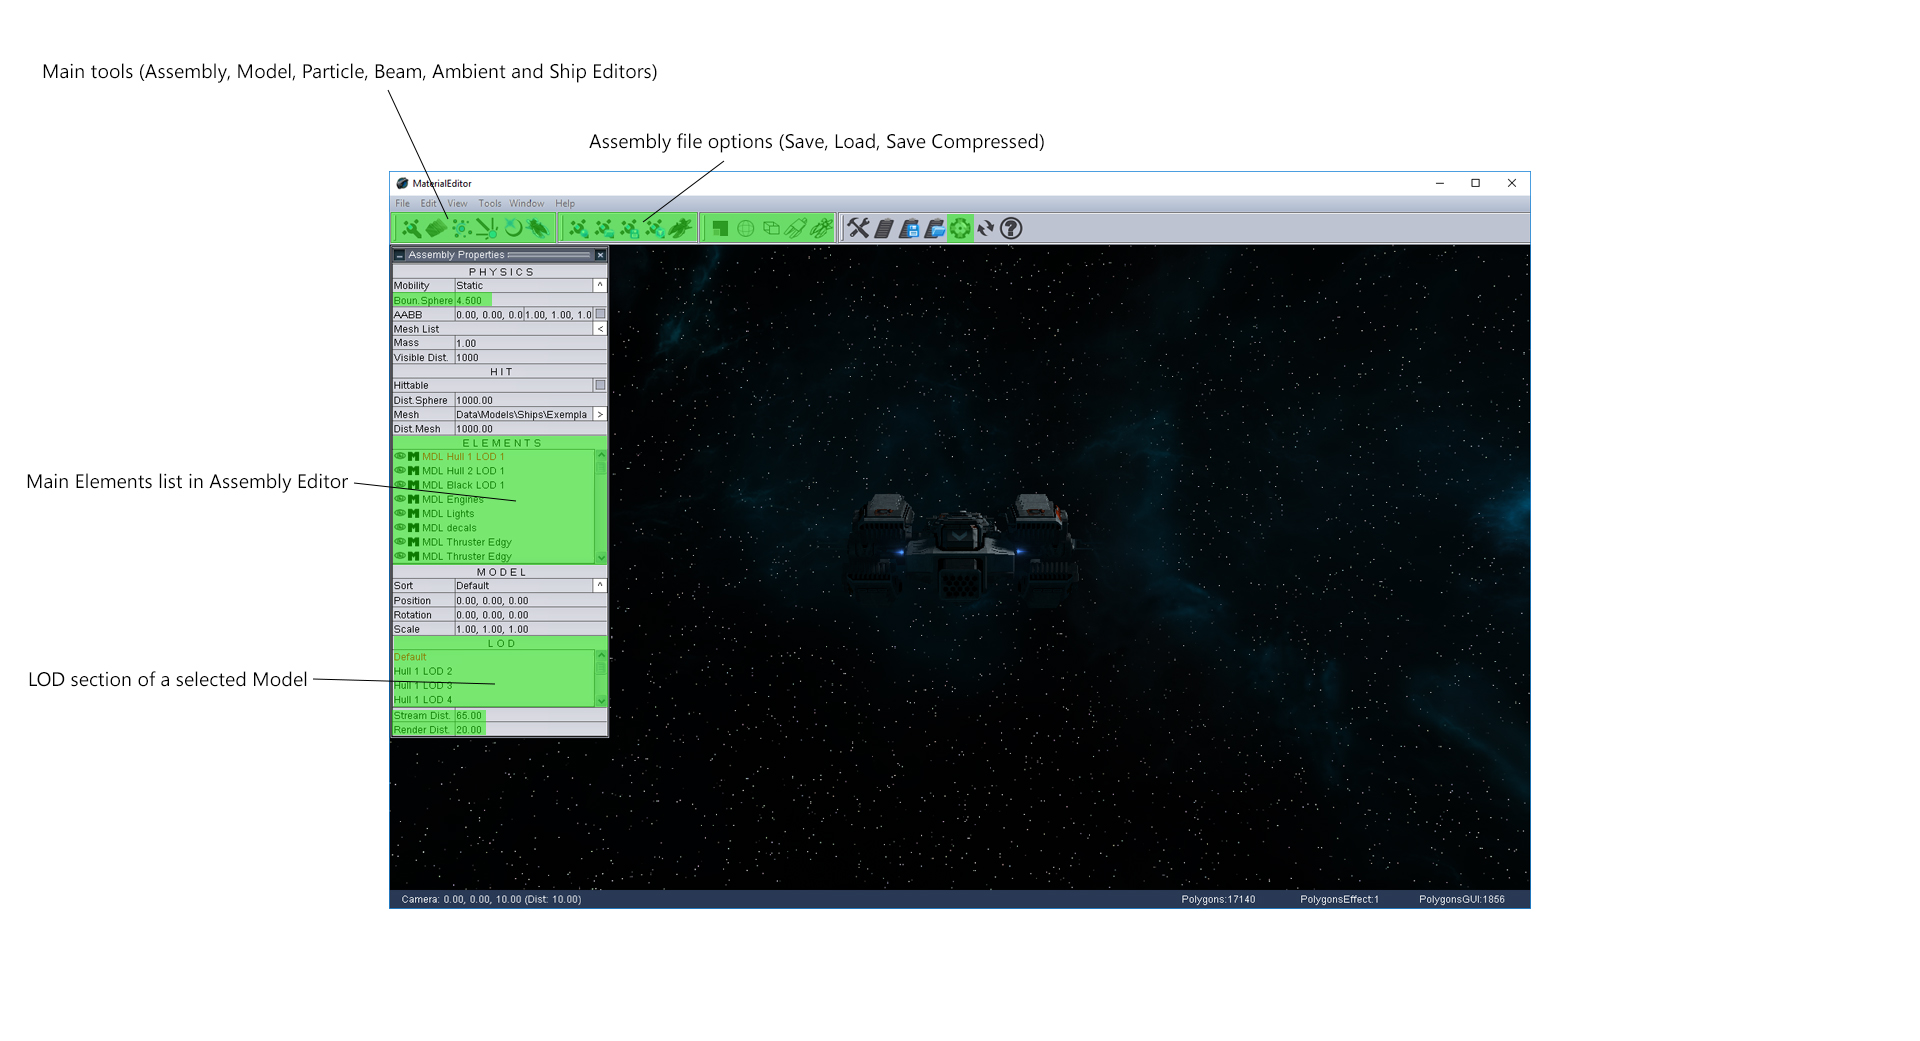
This doesn't necessarily mean that the lamp will be yellow. This is only the name of the particle we are placing in the .asb file. It's important to link the PARTICLENAME right. If there is no particle with that name in the linked folder, the editor will crash while loading the assembly, and will continue to do so until we place a particle in the proper folder, or put the link in the PARTICLENAME to the correct place of the decided particle. After the placement of the particles in the .asb, it's time to launch the Material Editor, but before that don't forget to save! Load the assembly and the particles we saved should now be visible in the main Elements list of the Assembly Editor tab. You should also see the particle on the model, depending on where you placed it in regards to the position, in the example above the coordinates are 0.00/0.00/0.00 (x/y/z).
We can also make a new particle by simply pressing the left button on the element bar and selecting AddParticle from the drop down menu. Select the new created particle from the list and open the PARTICLE EDITOR tab (Check the basic parameters and their purposes on Image 01).
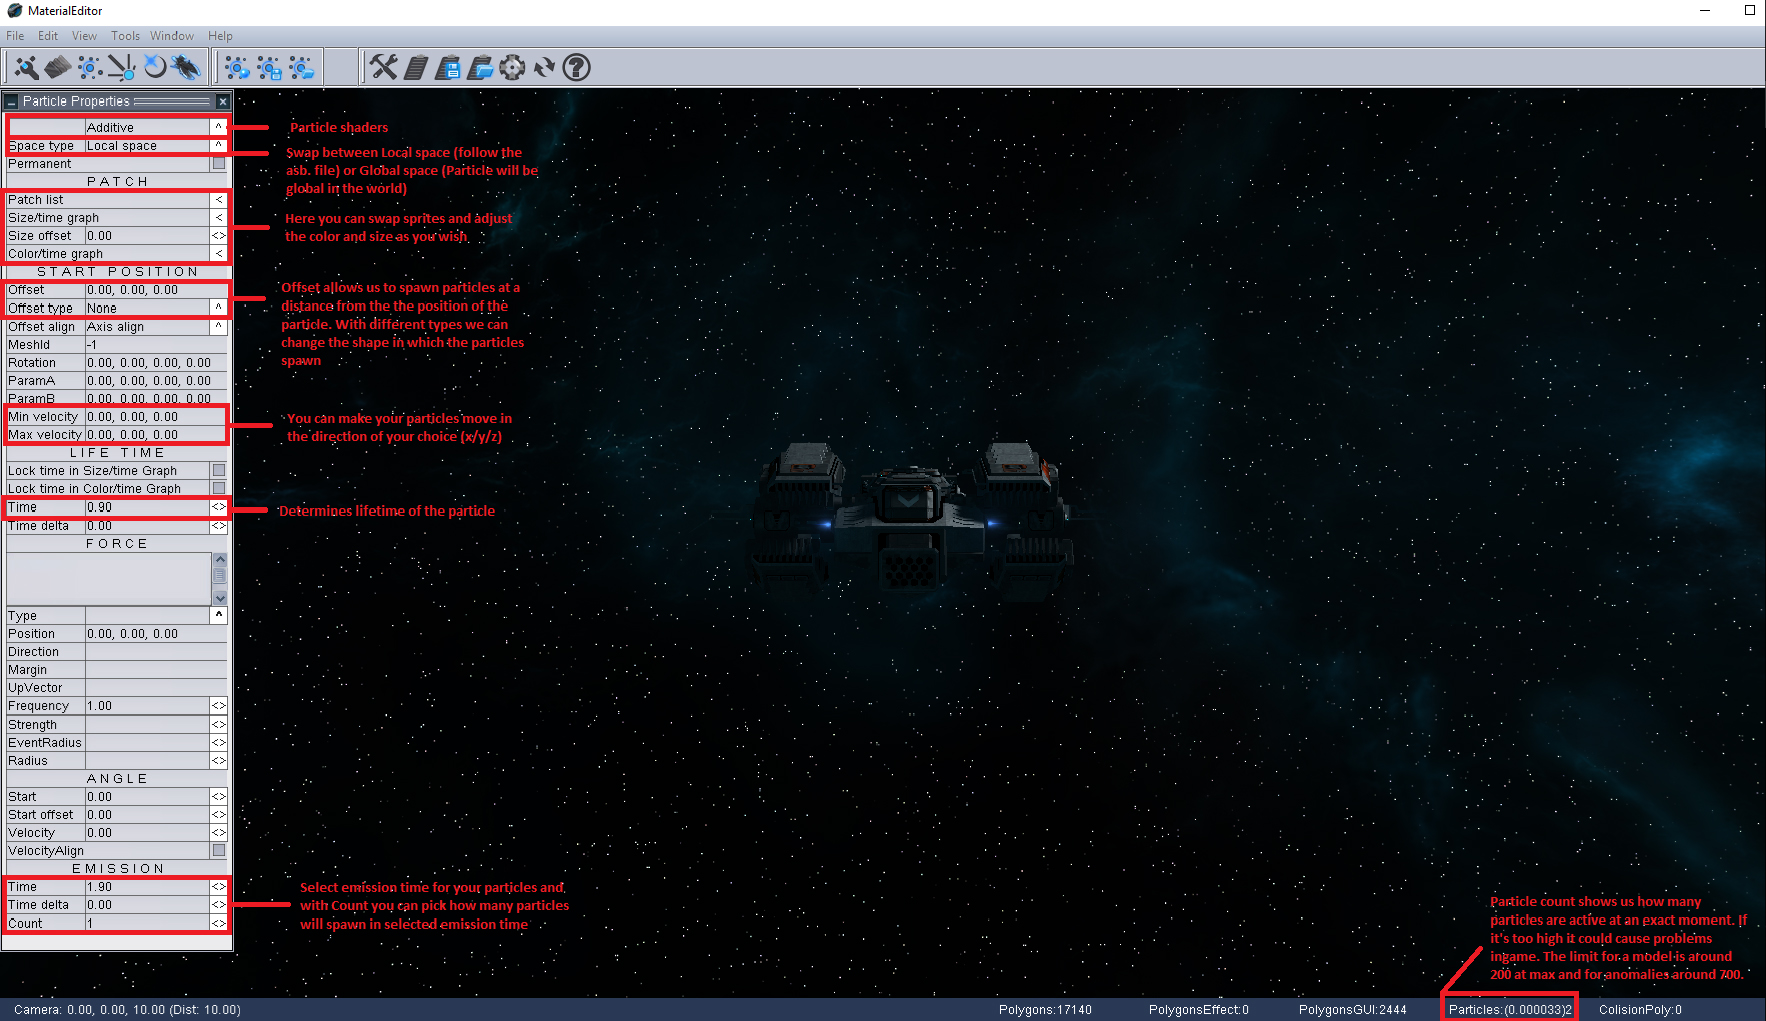 If we decide to create a new particle in the particle tab, we will need to change a few sections to make the particle visible. Start by selecting a patch from the Patch list. After we have a patch, change the size and the color of the particle. Finally pick a lifetime, emission time and emission count for the particle, and your particle should now turn up in its' set position.
Tip: If you are having problems with the positioning of your particle there are a few methods to do that. The first one is to just select your particle in the Assembly tab and by holding CTRL + right mouse button you can move the particle to any position. Below the Elements track there is a Particle track where you can see your new position of the particle. You can now enter the new position in the .asb file and the particle will be on your new position.
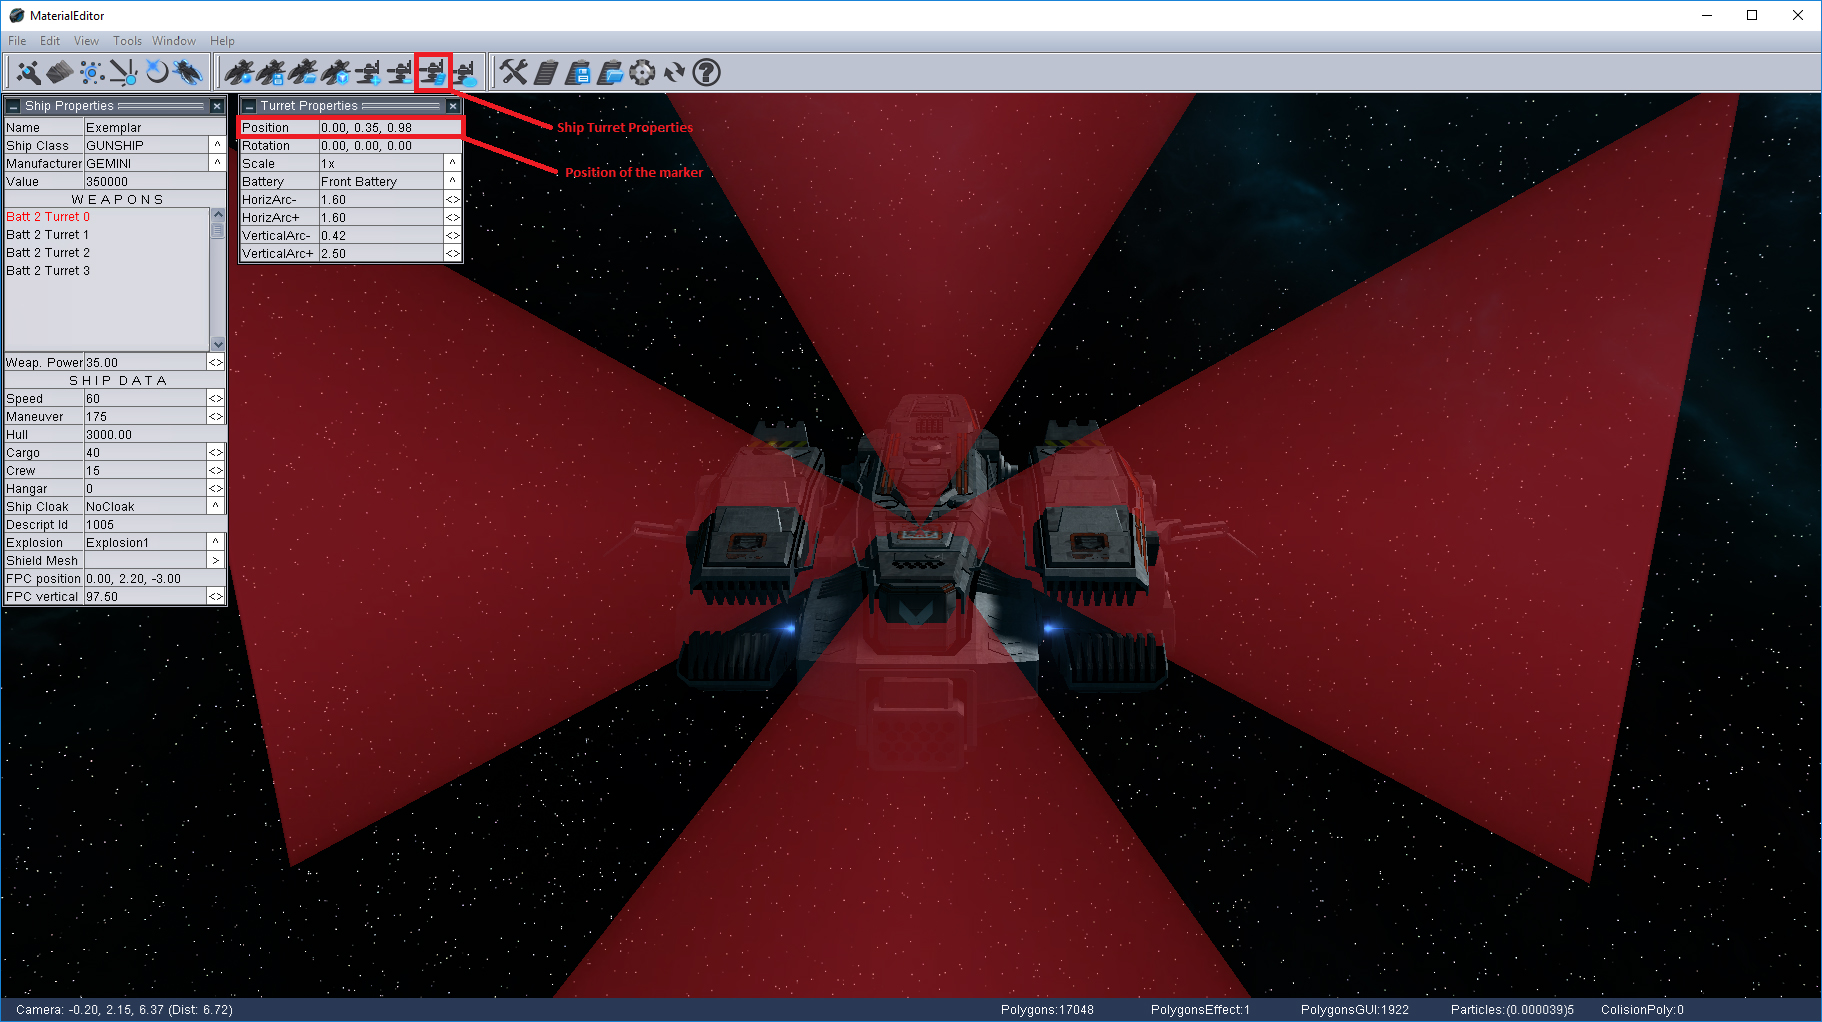 The second method is a bit more complex but I found it to be much better and precise when you get a grasp of it. You just need to switch to the Ship Editor tab. Select the option Ship Turret Properties. This option allows us to put turrets on the ship, but more on that later. For now, what you have is something like Image 02. The red marker will point to the middle position. Now you can move the marker by holding CTRL + right mouse button. It's faster and more accurate than the particle in the first method and that's why I think it's better for particle placement. When the marker is on the desired location just refresh Ship Turret Properties and the position will change to the new one. Place the new position in the .asb and your particles are ready for customization. It's important to use this method while in ship tab because in the other tabs you won't be able to move the marker.
 To customize a particle select it in the Main Elements list and switch to the tab called Particle Editor. This tab will allow you to tweak the selected particle as you wish. You can check the Image 03 for more detailed information on some main options. Just don't forget that if you decide to customize the particle you'll need to save it!
2. Thrusters and trails
Now that we're done with particles and have placed them on our ship, it's time for the ship file. You can simply copy a ship (.shp) file from any other ship and put it into the folder of our new ship. Now that you've done that you can rename it (ExemplarTutorial.shp) so there won't be any confusion, and we can open the ship file in Notepad or any similar program (Notepad++ is advised).
In the Shipmodel section of the .shp file under Name, you need to link the .asb file that you've made earlier. You can name your ship under ShipBase, but the part that we want to do now is put trails on our ship. Under the section ship trails we have a few things that we will need to change. There, in the chunk of code in the beginning of the section, which starts like this:
Particles:	4
TrailModelsStart:	6
TrailModels:	2
TrailSizeMin:	0.40
TrailSizeMax:	1.40
Trail:
{
	Position:	0.822	0.352	-0.009
	TrailLengthMax:	60.000
	Width:	0.300
	EndFadeFactor:	1
	PatchId:	0
	Color:	0.01	0.03	0.06
}
Particles and TrailModelsStart are important to place correctly or the Material editor will crash while loading the .shp file. Particles will be defined with how many particles are in the .asb file, so be sure to have, at most, the number of particles similar to the number of particles in the .asb file.
TrailModelsStart must be adjusted to the thruster Mesh in the .asb file. The number you have to place here is the number of the position that the Thruster mesh starts at (counting from 0). So if there are other, for example, 5 models/meshes before the first thruster model, the number we are looking for is 5.
The part that we will tweak the most is the TrailSizeMin and Max because they give us the final version of what our thrusters are going to look like. So if I were to put TrailSizeMax of 100 instead of 1.40, when at full speed, I would get a big freaking fire at the back of the ship. The best way to find a perfect number for this is to just test it 'til you're satisfied. How to test it will be described a bit later in this tutorial. For now, we want to make trails and to do so we have to put as much trails as we wish to see on our ship. In the case of Exemplar I want 4 trails since the ship has 4 engines, but just to make it look a bit cooler, I'm adding two trails on the left and right so it looks like it's going really fast when racing through space. Same as with the particles, you need to enter the position of the trails where you want to put them. After you've entered the position it's time to customize the trails to your liking. You can change the length and width as you like.
Also, PatchID allows you to swap the look of the trail so you can experiment with it. The PatchIDs we use goes from 0 all the way to 30, but for the most part we will use id number 0 - the basic. The last part of this section is the color of the trail that goes from 0 to 1 and functions as a Red Green Blue method (RGB). In the example above, we were going for a kind of blueish color of the trail. The last part before we are done with the trails is the PTEParticleEmitter, where we adjust the position and size of the thrust VFX when in Sublight (goes from 0 to 4). Before you exit the .shp file don't forget to save! Note that if you copied a .shp file that has more trails then you need delete the extra trails.
Now that we have trails, before we can do a test run of our ship, we need to place a model of the thruster. Same as with the .shp file, copy the thrust model (for example: Data\Models\Ships\Artisan\Thruster_Round.mdl) or from any other folder to the folder of your ship. Usually we use the round model for the ships but in the case of Exemplar we will use Thrusters_Edgy.mdl to better fit the engine model (Data\Models\Ships\Artisan\Thruster_Edgy.mdl). Have in mind that when copying the .mdl file from another ship’s folder it comes with a configured Material and shader so tweaking the existing material configuration and its size is all that you do. Open the ship's .asb file and copy the Mesh section from any DEFAULT mesh to paste it just before particle section. Rename the AditionalSort to THRUST like shown below:
StaticMesh:
{
	Instanced:	0
	MeshName:	Data\Models\Ships\ExemplarTutorial\Thruster_Edgy.mdl
	Position:	-0.96	-0.35	-0.07
	Rotation:	0.00	0.00	0.00
	AngularVelocity:	0.00	0.00	0.00
	StreamDistance:	400.00
	DrawDistance:	200.00
	AditionalSort:	THRUST
	Scale:	2.00	1.20	1.40
}
To adjust the thruster on the ship, you will need to do a few things before we can continue to the next section. First we need to position the thruster the same way we did with the particles and with the trails.
You can move the thruster like any other model with CTRL + right click after you've got it selected in the Elements list, Assembly TAB
After we are done with the positioning, we need to adjust the scale to fit the ship's engines. The method is also similar as before (x/y/z). You will have to do this for every thruster manually.
Once you're done with that, you can now begin the testing of the thruster in Material Editor. To do so, you'll need to load the .shp file in the Material Editor's Ship tab. Now you can fire up the thrusters by simply holding the F2 key. You can also shut them down with F1. Just a quick tip before we continue, if you wish to change the color or the glossiness of the thrusters, select the thruster model in the Element bar of the Assembly tab and from there go to the Model tab where now you can customize the selected model. To make the thruster less faded you can raise the Volume Fog Params (with Scale, you will elevate all three of the parameters - x/y/z, while the other three are individual). Color can be changed by simply going to the color option in the Volume Fog Params section by the method of RGB.
3. Shields and turrets
Shields in SGW are bubble-like visually and you set their parameters in the .shp file of a ship. We will however do a trick and use a “helper” spherical model that comes with the game to make it visually easier for a setup.
To put on a shield, firstly we have to find out the dimensions we need to fit the size of our ship. We can do this by just copying any DEFAULT StaticMesh from the .asb file and pasting it just before the particle section in the same .asb file. After we do this, it's time to link the correct mesh. We need to place this link (Data\Models\Sphere\ShipSphereShield7_2.mdl) in the MeshName (this is the path of an .mdl file that comes with the vanilla game as I mentioned before).
We’re going to use this bubble like mesh as a “helper” to get the desired shape for the shield. Save it and load the .asb file. Be sure to check if .shp file is opened in the editor. If it is, the sphere won't show and you'll have to reopen the Material editor.
Now by selecting the ShipSphereShield in the Element bar of the Assembly tab, you can change the scale to fit the whole ship inside the sphere. After you find the scale that fits the ship, you need to go to the .shp file and in the section ShipShieldMesh, place the scale you’ve chosen with the helper bubble-like mesh. Here's an example:
ShipShieldsMesh:
{
	MeshName:	Data\Models\Sphere\ShipSphereShield7_2.mdl
	Scale:	4.20	2.00	4.20
	Position:	0.00	0.00	0.00
}
The shields are set and you need to delete the Static “helper” mesh for the sphere in the .asb file so that it doesn’t render over the ship anymore. (Just to make sure, we are removing the entire chunk with helper sphere we placed in the .asb file, the shortened one in .shp file should remain).
We can head now to the turret placement (see Image 02). We already used the turret marker in the Ship tab so we shouldn't have many problems with the turret placement. In the first part of the tutorial, we stated how many turrets a standard ship class has. You can place even less or more turrets, it's up to you, but we usually keep to that formula to make balancing easier. Launch the MaterialEditor and go to the Ship tab. Load ExemplarTutorial.shp. We already have some turrets placed here since we copied a .shp file from another ship.
Select Ship Turret Properties but this time also click Show Ship Turret in Assembly Editor. In the center of the marker now you will find a turret model, using it we will place it all around the ship. You can also rotate it so it can be placed upside down or any way you like. An important part of turret placement is the ship class. Depending on the size of the ship you will have to use different scales of the turret, so keep an eye on that. When we are satisfied with the position and the scale, it is time to adjust the firing arc of a turret. We certainly don't want the turret of the ship to fire through the ship, so to avoid that we have to adjust the - HorizArc+/- and the VerticalArc +/-. When you're done with all the parameters open the .shp file in Notepad or any similar program and find the ShipWeapons section. There we will find four WeaponBattery sections representing the Left, Right, Front and Back weapon battery of the ship, in that order. Place the parameters from the turret you placed on the WeaponBattery so that it fits best and repeat this for every turret on the ship 'til you are done.
4. Drone points
To place drone points on the ship you will need to click on Enable waypoint editing which is located on the right in the Assembly tab. Once you have done this, a new panel called Waypoint Editor will appear. In this panel you will create drone points and link them to each other. The blue point is the starting point from which all drones will spawn and travel to the drone points. Yellow points are drone points on which drones will appear and fix explosions/red points. It's important that all of the drone points are connected, and it's even more important that at least one of those points is connected to the starting blue point. The 6 buttons on the Waypoint Editor are self-explanatory, just toggle over them and a description for every option will pop up.
When we have finished all of our drone points we should save the whole assembly. Now we have a new .mg file which is used for memorizing drone points. If we already have an .mg file it shouldn't be a problem, by saving the assembly it will just replace the existing drone points with the ones we have placed now. If we open the assembly in Notepad or a similar program, on the bottom of the assembly there should now be a linked .mg file under the section called Waypoints. We can also place drone points on the Derelict of the model by adding the same Waypoints section in the .asb file of the derelict or by doing the whole process manually on the derelict model.
5. Naming your ship
Now its a good time to give the ship a name. Navigate to Data\Texts\ and open name.txt file in Notepad++. Simply add the below chunk:
text: EXEMPLAR_TUT
{
	Exemplar Tutorial ship
}
EXEMPLAR_TUT is a keyname of a text to be displayed during sale on stations in this case. It must be the same as the Name of the ship in your Data\Base\Ships.wdt, and Exemplar Tutorial ship is a name that will be shown in game. Understanding and modifying databases is explained in greater detail in another tutorial which I fully recommend you read through.
Now we have a fully completed ship. All that’s left is balancing her properties and making it available for sale on a desired station in World.ics file. After all, what’s all the work for if you won’t be able to buy it in game.
6. Adding ships to shipyards (making them available for purchase in-game)
Requirement to add ships to station and planet shipyards is to first have that ship in the Data\Base\Ships.wdt database. Once we have the ship there we need to add the ship KeyName to the station/planet production template (let’s say our key name is EXEMPLAR_TUT). To do so, we first have to search for station/planet in Data\World\World.ics. For this example we will use Concordia HQ. Once we find the Concordia in the files (Station with headquartersSTA keyname) we can look at its parameters below. In the Port section there is a section Ships that indicates that the template this station is using is called SHP_Concordia. Now we need to access Data\Base\ProductionTemplate.wdt database and search for the keyname SHP_Concordia, upon further inspecting of the row where we've found it we can see the last parameter with the template path, in this case it is Data\Stations\Template\Ships\Concordia.txt. Now we need to find and open that .txt file. Inside the file we can see some of the existing ships that are available for purchase on Concordia. There we can add our ship to the file, just append the following and save the file.
Ship: EXEMPLAR_TUT
{
  Producing:  1
}
This means that Concordia will produce a ship of Key Name " EXEMPLAR_TUT " with the price and stats stated in "Data\Base\Ships.wdt" database. We can also change the price of the ship in the template as some stations/planets aren't native producers of the ship.
Production templates work in the same dynamic way like databases, so once again I encourage you to read through the Dynamic databases tutorial to learn the best practices for mod compatibility.
This means that Concordia will produce a ship of KeyName " EXEMPLAR_TUT " with the price and stats stated in Data\Base\Ships.wdt database. We can also change the price of the ship in the template as some stations/planets aren't native producers of the ship.
Ship: EXEMPLAR_TUT
{
  Producing:  1
  PriceModifier: 1.15
}
This is an example where price of " EXEMPLAR_TUT " is increased by 15%. After saving the file make sure you restart the game(or just start if it isn't running). And you will now see the ship " EXEMPLAR_TUT " for sale at Concordia.
7. Final thoughts
The entire procedure, laid out both in this and in the Model importing tutorial can seem daunting. And indeed, the process of getting your ship into the game and ready for everything the game can throw at you, can take some time, but keep in mind that the ships are what Warlords is about. As an analogy, ships in Warlords are what rigged and animated characters are in some other games, like fantasy action RPGs or something similar. It takes work and effort, but most worthwhile things do.
For further information, please feel free to contact us: modding@starpointgemini.com
For more information about SG Warlords check out these links:
Starpoint Gemini Warlords homepage
Starpoint Gemini Warlords forum
Starpoint Gemini Warlords Steam store page
LGM Games dev-blog
Follow us on Facebook
Follow us on Twitter