Happy 2014!
Since our last post the DH Team have been working hard on a new webisode for the series. (You can watch them on our YouTube channel!) We've had some questions around the process, so we got Lead Animator Alex Graham to give us a run down on the process.
ALEX: Animation for Double Happy is created through an entirely digital pipeline involving Chris (Character Artist), Ned (Background Artist), myself (Lead Animator) together with Animators Anthony, Chris, Alistair and Mawarini, and a selection of programs; specifically Photoshop (art creation) and After Effects (animation).
Character movement is made using “cut-out” animation. “Cut-Out” is a style of 2D animation that allows a wide range of movement with as little drawings as possible. This is achieved by physically moving parts of a character around instead of redrawing every single frame as found in traditional 2D animation.
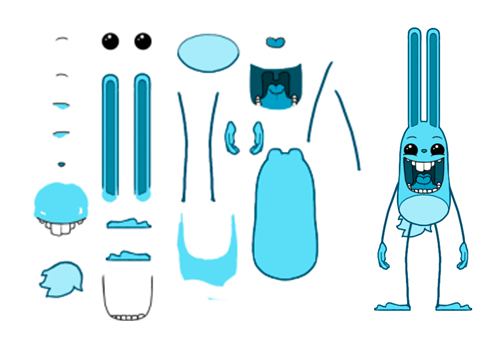
Chris and I sat down after character designs were finalised and began breaking the rabbits apart for animation. In the picture below you can see some of the parts that make up Blue. These are Blue’s front perspective assets. There are four other perspectives and each is set up in the same way (thanks Chris!). Each segment can be moved and warped for animation.
A completed character perspective is saved as a Photoshop PSD document with each asset saved on a separate layer. I would import the PSD into After Effects and create a new composition.

The screenshot above is of After Effects with Blue’s “FRONT” perspective PSD file imported and integrated into a composition (animation clip). From left to right we see:
1) the project files (assets, compositions etc)
2) the composition with character assets (this is what will be used for animation)
3) the timeline
4) general effects and options
5) ‘BLUE_Base’ composition visually
Each animation clip is saved separately, but they all begin as a duplicate of this Base clip. This is the beginning and ending pose for all of Blue’s animations so they can be linked and randomised during play with no clipping in movement. The next step is to set up the character for animation.
STEP 1: Parenting Objects Together
There are two hierarchies that must be organised properly for the animation to function correctly. The first is visual hierarchy; (E.G. “Eyes” are placed on top of the “Body”). The other is “movement hierarchy”.
One of the biggest advantages After Effects has over Flash is its ability to parent (link) objects to one another. For example; if I rotated Blue’s body, his arms, hands, ears and facial features would move as well; but these wouldn’t receive any key frames or value changes. They stay separate allowing far greater animation flexibility.
Using the Lasso tool found on each layer, simply hold and drag on top of another layer. These two assets become linked together. The selector is the “Child” and the selectee is the “Parent”. The Parent layer is the dominant one and manipulations of this layer will affect the child layer.
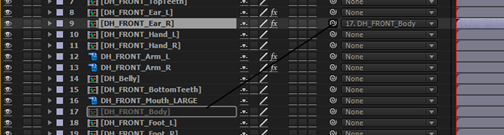
Above, you can see layer 9 “Ear_R” being lassoed (Parented) to layer 17 “Body”. When I influence Blue’s body, his right ear will move along with it without direct manipulation.
Above, you can see layer 9 “Ear_R” being lassoed (Parented) to layer 17 “Body”. When I influence Blue’s body, his right ear will move along with it without direct manipulation.
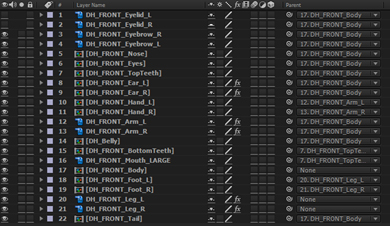
Above shows the final structure; note the right column displaying what each layer is parented to. Assets like “Hands” are linked to “Arms”, which in turn are linked to the “Body”. This is a typical movement hierarchy.
STEP 2: Pivot/Anchor Points
Each asset has an “Anchor Point” (pivot point) which acts as the centre of an object. For character animation, these can be seen as joints between bones. Below is an example of setting up anchor points for animation (red circle indicates Anchor Point location):
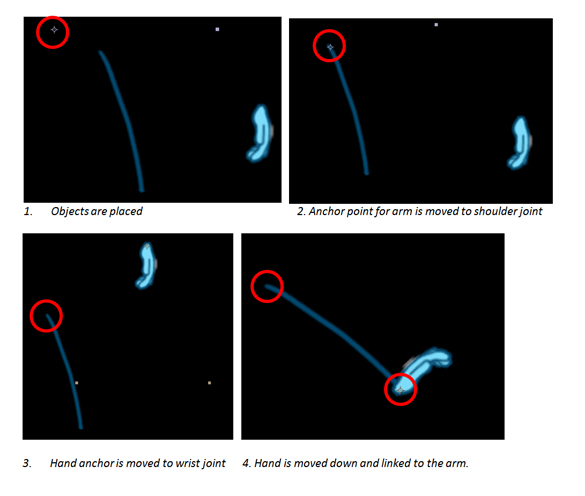
The end result is the ability to rotate the arm at the shoulder and have the hand rotate with it. I can now add animation like secondary movement to the hand asset.Once everything is linked together and anchor points are placed appropriately, I have one final step before animating. This is one of my favourite After Effects perks!
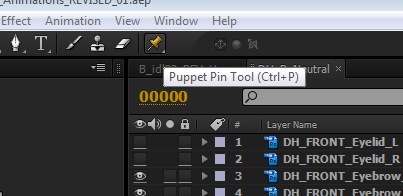
STEP 3: Puppet Pin Tool
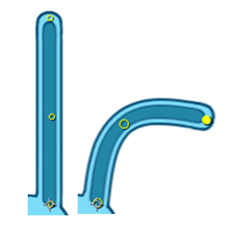
Seen in the diagram above, there is no elbow joint on Blue’s arm. That’s because we can create a “synthetic” one with the Puppet Pin Tool! You can find it here on the horizontal toolbar.
I place a yellow “pin” onto the elbow and knee of each arm and leg and three pins onto each ear. This gives a “Rubber Hose” effect with movement and gives the Rabbits their flexibility.
How does this differ from your pipeline? Feel free to shoot through any questions you have too!
Cheers!
The DH Team
www.doublehappyrabbits.com
Double Happy Facebook
Double Happy Twitter

Nice post, thanks for sharing. I haven't animated using the puppet tool for projects, most of my 2d animation work has been done in toon boom harmony.
How do you find Toon Boom? We did look in to it a while back, but at that point IK was a bit of a pain. Love the fact you can create assets in the software though, and the general flow of production is great. Have there been any changes recently which should get our attention?
I haven't been using it with rigging at this time, just frame by frame animation. Eventually I will get around to setting up assets to see if I like that workflow though. It is a beast of a program but an expensive one at that too.
Keep us posted on Toon Boom. We're using Max for the game which you mention you've used before too - keen to hear your thoughts on our process. (when we get to writing that one up!)