JoshKlint
Josh joined
Hi, I'm the founder of Leadwerks Software.
My Blogs (0 - 10 of 16)
Compiling Leadwerks for Linux using the Code::Blocks IDE wasn't very hard. I particularly like the way Code::Blocks handles files in projects. Instead of creating your own "fake" file system in the project explorer, you just add the folder or files you want, and they are organized in a hierarchy that matches the file system.
I found the X windowing system to be extremely easy to work with. I've implemented windowed OpenGL contexts on Windows, OSX, iOS, and Android, and Linux was by far the most straightforward and simple.
One problem I ran into was that some Leadwerks classes conflict with Linux classes. Our Windows, Font, and Time classes match other classes in the Linux headers. I got around this by prefixing the classes with the "Leadwerks::" namespace, but some better solution should be found.
Upon my first attempt to run Leadwerks, all I got was a blue screen. I fell back from OpenGL 4 to OpenGL 2 and started playing with the OpenGL matrix commands (a relic of the fixed-function pipeline I never even use anymore). When I called glOrtho() with the context width and height, I produced an OpenGL INVALID_VALUE error. From there it wasn't hard to figure out the cause...
int Window::GetClientWidth) { return 0;/*don't forget to add this later*/ }
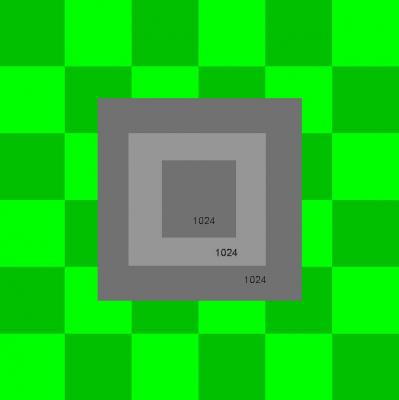
Once I implemented the missing function, everything worked fine. So I am pleased to unveil the very first screenshot in the history of the universe of Leadwerks running in Linux using OpenGL 4:

Behold, the green square of triumph!
Though this is a simple example, we have a full 3D engine with deferred lighting and a really unique terrain system, so I don't think it will be long now before we can start showing off some great Linux graphics. Linux has the fastest possible performance for 3D rendering, so it will be interesting to see what we can do with it.
Several people have asked me for my hardware recommendations for a new Linux gaming machine. I get rather frustrated by PC manufacturers who load computers up with expensive Intel CPUs and extra RAM you don't need, and then forget to include a graphics card. Or they proclaim PC gaming is not deadand proudly announce their "gaming machine" with a shoddy GPU, that costs more than my first car. I've been building my own PCs since high school, and I know you can build a PC with superior performance and lower prices than the garbage PC vendors are selling today. So I am writing this article to tell you what I would buy if I wanted to build a high-quality future-proof gaming PC with big performance on a small budget.
These components were chosen to give great performance at an affordable price, with maximum upgradability. I expect this computer would run any PC game today with maximum settings at 1920x1080 resolution. Components were chosen specifically for gaming, thus more importance is placed on the GPU and the CPU is relatively more lightweight. If you do not want to assemble the components yourself, any computer shop will do it for less than $100. I only chose components from reputable brands I have purchased hardware from before, no cheap brands or refurbished parts.
For Linux gaming, I recommend buying AMD CPUs. The integrated graphics chips in Intel CPUs may cause problems with detection of a discrete graphics card and make it very difficult to install graphics drivers. AMD CPUs also give a better price/performance ratio with somewhat slower single-threaded speeds at a much lower price. For gaming, the single-threaded CPU speed isn't actually that important since the intensive tasks like rendering and occlusion culling are typically offloaded onto the GPU, and modern game engines like Leadwerksmake extensive use of multi-threading.
Disclaimer: I have not built a machine with these exact components. I am not responsible if it doesn't work, do so at your own risk, blah, blah, blah. Now on to the parts...
Motherboard
Asus M5A78L-M LX3 Desktop Motherboard (Socket AM3+):
Newegg.com
Price: $44.99
CPU
AMD FX-4300
Newegg.com
Price: $109.99
RAM
Corsair 4GB DDR3
Newegg.com
Price: $39.99
Graphics Card
MSI Nvidia GEForce 650
Newegg.com
Price: $94.99
Case
Cooler Master Elite 350 with 500w power supply
Newegg.com
Price: $59.99
Hard drive
Seagate Barracuda 500GB
Newegg.com
Price: $59.99
Optical drive
ASUS DVD Writer
Newegg.com
Price: $19.99
Total cost: $429.93
Other cost-cutting tips
- If you have any old computer, chances are you can reuse the hard drive, memory, optical drive, and even the case. Eliminating these items would bring the cost down to a ridiculously affordable $249.97.
- I could have got the price down to about $350 if I used really cheap parts, but I don't recommend doing this.
- TigerDirect.com may have some prices even lower than NewEgg.com, but I find their pricing information to be confusing. I don't ever consider manufacturer rebates, since you have no guarantee you will ever actually receive a check.
Improving performance
- If you want better performance, invest in the graphics card. When shopping for graphics cards, just look at the number of "Cuda Cores". This will give you a pretty linear estimate of performance. (On ATI cards divide the number of "stream processors" by five and that is equivalent. But I don't recommend buying an ATI card for Linux gaming at this time.) My next choice up would be the Nvidia GEForce 670, which provides 1344 Cuda Cores versus the 650's 384, at a price of $299.99:
Newegg.com - If I were to upgrade the CPU, I would get the FX-8320, which only costs $159.99 and gives the best price/performance ratio, according to cpubenchmark.net:
Newegg.com - An SSD will significantly improve game load times, and will generally make your computer feel much snappier whenever files are accessed. However, the prices are still high compared to hard drives, like this 256 gb PNY SSD for $179.99:
Newegg.com
Conclusion
The companies selling PCs don't seem to have a clue about gaming hardware requirements. Fortunately, you can build your own gaming rig and get better performance for much less money than anything they are selling. A good gaming PC doesn't need to be expensive. My recommended build here costs less than $430, and can be less than $250 if you have any spare parts lying around or an old computer you can cannibalize.
The upgradability of the PC means future upgrades can cost very little and add significant performance to your hardware. My suggestions for improving performance would raise the price by about $365, giving you a mid-high machine for $795. I don't recommend buying the very highest-end parts because the price/performance balance just isn't there, and a year from now whatever you bought will be second-best anyways.
When you're done building your killer Linux gaming machine, remember to take the money you didn't spend on Windows and use it to buy some great Linux games.
All stickers from our Kickstarter campaign have been shipped, and they look absolutely fantastic:

I've never been a "sticker on my laptop" kind of guy, but I am putting one of these on mine as soon as I get home.
Physical items are a little different from getting software to customers. With software, there is at most a delay of a couple hours between the time I have it ready to go, and the customer is using it. I did not anticipate much of a turnover time for the shirts, and I still don't have all the ones I need. However, I am getting the last batch Monday and will ship them out the same day, or at least get them packaged, labelled, and ready to ship for the next day.
Leadwerks in the Wild
It's time to celebrate victory with your fellow backers and Linux gamers. Let's see your creative use of Leadwerks schwag! Post a photo on Google+ of your sticker or T-Shirt with the hashtag #LeadwerksInTheWild.
A new update to Leadwerks 3.0 is out. Registered developers can run the Leadwerks updater to download and install the patch. This update adds terrain, bug fixes, and a few small feature enhancements.
Our new terrain system, described in our Kickstarter campaign to bring Leadwerks to the Linux operating system, is based on a unique "dynamic megatextures" approach. This technique renders sections of the terrain into virtual textures and places them around the camera. The terrain presently allows a maximum size of 1024 meters and 16 texture layers, but these constraints can be lifted in the future once it's been thoroughly tested. You can see an example terrain the the "terrain.map" scene included in the example project folder.
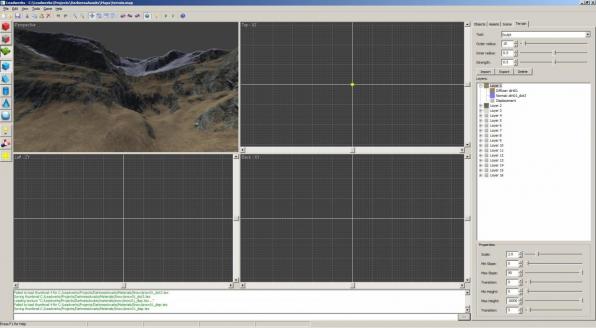
With the increased scene geometry terrain brings, I found it necessary to precalculate navmeshes in the editor. To calculate a navmesh for a map, select the Tools > Build NavMesh menu item to being up the Build NavMesh Dialog. The navigation data will be saved directly into your map file for pathfinding. Two values have been exposed to control the navmesh calculation and the appearance of the navmesh has been improved to allow easier visual debugging. Additionally, the new World::BuildNavMesh command lets you calculate navigation meshes in code.
The bug report forum contains info about recently fixed problems. The most notable fix was for character controller physics. Some frame syncing issues were fixed which were causing entities to sometimes pass through walls and floors. This problem was very apparent in the recent game demo GreenFlask.
A new command World::SetPhysicsDetail allows you to balance the speed and accuracy of the physics simulator.
The Transform::Plane command has been enhanced to work with Lua, which had trouble understanding the syntax of the command.
Development of Leadwerks 3.1 for Linux remains on schedule for the December release. With the (highly experimental) terrain system out of the way, my attention is turning towards the OpenGL 4 renderer and getting my Linux expert started with the porting process to make Leadwerks run natively on Linux.
I wanted to add some default procedural generation tools in the Leadwerks 3.1 terrain editor. The goal is to let the user input a few parameters to control the appearance of their terrain and auto-generate a landscape that looks good without requiring a lot of touch-up work.
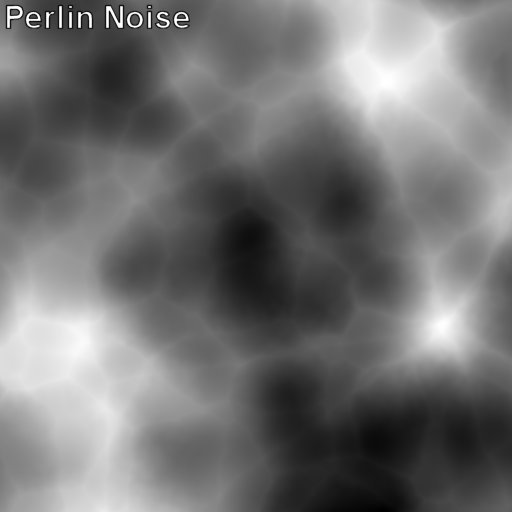
Programmers commonly rely on two methods for terrain heightmap generation, Perlin noise and fractal noise. Perlin noise produces a soft rolling appearance. The problem is that Perlin noise heightmaps look nothing like real-life terrain:
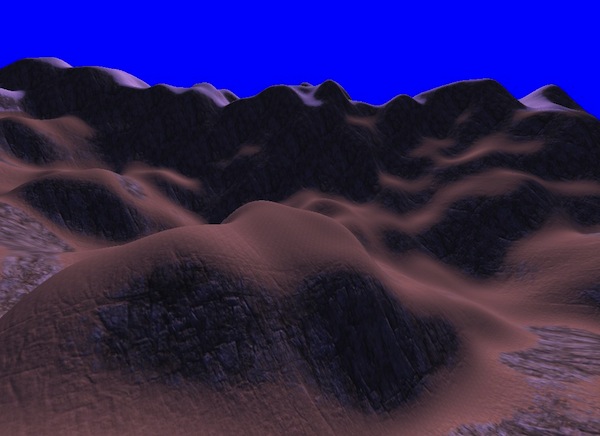
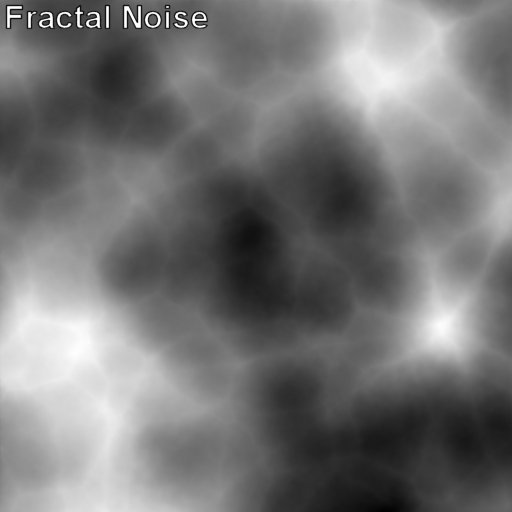
Fractal noise provides a better appearance, but it still looks "stylized" instead of realistic:
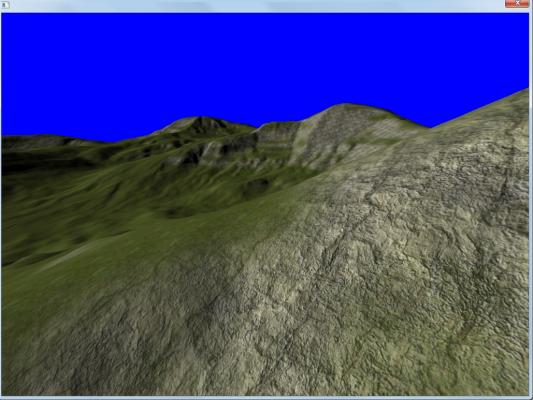
To get realistic procedural terrains, a more complex algorithm was needed. After a few days of experimentation, I found the optimal sequence of filters to combine to get realistic results.
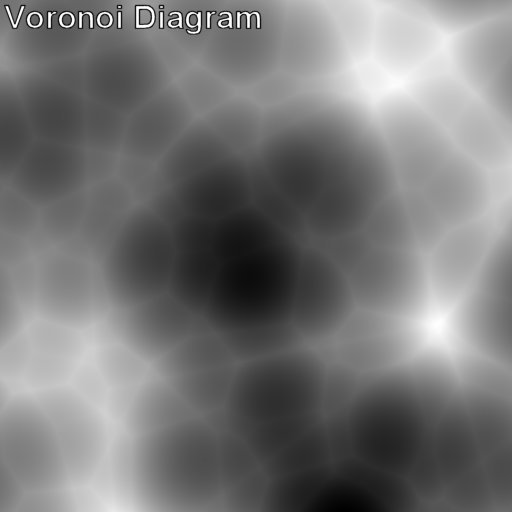
We start with a Voronoi diagram. The math here is tricky, but we end up with a grid of geometric primitives that meet at the edges. This gives is large rough features and ridge lines that look approximately like real mountains:

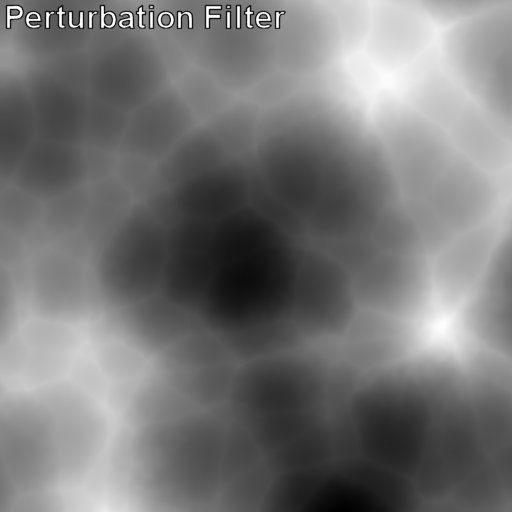
Of course, real mountains do not have perfectly straight edges. A perturbation filter is added to make the edges a little bit "wavy", like an underwater effect. It gets rid of the perfectly straight edges without losing the defining features of the height map:
The next step is to add some low-frequency Perlin noise. This gives the entire landscape some large hills that add variation to the height, instead of just having a field of perfectly shaped mountains. The mixture of this filter can be used to control how hilly or mountainous the terrain appears:
We next blend in some Fractal noise, to roughen the landscape up a bit and add some high frequency details:
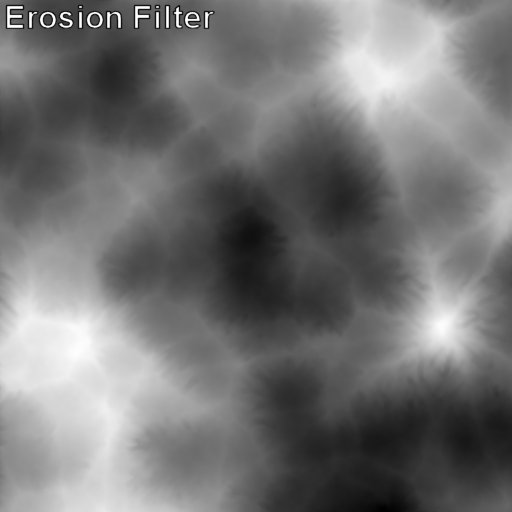
Finally, we use thermal and hydraulic erosion to add realistic weathering of our terrain. Thermal erosion works by reducing the harshness of steep cliffs, and letting material fall down and settle. Hydraulic erosion simulates thousands of raindrops falling on the landscape and carrying material away. This gives beautiful rivulets that appear as finger-life projections in the height map: Rather than relying on conventional hydraulic erosion algorithms, I created my own technique designed specifically to bring out the appearance of those features.
Here is an animation of the entire process:
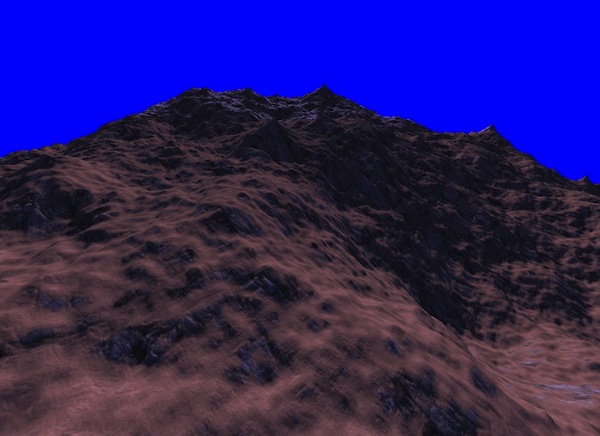
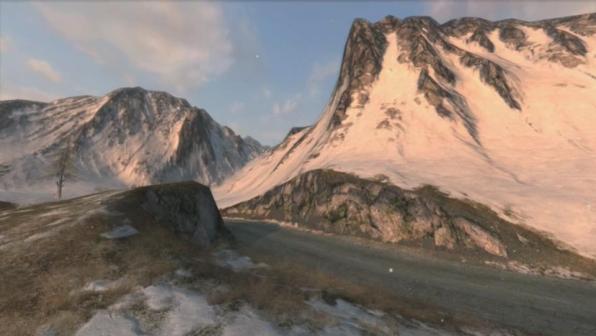
And in the renderer, the results look like the image below. All the parameters can be adjusted to vary the appearance, and then you can go in with the manual tools and sculpt the terrain as desired.
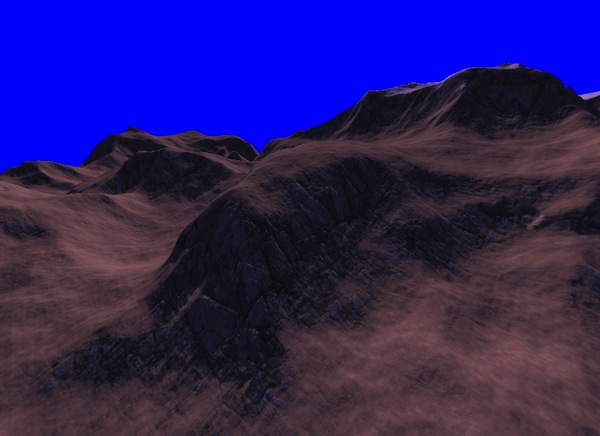
The new landscape has ridges, mountains, and realistic erosion. Compare this to the Perlin and fractal landscapes at the top of this article. It's also interesting that the right combination of roughness and sharp features gives a much better appearance to the texture blending algorithm.
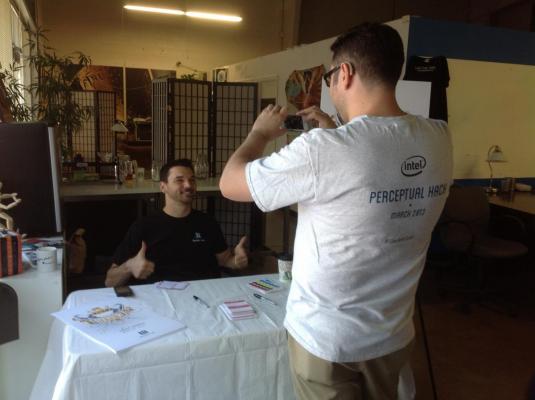
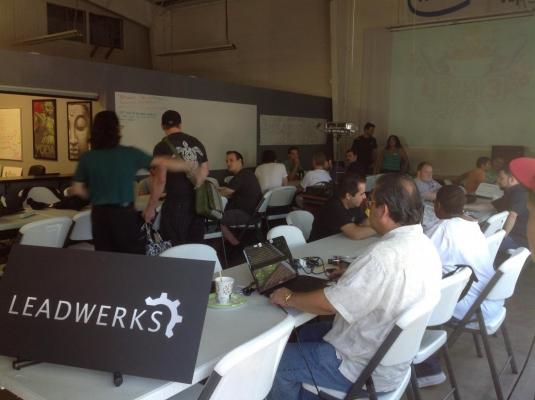
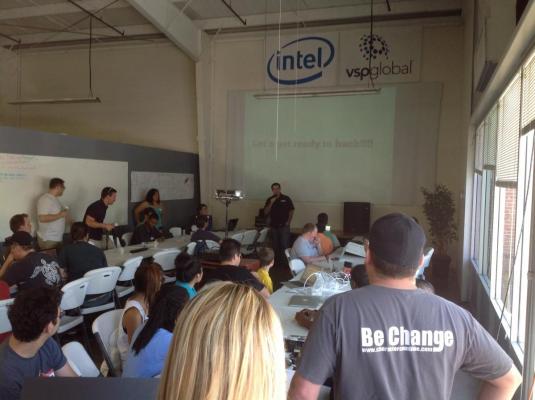
Leadwerks is a prize sponsor for Cereal Hack 3 at the Sacramento HackerLab. I stopped by in the morning to listen to the pitches and say hi. Here are a few photos from the event:

I've been seeing glimpses here and there over the last couple of years of a project by one of our users. He didn't give much detail in the past, but what he did show the community looked stunning. Now, after two years of work, FSR Game Development has finally unveiled the official trailer for Death Statue, and it's spectacular!
Although this was made in the old version of Leadwerks (which isn't surprising, considering how long they've been working on it), this is representative of the quality of games we can bring to Linux with Leadwerks 3.1.
In just three weeks, the Linux community has successfully funded the development of Leadwerks for Linux. This means we're going to bring Leadwerks 3.1 to Linux, with native support for developing Linux games...so Linux games can now be completely free from Windows.
Greenlight
It's been an amazing few weeks. During this time, we also successfully completed our Greenlight campaign to make Leadwerks available on Steam and take advantage of features like the Steam Workshop. You can see from the graph below that our campaign did better than any other software in Steam we had data for. The votes look like they would have gone a lot higher, but Valve approved us early!
Megatextures
I also had a chance to prototype the major feature of Leadwerks 3.1 I was most concerned about. I wanted to implement a new terrain system that would remove the limitations of our old one, and thought that a technique I call "dynamic megatextures" would be a good solution. Basically, this works like id Software's megatexture technology, only the virtual textures are generated on-the-fly rather than being paged from the hard drive. This means the entire terrain can be uniquely textured, but it doesn't require the hard drive space megatextures usually need:
Getting that knocked out of the way makes me confident we can deliver Leadwerks 3.1 for Linux according to our original vision.
Congratulations, Linux community! I'm happy to make Linux a core part of our company's focus moving forward.
The Leadwerks 2 terrain system was expansive and very fast, which allowed rendering of huge landscapes. However, it had some limitations. Texture splatting was done in real-time in the pixel shader. Because of the limitations of hardware texture units, only four texture units per terrain were supported. This limited the ability of the artist to make terrains with a lot of variation. The landscapes were beautiful, but somewhat monotonous.
With the Leadwerks 3 terrain system, I wanted to retain the advantages of terrain in Leadwerks 2, but overcome some of the limitations. There were three different approaches we could use to increase the number of terrain textures.
- Increase the number of textures used in the shader.
- Allow up to four textures per terrain chunk. These would be determined either programmatically based on which texture layers were in use on that section, or defined by the artist.
- Implement a virtual texture system like id Software used in the game "Rage".
Since Leadwerks 3 runs on mobile devices as well as PC and Mac, we couldn't use any more texture units than we had before, so the first option was out. The second option is how Crysis handles terrain layers. If you start painting layers in the Crysis editor, you will see when "old" layers disappear as you paint new ones on. This struck me as a bad approach because it would either involve the engine "guessing" which layers should have priority, or involve a tedious process of user-defined layers for each terrain chunk.
A virtual texturing approach seemed liked the ideal choice. Basically, this would render near sections of the terrain at a high resolution, and far sections of the terrain at low resolutions, with a shader that chose between them. If done correctly, the result should be the same as using one impossibly huge texture (like 1,048,576 x 1,048,576 pixels) at a much lower memory cost. However, there were some serious challenges to be overcome, so much so that I added a disclaimer in our Kickstarter campaign basically saying "this might not work"..
Previous Work
id Software pioneered this technique with the game Rage (a previous implementation was in Quake Wars). However, id's "megatexture" technique had some serious downsides. First, the data size requirements of storing completely unique textures for the entire world were prohibitive. "Rage" takes about 20 gigs of hard drive space, with terrains much smaller than the size I wanted to be able to use. The second problem with id's approach is that both games using this technique have some pretty blurry textures in the foreground, although the unique texturing looks beautiful from a distance.
I decided to overcome the data size problem by dynamically generating the megatexture data, rather than storing in on the hard drive. This involves a pre-rendering step where layers are rendered to the terrain virtual textures, and then the virtual textures are applied to the terrain. Since id's art pipeline was basically just conventional texture splatting combined with "stamps" (decals), I didn't see any reason to permanently store that data. I did not have a simple solution to the blurry texture problem, so I just went ahead and started implementing my idea, with the understanding that the texture resolution issue could kill it.
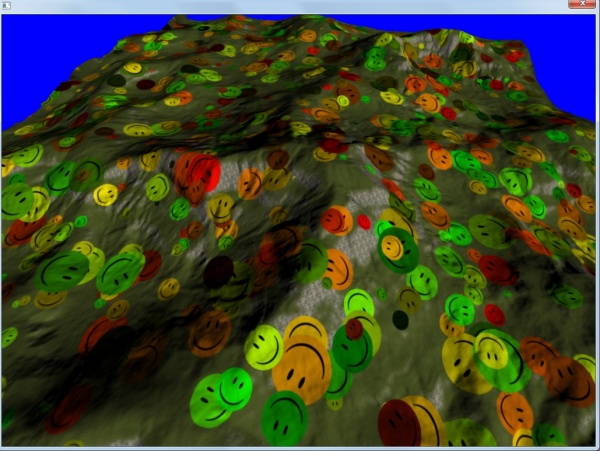
I had two prior examples to work from. One was a blog from a developer at Frictional Games (Amnesia: The Dark Descent and Penumbra). The other was a presentation describing the technique's use in the game Halo Wars. In both of these games, a fixed camera distance could be relied on, which made the job of adjusting texture resolution much easier. Leadwerks, on the other hand, is a general-purpose game engine for making any kind of game. Would it be possible to write an implementation that would provide acceptable texture resolution for everything from flight sims to first-person shooters? I had no idea if it would work, but I went forward anyway. Because both Frictional Games and id had split the terrain into "cells" and used a texture for each section, I tried that approach first. Our terrain already gets split up and rendered in identical chunks, but I needed smaller pieces for the near sections. I adjusted the algorithm to render the nearest chunks in smaller pieces. I then allocated a 2048x2048 texture for each inner section, and used a 1024x1024 texture for each outer section: The memory requirements of this approach can be calculated as follows: 176 megs is a lot of texture data. In addition, the texture resolution wasn't even that good at near distances. You can see my attempt with this approach in the image below. The red area is beyond the virtual texture range, and only uses a single low-res baked texture. The draw distance was low, the memory consumption high, and the resolution was too low. This was a failure, and I thought maybe this technique was just impractical for anything but very controlled cases in certain games. I wasn't ready to give up yet without trying one last approach. Instead of allocating textures for a grid section, I tried creating a radiating series of textures extending away from the camera: The resulting resolution wasn't great, but the memory consumption was a lot lower, and terrain texturing was now completely decoupled from the terrain geometry. I found by adjusting the distances at which the texture switches, I could get a pretty good resolution in the foreground. I was using only three texture stages, so I increased the number to six and found I could get a good resolution at all distances, using just six 1024x1024 textures. The memory consumption for this was just 24 megabytes, a very reasonable number. Since the texturing is independent from terrain geometry, the user can fine-tune the texture distances to accommodate flight sims, RPGs, or whatever kind of game they are making. The last step was to add some padding around each virtual texture, so the virtual textures did not have to be complete redrawn each time the camera moves. I used a value of 0.25 the size of the texture range so the various virtual textures only get redrawn once in a while. First, because the terrain shader only has to perform a few lookups each pixel with almost no math, the new terrain shader runs much faster than the old one. When the bottleneck for most games is the pixel fillrate, this will make Leadwerks 3 games faster. Second, this allows us to use any number of texture layers on a terrain, with virtually no difference in rendering speed. This gives artists the flexibility to paint anything they want on the terrain, without worrying about budgets and constraints. A third advantage is that this allows the addition of "stamps", which are decals rendered directly into the virtual texture. This allows you to add craters, clumps of rocks, and other details directly onto the terrain. The cost of rendering them in is negligible, and the resulting virtual texture runs at the exact same speed, no matter how much detail you pack into it. Below you can see a simple example. The smiley face is baked into the virtual texture, not rendered on top of the terrain: The texture resolution problem I feared might make this approach impossible was solved by using a graduated series of six textures radiating out around the camera. I plan to implement some reasonable default settings, and it's only a minor hassle for the user to adjust the virtual texture draw distances beyond that. Rendering the virtual textures dynamically eliminates the high space requirements of id's megatexture technique, and also gets rid of the problems of paging texture data dynamically from the hard drive. At the same time, most of the flexibility of the megatexture technique is retained. Having the ability to paint terrain with any number of texture layers, plus the added stamping feature gives the artist a lot more flexibility than our old technique offered, and it even runs faster than the old terrain. This removes a major source of uncertainty from the development of Leadwerks 3.1 and turned out to be one of my favorite features in the new engine.
Implementation
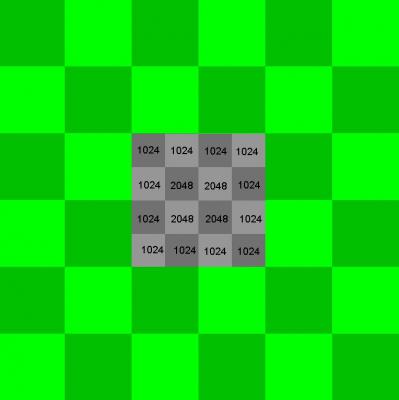
1024 * 1024 * 4 * 12 = 50331648 bytes
2048 * 2048 * 4 * 8 = 134217728
Total = 184549376 bytes = 176 megabytes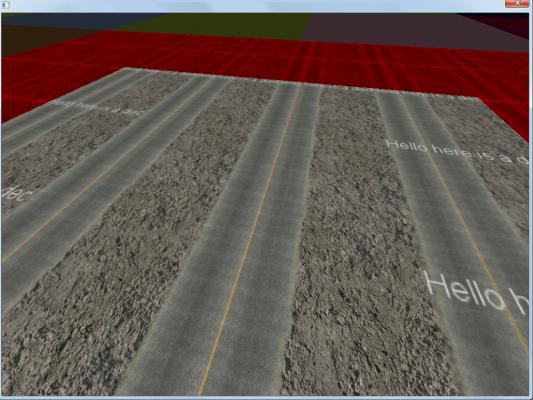
Advantages of Virtual Textures

Conclusion
Leadwerks has been successfully Greenlit for Steam, meaning we can integrate great features like the Steam Workshop and Valve file formats right into our game engine! Thank you so much to everyone who voted.
We saw an incredible response from the Steam Linux community, both here and on our Kickstarter campaign for Linux support, which is nearly 85% funded. If the campaign reaches the first stretch goal, we're throwing in Android and OUYA support for everyone who pledged $100 or more to the campaign.
Valve is one of my earliest influence in design and coding, and I'm really excited to be working more closely with them in the near future. Again, I sound like a broken record, but a big THANK YOU to the Steam, Linux, and Leadwerks communities!
Profile

Popular Blogs