Cryrid
Michael joined
A professional 3D artist in Atlantic Canada.
My Blogs
Man, it keeps getting easier and easier to start a model off with the form you want.
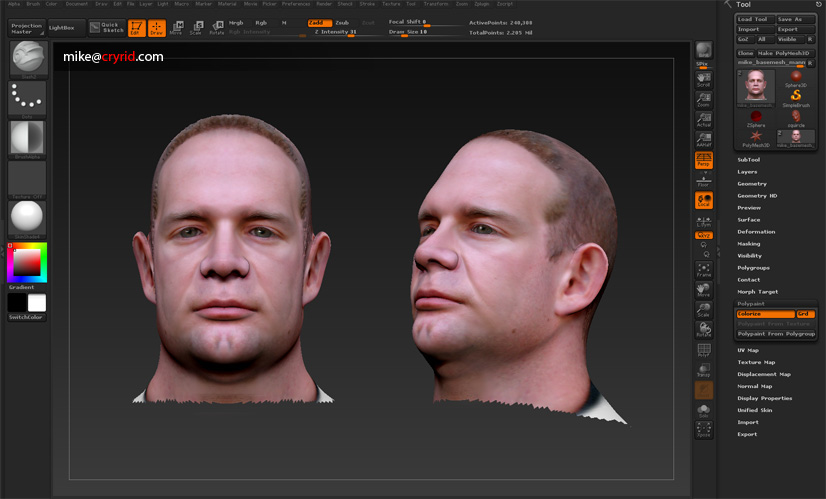
First up is Autodesk's Photofly, which generates a model using a series of photographs.
Even with a cheaper point-and-click camera and less-than-ideal lighting, the result it generated still managed to surprise me. It's a complete mess of triangles of course, much like a scan, so I'm in the process of seeing how well it works when retopologized and cleaned up. Eventually I'll move on to sculpting in more detail, correcting the shape, and cleaning the lighting information out of the texture. So far so good though.

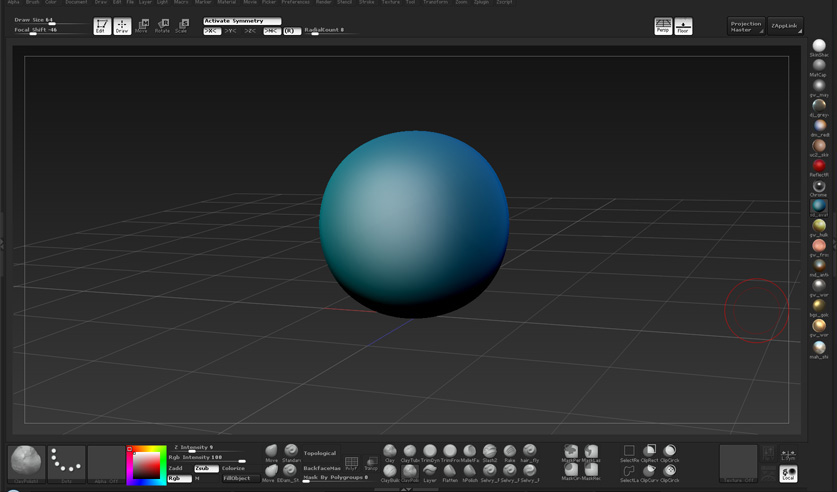
ZBrush: Dynamesh
ZBrush 4 Release 2 has been out for a short while now, and I'm really loving some of the new features. It's now even faster to mash a bunch of basic shapes together to get the overall form you want. This is using the same technique I mentioned a while ago, except without doing any manual retopology. Instead just pop it into zbrush, turn on dynamesh, and smooth out the joints. Before long, you're onto the fun part of sculpting.
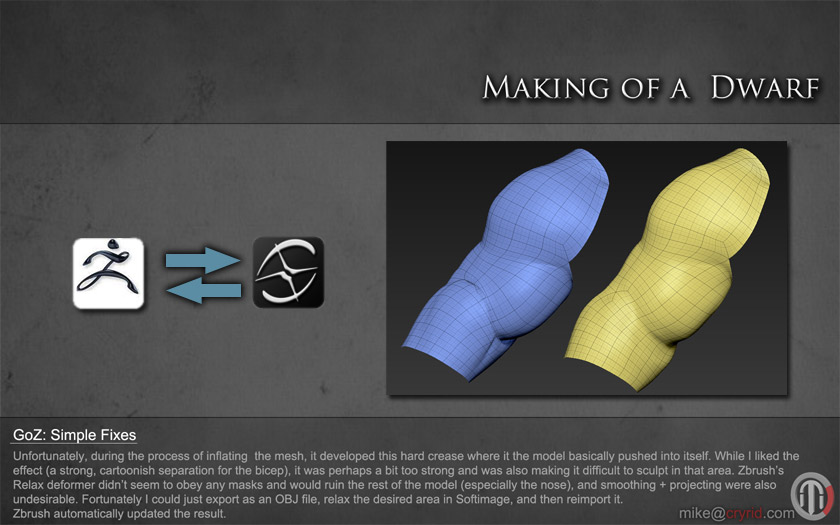
I've been somewhat documenting my latest project. The model itself is not yet finished and I may add more parts such as how I'd quickly create a basemesh for something like the spaulders, so this entry will probably see some updates.
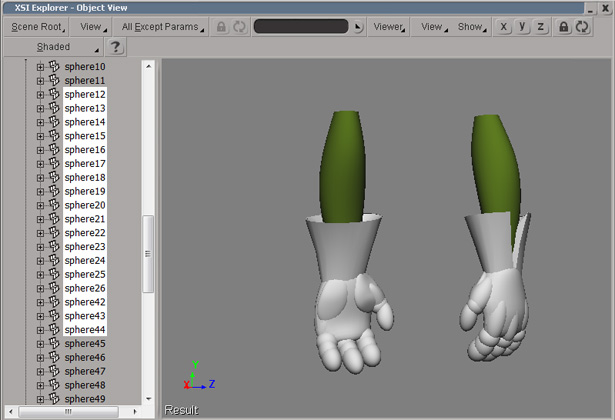
For those who have Softimage / XSI / Modtools, you may be interested in the Grow Rig demo.


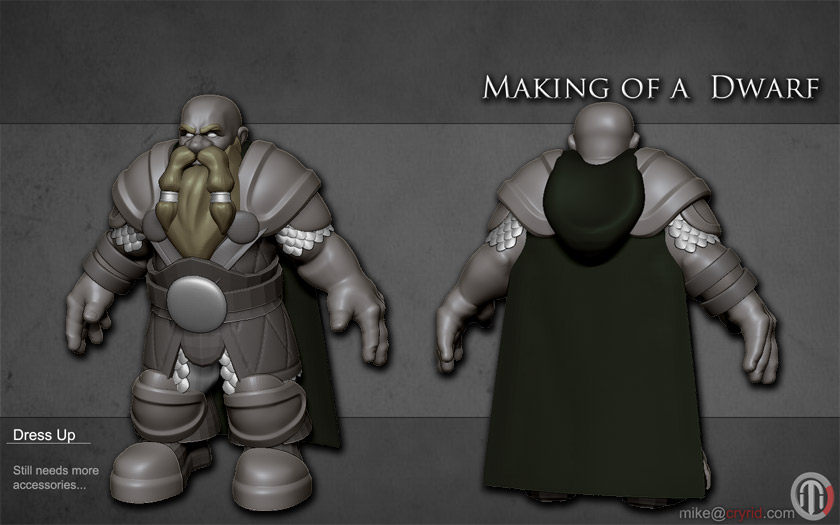
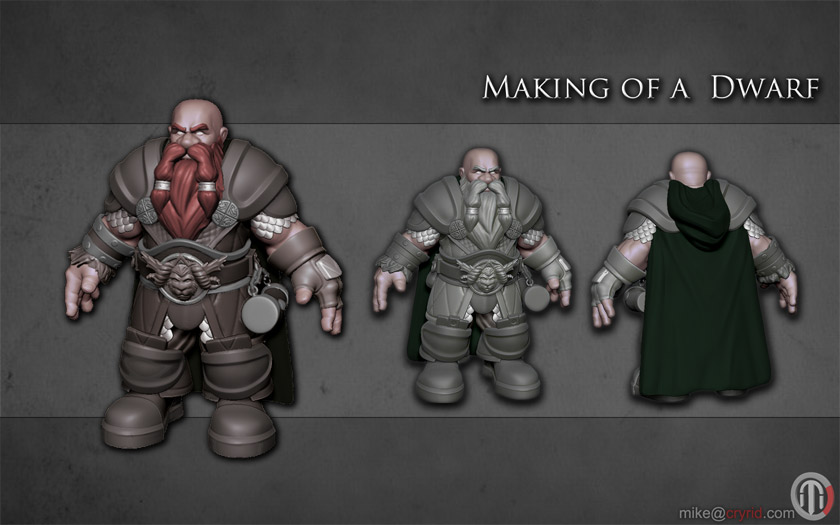
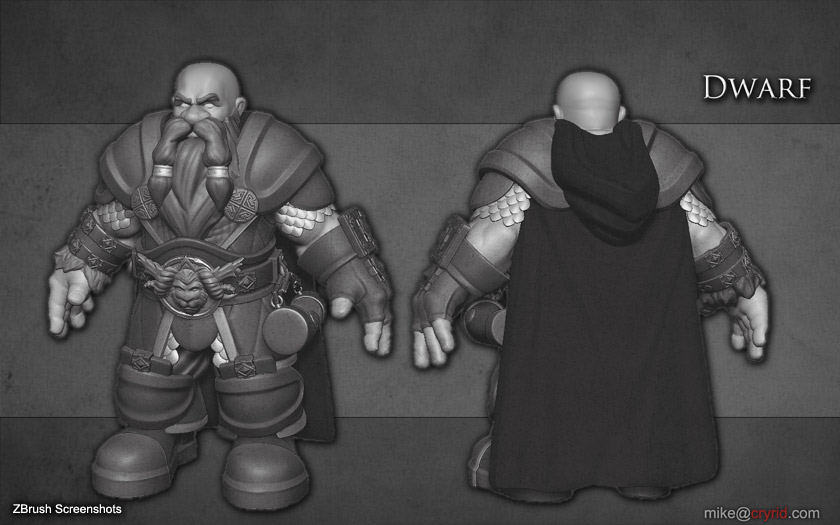
These next few are pretty much rinse and repeat as I create new basemeshes, while trying to finalize the overall design. I'm also working in the folds of the cloak more, as I believe they play an important role in maintaining the style. Clay, Trim Dynamics, and Damian Standard rule.

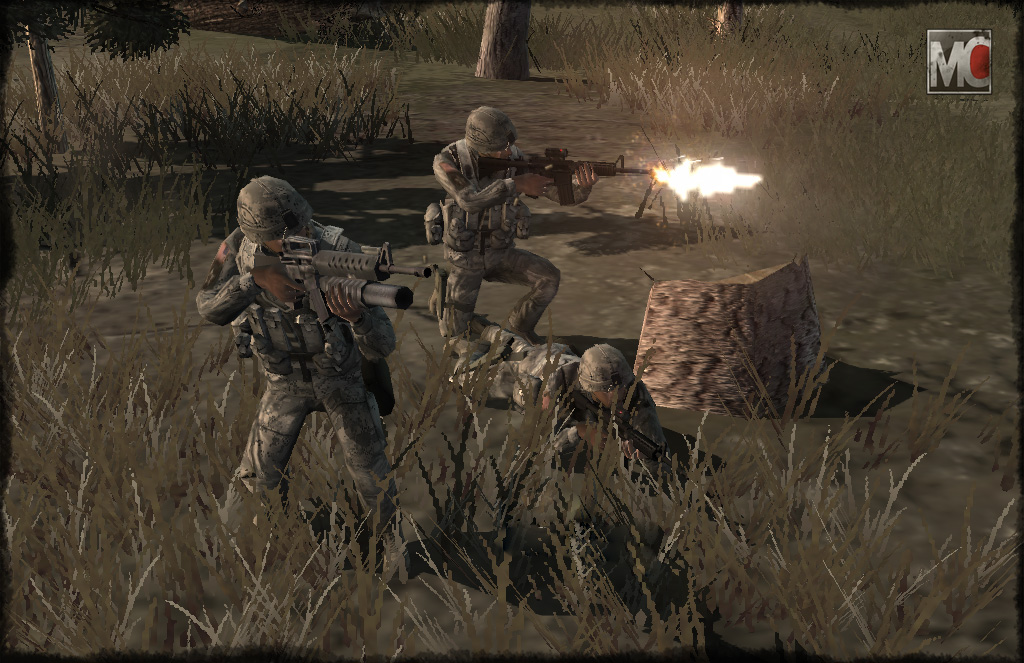
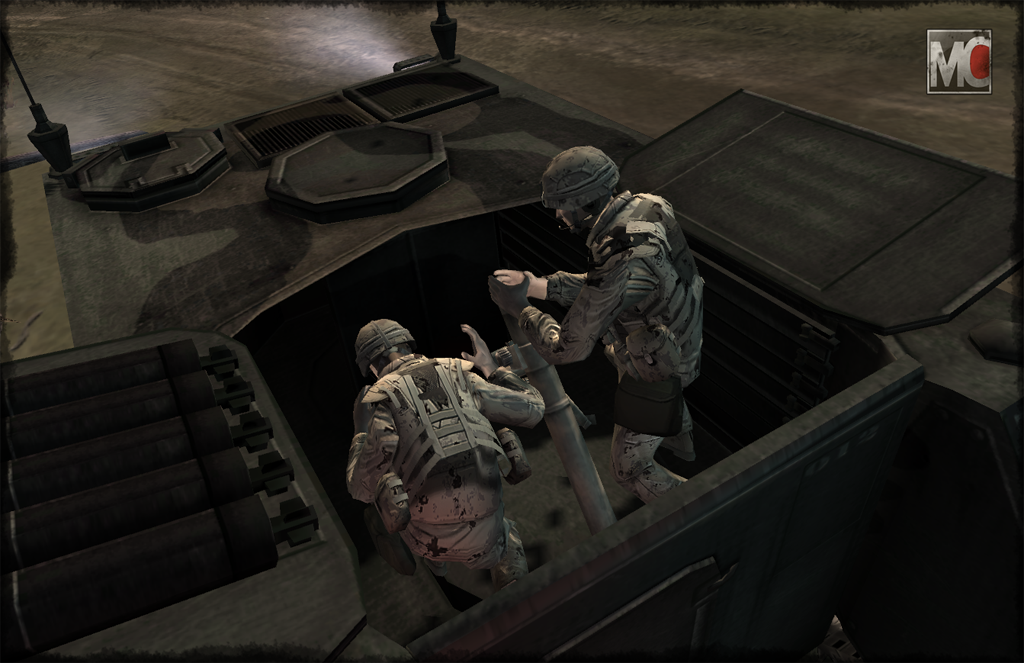
The fine folk over at Moddb.com have released a fresh batch of screenshots showing some of my work in action. There's plenty of pics, and all of them are looking great for a RTS. Go check 'em out!
And for those following my last entry, here is my latest progress on my new character:
Concept:
It's a bad habit, but I'm winging this one. I had a basic idea, gathered some reference images, and began working it out as I went. For those familiar with World War Z, there comes a point where the surviving humans start to get their act together and turn the tides against the zombies ("total war?"). There was a restructuring of how communities work regarding things like education and job placement (making sure everyone can be put to use), and the combat tactics adapt as well. BDU's no longer require camo and go back to a navy color, possibly because it is the cheapest dye, armor is geared more towards stopping bites, winter is the prime offensive season as the zombies become less effective due to the cold, guns are more modular but go back to using wooden stocks as its cheaper/easier than composite materials, and sometimes its just better to not use a loud gun at all (such as the Standard Infantry Entrenchment Tool: a fusion of a shovel and an axe).
This isn't quite what I'm doing, though it is very heavily inspired by such things. I'm a fan of zombies, I like the thought of simpler uniforms, a more classic looking firearm, and the thought of relying more on close-combat using swords and axes unless it couldn't be helped. I also like the thought where it is no longer the zombie apocalypse; the remaining civilization has adapted and dealing with the countless flesh-eating corpses is just another part of life. Some modern technology may remain, others cease to exist or take several steps back (UAVs and video feeds remain helpful, billion-dollar fighter jets and missiles not so much). It's a good setting for a story.
This isn't quite what I'm doing, though it is very heavily inspired by such things. I'm a fan of zombies, I like the thought of simpler uniforms, a more classic looking firearm, and the thought of relying more on close-combat using swords and axes unless it couldn't be helped. I also like the thought where it is no longer the zombie apocalypse; the remaining civilization has adapted and dealing with the countless flesh-eating corpses is just another part of life. Some modern technology may remain, others cease to exist or take several steps back (UAVs and video feeds remain helpful, billion-dollar fighter jets and missiles not so much). It's a good setting for a story.
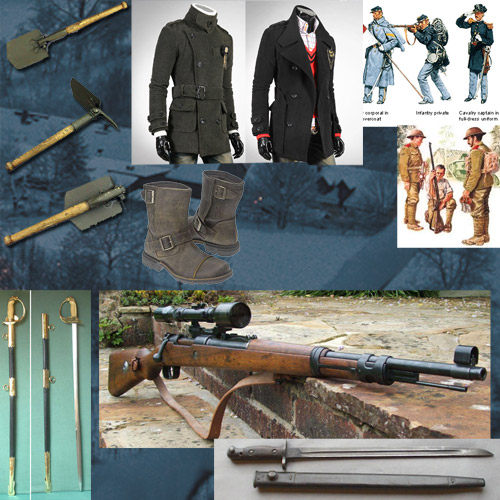
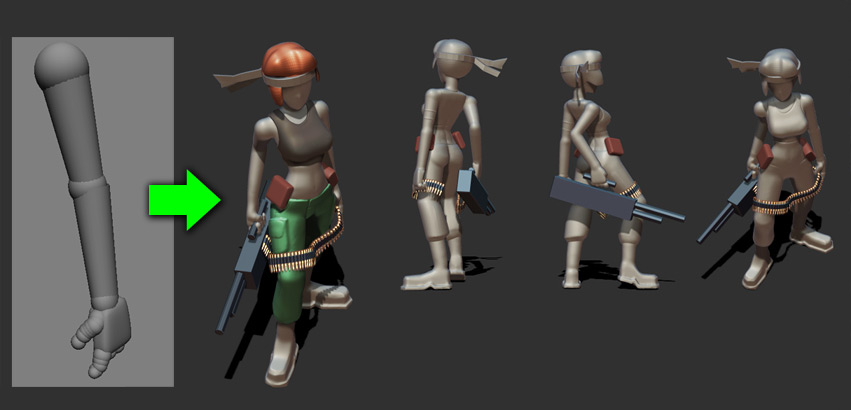
I found a coat from Dangoon that can be quickly converted from a stylish jacket to more of a military-looking uniform, so to me it seemed like something that could be either standard kit for a soldier, or just a good choice for a survivor. I also feel in love with the scoped Kar. Both seemed like they'd be fun to model.
Modeling:
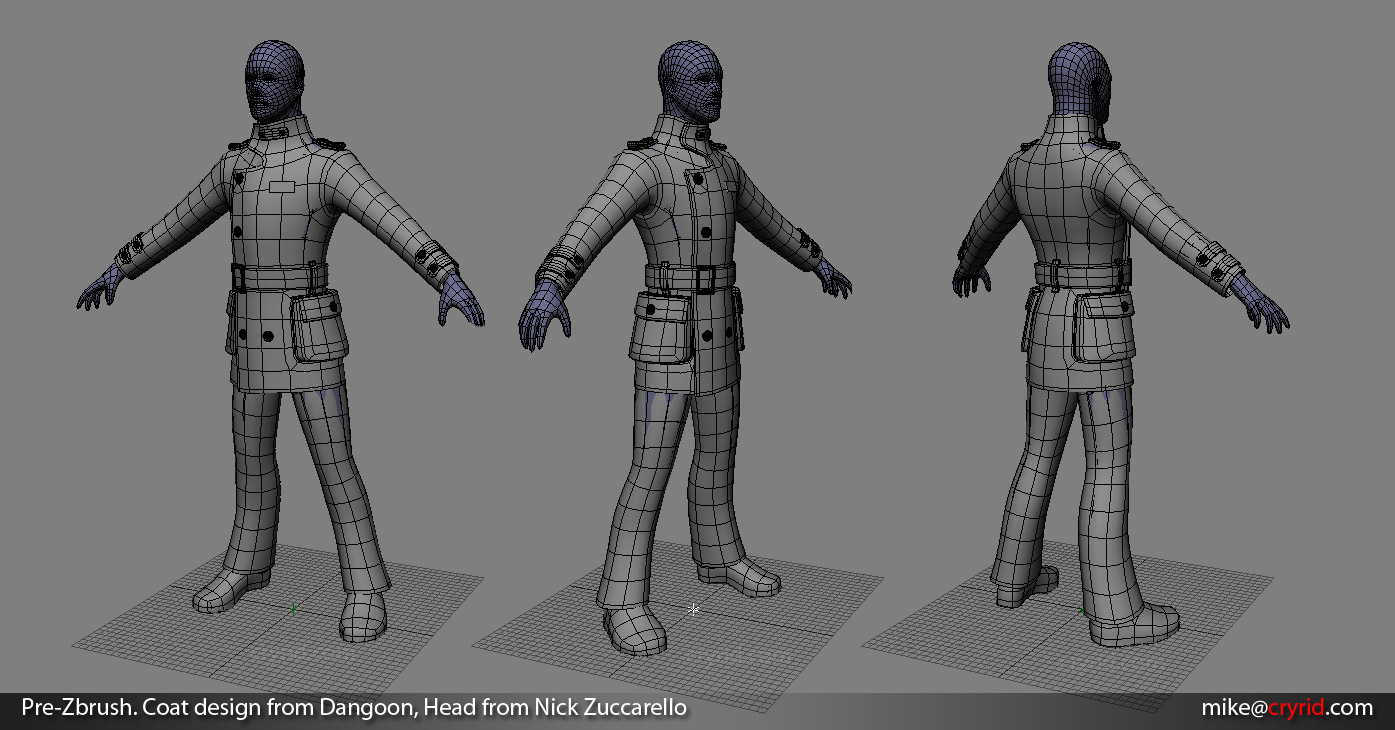
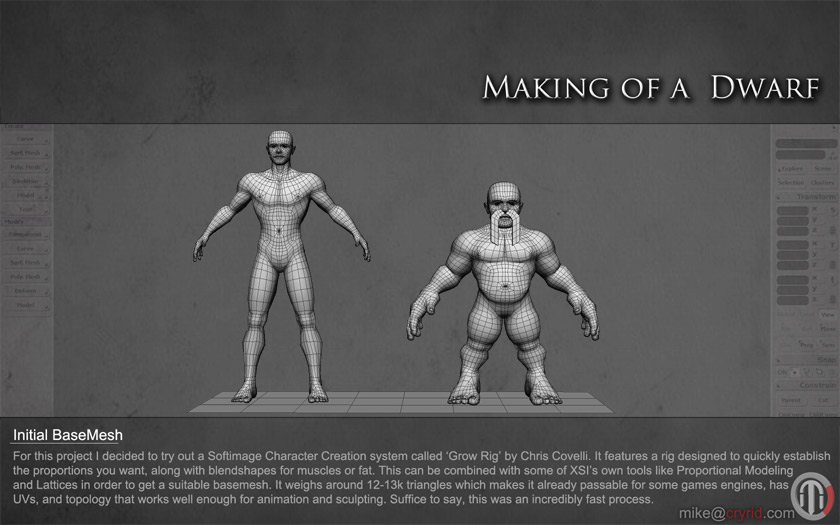
Nothing too fancy yet. Just a simple base mesh with extra control-edges thrown in so that it will hold its shape more during subdivision. I also try at this stage to allow me to work with as little retopology as possible. This is exactly what I wrote about earlier: Moddb.com
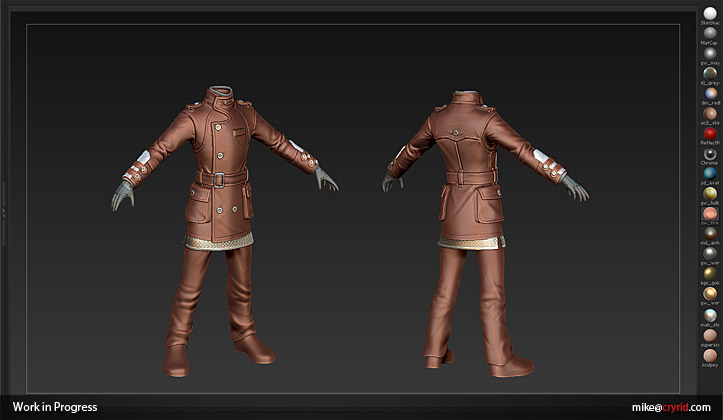
ZBrush:
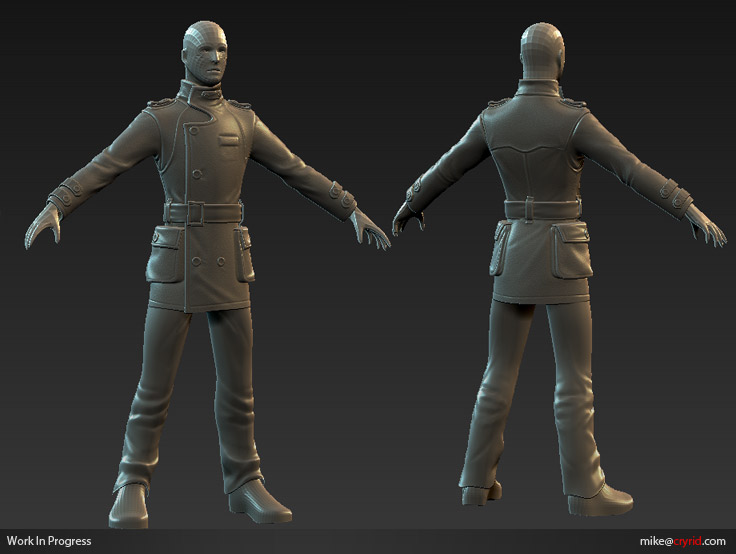
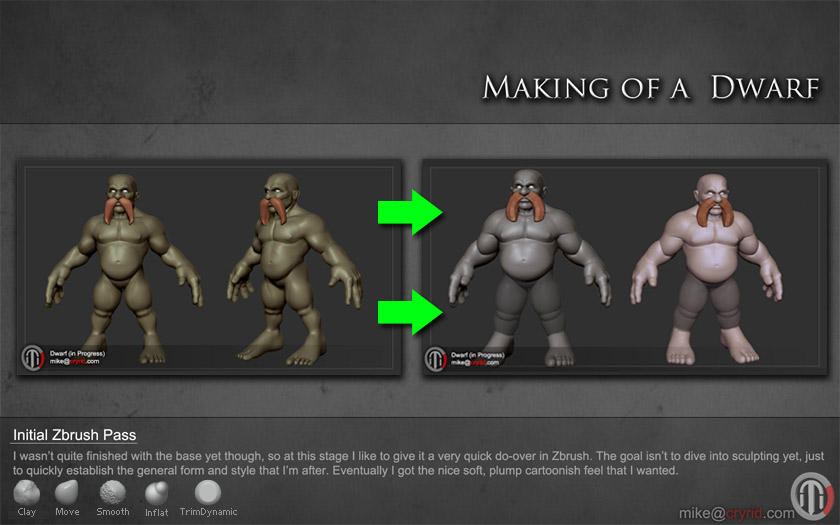
This is the first pass in Zbrush, done to help me get a basic feel for things. Nothing is final, certainly not the folds. Around this stage I like to work in the clothing seams and whatever features would help guide me. I don't plan on getting too hyped detailed; my laptop isn't capable of pushing too many polygons in zbrush, and I at my target resolution I don't imagine a whole lot would would even show up too well anyway. Thankfully the coat is a thicker material ( a wool blend), so it wouldn't have a lot of folds or threads anyway.
Edit:

Continuing to work away on it when I can find the time over these holidays. The clothing folds for the coat are more finalized; though the pants I've yet to pay attention to (I'm still considering changing them so that they are tucked into the boots). I just thought I'd post to say I like checking how the model would look with different matcaps applied. Aside from my general hatred of the default Wedwax (why do people leave it on when taking screenshots??), different materials can allow you to see the forms differently (accounting for bounce-light and the like). This allow allows me to preview the object as different materials; while I was originally thinking of sticking with a more charcoal/black look like in the reference, now I'm considering fancier accents or trim. I'm also toying with some more additions, such as the metal plates/bracers. It might be time to add in the sword/sheath.

I've been working on some lower poly stuff lately.
It's Cherubi!
Look at him Twirl! (click for full-resolution)
I might go back and add an idle animation along with the spin.
Then there is Pumpkinhead, which was created for a Halloween contest.
And finally something I've been working with to turn into a variety of stylized characters:
ZBrush Custom UI
I've created a custom ZBrush UI. It removes some of the 2d clutter, gives me quicker access to features like symmetry and automasking options, and adds some common brushes and materials I use. If you're interested in giving it a spin for yourself, you can find it on my site here, or on Moddb here.
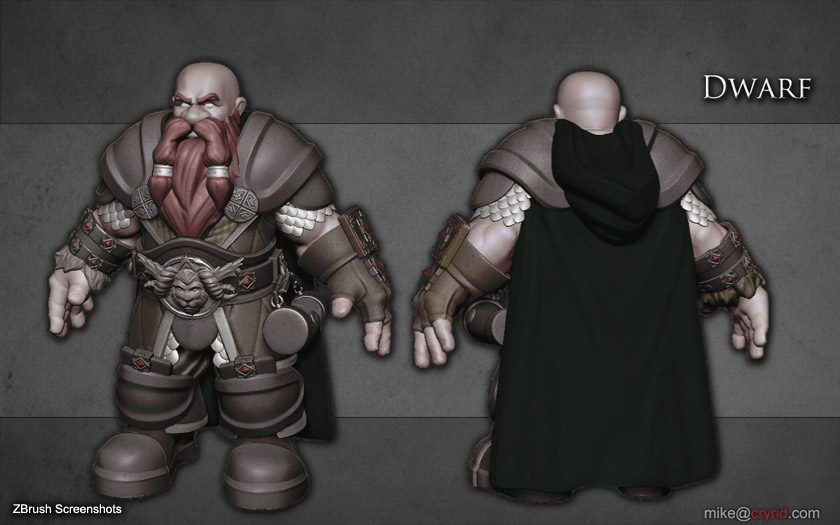
Company of Heroes: Modern Combat
The folks behind CoH: Modern Combat have begun to implement my model into their mod. It's not the final version (as they require American and Chinese soldiers), but for the time being I think it's cool to see it running around in an RTS, blowing stuff up.
WebSite
To start, I've updated the look of my site/blog. It shares some content that I post here, along with some extra.

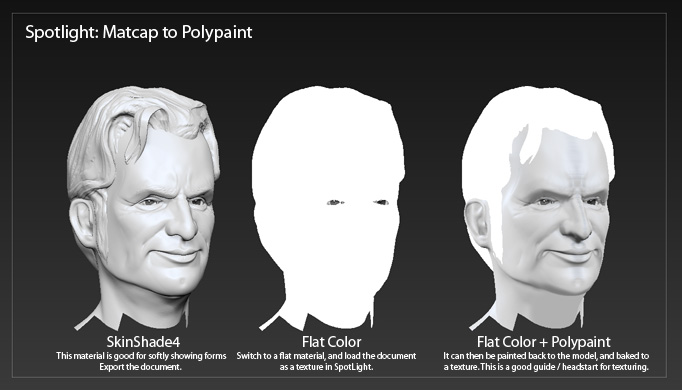
ZBrush Mini Tutorial:
I thought of this yesterday reading one of the beta testers talking about using Spotlight in a similar manner to ZAppLink. It's basically a quick way to capture matcaps to a texture, which in this case can be a good guide base for starting a texture.
Well Pixologic have released Zbrush 4.0, and all I can say is wow. There are some new features I have no real use for as a game artist, but other new features are already making my day. Here are some of my own quick experiments.
Spotlight:
A quick and easy way to work with images inside zbrush. So far it is great for use as references, and for projection painting...this is basically what I always wanted.
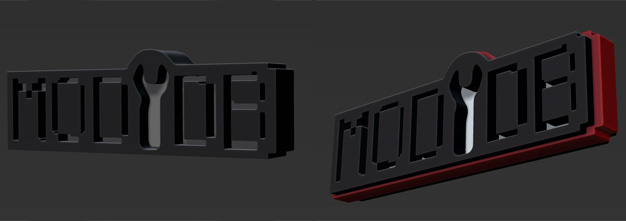
Shadowbox + Clip Brushes:

Shadowbox is a fun way to create a variety of shapes quickly, and you can come up with some very interesting shapes just by messing around with it. Combined with the new Clipping Brushes, I think it's a solid edition to the hard-edged modeling toolset Pixologic started to introduce in v3.5
There's a certain skill required for subdivision modeling, which traditionally can make it tricky to create certain shapes (ever try to create cylinders smoothly / seamlessly protruding out of other cylinders? You'll know what I mean - stuff like that requires some planning and edge control to prevent pinching and whatnot). With Zbrush4 however, you can very quickly produce all manner of complicated objects and intersections. It's so easy that I tend to think of it as using brute force to quickly overcome these obstacles. Don't get me wrong, I do appreciate the charm of making a model that subdivides well with minimal faces at sub-d lvl1, but I've also been in a production environment where speed is key and all that matters is the final result. Not only can zbrush help me create the shape I want quickly, but it also has tools such as Remesh and Decimation Master which help ensure that it is every bit as usable towards my final goal (either normal map baking, or using it directly in a program like ngrain). .
Works well with alphas too.
MatchMaker:
As I saw it, I knew I'd be putting it to good use in the future. It shrinkwraps one object to another (and does so very quickly, despite the number of polygons that can be involved). My original instinct was to draw something intricate in Shadowbox, which could then be shrinkwrapped to fit rounder armor.

Lightbox:
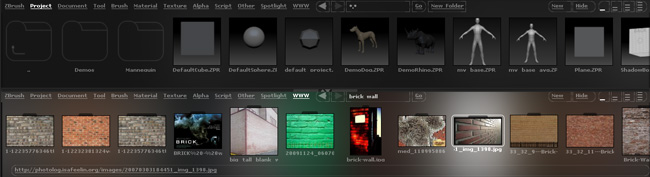
When Lightbox was first introduced in previous versions, it was hinted at serving a bigger role in the future. As such I started to use it, and found it to be a convenient way to organize tools, brushes, and materials without cluttering the UI. That hasn't changed, but now it adds projects (which are a very convenient way for saving scenes, great for setting up quick start templates), and the ability to search the web for references without leaving zbrush.
Layers:
Haven't done a lot with these either yet, but layers now behave nicely across subdivision levels (they're no longer locked), you can blend several together, and they support polypaint as well. Good stuff.
Previously I discussed one method of quickly building out the form of a character with basic primitive objects, which can then be retopologized to a cleaner mesh for animation afterwards.
Normally my workflow with organic models (such as characters) is to create a simple base-mesh (evenly spaced quads if possible), import it into zbrush to refine it and add all the detail, and then retoplogize it into a more animation friendly mesh. This works out well enough for more unique characters, but to save time on more realistic human characters I try to make the basemesh as simple-yet-animation-friendly from the start as I can. With good topology, I won't have to subdivide as often to get in the detail I want (such as around the face, you'll know what I mean if you've ever sculpted from a normal sphere or cube), and the lowest subdivision level will often be 90-95% ready for a game as soon as it's exported (less than 4k triangles, with topology that is overall good for animation). Most times all that's needed is a few loops added around the certain areas of deformation, and some slight triangulation/cleanup (which is much, much faster than retopologizing the entire thing, or what I deem trouble areas). And best of all, it's easily reusable for other human characters as well.
You can find quite a few free basemesh's at Polycount. A lot of the time, I use a modified version of one created by Arshlevon.
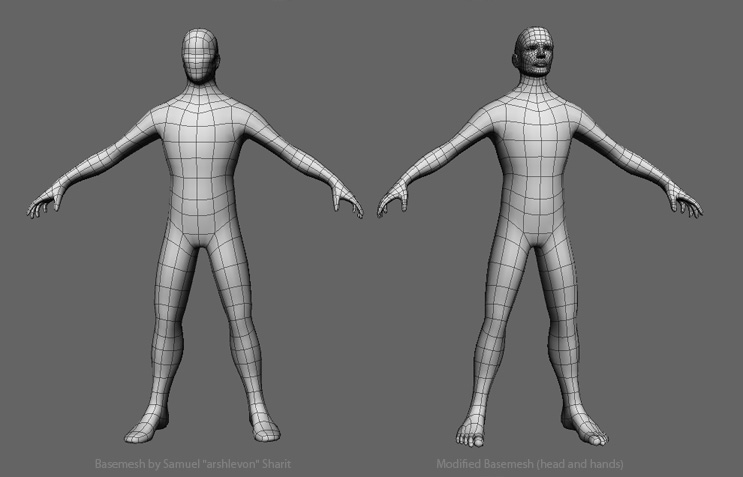
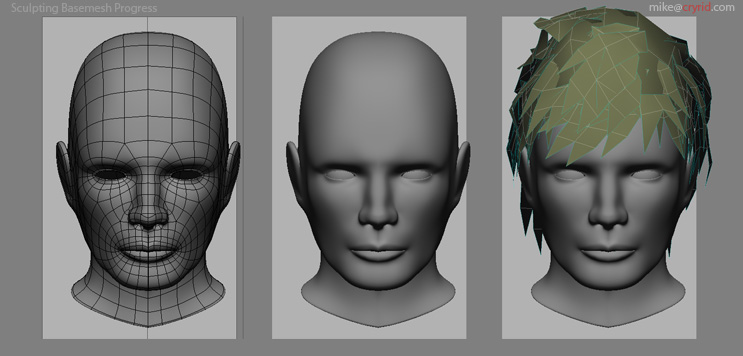
The major difference is the head. The geometry is simple enough (and rigged) so that it can be shifted around in Softimage to match a wide variety of human heads within minutes, and the loops can also quickly be dissolved and made even simpler if needed (such as when a project does not require facial animation, or if the character wont be close enough that it needs to be so smooth). By using the same base model for all characters in a project, it also makes it easier to share edges for UV seams, and also speeds up rigging and animating.
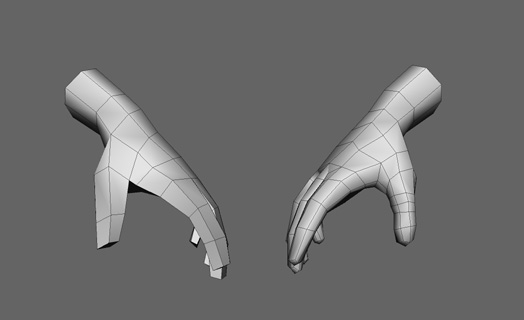
A similar change was made to the hands. The fingers have more geometry and a rounder form than in a typical basemesh, but they hold up well while shifting between subdivision levels, and save me a lot of time as they don't end up being 4-sided if I do export the first level of subdivision for a game (hard angles like that make normal mapping harder). The knuckles usually see added loops afterwards to aid in animation, but it is so much quicker to add these loops than to try and make a square finger round.
From there, making a character (or several) is a breeze. Whether its a full body or just a head, new characters can be made and ready in no time.
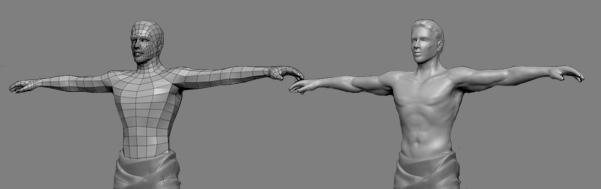
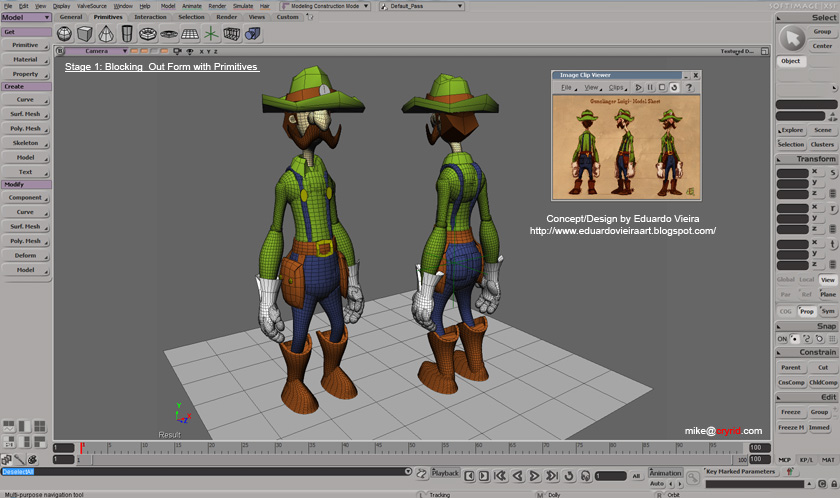
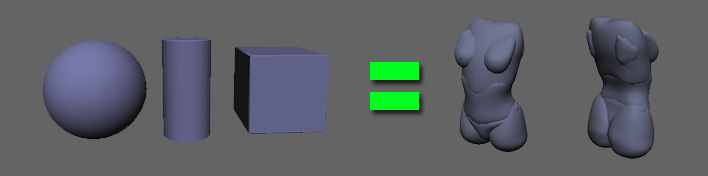
I'm currently putting together a new character model, so I thought I'd document the process I use. It makes creating a new character from scratch pretty quick. The idea is to quickly block out the character's proportions first using simple cubes, spheres, and cylinders. There's no need to worry about the topology/edge-flow, just quickly flesh out the smaller shapes that make the character.
These basic shapes can be quickly manipulated into place using lattices and proportional modeling.
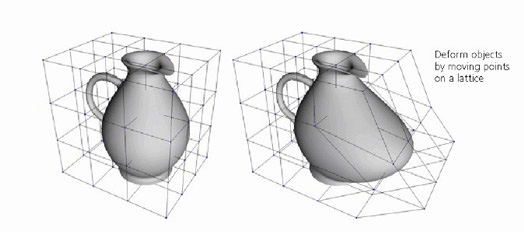
Lattices make it easy to warp geometry using a simple cage.
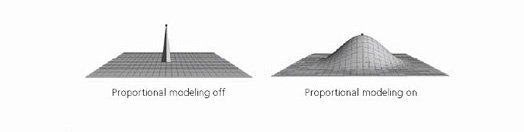
Proportional Modeling adds a fall-off to the basic transforms.
The workflow becomes as simple as mashing many meshes together, and quickly warping them using the above tools to get the bigger shapes you want.
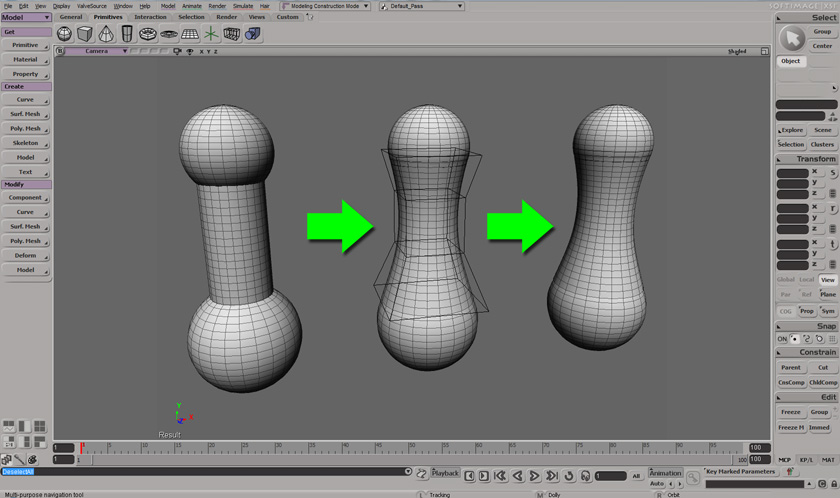
Breaking an otherwise complicated object into much simpler shapes makes creating them easier and faster.
Before you know it,you'll have a character fully flushed out,with most of the harder work eliminated.
All that's left is to turn it into a more proper model, which is very easy to do.Now you're free to focus on the topology without worrying about the shape of the model itself.
Profile
