C0RAL
Carl joined
I'm an Australian Game Artist with 3 years professional experience in the Games Industry. I Specialize in Realistic & Styled Environments, Props & Weapons for AAA & Mobile Games. Titles I've worked on Include Miscreated (Available on Steam) & Flame Run (Android)
Strumpy Shader Editor by Strumpy Games is a Visual Shader Creation Package. Its Completely Free to download & use. You can download it from the Asset Store or Direct Download from the Unity Forums.
What is a Shader? Shaders control what type of Map the a Material can Intput & display such as Diffuse, Normal + Detail, Spec (Power/ Sharpness), Emissive, Cubemap, Rimlight & Alpha Transparency. This Tutorial will cover all the above and more.
When Beginning a new Shader I like to break it down into what individual Parts I want the shader to do. For a basic game Shader you’d use Diffuse, Normal & Specular. For a more complex shader such as a Glass Shader you’d Add Transparency through the Diffuse Alpha. It’s always better performance wise to keep your shader as simple as possible and use multiple shaders needed for a certain type of material. However some things must be sacrificed in order to do this. Eg. A shader using Diffuse + Alpha Transparency needs to have the Specular in a separate channel. However If you don’t need Transparency you can apply your Specular through your Diffuse Alpha.
For the Purposes of this Tutorial I’ll go through creating a Complex Shader that will give you can Idea of what can be done and you’ll be able to Optimize later to create any shader you wish.
Navigating Strumpy Shader: Install it like a normal Package, this will add Shader Editor to the top Bar/ Strumpy Shader Editor. A save shader Error will appear, Ignore it. when opening Strumpy your given Node Graph & Preview. To move around use Alt + Left Mouse. To connect nodes left Click the connection box to another, to Remove Right click on the Line. To move nodes select them once to highlight and drag to move them around.
Setting up a new Shader: Your given a basic starter Shader when you open Strumpy. In the Right go to File/ New Graph. You have a Master Node that controls all your Connections for your nodes. You can add a new Node under the “Node” tab (4th Top Tab) or by right clicking in the graph. Some Import Nodes are Tex2D, Sampler2D, Add, Multiply, Range & Float. You can Name each Input under the Input Tab (2nd Tab)/ Description, This means it will display with that name when you save the Shader.
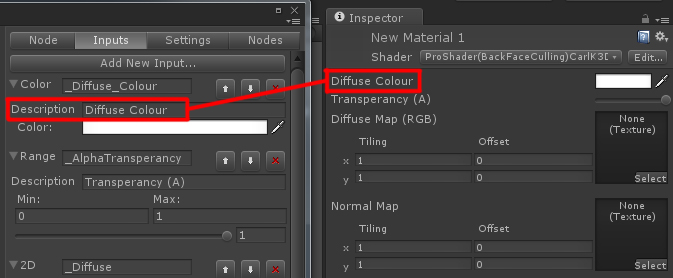
Diffuse, Normal & Spec: To setup Diffuse, Normal & Spec you need a Tex2D (This is the Connection Node for the RGBA + A) & Sampler2D (Direct Connection of 2D Texture). you can multiply a Color with the Diffuse to act as an Override by using a Multiply & a Color Node. Normal Maps Connect to the “Normal” in the master Node. Use a UnpackNormal Node, Tex2DNormal & Sampler2D. Specular is done the same way as Diffuse but is plugged into the “Specular” Channel of the master node. I’ve also Added a Spec Shineness so I’ve used an Add to “Add” the Spec Color Override to the Specular then Multiply the Texture with the Shininess. Refer to the below Image.
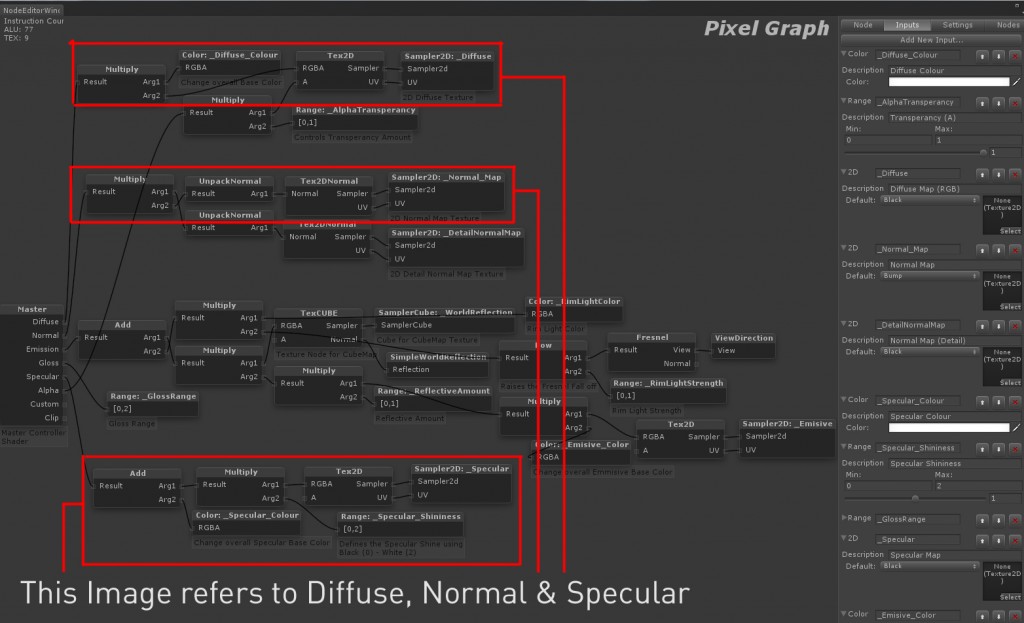
*Note: Anything in Red Requires fixing before you can save the Shader out.
Emmisive, Cube Map, Normal Map Detail & Rim Light: These are most of the Additional features that can be added to a shader If need be. Emmisive creates a self Illuminated effect that can be used for faking Lights. This is plugged into the Emission node. Cube Map uses a Texture as a reflection in an Object (I might go through setting up Cube Maps in a later Post). This is done with a TexCUBE, SamplerCube & SimpleWorldReflection Node much like the Normal Map. Normal Map Detail is Exactly the same as the Normal Map, the reason I call it Detail is because this is used as a High detail Normal Map, when you get close to the object Eg. Brick, the Detail Normal appears. This is the Normal Map Tiled a Number of times Eg. 10x. Rim Light is exactly what it sounds like, It adds a Light around the Rim of the Object. This is done using a Power, Fresnel, ViewDirection & Range (Controls the Strength).
Alpha Transparency: setting up Transparency is done using a Multiply from the Alpha Master Node. and connecting Arg1 (Argument 1) to A (In Tex2D) & a Range in Arg2. This will allow you to use a Alpha Channel in your Diffuse for Transparency. However If you have an Object with Opaque and Transparency This could have Alpha sorting Problems (Solid Objects will appear in front or behind Transparent object).
Cutout Transparency is done connecting Clip – Subtract (Alg1) – Range & (Alg2) – Tex2D (A) in the Diffuse. Only settings that need changing are Queue Settings need to be set to Transparent.
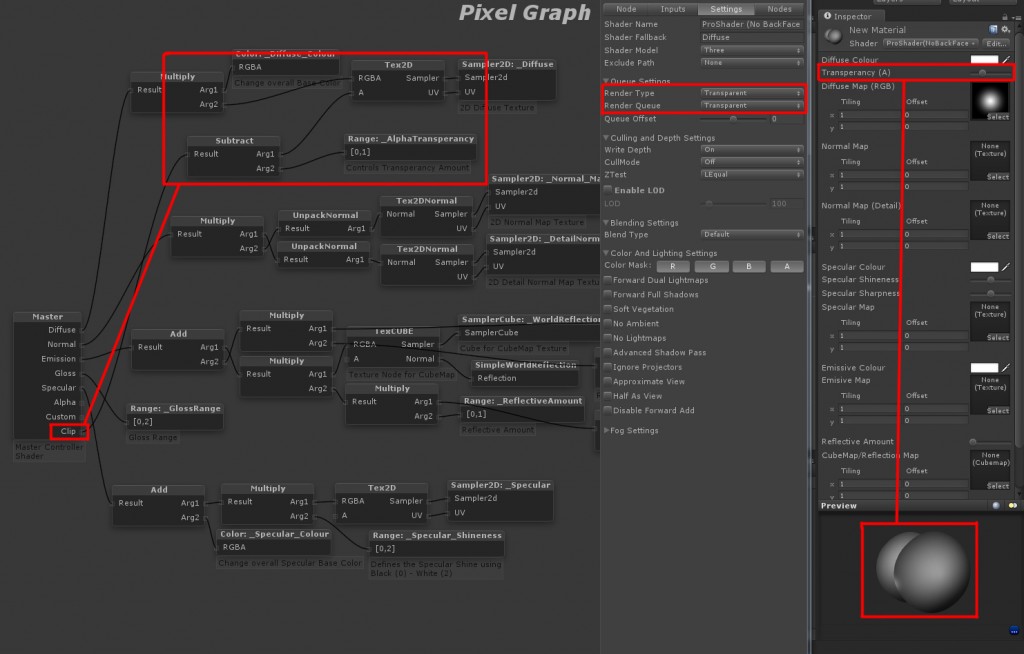
These are just a basic summery of what each part does and what they use. After a while of using Strumpy you will begin to understand exactly what each Node is doing.
BackFace Culling: is only render the face of an object in the direction of its Normals. This is good for Objects like a Building or a Tree. Having No BackFace culling will render both sides which uses a little more performance then having backface culling but its not noticeable. Having no BackFace Culling is good for Glass or 2D Geometry. to Turn No/Off Culling go to the Settings Tab/ Culling and Depth Settings/ CullMode/ Back (BackFace), Front or Off.
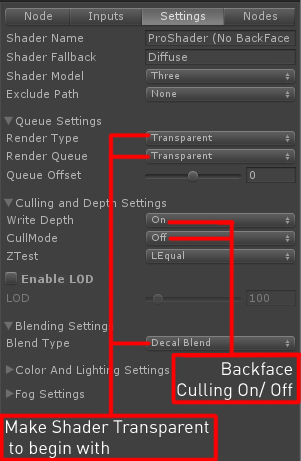
Settings: The Settings Tab is where you Name what your Shader will appear as In Unity. there are a number of settings such as Color, Lighting, Blending, Culling & Fog. Part of setting up Transparency for correct Cutout Transparency is done here as well as BackFace Culling.
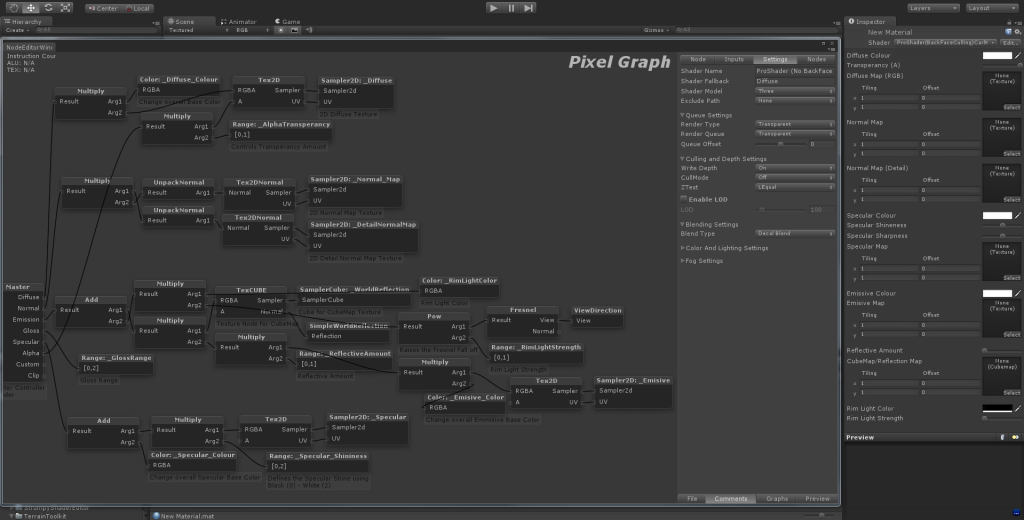
Reference Shader Setup Image.
The Terrain ToolKit is a Free Package for Unity created by SixTimesNothing a small Indie Games Company.
You can download Terrain ToolKit completely for free – Here
Much like Unity’s Terrain Editor the Terrain Toolkit allows users to create and generate different types of surfaces using a number of different presets and sliders to very quickly create diverse terrains to suit any landscape you can think of.
Installing a Package: Simply download the Package from the above link, Double click it will make it open with Unity. Click Import (Everything should be ticked already) and your done.
Adding the Terrain ToolKit to a Terrain: Once you have Inported the Package go to Terrain (Tab)/ Create Terrain. Then with the Terrain selected (In the Hierarchy) go to Component/ Terrain/ Terrain ToolKit. This will add the Terrain ToolKit to your Terrain.
Using the Terrain ToolKit: This is were things get complex. I advise watching this 8 minute Tutorial Videos from the developers on the basics of the Terrain ToolKit – Link
Basics of the Terrain ToolKit: I wont go into to much detail since I find that to become good with the Terrain ToolKit requires a lot of experimenting on your part. The Things I will go over will also be outlined in the above video.
You are given 3 main Tabs Create, Erode, Texture. Most of the different Create Types work best with testing. using a Fractal for example with a Rough Mountains Preset will give a jagged rock appearance, while a combination of Voronoi and Perlin will give a more rolling Mountain look. Its up to you and how much time you spend tweaking it to perfection.
Erode: Will alter your terrain in the same way that weather and effects over time would change the landscape and shape. such as Rain, Ocean & Wind.
Texture: Allows you to add Multiple 2D Textures (Tiled) to the Terrain. You will be able to apply each texture to different areas of the Terrain. Low to High. You can change at what Height the texture will be effected. There is also a Texture Slope that change at what Angle different Textures will be applied.
a very quick Example of what can be done with the Terrain ToolKit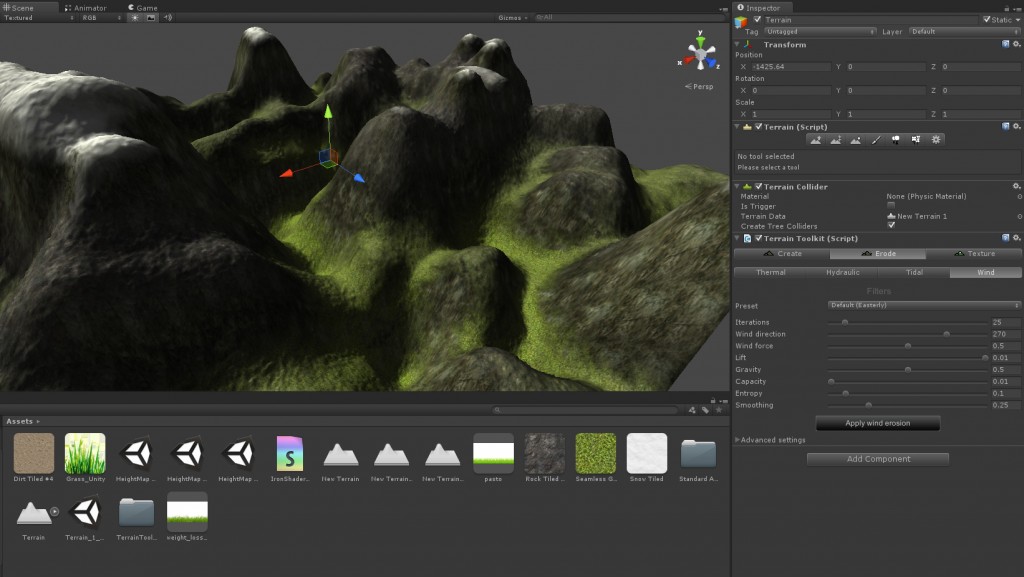
If you Plan to Sculpt, Work on the Terrain more or use it in a Different Engine. Theres a Terrain Exporter script thanks to Eric Haines & Yun Kyu Choi that can be found - Here
I use this Simply right click in Unity (Project Window)/ Create/ JavaScript. Name it “ExportTerrain” if you don’t, It wont run. Remove the Existing Code and Copy & Paste all the Code from ExportTerrain.js
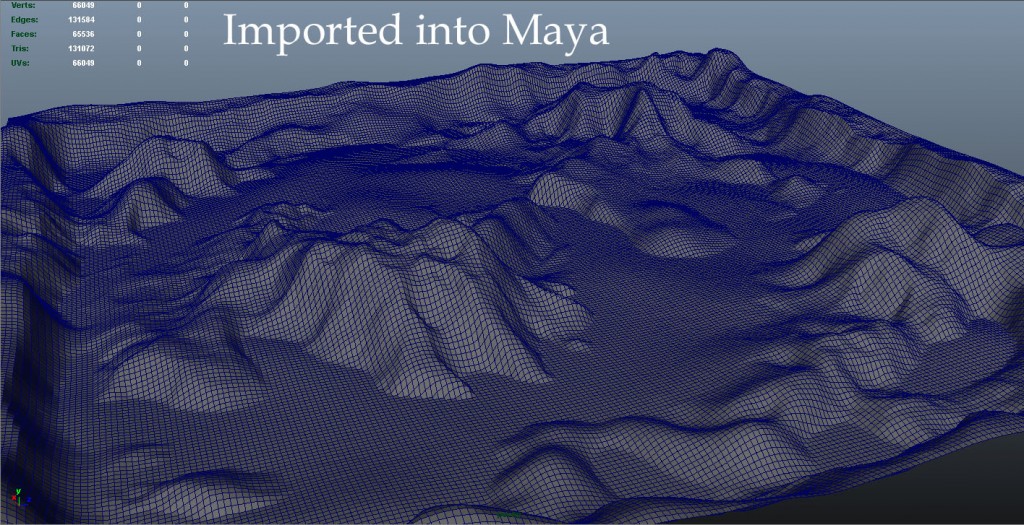
save it and put it in a folder named Editor this is found under Assets/ TerrainToolKit/ Editor. When you go to Terrain (Top Tab) there will be a button called Export to OBJ. Select you Terrain then select Export to OBJ. Choose Triangle or Quads & Resolution, Half should be fine but Full will have all the details. This is a High Poly Mesh so you will have to retopo or save out a Lower Resolution mesh
This will Continue from the Previous Post about Creation & Painting. This time I will be adding Grass (Texture), Trees (3D Models with Materials & Textures already Applied) & Detail Meshes such as Rocks.
Grass: In The Terrain Editor makes it so Incredibly easy to create amazing looking grass only using a Texture. By this I mean Unity will already include a Plane for the Grass Texture. aka You don’t need to create a mesh for grass, just a texture.
for this example I will use this

Simply add this Into Unity. Go to the Grass/Detail Mesh Tab (6th Tab) Select your Brush, I would recommend a hard brush to stop spaced out grass around the blending areas. Go to Edit Details/ Add Grass Texture/ Select your Grass Texture.
Adjusting the Setting is Important since just adding it wont give a desired result first time. these just require tweaking and will update in real time so you can adjust to what looks best for you.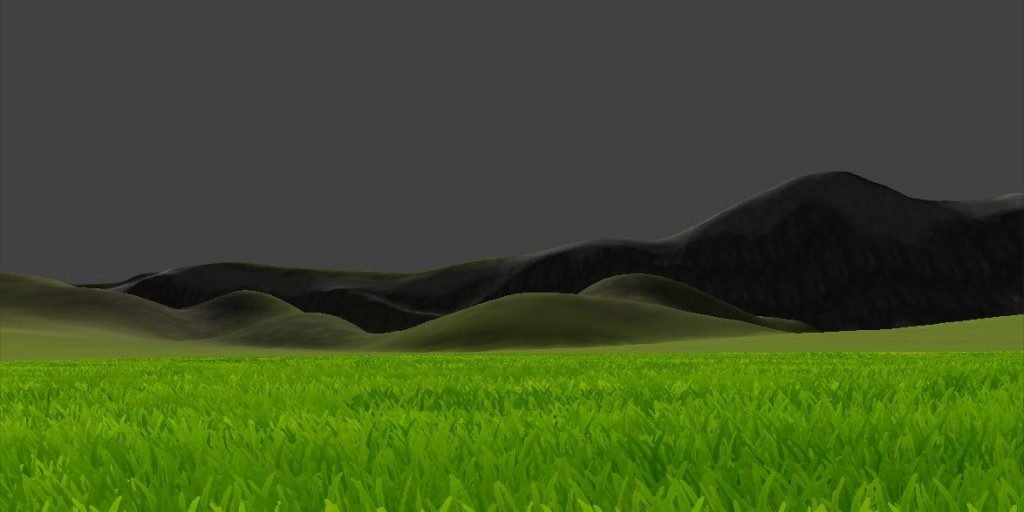
Trees: These work under the same system as Grass. Open the 5th Tab/ Edit Trees/ Add Tree/ Select your Prefab. Change the bend factor to something that will suit your environment conditions.
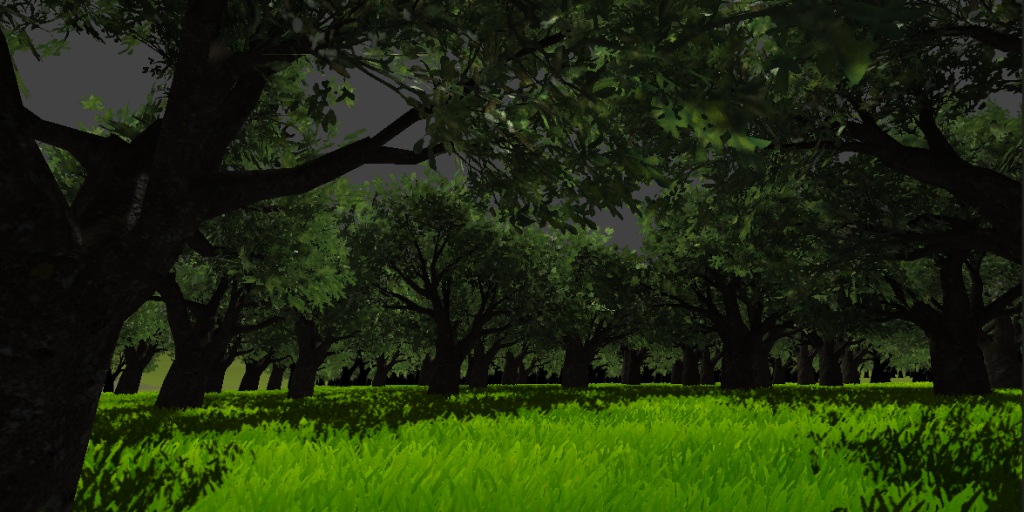
The Same Rule applies for Detail Meshes, These can be static objects such as rocks, logs or even Buildings.
The Terrain Editor is Unity’s inbuilt Terrain Creation Tool. It is a very powerful tool that allows you to create Complete Environments in no time at all. With this tool you can create a 3D Terrain Including (Mountains, Rivers, Cliffs & anything else you can think of), You add Multiple Tiling Textures to the Terrain the blend between Textures depending on the surface, Trees, Grass & other objects can be added and painted onto the surface using the a brush. This Post will cover creating Terrains, Sculpting on them, Adding and blending Textures onto the Terrain. Everything you need to know about terrains or anything covered in this tutorial is located - Here
Create a Terrain: In Unity Under the Tab Terrain/ Create Terrain. This will add a Terrain to your Project Panel & Hierarchy. You can select this in the Hierarchy to select it. Pressing F will position the Camera to the center of the Object, In this case Terrain.
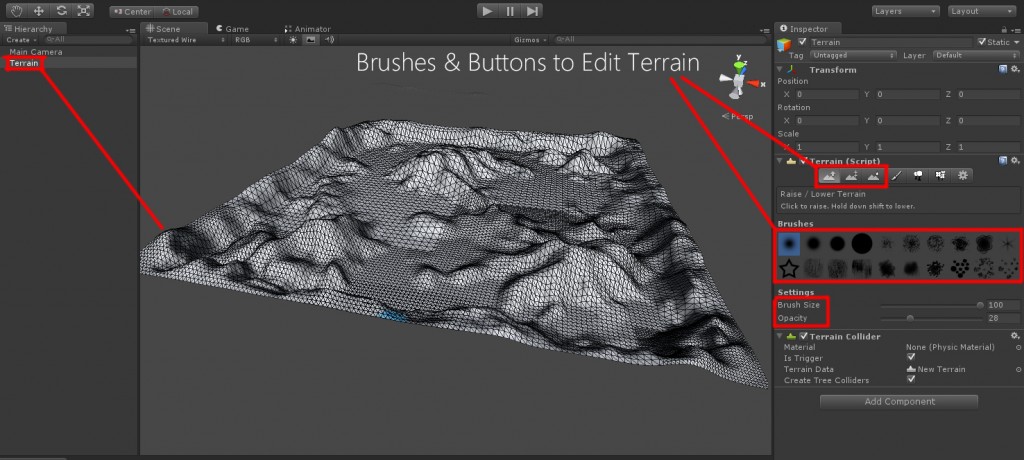
*Note: Selecting the Buttons under Terrain (Script) will give a brief description of what it does, there are many different Buttons we will cover but in this tutorial we are focusing on are Settings, Raise/Lower Terrain, Paint Height, Smooth Height & Paint Texture.
Setting up your Terrain: Some of the Information on the Unity Website has been change due to later releases. So to change the Resolution of your Terrain select your Terrain and go to Terrain (Top Tab)/ Set Resolution.
Sculpting your Heightmap: First of all a heightmap is a Texture that uses a greyscale to determine how high or low geometry needs to be, Complete White (Highest point), Complete Black (Lowest Point) anywhere in between is between 0.1% & 99.9% roughly. This means you can also create your own Heightmap in 2D Programs such as Photoshop. (It needs to be in GreyScale Not RGB to work with Unity).
To start painting your Heightmap in 3D Select any of the Tools Raise/Lower Terrain, Paint Height, Smooth Height. These are rather self explanatory as to what they do. Raise/Lower Terrain Raise Or Lowers the Terrain Height, Paint Height Raises to a target Height and stops when it reaches it, Smooth Height Smooths the Terrain, in technical terms this advantages the Vertices height between each other. At this point all you have to do is adjust Brush Size and Opacity and Paint! To clear your Heightmap go to Terrain (Tab)/ Flatten Heightmap/ Flatten
*Note: You will notice that when you paint on the Heightmap the Terrain becomes more dense where you paint & when you get closer or nearer. This is called Tessellation and is a very handy Optimization Technique for Performance and Graphics.
Painting the Base Terrain: To Paint a Base Texture to the Terrain go to the 4th Button (Paint Texture). Select a Brush like normal, Add a Texture under Textures/ Edit Textures/ Add Texture. A window will open up and you will be able to connect a 2D Texture Map & Normal Map (Since you will be Tiling this Make sure your Texture is Tillable), Once this is done adjust the Size, This is how many time it tiles in x & y. to Adjust the Tiling Size you can select your Texture in the Paint Texture Button/ Edit Textures/ Edit Texture.
Painting Blending Textures: This is the Same Process as Painting the Base but this time you will use a brush to Blend/ Mask Texture into the Terrain, Simply add your next Texture/ Normal Map & use a brush to paint it in (Mixing your Size & Opacity is a good idea)
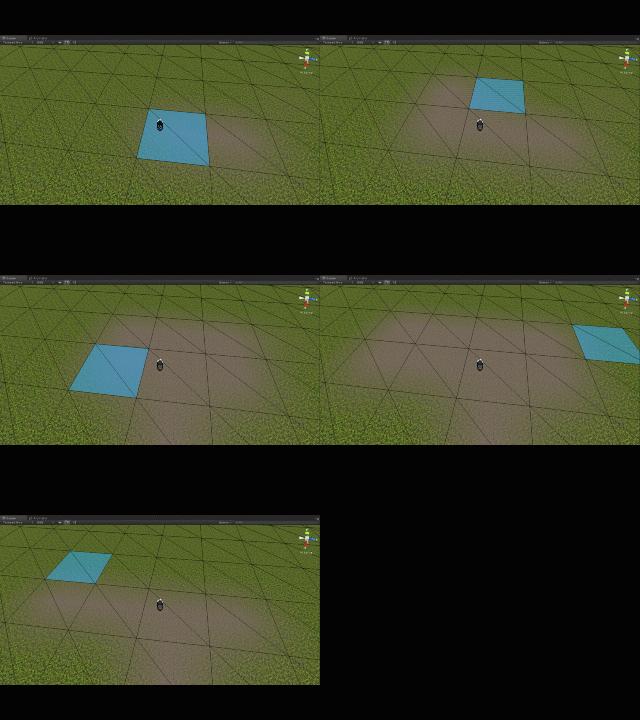
Make Player Controllers Collide with Terrain: To do this simply Import the Character Controller, Drag 1st or 3rd Person Into the Scene, Position it where you want to spawn in the Game at the ground (Make sure its a little bit above or perfectly level so you don’t fall through), Select your Terrain in the Hierarchy/ Make “Is Trigger” Unticked. Done!
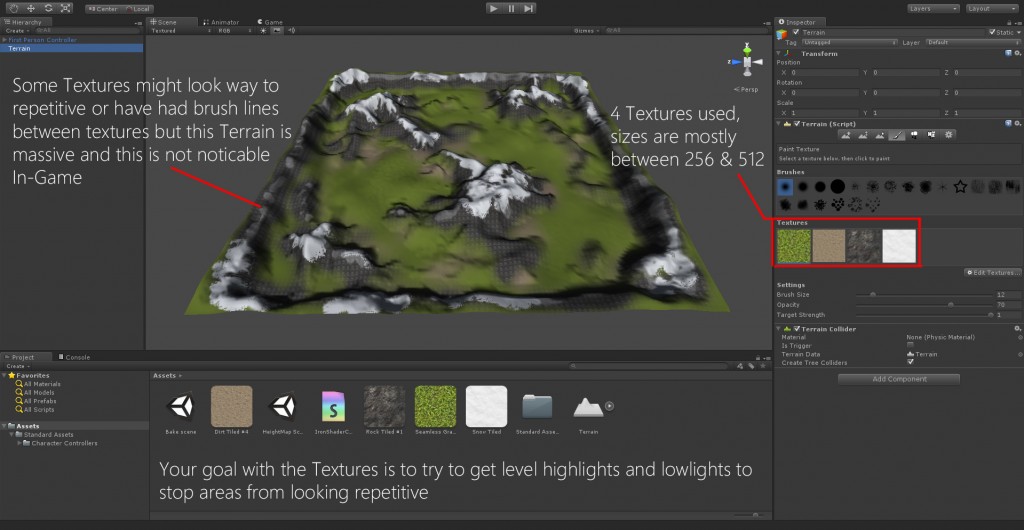
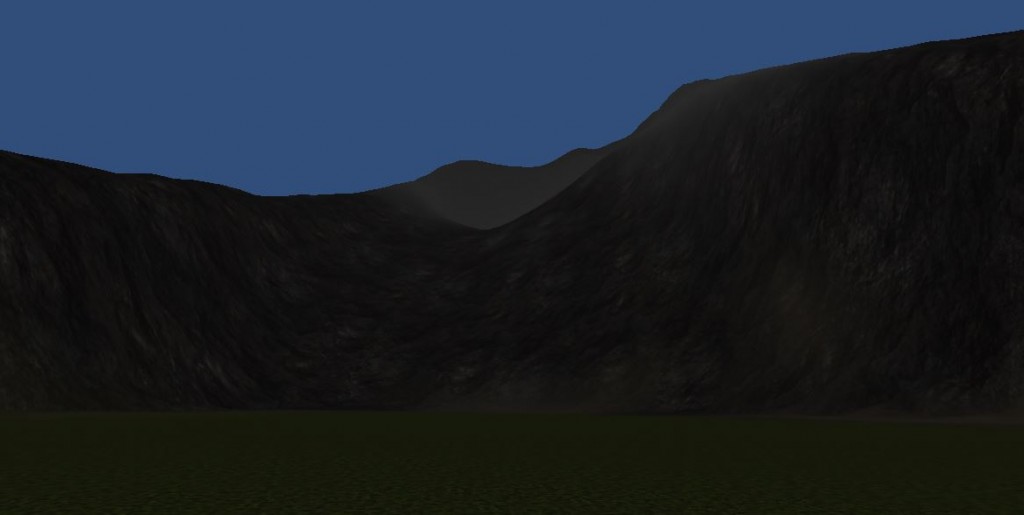
*Note: There are no Normal Maps in any of these Textures, Normal Maps will help to give the Illusion of Height in Textures such as the Rock or Dirt.In-Game Snapshot
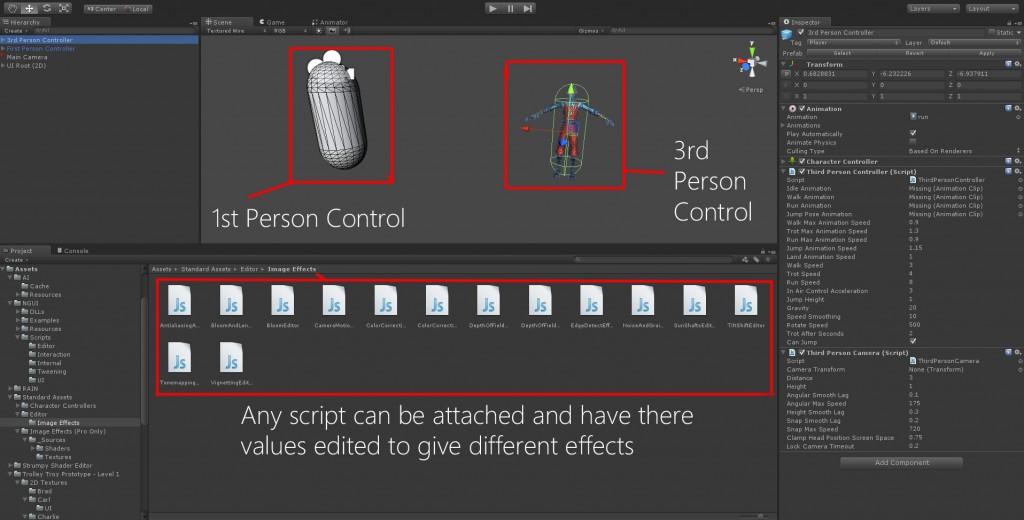
This is another 2 in 1 Post since these are both very simple elements already Included in Unity Free & Pro.
Character Controller (1st Person) : This is exactly what you would think its a controller that allows you to move around the Game Scene in 1st Person View and move using WASD controls. This controller is a great start for anyone wanting to start a 1st Person Game. The 1st Person Control Includes a Capsule (This the the Collider). and a few scripts for Mouse Look, Movement, Jumping, Sliding etc. To add it to the scene Drag & Drop in.
Character Controller (3rd Person): Same with the 1st Person Controller this allows you to move around in the scene the only difference is the Camera is behind the Collider. The Capsule is also replaced with a 3D Model (By Default its the Unity 3D Guy) You can replace this with your own Including Animations (this will be covered in another tutorial)
To Import The Character Controller go to the Project Window go to Assets/ Import Package/ Character Controller. More Info on Controllers can be found –Here
Image Effects (Standard): Image Effects are Post can be applied to Prefabs or Cameras to create different Post Effects. with Unity Free you can take advantage of Anti-Aliasing, Bloom & Lens Flares, Color Correction, Depth of Field, Edge Detection, Noice & Grain, Tone Mapping, Vignetting more. These cannot all be explained at once the best way is to test them for yourself. If your familiar to 3D you’ll understand most of these already.
Image Effects (Pro Only): Similar to the Standard Image Effects this Package is only available to Pro/Paid Users. These Include allot more Post Effects such as Glow, Grey-scale, Motion Blur, Fog, Fisheye, Sun Shafts, Distance Blur etc. Again all of which can be applied to Prefabs or Cameras.
To Import The Image Effects go to the Project Window go to Assets/ Import Package/ Image Effects (Pro Only). Standard Effects are Included in a new Unity Scene Under Standard Assets/ Editor/ Image Effects. More Info on Controllers can be found – Here
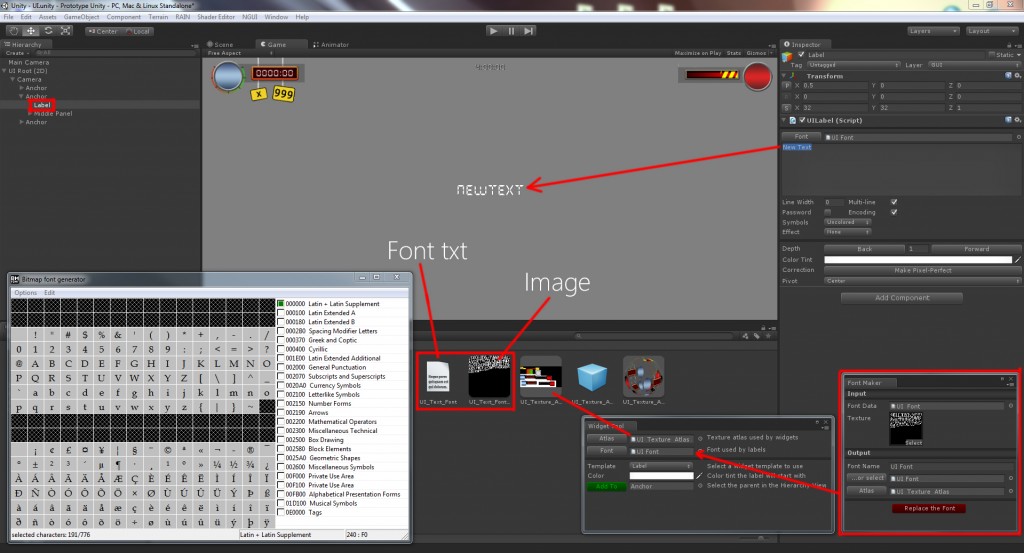
With NGUI you can create Labels that can use different types of fonts. Most of these don’t come with NGUI by default but you can add them yourself. For this I’ll be using Photoshop to select my Font Type. So for anything you want to add its a good idea to type out your text and have a look through what suits your UI best.
Fonts can be found under C:/Windows/Fonts. Find the name of your text from your Program such as Photoshop and Copy & Paste it to the desktop for now. You can also download Custom Fonts Online from Places such as Dafont or1001 Free Fonts
1. We will need to Turn this Font Into an Image, tga or png (This will be added to the Atlas so it can be used as the Image for the Label). The Other thing needed is the Font File in .txt so Unity can read it (This is the Definition so Unity can label with part of the Image is displayed when you press a Key)
2. Once you have a Font of your choosing you will need a program to turn this Font Into a Image & .txt file. BitMap Font Generator is a Freeware Tool for this. Once you have Downloaded, Installed & Opened it you need to select your Font (If its a Basic Windows Font it will be there) If its a custom font you can add the File Under Options/ Font Settings/ Add Font File Most setting under Font Settings can be left a Default except Size. 32px should work fine for most though.
3. Once you have loaded/selected a Font click Ok then go to Options/ Export Settings. You can change the Texture Size anywhere from 32×32 to 1024×1024 I wouldn’t recommend higher 256 should be fine. select the Textures: tga – Targa. Click Ok. To select the Font you want select the 1st tick box on the right side of the screen “Latin + Latin Supplement” but have a look through the others to.
4. To save the Font & Image click Options/ Save Bitmap Font As. Put it on your desktop for now
5. Now you will have a .tga file and the Font File. you need to change the Extension from .fnt to .txt to do this Right Click the Font File/ Properties/ In the name change the .fnt to .txt
6. Copy both these files into Unity, Place them where you want. Open the Font Maker under NGUI Tab. Select or Drag & Drop your Font txt & select your 2D tga Texture, Name your Font, Select your Altas you want to add these to and click Create Font. Now you can create a Panel, Select your Font (Prefab) and type away. You can change your Font at any point Under UI Label Script/ Font (Your Label must be selected)
Now that you have a basic understanding of Unity, How to use it, Setup Scenes & Use Prefabs & Materials. I Want to get into a few different Addons & Features Unity has to offer. A good start for this is GUI (Graphic User Interface) & UI (User Interface). In the Past most of this would be set out by a programmer but NGUI gives control back to the Artist by allowing you to create your own GUI & UI and set it up in unity as well as get it working with pre-existing Scripts for basic things such as Buttons, Sliders, Sprites, Check-box & Much more.
There are 2 versions for nGUI. Free (Contains a Watermark for a few seconds) or Full (Costs $95). I use the Free Version.
Create GUI/ UI: Once you have downloaded the nGUI Package Free Version Here, Simply Open it. This will add a Tab up the top of Unity called “NGUI”. To Create a New GUI go to NGUI/ Create New UI. Set your desired type of Camera, 2D Locked to X & Y or 3D X, Y, Z. Select a Layer (It’s a good Idea to create a new Layer for GUI or UI. To Create a New Layer go to Layers (Button, Right side of screen)/ Edit Layers/ User Layer 8, 9….. Type a Name for the New Layer Like “GUI”, What this will do is Make your UI Camera Only render Objects on that Layer. with this you can Make the Layer all Unlit & Follow the Camera. Once that is done select Create Your UI.
*Note: All of these new Windows can be re-positioned anywhere you want. Very Handy!
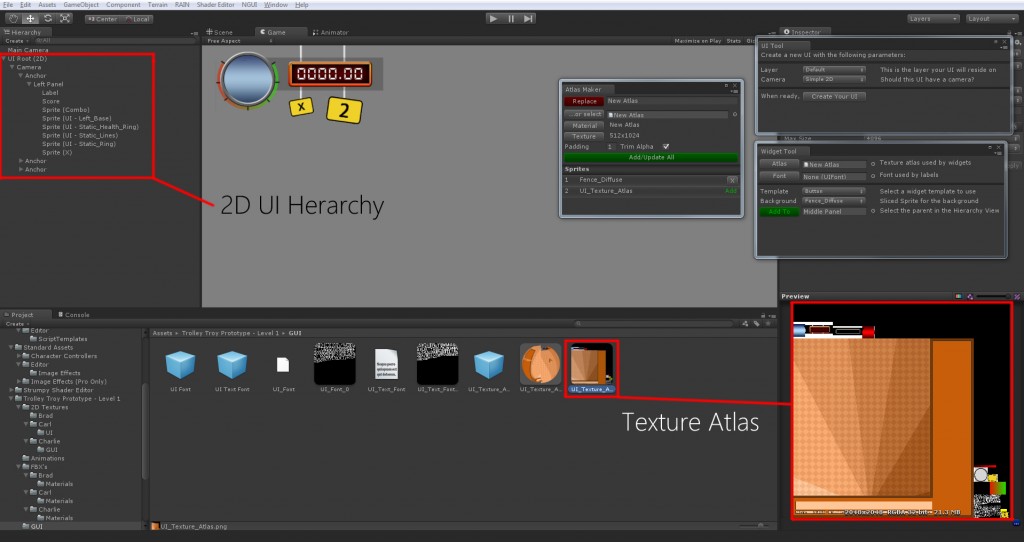
Create an Atlas: An Atlas or “Texture Atlas” is a Collection of 2D Textures all compiled into 1 Texture Map. for example: 4x 256 Texture Maps would use 4 Draw Calls. If you makes these Textures into a Atlas this will put them all together in 1x 512 Map & use 1 Draw Call. However this Atlas Maker is only for NGUI and will work in conjunction with NGUI Widgets (More on them Bellow).
To Create a Atlas go to NGUI/ Atlas Maker. Name your new Atlas or select a existing one if you have one. At this point you can create the Atlas. This will make a Shader & Material for the Atlas and a Prefab for all Widgets to use this Prefab.
To Add Texture to the Atlas, Select your Texture and it will appear in the Atlas Maker under Sprites, Click Add/Update All. You can select as many Textures as you want, just remember the more textures you add the bigger the Texture size will get. You will see this in the Preview Window.
Create UI Widget: A “Widget” is what will populate the UI such as Sprites, Buttons etc. To create one go to NGUI/ Create a Widget/ This is where all your Creation will occur. Most Widgets here will reference the Atlas as a Sprite so this will list all your Textures in your Atlas for your current selected Atlas.
Clicking the Atlas Button will show all your Atlas you’ve created. If you have created a Font or Have one to use you can select it under the Font Button (Font Creation will be covered in next Tutorial). You can then Select your Template. Once you have done this click Add to Panel (Or select where you want it to go). In the Heirarchy you will have The UI Structure (Type), Camera its locked to, and a Panel. Widgets are placed in the Panel, Scripts applied to the Widgets are in the Inspector.
Experimentation here is key to learning what you like and what you can do.
Credits go to Brendan Bottomley for Teaching me.
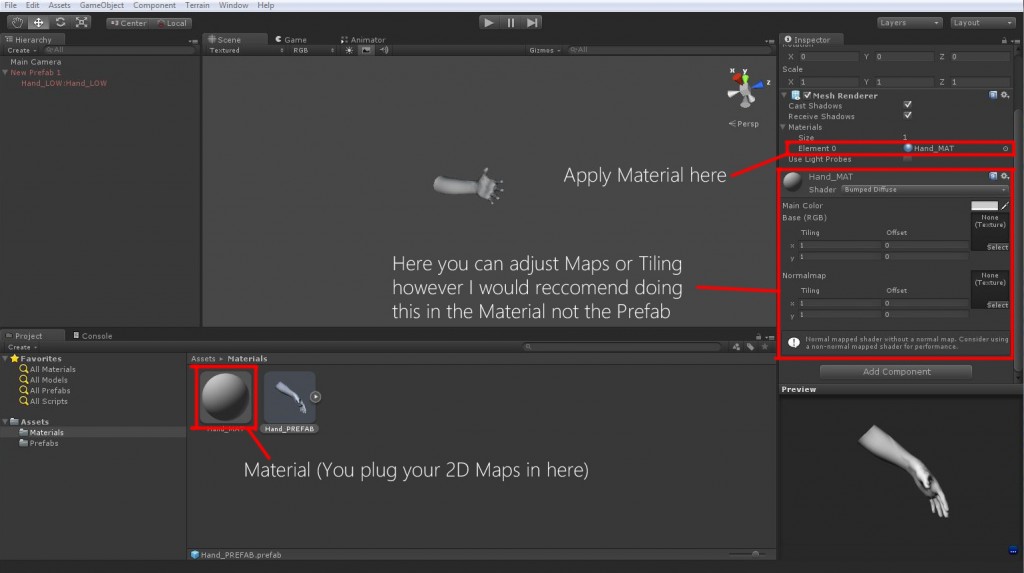
Materials: A Material is Base for any 3D Asset you Use within Unity. It defines What Textures the object you apply it to will use and acts as a bridge between your 2D Textures & your 3D Mesh.
Many things can be connected to a Material including Diffuse + Alpha, Normal, Spec, Glow or “Emmisive”, Cube Map or Rim Color just to name a few. However these are not just here by default. These have to be Programmed into the “Shader” (as described bellow).
Materials that come from your 3D Package are not needed for Imported Meshes in Unity so you can delete them & create your own for your Prefabs. You don’t need them for any .fbx or .obj
Create & Apply Material: To create a Material go to Assets/ Create/ Material OR Right Click in the Project Window Create/ Material. I prefer to Right click since I can directly control which folder I want the Material in without moving it afterwards. To Apply a Material to a new Prefab, select the Prefab/ Add Component (In its Inspector)/ Mesh/ Mesh Renderer. Under Materials/ Element 0 or 1, 2 etc if you have more then 1 Material applied to the mesh. Select the Circle at the Right Hand side/ Select your Material you created. You can also drag & Drop the Material onto the Prefab but it will only work if you have a mesh renderer applied.
Applying a Material to a Prefab will mean any copies you make will use the same material. However you can apply different Materials to copies of that Prefab without affecting the original Prefab. but this will have to be done for each you want to change. You can revert back to the original Prefab at any point by selecting the Prefab (With different Material) & Under Mesh Renderer/ (Right hand side Cog with down arrow) / Revert to Prefab
Shaders: Shaders or a Shader Network is a Programmed script that is applied to a Material to control what the Material can render. As described above you can program your Shader to use Any Maps available in 3D including Diffuse + Alpha, Normal, Spec. Shaders can be written in a Programming Language or Visually In Unity! Since I’m a Artist I will show you how to create them Visually In Unity at a later Tutorial.
* Shader Creation will be covered in a later Tutorial*
Any Information I missed will be Here
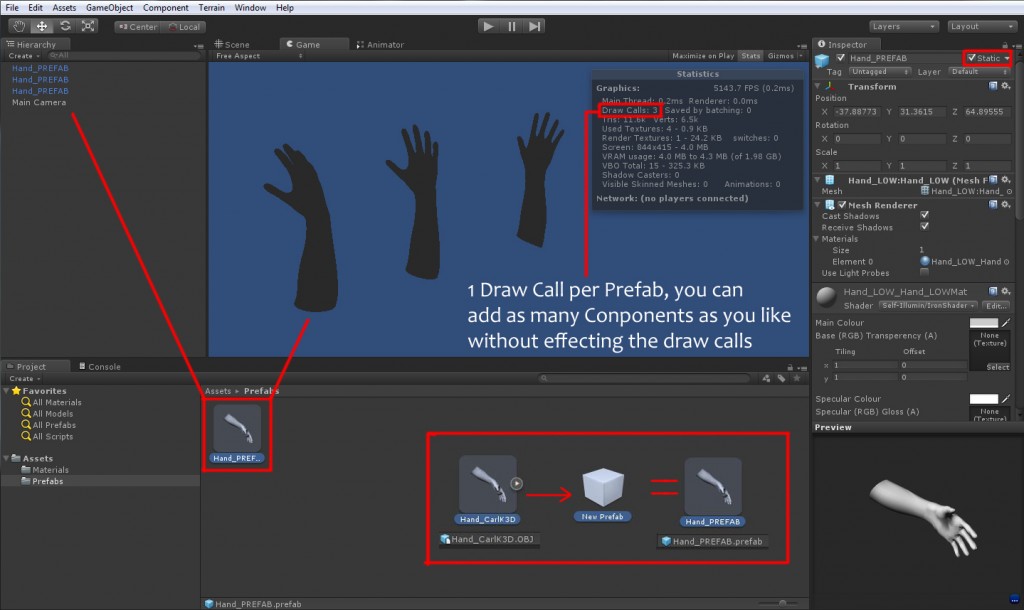
Prefabs in Unity work in a way that when you add one to a scene it creates an Instance of that object. All Prefab Instances are Linked to the Original Prefab and are essentially clones of it. You are able to change the properties of each Prefab (clone) But you always have the option to revert back to the original Prefab.
Prefabs Info: To be clear what a Prefab does, it Instances an Object. Each Object will still have to render each assets geometry. What the Prefab will do is “Call” The Material, Texture, Script and anything else connected to the original Prefab into the Engine once and each Prefab (Clone) Will use that. This means 1 prefab will only use 1 Draw call for Multiple Objects.
Creating Prefabs: Its very simple to create a Prefab. Make sure you have a Imported Model, .fbx or .obj will be fine. Then go to Assets/ Create/ Prefab. Name it what you want (I use a naming convention of “ObjectName_PREFAB”.
*Dont forget to create folders for all your different components such as Imports, Prefabs, Materials, Textures & Scripts*
There are 2 ways to connect your Imported Model to the new Prefab. If there in the same folder (I wouldn't recommend it) Drag & Drop, Or Drag your Import Into the ‘Hierarchy’, Navigate to the Prefab then Drag it from the Hierarchy to the Prefab. I like to delete the converted Import from the Hierarchy and start from the Prefab I created.
Draw Calls: Unity uses Draw Call Batching to call an Object from Memory to the screen. This is drawn from the Graphics API (e.g OpenGL or Direct3D)
Material Sharing using Prefabs and be batched together. also using Big Textures for multiple objects will result in less draw calls but use slightly more memory to draw the large texture size.
All devices and Platforms work with draw calls in mind, to run a scene with high performance it is good practice to keep your draw calls bellow the recommended platforms capabilities.
Static Batching: This allows the Engine to reduce draw calls provided the Object doesn't move (Static) this can be done by selecting your Prefab and Ticking Static in the Top Right Corner.
This Post will be a brief description of how to Create Assets (Project Browser) & Game Objects (Hierarchy). How to Import your own Assets & Textures. Then place them in the scene from the Project Browser.
Create: You can create a number of things to get your scene up and running the first of which is a Folder. Assets/ Create/ Folder (To rename thing simply select it then click once on the text to edit it). There are many things you can create some of which will need there own tutorial later on to fully understand such as Prefabs, Materials, Shaders, Animations, Animator Controllers or C#/JavaScript.
*Note: Anything you add from ‘Assets’ will appear in the Project Browser.
Under GameObject you can find ‘Create Empty’ This is a parent group by default with only Transform, however you can add components to it just like any other object in the scene but its best used as a Parent Group I find. Simply Rename it and Drag & Drop the Objects you want into this Group to Parent them. Other Handy GameObjects are Particle Systems, Different types of Lights & Cameras (If you need multiple, Unity will have 1 by default) all of which can be added directly to the scene.
*Note: Anything you add from ‘GameObject’ will appear in the Hierarchy.
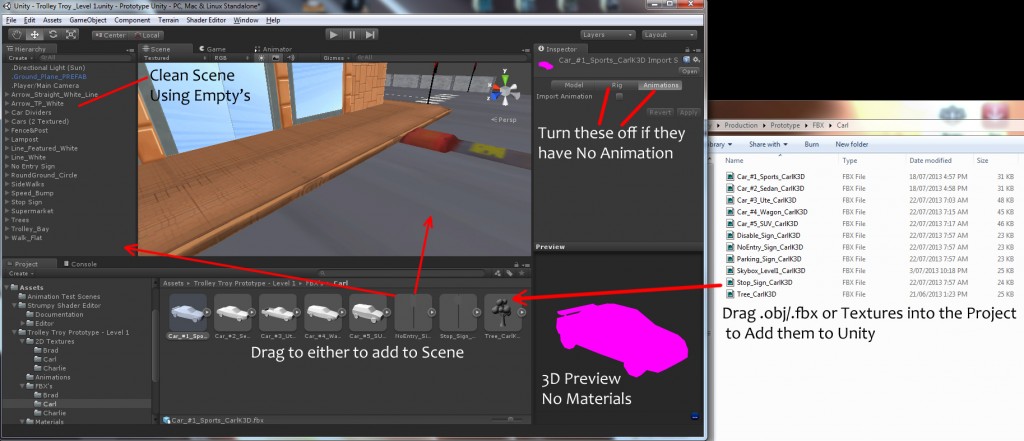
Importing: Before Importing make sure you have named your Model Accordingly in your 3D Program and Merged all parts that are not Animating. Importing or Adding Models or Textures is as easy as Drag & Drop from your desktop to the Project Browser. Unity Will Accept most File Types, I commonly use .fbx, .obj (Models), .tga, .png, .jpg (Texture). You can then use the Breadcrumb Trail Folder structure to move it where you want if its not already in its correct folder (as I’ve already discussed theres no Copy/Paste). When Importing a Model, .OBJ or .FBX by Default Unity will Include an Animation Type ‘Generic’ under Rig & Import Animation under Animations. Make sure to turn these Off if your object has no Animation or Rig Setup and Click Apply for each. For Textures you can compress your Texture to any size from 32×32 through to 4096×4096. This means you can work in what ever size you like and compress it later.
*Tip: I would recommend to delete any Materials That get imported with your models. You will be setting up Custom Materials Later on so there not needed and make the Project Browser Messy.
Implementing: Placing your Models into the Game Scene is as simple as Drag & Drop (Like normal) Into the Scene or Hierarchy. The Difference is Placing in the Hierarchy will place your model at a default 0,0,0 position within the scene depending on wheres it located in your 3D Program. But by placing it in the scene you’ll be able to control where you want it roughly.
*Tip: Selecting an Object & Pressing V will allow you to select any Point (Vertice) on the Model and Snap it to and other Point in the scene. This is great for snapping Modular pieces or placing new Models near the main scene if there far away.
