In my book, Unity in Action , I mostly cover how to program games. Still, it is important to understand how to work on and improve the visuals. Visuals are important because you don't want your projects to end up with just blank boxes sliding around.
It's fairly easy to create walls in a game--you just use the Tiling property to place images of stone and brick. But things get a little more complex with creating a sky visual, one of the most common visuals you’ll need to create in a game.
If you want a realistic look for the sky, the most common approach is to use a special kind of texturing using pictures of the sky. In this article, I'll explain how to do this using a skybox, first by using provided sample material and second, by creating from scratch.
What is a Skybox?
By default, the camera’s background color is dark blue. Ordinarily that color fills in any empty area of the view (e.g., above the walls of this scene) but it is possible to render pictures of the sky as background. This is where the concept of a “skybox” comes in:
DEFINITION A skybox is a cube surrounding the camera with pictures of the sky on each side. No matter what direction the camera is facing, it is looking at a picture of the sky.
Properly implementing a skybox can be tricky; figure 1 shows a diagram of how a skybox works. There are a number of rendering tricks needed so that the skybox will appear as a distant background. Fortunately Unity already takes care of all that for you.
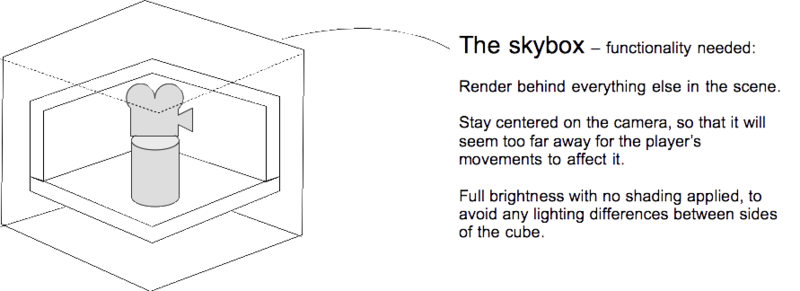
Figure 1 Diagram of a Skybox
New scenes actually come with a very simple skybox already assigned. This is why the sky has a gradient from light to dark blue, rather than simply being a flat dark blue. If you open the lighting window (the menu Window > Lighting) then the very first setting is Skybox and the slot for that setting says “default”. This setting is in the Environment Lighting panel; this window has a number of settings panels related to the advanced lighting system in Unity, but for now we only care about the first setting.
Just like the brick textures earlier, skybox images can be obtained from a variety of websites. Search for “skybox textures”; for example, I obtained several great skyboxes from www.93i.de, including their TropicalSunnyDay set. Once this skybox is applied to the scene, you should see something like figure 2.
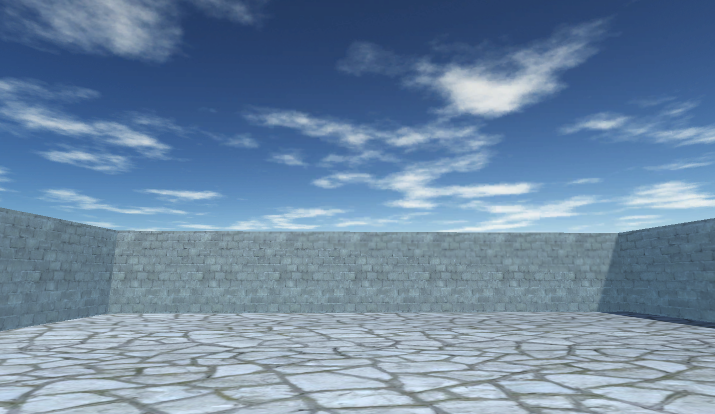
Figure 2 Scene with background pictures of the sky
As with other textures, skybox images are first assigned to a material, and that gets used in the scene. Let’s examine how to create a new skybox material.
Creating a new skybox material
First off, create a new material (as usual either right-click and click Create, or choose Create from the Assets menu) and select it to see settings in the Inspector. Next you need to change the shader used by this material. The top of the material settings has a menu for Shader (see figure 3).
DEFINITION A shader is a short program that outlines instructions for how to draw a surface, including whether to use any textures. The computer uses these instructions to calculate the pixels when rendering the image. The most common shader takes the color of the material and darkens it according to the light, but shaders can also be used for all sorts of visual effects.
Every material has a shader that controls it (indeed, you could kind of think of a material as an instance of a shader). New materials are set to the Standard shader by default. This shader displays the color of the material (including the texture) while applying basic dark and light across the surface.
Well, for skyboxes there’s a different shader to use. Click the menu in order to see the drop- down list (see figure 3) of all the available shaders. Move down to the Skybox section and choose 6-sided in that submenu.
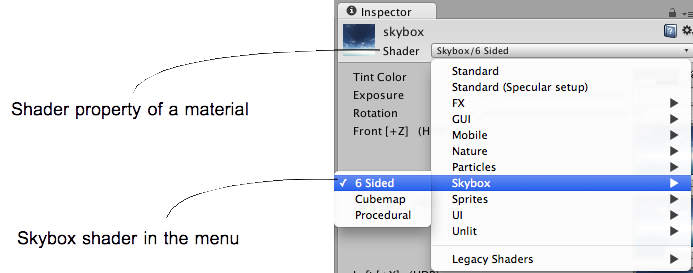
Figure 3 The drop-down menu of available shaders
With this shader active, the material now has six large texture slots (instead of just the small Albedo texture slot that the default shader had). These six texture slots correspond to the six sides of a cube, so these images should match up at the edges in order to appear seamless. For example, figure 4 shows the images for the sunny skybox.
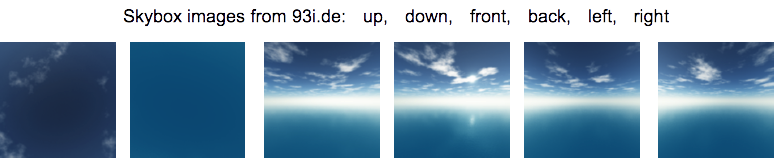
Figure 4 Six sides of a skybox—images for top, bottom, front, back, left, and right
Import the skybox images into Unity the same way you brought in the brick textures: Drag the files into the Project view, or right-click in Project and select Import New Asset. There’s just one subtle import setting to change: Click the imported texture to see its properties in the Inspector, and change the Wrap Mode setting (shown in Figure 5) from Repeat to Clamp (don’t forget to click Apply when you’re done). Ordinarily textures can be tiled repeatedly over a surface; for this to appear seamless, opposite edges of the image actually bleed together. However, this blending of edges can create faint lines in the sky where images meet, so the Clamp setting will limit the boundaries of the texture and get rid of this blending.

Figure 5 Correct faint edge lines by adjusting the Wrap mode
Now you can drag these images to the texture slots of the skybox material. The names of the images correspond to the texture slot to assign them to (such as left or front). Once all six textures are linked up, you can use this new material as the skybox for the scene. Open the lighting window again, and set this new material to the Skybox slot; either drag the material to that slot, or click the tiny circle icon to bring up a file picker.
TIP By default, Unity will display the skybox (or at least its main color) in the editor’s Scene view. You may find this color distracting while editing objects, so you can toggle the skybox on or off. Across the top of the Scene view’s pane are buttons that control what’s visible; look for the Effects button to toggle the skybox on or off.
Woo-hoo, you’ve learned how to create sky visuals for your scene! A skybox is an elegant way to create the illusion of a vast atmosphere surrounding the player. The next step in polishing the visuals in your level is to create more complex 3D models.