Use this link for the raw tutorial.
Wheaton's notes and guides regarding Vector Thrust animations and export.
REQUIRED SOFTWARE:
- 3dsmax 9 ( not 2009 ), either x86 or x64.
- Vector Thrust itself ( I guess ! )
- The most recent OgreMax plugin for 3dsmax; note that the plugin must be installed as 1.8! Installing it in 1.7 will NOT give you the retrocompatibility mode used to export in VT's format! When installing the Ogremax plugin, double-check to make sure you're installing the 1.8 plugin!
- An image manipulation program to make the plane's textures; I'm technically fine with GIMP 2.6. Regarding GIMP, if you use it, make sure to grab a .DDS save/load plugin.
SOME FACTS:
How Vector Thrust's animations work:
- TS handles animations in a particular way. There are usually only 4 animation sets for a plane, 5 if it has variable geometry wings, and such.
- The usual four are for Pitch, Yaw, Roll and Braking, called "AnPitch", "AnYaw", "AnRoll" and "AnBrake".
The animation names are found in a plane's .ini files and can use custom ones if needed, but VT's system is already quite complete as it is. Didn't one say it was designed with mods in mind :) ?
In technical terms / 3dsmax's side, an animation is actually made of an odd number of frame ( as opposed to even ). Let's say you have an animation for a plane, the Pitching one. This one turned out to be pretty easy for me once I figured that out. Go in Ace Combat 6 in the hangar/plane viewer, and tilt the analog stick down, then up: what you just saw is VT's way of making animations.
What it does is use an animation made of, let's say, 11 Frames, the first and last frames ( no matter where they're positionned in the 3dsmax animation timeline ) indicate the most extreme positions for the plane's pitch up ( the first frame of this sequence ), the last frame is when the plane's control surfaces are the most pitched down.
So why an odd number of frames?
No matter where your 11-frames long animation sequence is in the 3dsmax timeline, VT will simply play the animation forward or backwards depending of what controls you're doing in the game: it needs an odd number of frames, because of the central frame ( from 1 to 11, if you count, you should find out that the middle frame would be FIVE, with 4 frames on either side, PLUS their "final" frame on either side ).
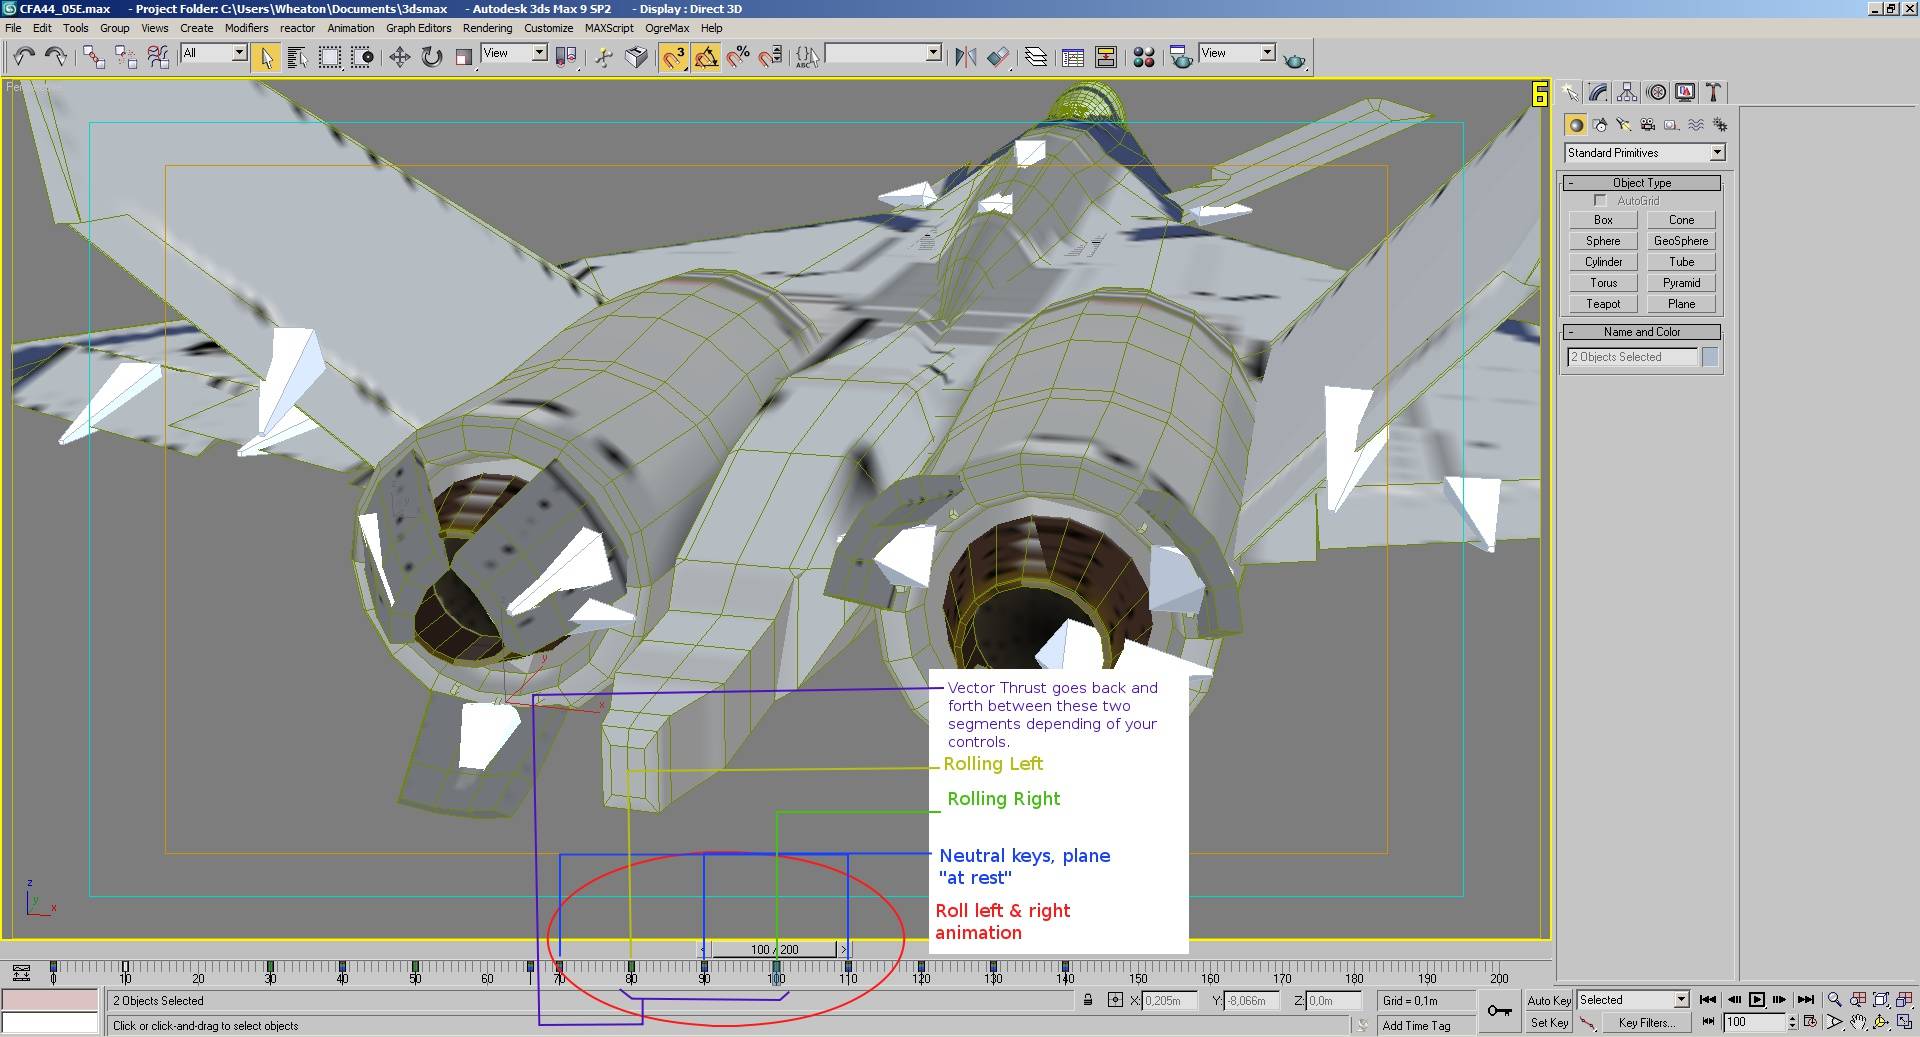
This central frame is the plane's "rest" position as mentionned by TimeSymmetry's tutorial. If you pitch the plane up, it will play frames 1 to 6 BACKWARDS; if you let go off the stick, it will return to the basic frame, 6. Same goes the opposite way if you pitch the plane down: the control surfaces you chose will play the second half of the animation: 6 to 11. Letting go plays 6 to 11 backwards so the plane returns to its normal state, like it would do!
The animations for Rolling work the same way, excet the order is: the leftmost frame is for the plane rolling counter-clockwise; the rightmost frame is for when you roll clockwise. Kind of obvious, isn't it?
Same goes for Yawing left and right with the plane's tail control surfaces.
Nothing changes.
Braking is a particular animation, because it has no middle "neutral" state. You can't "brake backwards", can you? The braking animation simply has "not braking" and "braking". Example: Frames 50 to 60. 50 is where the brakes are at rest, and 60 is when they're deployed. Vector Thrust will play the animation forward or backwards depending how much you press on the brake pedal :).
Though I haven't tried yet, the exact same as brakes should be done regarding the variable geometry wings such as the F-14, X-02 Wyvern and XFA-27. Though, they require additional setup in the plane's .ini files to indicate how and at which speed rates the animation plays. I suggest looking at the A-10A and F-15C's .ini files on how they do it, as they do have a variable speed state animation ( in particular, in the A-10's case, it's the engine's fans spinning at different rates depending on your speed ).
SETTING UP THE ANIMATIONS:
In 3dsmax, you need the OgreMax plugin so the animations would work in VT. The Easy Ogre Exporter is a good way to learn how to export to VT/Ogre, but OgreMax as a plugin is quite important. You NEED to install the Ogremax plugin in 1.8! Installing it in 1.7 will NOT make it able to export in VT's lower 1.4 format. Only the 1.8 version of Ogremax has a retrocompatibility option.
In 3dsmax, the way animations are created is explained in the F-104 Tutorial uploaded by TimeSymmetry. It requires using bones, skinning, and keyframes/auto keys, if you need a reminder.
The animations must have an odd number and have a neutral position right in their middle. There are at least four required animation segments for a basic plane in VT.
Though, in case your plane uses thrust vectoring nozzles in some form, you might want for it to actually tilt the way the afterburner points at when you turn. For that, two extra Bones must be created, then parented to the plane's basic Bone. However, these bones must NOT be part of the skinning process. Their angle must be 0 0 0 XYZ, or else the flame burst will be 90° on the side like a freak of physics. During the animation process, make sure to tilt these Bones correctly up and down along with the thrust vectoring nozzles.
The afterburner engine flames must be set in the plane's .ini file, so they use Nodes.
Example:
NumEngines=2
Engine_1_Pos = "0 0 0"
Engine_1_BoneAttach = "true"
Engine_1_BoneName = "EngineL"
Engine_2_Pos = "0 0 0"
Engine_2_BoneAttach = "true"
Engine_2_BoneName = "EngineR"
This will order the game engine to use nodes instead of 3D coordinates to hook the afterburners on. However, make a single typo mistake, and the game instantly crashes.
Once the animations are done, you need to tell OgreMax which segments of the animation timeline are what. Don't worry about making different animations for different combinations of actions, Vector Thrust takes care of mixing animations together ( for example: Rolling + Pitching ). If Ogremax is installed, it should have its own thumbnail near Help at the top of 3dsmax's window. In there, there should be "Ogremax Global Settings". Check in there, if the binary mesh format is set to 1.4. If it is, then the meshes will be exported to a compatible format with Vector Thrust. If it's not, you'll get an instant crash during the game's loading.
Telling Ogremax which animations are what are explained clearly in TimeSymmetry's F104 Advanced Tutorial. That part of the tutorial is clear enough and straightforward. It won't pose any issues; understanding HOW animations work, and not how they're "declared", is the hardest part, but once you got it in your mind, everything should go smooth. If it doesn't, feel free to tell me what I did wrong.
Don't forget to name the animations in the Ogremax "Object properties" as "AnPitch", "AnYaw", "AnRoll", "AnBrake" or everything you need: It needs to have the SAME NAMES in the plane's .ini files, or else, bye-bye stability.
Another important aspect I noticed in TS's tutorial is that you don't need to repeatedly go back and forth between the "Skin" modifier and the "Editable Poly" to select parts of the plane to rig with its bones.
I personally use Editable Meshes, and so, use Edit Mesh modifiers. As for skinning, I set it so I select Vertices like TS's example does, but also check "Select By Element". That way, selecting a vertice from a sub-part of the plane's 3D model will also select all of the vertices of that same part. Then, apply "absolute effect" to 1.0 and repeat the rest like usual.
(note: nothing prevents you from using a higher ammount of frames if you need to)
REGARDING TEXTURES:
[spoiler]Whatever texture you use, it needs to be named "mat_Solid1" in 3dsmax ( the material itself ) so VT knows it's that one it must use.
Exporting the mesh will also convert a copy of the texture to .DDS format, but nothing forces you to use that one. Vector Thrust uses a system of .skin files which allow to choose which precise skin file to use in the hangar, or so. .skin files are text files, they can be edited and will be checked one by one during the game so you can have many different paint schemes for the plane.
"What is the Spec" texture for? The Spec-ular, Specular texture is used for reflection and bumps of light on the plane. The brighter it is, the more light will be allowed to shine and reflect on those parts. Think of it this way: dull rubber would not shine much, but crystal definitely would shine a lot. That would make dull rubber all black or dark gray, and crystal would be pure white. The ammount of white in a specular texture file indicates if yes or no that part would shine more or less when exposed to sunlight. As a result, you can have matte paint look dull under the sun, but bare metal such as the engines shining a lot due to not having dull paint at all.
THE CORPSE MODEL:
The Corpse model and its texture are used for when the plane takes a hard beating and is completely destroyed, about to blow up in mid-air. Usually, Corpses are not looked at for very long and it's better to make a crappy looking version of the model with a lot less polygons and details. For the texture, simple: take the "bare" one you made for your main plane, make a copy of it, resize said copy so it's much smaller than usual ( my work on the CFA-44 Nosferatu used 2048x2048 for the main plane, but 512x512 for the Corpse version ), and make a similar spec texture, both splattered in black spots, burns, and anything you want. The goal is to make the plane look destroyed.
The Corpse textures are indicated in the .skin files, but the .ini file also has its own fields for the Corpse model and textures.
Note that you don't have to make a corpse texture version of every skin you made; it's up to you: it usually saves space and upload time if you make a single same corpse texture for all the skins you made.
THE COLLISION MODEL:
Easily explained in the F-104 Tutorial. It's simple as that, just follow the steps. Make a VERY LOW detail "hull" model that coats your plane, name it "Collision", and it will also be exported as well; This model won't be visible, and you need to tell your plane's .ini file to use this one to detect projectiles and impacts.
THE COCKPIT:
I haven't yet fully understood how the cockpit works. I can make a model working in-game, but when it goes to textures, i'm totally lost, as much as you : <. I'm sorry.
MAKING SURE EXPORT WORKS RIGHT:
- The OgreMax plugin needs to be configured to export in 1.4 Ogre format.
- The animations must have correct names on both sides: 3dsmax's object Ogre properties, and the plane's .ini in VT's folders.
- The skinning must not use the thrust vectoring nozzle AFTERBURNER direction bones.
- There should be an Odd number ammount of frames for the animations.
- There should be neutral / rest position keyframes everyonce in a while between the different animation sequences to make sure there's no unwanted moves.
- The plane's .ini file and folder name should be exactly the same.
- That you have read TS's tutorials as well.
- That you know what you're trying to do :).