A Guide to Creating Skirmish Maps
Throughout the history of Warlords Battlecry, there have been many maps. Some are excellent examples of map design whilst others can be tremendously flawed. Maps have the ability to change the way the game is played and create biased situations for players, whether that be due to the use of terrain, entity placement or even something as fundamental as the map size. In Warlords Battlecry, there’s no ‘bar’ to measure up to, maps can be made however the maker pleases. The upside to this is that maps can be highly creative. The downside is that there’s extreme inconsistency and poor design resulting in serious balancing issues. Maps have as much of an effect on gameplay as the fundamentals of the game, so it’s beneficial to try and strike a balance between creativity and balance at no cost to either aspect. This guide will cover the basics of skirmish map-making and will attempt to establish a standard of map-making quality (it won’t cover advanced features like events, flags or NIS script).
Map Style: Asymmetric or Symmetric
Warlords Battlecry originally established itself with the use of asymmetric maps. Asymmetric maps are very difficult to balance, whereas symmetric maps are nearly always perfectly balanced. Sometimes, players want the former but at other times, they want the latter. There is no correct style; it depends entirely on your own personal preferences. However, the type of style you choose impacts the way in which the map can be played. Asymmetric maps are unfair by nature and hence are much harder to use for balanced, competitive games. Symmetric maps on the other hand may be fair, but are useless for missions. Pseudo-symmetric maps have near the fairness of symmetric maps but also have a great deal of creativity.
Asymmetric Maps
As asymmetric maps can take any form, there is no particular method of creating them. Missions can challenge players in numerous ways by modifying simple things such as the way the player starts the game or by changing rules such as the win condition. Any part of a mission can proceed from any other. Players can discover a base to use, lose that base to an invading force and then ferry across to another part of the map in order to escape or to rebuild what they once had. By using special events and NIS script, you can incorporate effective RPG features and even portray a story consisting of one or more missions. A series of missions is called a campaign, and these can make use of the world map which comes with the game. For more information on events and NIS script, read the manual located in The Protectors/Manual/NIS files explained. Campaign locations and options do not have a guide as of yet, but you can see how these function in each campaign’s respective xcr file (this will require you to obtain an xcr editor which you can find on the Warlords Battlecry wiki in the Tools section).
Asymmetric skirmishes do not often have much balance, but must be enjoyable to play regardless of the position you choose to start at. At the very least, try to create the implication of fairness. Don’t make the map frustrating to play on, whether due to the terrain or features or due to the position of mines, utilities or lairs. Asymmetric skirmishes can be balanced to an extent if that is desired. Make sure to thoroughly playtest the map to determine the value (or negative value) of the terrain or buildings. Asymmetric balance is something that’s extremely difficult to achieve since the designer of the map has to consider the differences in terrain-irregularity which vary in their effectiveness from race to race. Access-restricted zones for example, benefit races with long-range units and penalise races which have few missile units, such as Minotaurs. The only way to test the balance in asymmetric design is through extensive playtesting with a variety of races and hero classes. As such, there’s no definitive way to explicitly calculate the map’s balance.
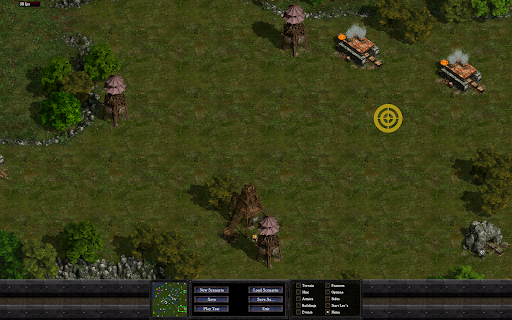
Ephemeral Gardens - an example of an asymmetric map where mines and utilities are unfairly distributed between players.
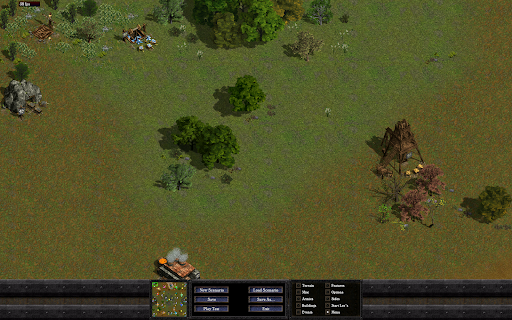
Gornak’s Garden - an example of a pseudo-symmetric map where mines and utilities are equally accessible between each player. Terrain and features are also somewhat consistent between players. This results in a map that is much fairer to play than Ephemeral Gardens.
Symmetric Maps
Symmetric maps are perfectly mirrored and hence are balanced for any side. Mines and utilities are likewise mirrored or centrally distributed between players. The way in which a map can be mirrored is up to you. For example, a team-based symmetrical map can consist of two halves which are mirrored with each other. Free for all symmetrical maps can consist of two halves, or even three thirds, four quarters etc, which are mirrored with each other, depending on the number of players on the map. Should they have an impact on the game, features should also be mirrored. Cover zones themselves should be mirrored, but their contents do not need to be so exact. All that needs to be done is to make sure that the same area is counted as cover and as the same type of cover in all mirrored areas.
Before making a symmetric map, make sure to place void tiles on the bottom and right-hand edges of the map! This is imperative for both balance and symmetry. This is because the tile edges on the bottom and on the right do not consist of a fully-sized tile and hence making use of them will only allow you to use a part of the tile. For example, if you have placed a ramp on the far left-hand side of the map, the entire tile will be useable. If you do so on the right or bottom, part of the tile will be obscured by the edge of the map.
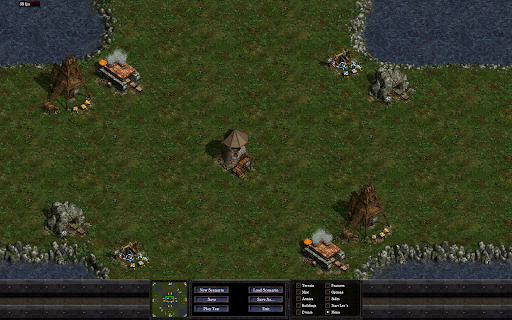
Mattigar’s Fortress - an example of a symmetrical map with mundane use of terrain, mines and utilities which results in generic, banal gameplay.
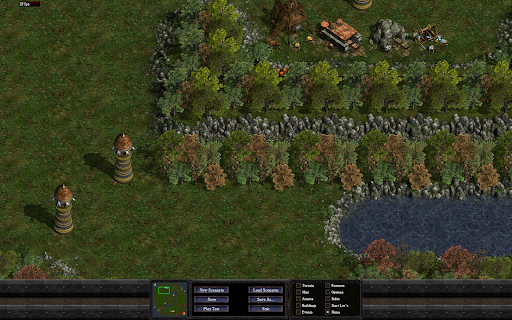
Dragon Island - an example of a symmetrical map with good use of terrain, mines and utilities which results in the ability to choose multiple different strategic options and good mid-map contention.
Pseudo-Symmetric Maps
Pseudo-symmetric maps can be classified as being both asymmetric and symmetric. They usually have mirrored mine and utility distribution between players, and they also can have mirrored terrain as well, much like a symmetric map. However, where they differ is the application of creative-license. The mirrored terrain and even many of the features on the map can be adjusted to create minor differences. This results in a map that's both well-balanced like a symmetric map, and also interesting to look at and play on like an asymmetric map (that's not to say the symmetric maps can't be interesting to play on, rather that they are not interesting in the same way as asymmetric maps). Pseudo-symmetric maps are often some of the finest examples of map design in Warlords Battlecry's history.
Map Size
The most basic principle of a map. With smaller map sizes, warriors, bards and other classes with a high amount of starting power have a higher chance of winning. Gameplay will be faster and the total number of resources that players mine and the technology tiers they acquire will often be lower than expected. On larger maps, starting power becomes less relevant, making support classes like the merchant more powerful. Resources can become plentiful and technology tiers higher than normal. Getting a player-count map size balance is highly important for these reasons. In order to achieve this, map sizes need to be proportional to the number of players on the map and the standard distance between enemy sides needs to be defined (in free for all maps, player distances should be proportional to each other). These are the recommended player counts for each map size:
- 64x64: Don’t use this map size for skirmishes, it is barely capable of containing a single player.
- 128x128: 2. This is the bare minimum map size for skirmish maps and it usually results in slightly quick matches. Use this map size only for 2 players.
- 192x192: 2-4. This is a slightly large map size for 2 players. It’s optimal with 3 players and can fit 4 if players are crammed-in at the edges.
- 256x256: 4-6. This is a solid choice both for 4 players and 6 players. 4 players will have plenty of space on this map. 6 players will be a tiny bit claustrophobic for FFA games, but will fit team games well.
- 320x320: 6-10. A fairly large size for 6 players, but it can work if you make sure to place the enemy sides near each other in team games. 8 players are optimal for this map size, whereas 10 players will be somewhat close to each other, but it can still work for slightly faster games.
- 384x384: 8-14. This map is too large for 6 players and can still be somewhat oversized for 8 players. 10 is a good fit with 12 being slightly more optimal and 14 being a bit crammed-in.
- 448x448: 10-12. Very sparse for 10 players and a bit oversized for 12. 14 is a good fit and 16 can fit well too.
- 512x512: 14-16. Far too large for 10 players and slightly too large for 12 players. Still has space to spare for 14 players as well. 16 players are best on this map size.
- 1024x1024: Don’t use this map size for skirmishes, it’s far too large for any player count.
These guidelines are flexible and can change based on the quantity of resources available on the map. If you want to change the size of your map, try the resize function in the load/save map menu. To do this, load up the map you want to resize. Then, click New Map. The menu will look like this:
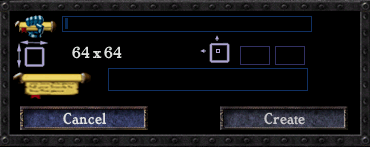
Enter a map name and description as normal. Then, change the map size to whatever you want. In the boxes on the right, input the new location of the map. '1, 1' places the map at the co-ordinates '1, 1' on the resized map, so the map will be in the top-left-hand corner. If you don't want to shift the map at all (you want to position it directly in the centre of the map), enter co-ordinates equal to half the difference in the x and y co-ordinates of the resized map. For example, if you are resizing a 256x256 map to 320x320, input '32, 32'. Then, after clicking Create, you should have your resized map!
As for player distance, numerous different factors need to be taken into account. From resource income, mine functionality, mine distance, unit production rate, unit combat time, unit speed, hero speed and unit cap, everything factors into the optimal value for player distancing. Maps and strategies are highly flexible and can easily deviate from the norm and hence you should always test them to see if the distance is too much or too little. According to the previously mentioned factors, a value of 12 tiles (or 120 cells) should be most desirable should the map follow the guidelines for resource income. Less than 12 promotes rush gameplay and makes battles more conclusive, whereas more than 12 does the opposite. This value is a guideline rather than a rule. Maps can work well with less or more distance between players, though try not to go too far otherwise there can be negative consequences.
Terrain and Features
The most defining part of any map is terrain. Terrain has as much influence over maps as any utility or mine, but terrain can more-often create or promote a variety of different strategies depending on how it is used. Swamp, sand, snow and ice slows ground units and lava gives resistance penalties for fliers. Ice and swamp give additional penalties as they cannot be built on and they give any ground unit negative cover whilst they traverse it. These two terrain types are particularly useful to designate no-building zones, which can be used to enhance highly-contested areas so that defences cannot be constructed in them. Likewise, they can be used to create areas of risk, as anything with negative cover takes more damage from projectiles. For example, shorter routes could feature more risky terrain whereas longer routes could have more defensible terrain. On the other hand, areas covered in features provide positive cover, which has the opposite effect as negative cover but also decreases the combat and speed of larger units. A giant or mounted knight will find it very difficult to move through a huge, dense forest and will be hindered.
Terrain can be used to beautify a map. Terrain tiles consist of 10x10 areas and because of this, they can look blocky. If possible, try to avoid this by creating plenty of interesting, unexpected, angular features through the use of corners. By doing so, your map will look less geometric. Many types of terrain can merge well with other types, but there are some types which don’t merge well with certain others. At times, mixing different versions of terrain can help to create a new theme for the map, but it may also make them clash. For example, WBC2’s grass is very colourful and smooth, whereas WBC3’s grass is rough, dark and detailed. If the two are merged, make sure to incorporate the differences in these terrain styles as part of the design of your map, otherwise they may conflict with each other and look ugly. It may be worth considering the theme of your map before you develop it. For example, if your map is supposed to be arid, try not to overuse river or water tiles (unless those water tiles are oceanic). If your arid map has magical influences or is part of a special, unique biome, then the use of tiles such as marsh can instead work in the map’s favour.
Multiple different terrain types and tilesets can be used to divide maps in different ways. Water allows floating units to pass, whereas cliffs and hills only allow flyers to pass. Void stops the passage of any and all units. By using a variety of terrain, players can develop varied strategies and different races can capitalise on their preferred terrain types. Maps become more entertaining to play if players are faced with negative zones such as ice and swamp, positive zones which provide cover and areas of high and low elevation (units at a higher elevation have combat and damage bonuses against those at a lower elevation). Areas which promote or limit movement are also highly effective, such as lakes, rivers, hills, mountains and other obstacles. All of these elements change the way maps can be played.
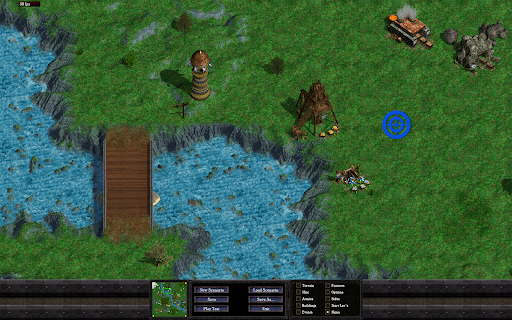
Elduin Vale - Terrain varies from side to side. Blue, red, purple and yellow have an advantage because they can only be attacked via a single bridge from one side. Black and green however have completely open sides. This is an imbalance in the use of terrain.
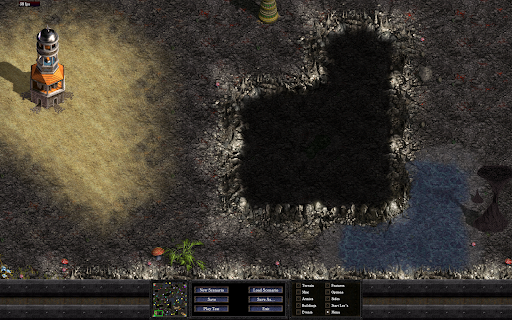
Ocean Floor Cavern - Each base has three points of defense: one ground and two floating. Because each player starts with an Elemental Temple, players can use floating-based strategies to assault each others’ bases.
Common errors in the use of terrain are funnelling and walled-off bases. Both of these errors should be avoided whenever possible. Funnelling is an extended choke point, a corridor-like area which usually cannot be circumvented under realistic conditions, thereby resulting in only a single viable route of attack. Funnels are very bad for gameplay for three reasons:
- They remove all strategy and make gameplay into a tug of war. If there is only one route to attack the enemy, the only strategy which exists is to attack the enemy head-on. All other strategies in the game are removed due to funnels. In addition, with restricted room to attack enemies, combat takes considerably longer to resolve, which will have a similar effect as an increase in the size of the map. In the case of funnels, this is not compensated for and as such, is an unexpected outcome.
- They favor missile units as they are unrestricted by the small amount of room. The number of melee units which can attack is limited by the funnel, but missile units are unrestricted. This removes the purpose of unit variety.
- They make defence extremely effective. If the only route is a thin passage and if this passage opens out into a wide area, then any offensive maneuver through the passage is near-impossible since units proceed through the funnel at a low rate whereas the defenders can have any number of units stationed on the open space. In addition, it’s much harder to reform units in tight spaces, so the formation of the units is dependent on however they went into the funnel.
Walled-off bases are those with only one area of grounded defence. In a sense, walled-off bases are similar to funnels, except the funnel is always the only route and it is located outside a player’s base. A single area of defence means that there is no decision making and no strategy in besieging bases. Only a single route can be taken into a player’s base, which means only one area needs defences and only one area needs to be guarded. Ground units form the base of the game and it is always important to give a choice in the direction of their attacks. This allows the attacker to use different strategies when besieging an enemy and likewise, the defender needs to be more alert and incorporate defences and guards in multiple locations. This way, the advantage of defence can be diminished by cunning strategists, sieging is more fun as there are options and the game doesn’t drag out as long. 2 different areas of defence is the bare minimum. 3 is the recommended number.
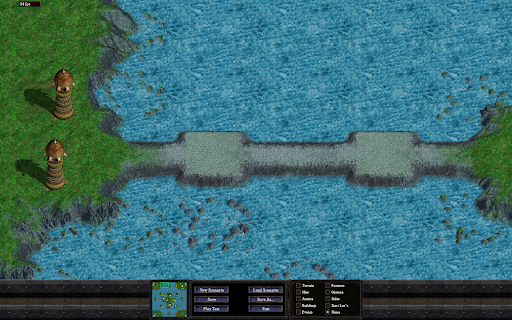
Four Small Forts - Bases can be attacked from two different directions, but because of the amount of time it would take for players to make an indirect attack, there is essentially only one way to attack each player. All routes on the map are funnels which damage the strategic aspects of the game and make missile units dominate.
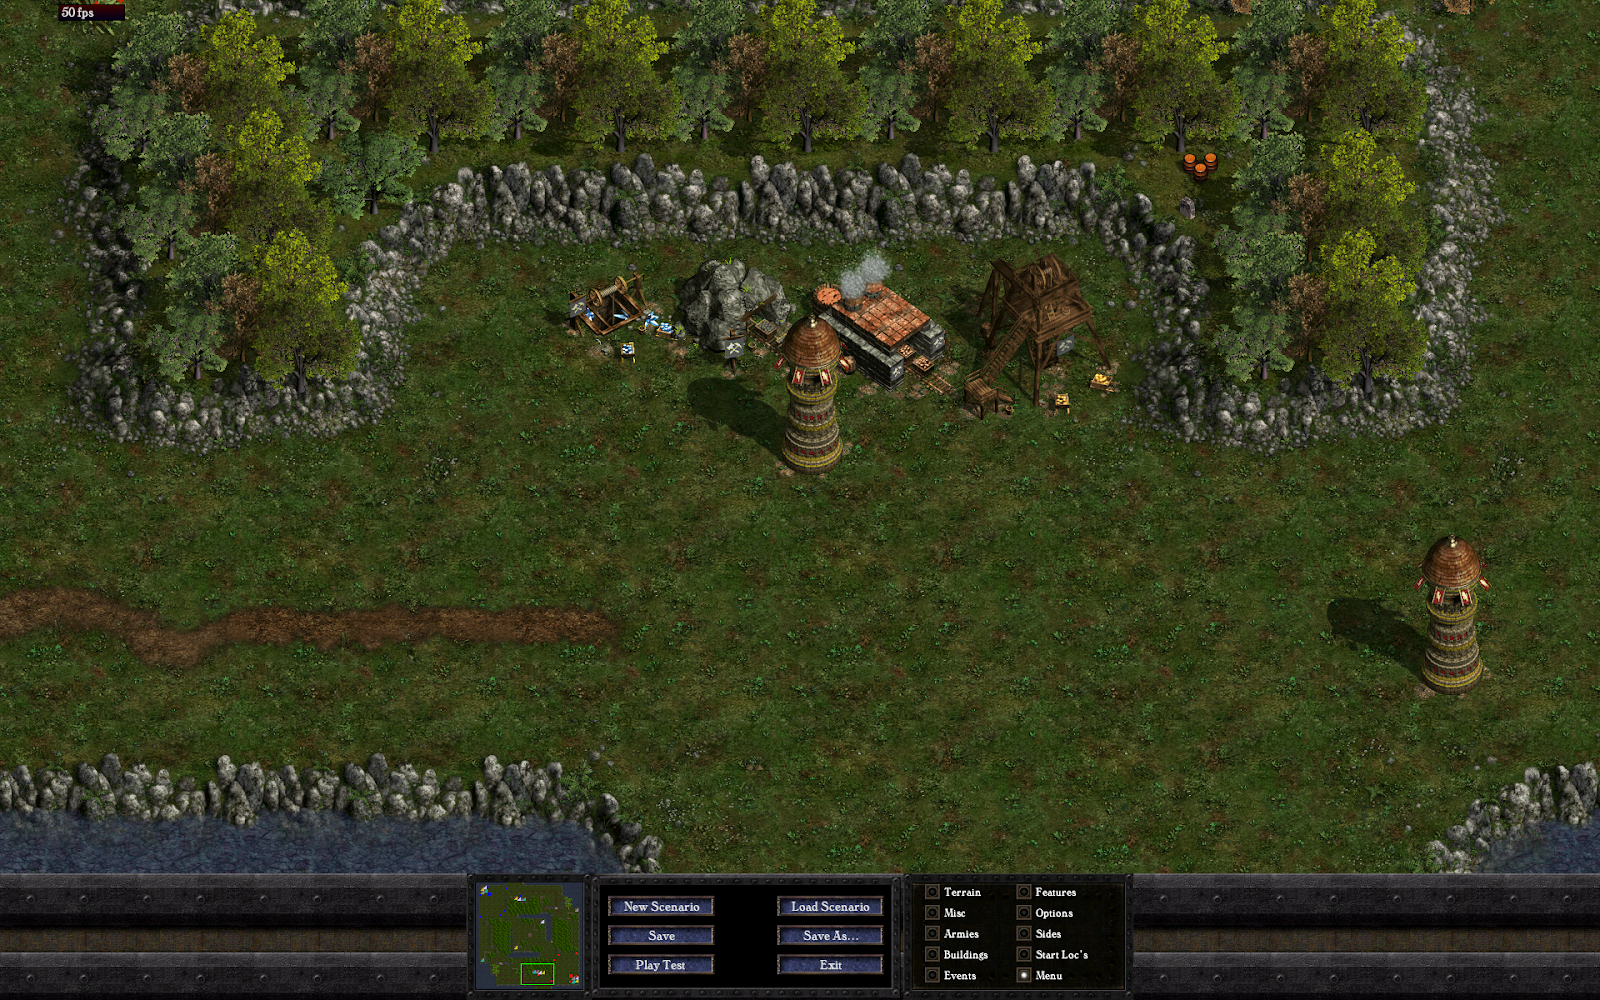
Dragon Island - Each base has three defence points and each one is different in nature. One is more heavily defended but is direct, one is a bit more heavily defended but features the players’ nearby mines and the last is a bit narrow but is the least-heavily defended. Besieging the opponent’s base always has strong strategic repercussions as each route has both advantages and disadvantages.
The 'smooth' and 'variate' terrain functions can make map-making easier for you. Smooth attempts to 'blend' each terrain type on the map to each other, so if there are water and grass tiles together, the function will place grass coast to smooth it out (the tile type which will be replaced depends on which terrain type is dominant. If you have a map with grass and water on it, the adjacent water tiles will be replaced with coast as grass is dominant). Keep in mind that the smooth function also reverts all tiles of each type back to their most basic form, so any grass tiles will become basic grass 1. Because of this, it's best to use the smooth function before variate. In addition, smooth may not work with some tile arrangements. If this happens, it is most likely because there are no transition tiles between the two (or more) terrain types or there isn't enough room to place them. Variate randomly interchanges each type of tile with another of the same type. For example, if you have a map covered in grass tiles, pressing the variate button will randomly replace those grass tiles with other grass tiles, including features like cracks and mounds.
Since the advent of 0.8.9, features serve multiple purposes. They can be used as obstacles or blockades, they can be used to enhance the detail of the map and now, they can create a positive zone which provides the cover effect. Small features such as grass or flowers can’t block units or provide cover. These features can be used to beautify a map and also to designate zones. Since beautification has little to no impact on a map’s gameplay, it’s fine to break symmetry using features. Larger features like trees can also be used for map beautification, though if this is done, make sure that no cover is unintentionally generated from them. Beautification can be approached in different ways. Features can be placed around any area to help make them look nicer. This is very useful for vast, sprawling plains, but may present too much visual clutter in more constrained areas. In such areas, beautification is best left to terrain edges such as coasts and cliffs, where the visual clutter won’t impede gameplay. Features like long grasses can be used to show exactly where cover can be obtained, though if used in this manner, don’t use the same features to beautify the map otherwise players will be confused as to what is and what isn’t cover.
Larger features like bushes, trees and houses not only block grounded units, but they can also provide cover. Cover is determined by the quantity and distance of features from each other. Each feature has a radius of 5 (measured from the edge of its blocking grid) and if two more features are within that radius, a zone of cover will be created where each feature’s radii coincides. Smaller features like bushes provide light cover, larger features like boulders provide medium cover and huge features like buildings provide heavy cover. The type of cover that each feature provides is denoted by the letter by its name (L for light, M for medium and H for heavy). If cover is created from features with different cover types, then the cover will be the lowest of the three features in that area. For example, if there are two large trees and a bush next to each other, the cover created will be light. Lastly, if features are placed on negative zones, the cover provided by them will cancel out the negative cover. For example, if bushes are placed on ice, they will cancel out the negative cover and hence there will be no cover penalties or bonuses from that area. If boulders are placed on ice, they will provide light cover, as the ice will deduct the level of cover by one stage.
Mines
Mines are the most common structures that players can find throughout the map. Once converted, mines give their controllers an amount of income depending on the mine’s level. In the current version of The Protectors (0.8.9b), all races have a use for all resources. Depending on the race, a resource type might be used to produce a specific unit type, or another unit type. This means that maps need to have an equal distribution of each type of resource should you want the map to be fair. For example, a race uses metal to produce cavalry and another uses metal to produce missile units. If there are only metal mines on the map, then the former race has a big advantage because cavalry units are usually good against missile units.
The distribution of mines can often change the way maps are played, much like terrain itself. Mines placed closer to players are in less danger of being destroyed and are easier to fill with miners, whereas mines which are further away are in more danger and are harder to fill with miners. When developing a map, it is always beneficial to place higher value mines far away as this will encourage mid-map interactions and conflict between players. Placing higher values nearby means there is no desire to explore or control the map and thus no interactions will occur. Instead, players will develop their nearby mines and simply attack with an army.
When considering the distribution of mines, you may want to think about three points: 1) The distance between the player starting locations and each region of mines, 2) the number of mines at a single point and 3) the quantity of mines.
Mine Distance
To determine distance for maps, it is best to segment the map into 5 segments from: The player’s base, the near-map, mid-map, far-map and the enemy’s base. The two bases can have a standard set of level 3 mines, the areas near players should have low-grade mines and the area in the centre of the map should have high-grade mines or other convertible structures. For FFA maps, the mid-map is instead the centre of the map between the players, the area of greatest contention. Whereas team maps tend to be two halves, FFA maps are more cyclic and so the zones are circular rather than rectangular.
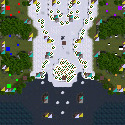
An example of a team map. Each zone is clear; from one team’s bases, to the nearby mines to the structures around the middle of the map. The highest value structures are around the middle.
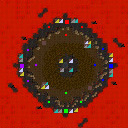
An example of an FFA map. It features nearby, lower value structures and in the middle of the map are the high value mines. Each quadrant of the map is effectively mirrored between the players as each side has equal access to the lower level mines and the utility.
Mine Sets vs Singles
(version 0.8.9 and past)
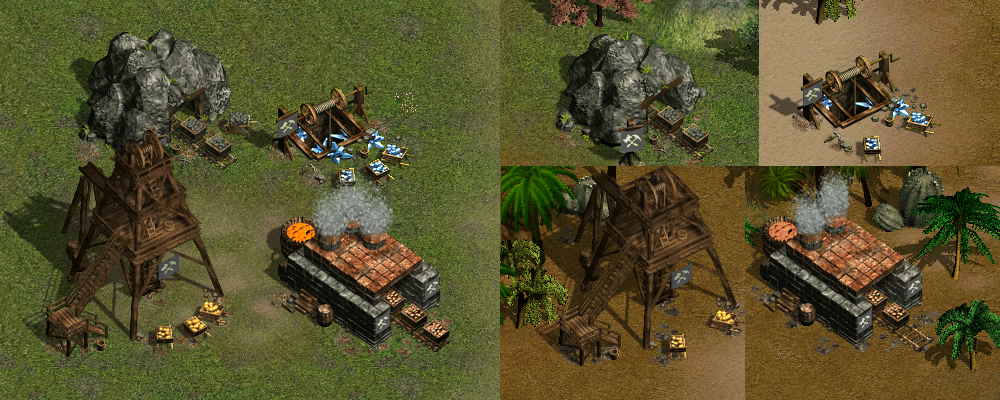
Since the dawn of Warlords Battlecry, mine placement has always been singles. Only a few maps ever clustered more than one mine together and it was exceptionally rare that a complete set had been placed. In older Warlords Battlecry titles, mine conversion was very easy (though micro-intensive) because converters could be built en-masse. In the Protectors 0.8.9 and in the past, converters are restricted. This means mine conversion is considerably harder than it was. The default conversion time for any hero or unit was 55 seconds (as the average hero dexterity value is 5, the default conversion time for heroes can also be considered to have been 50 seconds). For every additional building, the conversion takes an additional 10 seconds. This mechanic makes mine clusters much easier to convert than single mines (and it’s also much less micro-intensive). Taking a look at some figures, we get:
- 1 mine - 20 seconds
- 2 seperate mines - 40 seconds
- 3 seperate mines - 60 seconds
- 4 separate mines - 80 seconds
- 2 clustered mines - 20 seconds
- 3 clustered mines - 20 seconds
- A set of mines (4 clustered mines) - 20 seconds
The immense disparity between the times is immediately obvious. It could take 220 seconds or 85 seconds to convert the same four mines. During the time it takes to convert four separate mines, a player could produce 105UV’s-worth of units and could receive 1320 resources of each type. If those mines were within zones of mid-map conflict, more than an entire army could be produced should the initial army be defeated. By comparison, only 40UV’s worth of units could be produced and 510 resources of each type received over the time it takes to convert a set of mines. The benefits of clustered and in particular, a set of mines, are that they are easier to control which means it’s easier to maintain the expected income value for a player. Slower, separate conversion makes it much harder to defend mines and defending or developing them becomes less worthwhile.
Due to the long time it takes for units to convert separate mines, the expected income value becomes more latent and tends to draw out gameplay, especially if all mines are separate. Keep in mind that the game’s skills and perks were designed for an income value of around +6 per second for each type of resource. Stuffing mines to acquire this value could take as long as 420 seconds by default with two keeps on constant miner production (in this case, the mines would be a set of level 3 mines and a set of nearby level 2’s). Adding on the conversion time, acquiring +6 income could take 675 seconds (11 minutes and 15 seconds with 1 converter). If you were to do this for separate mines, it could take 945 seconds (15 minutes and 45 seconds with 1 converter). Due to the extension of game time and for all the previous reasons mentioned, sets are usually the superior option for skirmish maps as they are more gameplay-friendly.
Mines and utilities often represent regions or capture/control points. Since all four resources are equally required for each race and because these resources have an identical function, all four are needed for each side in equal amounts. What this may mean is that the map will quickly be filled up with mines. Singles aren’t desirable for the reasons mentioned before, but sets of 2 mines can be, depending on the size of your map. Most maps will need a moderate quantity of ‘capture points’ to increase the number of strategic choices available, to properly represent and fill each region of the map and also to give more power to the conversion mechanic, which mine-thief heroes are built for. This makes sets of 2 the most desirable for most maps, whereas sets of 4 function better in small maps or as a (usually central) zone of high contention.
(version 0.9.0 and forwards)
In TPC version 0.9.0 and onwards, mines take 20 seconds to convert from enemy to neutral and another 20 to convert from neutral to friendly. This means that conversion is considerably easier. Additional buildings also no longer take additional time to convert. This makes sets vs singles less relevant - but it can still affect something: the amount of time spent converting structures around the map. The more individual mines/utilities there are on the map, the more time a player spends converting and hence the more time there is between combative clashes.
Mine Quantity
(version 0.8.9 and past)
Just like mine distribution, mine quantity can also change the way the game’s mechanics function. Too few resources makes each loss far more punishing and also makes HP regeneration far more of a factor whereas too many resources destroys strategy and replaces it with constant spamming. As the game’s mechanics are based on an income of +6 for each resource, this is a good number to compare mine quantity to. Like other factors in map-making, this is only a guideline; you may want your income value to be higher or lower. Your expected income value, or the amount of income you expect players to generate, should include:
- The standard income of starting mines and near-map mines. Mid-map mines are a precarious source of income and as such, you may not want to factor these into your income value.
- The mine-filler of starting mines and near-map mines.
- The highest level of generic Income research, which is Income level 3 (Income Level 4 is specific to the High Elven race). Income level 3 increases mine income by 37.5%, including the income of miners.
For reference, this is the amount of resources which mines can generate:
- Level 1 mines add +0.5 and at full capacity, +1.5. With Income 3, they add +0.6875 and +2.0625 at full capacity.
- Level 2 mines add +1 and at full capacity, +2.5. With Income 3, they add +1.375 and +3.4375 at full capacity.
- Level 3 mines add +1.5 and at full capacity, +3.5. With Income 3, they add +2.0625 and +4.8125 at full capacity.
- Rare mines add +2 and at full capacity, +4.5. With Income 3, they add +2.75 and +6.1875 at full capacity.
The following are a small number of examples for a player’s expected income:
- A starting set of level 3 mines and a nearby set of level 1 mines (+6.1875)
- A starting set of level 3 mines and one distant sets of level 3 mines (+6.875)
- A starting set of level 3 mines, a nearby set of level 1 mines and a distant set of level 2 mines (+7.5625)
- A starting set of level 3 mines and a distant set of rare mines (+7.5625)
- A starting set of level 3 mines, a nearby set of level 1 mines and a distant set of level 1 mines (+6.875)
(version 0.9.0 and forwards)
With the advent of version 0.9.0, this is irrelevant as the army limit is freely adjustable and hence maps can have whatever resource income is desired.
Army Limit (version 0.9.0+)
In version 0.9.0, maps can have their own army limit settings. This means that map-makers can be as creative and as unorthodox as they like with regards to the size of their map and the resource income. No longer will they have to worry about income being too high or too low with respect to the distance between players and the hard-set 100 army limit. Generally speaking, an army limit is defined by the income of a map, the average distance between players on different teams and the amount of time that players are expected to spend converting around the map. The more income there is, the bigger the average distance and the more individual convertible structures there are, the more AL is required, and vice versa. We don't want AL to be set too low, otherwise it will result in indefinite gameplay and infinitely-stockpiling resources and we don't want it to be too high otherwise games will almost-exclusively be decided by unit quantity. Why is an AL required and why not just set it to the maximum every time? Well, a specific AL setting is required for two reasons: it promotes an adequate amount of combat over time and it stops games from being resolved by unit quantity alone.
TPC Map Army Limit Calculator
The best way to determine your map's army limit number is by using the TPC Map Army Limit Calculator excel spreadsheet located here. Do not worry, it's not particularly tricky to use and instructions on how to use the calculator can be found inside the spreadsheet. Keep in mind that the calculator is an estimation and that results may vary depending on the way the player plays on the map. If there are any problems, playtesting is often the best way to revise your army limit setting. Try out each start location to help you figure out a better value.
Rough Rule of Thumb
If you don't want to use the calculator, there is a rough rule of thumb you can follow, but unfortunately it is not as accurate as the calculator and it will still require calculations. If this isn't your thing, I would recommend playtesting your map to figure out a suitable value instead. In any case, the first thing to understand in map AL calculations is that, generally speaking, it uses the following multipliers: expected income and map size. These two factors constitute the army limit for almost any map, even campaign maps and missions. AL calculations are not particularly easy to do and not everyone can use the calculator. Therefore we need some kind of rule of thumb to go by so that anyone can set a reasonable AL for their map. Let's start with the map size definitions. The first factor to consider is how close each team is to each other, on average. If the map is designed to be FFA, then it would instead be how close each player is to each other. The closer players are to each other, the less time will be spent on the map and hence combat ensues more quickly. The further away they are, the more time will be spent before combat inevitably ensues. Army limits are affected by this - the smaller the distance, the smaller the AL, the bigger the distance the larger the AL.
This is what the AL looks like with expected income values similar to the average (as described above):
Map size (in cells) - distance between players (in cells) - army limit
- 64x64 - 7 - 54
- 128x128 - 71 - 68
- 192x192 - 135 - 82
- 256x256 - 199 - 96
- 320x320 - 263 - 110
- 384x384 - 327 - 123
- 448x448 - 391 - 137
- 512x512 - 455 - 151
- 1024x1024 - 967 - 261
Let's start by creating a basemark. This will be 192x192 with average income, which has a player distance of 135. The AL at this distance and with this income rate is 82. At average income, the AL increases by 14 for every 64 cells distance. This means that each tile, which consists of 10 cells, increases AL by 2.1875.Now for income, and how this affects our AL/distance. The average income may increase or decrease AL by 2.1875 per tile, but as expected incomes change, so does the AL per tile. We have nearby mines which are expected to be filled with miners and defended easily, and we have distant mines which are expected to be devoid of miners. To understand these two terms, see above in this document or read the instructions in the AL calculator. Typically, nearby mines, particularly nearby stone and crystal mines, produce a lot more gold than distant ones.This quick guide shows how nearby and distant mines add to the AL total for an averagely-sized map where player distances are around 135 cells:
Nearby Mines
- Gold Level 1 - 6.1
- Metal Level 1 - 6.1
- Stone Level 1 - 3.2
- Crystal Level 1 - 3.2
- Gold Level 2 - 10.2
- Metal Level 2 - 10.2
- Stone Level 2 - 4.9
- Crystal Level 2 - 5.3
- Gold Level 3 - 14.5
- Metal Level 3 - 14.5
- Stone Level 3 - 6.6
- Crystal Level 3 - 8.2
- Gold Level 4 - 18.5
- Metal Level 4 - 18.5
- Stone Level 4 - 8.2
- Crystal Level 4 - 9.4
Distant Mines
- Gold Level 1 - 4.1
- Metal Level 1 - 4.1
- Stone Level 1 - 2.4
- Crystal Level 1 - 6.1
- Gold Level 2 - 6.1
- Metal Level 2 - 3.2
- Stone Level 2 - 3.7
- Crystal Level 2 - 8.2
- Gold Level 3 - 8.2
- Metal Level 3 - 8.2
- Stone Level 3 - 4.1
- Crystal Level 3 - 4.9
- Gold Level 4 - 10.2
- Metal Level 4 - 10.2
- Stone Level 4 - 4.9
- Crystal Level 4 - 6.1
Should your distance between players not be 135 cells, then add up all of the average AL points of mines on your map on a per-player basis, then multiply your AL number by the difference between 135 cells and whatever average distance between players you have on your map. Whether your average distance is greater or lower than 135 cells, divide it by 135 to get the number you need to multiply your total AL by.
This is a very rough guide. If there are more individual mines/utilities than 8 for each player, you may find that you need to increase your AL value. Likewise, if there are less, you may find that you need to decrease it. Generally, it's better to use the army limit calculator to find your army limit setting, though ultimately, playtesting is your greatest ally. Try setting an AL for your map, and then playtest it from each side or at least once on each team if it's a team vs map and there isn't any intention of it being FFA.
Utilities
A utility is a convertible non-mine structure which provides access to special productions or bonuses. Utilities are used in much the same way as mines; as capture points, albeit capture points with unique functions. Utilities can have an even stronger presence on the map than mines, as they provide races with special strategic options. Some utilities such as the elemental temple can provide units such as air, fire or water elementals which combine well with water terrain, fire of which can also float over lava terrain. Dragon temples not only give access to every dragon in the game, they can be produced much earlier at tier 3 as opposed to tier 5 (and as such, a dragon temple may encourage a player to defend and invest in tech so they can use the building as a win condition). Shipyards are particularly special utilities which function just as well as starting buildings or as a mid-map capture point. This is because shipyards provide a function which is required for water terrain maps - boats.
Out of the numerous utilities available in the game, only a select number are considered balanced and only these should be used on fair maps. Quest buildings and shops are never fair as the bonuses they provide are completely random. Shops are particularly unfair as the bonus they provide not only depends on the list of randomly generated items, but also on the amount of crowns that the hero has. The list of fair utilities are as follows:
- Shipyard
- Temple of Navaar
- Temple of Lucifus
- Elemental Temple
- Dragon Temple
- Windmill
- White Tree
Recapping the Golden Rules
Regardless of the style of map you choose to develop, these rules should be followed as closely as possible:
- Don’t make the map too small or too large. Follow the guidelines in the map size section. If you want to make larger or smaller maps for unsuitable player counts, then consider lowering or increasing the amount of available resources on the map.
- Players need at least 4x4 tiles of building space. This is a good rule of thumb to follow since the size of buildings and bases vary greatly.
- Place each starting location in equidistant places for FFA maps. If two sides are closer by comparison to other sides, those two sides will be at a disadvantage.
- Make sure that each base can be attacked from at least two different directions by ground forces. Three is optimal.
- Ensure that there is no wasted space. Avoid making an area which has no purpose or a route which is useless by comparison to others. Create different upsides and downsides for each route across the map.
- Use a variety of terrain. Include negative zones such as marsh, ice or shallows, positive zones via the use of features and include variations in terrain heights such as plateaus and ditches. Also use terrain in ways which purposefully promotes or limits movement in some capacity - such as lakes, rivers, hills, mountains and other obstacles, but don’t overuse obstacles otherwise they make it too difficult to traverse the map.
- Make the map look nice. A blank map is not interesting to look at. Avoid the overuse of features intended to beautify the map, especially in designated routes which should be free of visual clutter. Also try to avoid the accidental creation of small cover zones where there aren’t supposed to be any and if you have designated a type of feature as the indicator for cover, don’t use that feature as beautification (otherwise players won’t know what is and what isn’t cover).
- Make sure that the map doesn’t suffer from funnelling or walled-off bases.
- Do not deviate too far from the mine quantities listed in the mine section. Too few will make the game slow and highly conclusive when armies clash. Too many will make units worthless and infinitely spammable.
That concludes the guide to skirmish maps for version 0.8.9b of The Protectors. As the game is still in development, there may be major changes to the way parts of the game work. If so, then parts of this guide may no longer be correct. In this case, the guide will be updated according to these changes. Thank you for reading and for your continued support of the project. I hope this guide is useful for anyone who is interested in developing maps for the game. If you have any questions about the guide or about map creation, feel free to post a comment and we’ll try to help where we can.
- Joe the Bartender (The Protectors Modding Team)


Amazing, thanks for the article!
So don't do this and don't do that.... Right? Got it.