Creating a textureless “pure3D” look
Introduction
After requests from other devs for my shadercode, I've decided to share both the shader files as well as make a how-to guide, for creating textureless 3D assets, and shading them inside Unity3D. This is that how-to guide. It's also available at Blog.littlechicken.nl
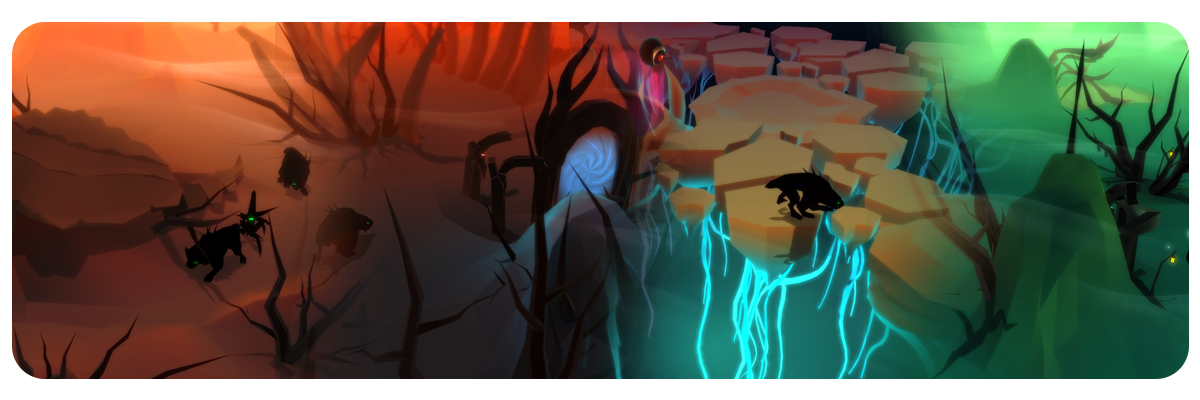
One of the ways I decided to challenge myself when starting Oberon’s Court was to create a visual style that does not use any textures. There’s two reasons for this.First of all, it looks beautiful. Having grown up with pixel games and the advent of 3D games has instilled in me a deep appreciation for 3D graphics. But the advent of pixel art has shown me that you can take any visual tech and distill it to its purest form. Creating 3D art without the use of textures does exactly this; it distills your modelling, animation and visual skills. Henceforth I shall call this style “pure3D” (feel free to add that your technobabble jargon).
Secondly, it’s very efficient, taking away the need to unwrap and texture a model removes a significant chunk from the development process. However, you will need to adjust your models and shaders to compensate for the lack of definition, seeing as you’re also losing an aspect or tool in your pallet.This post is a how-to on approaching this style.
This is by no means a “one-and-only” guide, as there are many artists and indie-devs using wildly different approaches to creating a stylized and purist 3D aesthetic, but it is how I did it for Oberon’s Court.In this first post I’ll write about the general setup, and going through the process step by step.
Regarding shader code:
I’ll do an in-depth look into each shader and how to create them yourself in Shaderforge or Strumpy as a part two of this post. For those eager to experiment here’s a copy of my entire shader library that I used for Oberon’s Court:
Oberonscourt.com
In the meantime, please do download / purchase these two awesome shader tools for Unity3D. I highly recommend them, as I use these as essential tools for my development process
Download Strumpy for unity3d
Purchase Shaderforge for unity3d
Lets get started!
Evolving the aesthetic
When I started creating the visuals of Oberon’s Court I was very much into compensating for the lack of textures, adding lights and accents to maximize the impact of the style. However, I quickly found that increasing contrast, when you have nothing but gradients, edges and solid colors to work with, does not improve the clarity of a game. Even though visually striking, it was hard to discern units and foreground items from the background.

First true textureless unity3D test. Very striking, but sadly not very well readable from in-game perspective.
As development progressed I found myself removing and subtracting visual effects to create a visual style where the player could easily discern the “shadow” units from their environment. Additionally, I found it a very pleasing experience to subtract effects, instead of adding more and more.If you compare the earlier screens with the latest screens you can see that some of the initial tests where visually more striking, however they weren’t very suitable for game play. I’m not saying that you can’t make a game using a more high-contrast approach, but it was not the game I was designing.

Cluttered and hard to read.
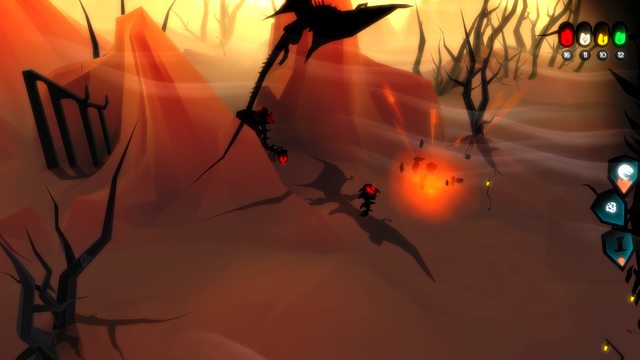
The final style.
The ingredients
To create the pure3D style I used a couple of recurring ingredients and themes. I’ll iterate on those here, explaining what techniques are involved and how I achieved the ingame results.In essence the style is very, very simple. There is nothing new here for most game artists. But combining these ingredients can lead to striking result when you remove the texturing from the process.
- using smoothing groups as shape definition
- using additional dark/light vertex color data, such as radiosity solutions
- using UV coordinates to create color gradients and color mixing
- using shaders to add shape enhancing effects(fresnel etc.) to the model
- using unlit shaders (without lights), but with realtime shadows
- using select post-fx (bloom) to enhance/soften the look
1. Using smoothing groups as shape definition
When working without textures, you lose an important part used to help enhance the depth of your 3D model. Especially for mobile development, where textures are often used as main way to enhance the visual complexity and shape of an otherwise very lo-poly model.In Oberon’s Court I used smoothing groups to enhance the definition of my 3D models. Usually smoothing groups are discarded, as normal maps and other techniques are used for describing the angles of faces. Nowadays we’re more used to creating high poly models and distilling that angular (normal) data in a texture. When you have the full dataset of a hi-res texture, smoothing groups seem quaint and only of passing interest. But using them effectively can provide a beautiful tool of enhancing the shape of your model. Both as it’s being lit as well as for use in shaders.
Some notes:
- Unity does accept multiple normals per vertex, so your smoothing groups will transfer to Unity3d’s lighting models still intact. The same does not count for vertex colors (more on that later)
- Edge triangulation: when creating smooth surfaces you’ll need to occasionally re-triangulate to create the smoothest look. Just make sure you’re modelling in basic shaded preview mode
- Create smoothing groups that enhance the edges of your model
- Break up over-convex shapes, if the angle between two faces is too big (too sharp) do not try to smooth over it, break it up in two smoothing groups
- Create enough faces so you can create interesting edges and protrusions, which the smoothing groups can enhance.
- Use a limited number of smoothing groups, just for practicality. You can repeat use smoothing groups, as long as they don’t touch another set of faces with the same smoothing group ID
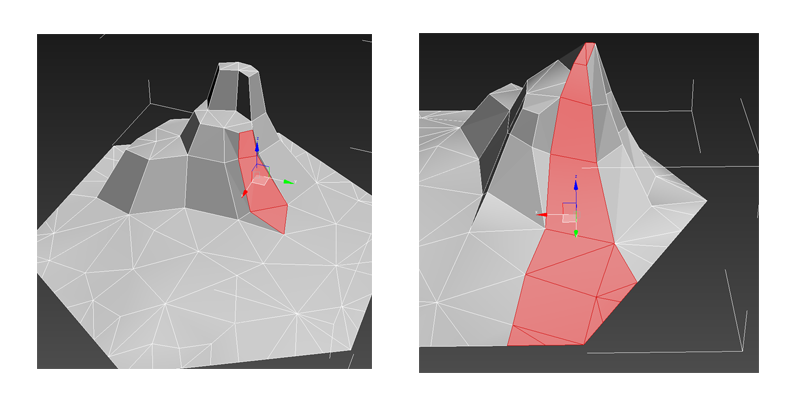
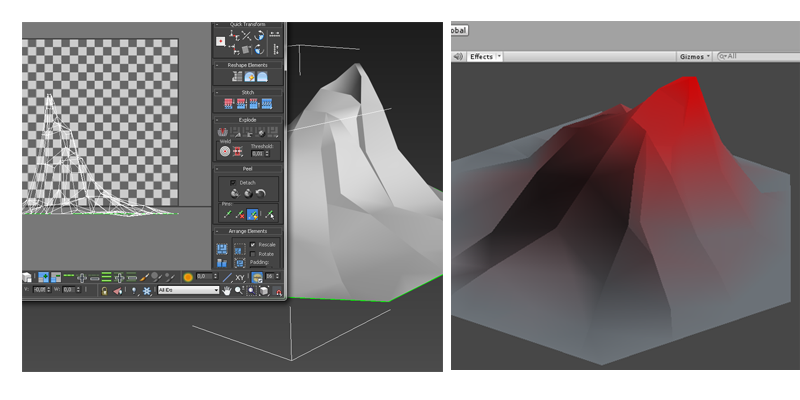
Creating an interesting hill shape by extruding faces.
Selecting faces to create smoothing groups, and the end result in preview shading.
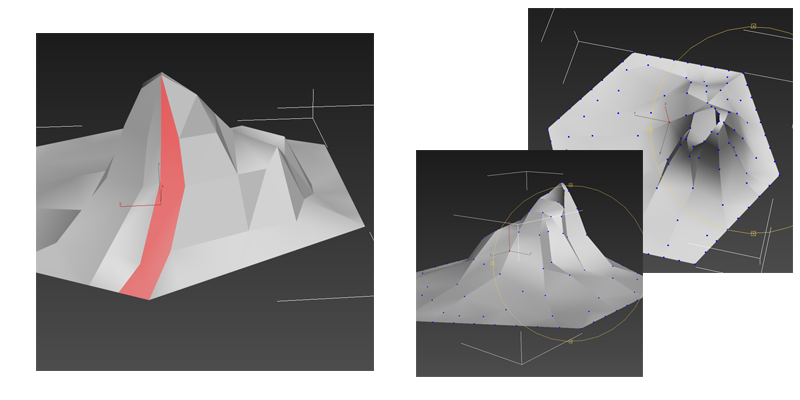
2. Using additional dark / light vertex color data, such as radiosity solutions
When working with shaders you want to be able to add as much additional information as possible into a 3D model. Most shader models work with data stored in the textures (normal maps, diffuse maps etc), but also with data stored in the geometry and vertices (points). The simplest form is the position: the normals and basic data required to display the model. But you can keep adding more data to each vertex. This can be physics data for physical materials, but also additional lighting data. In Oberon’s Court I used 3D Studio Max’ ability to render a radiosity solution on vertex level and save this to vertex colors. Basically creating a dark-light shading for an object based on a complex lighting solution. This allowed me to darken and lighten the model based on a pre-determined lighting scheme.
Some notes
- Using skylights is a quick way of creating a soft outdoor look with radiosity
- Object and vertex colors will influence the color of other faces, as light literally gets bounced off the geometry, and thus radiates color
- Don’t worry if the radiosity is not very precise, you can add extra tesselation and vertices to improve quality. We only need a hint of dark-light to give depth to a model. It doesn’t need to be realistic, nor perfect
- Only add radiosity after you’ve done the smoothing groups, as smoothing is taken into account during the calculations
- Radiosity is found in the scanline renderer of 3D Studio Max and is an advanced lighting method. (Similar features are available in Maya, I believe)
- You can assign the radiosity to be permanent, by using the vertex colors modifier, and use the “assign vertex colors” function in the roll-out
- Detach each smoothing group! Unity does not retain multiple vertex colors per vertex over the same channel, so if you want to retain the radiosity solution and the sharp smooth edges, you must detach each smoothing group to separate elements.
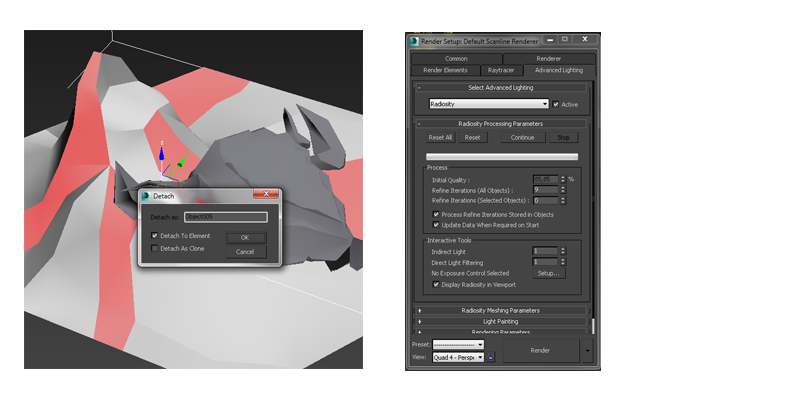
First detach all the smoothing groups, so they’re seperated, then perform radiosty calculations.
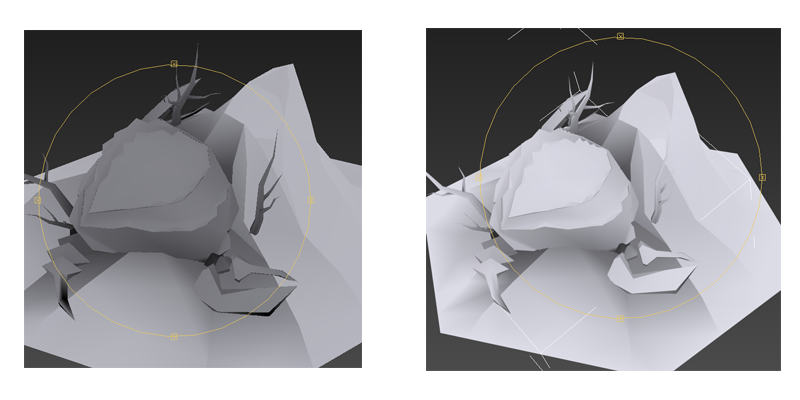
First results of the radiosity solution, and then assigned to the vertex colors and graded. Notice how the smoothing groups really pop out the shape of the models.
3. Using UV coordinates to create color gradients and color mixing
In order to differentiate height in the environment, I used color gradients. The easiest way of implementing these would be to create a texture. However, seeing as I committed to not using textures, this wasn’t an option. Also, gradients are something shaders can do quickly, without much fuzz. In order to create a gradient we need information on both the direction and length.
Initially I used world position data for this, to create a true height-map type effect. However, this approach is calculation-heavy, as the shader needs to retrieve the world position of each individual vertex. Therefore, this approach is not very suitable for mobile use. After coming to this conclusion, I decided to use UV coordinates to achieve the same results.
Simple shader that turns UV Coordinates into gradient.
You can even use UV coordinates to create not just gradients but entire dynamic gauges and bars, using shaders.
Creating the shader (using the Strumpy shader editor):
- Create a model with a simple UV set (in 3dsmax, simple planar mapping)
- Create a gradient by lerping between two colors based on either U or V component
- Floor or ceil the gradient value (makes it a hard line, either zero or one)
- Add a sine deform based on time, to the gradient value (sinetime)
- Add an offset to make the gradient rise or fall (add float value)
You end up with this:
This stuff will stay sharp at any resolutuion and zoomed -in.
All the way until your floating point units go BLERGH!
4. Using shaders to add shape enhancing effects (fresnel etc.) to the model
When writing a shader you can combine gradients, vertex color data, and finally some shader specific effects to create a nice unlit shading that is quick to render and accentuates the geometry, instead of hiding it.The shader algorithm I used is really simple, and can be summed up as such:
- Create a top down gradient for basic colors
- Add a fresnel effect, (shiny rim effect based on the normals of your model)
- Mask the fresnel effect with another gradient (so the shiny rim only applies on the top of the model, not the flat floors)
- Multiply all with the radiosity vertex colors (adding a dark / light shading to everything)
- Add a realtime shadow layer to the unlit shader
- Tweak until right
Here’s how this looks in strumpy shader editor, and here’s a link to the strumpy shader file
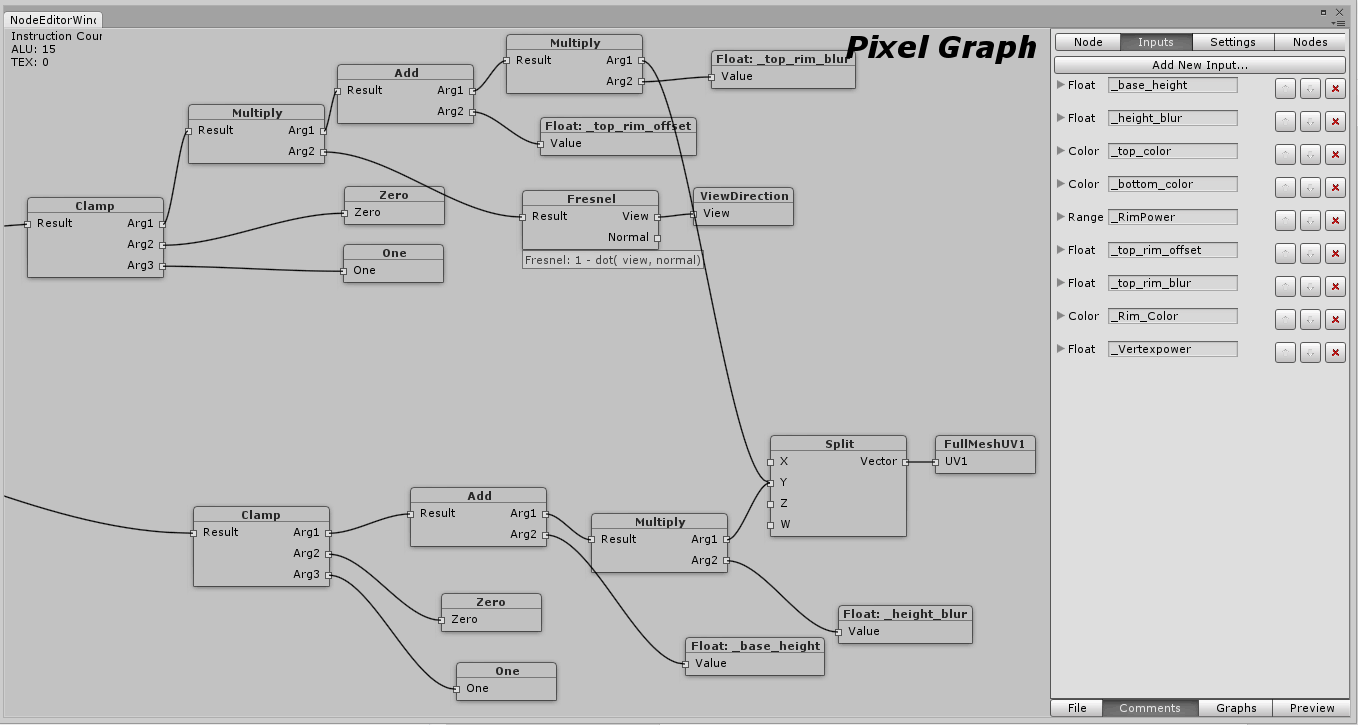
Creating two gradients from Uv coords, 1 to make a color gradient, and one to mask the fresnel effect.
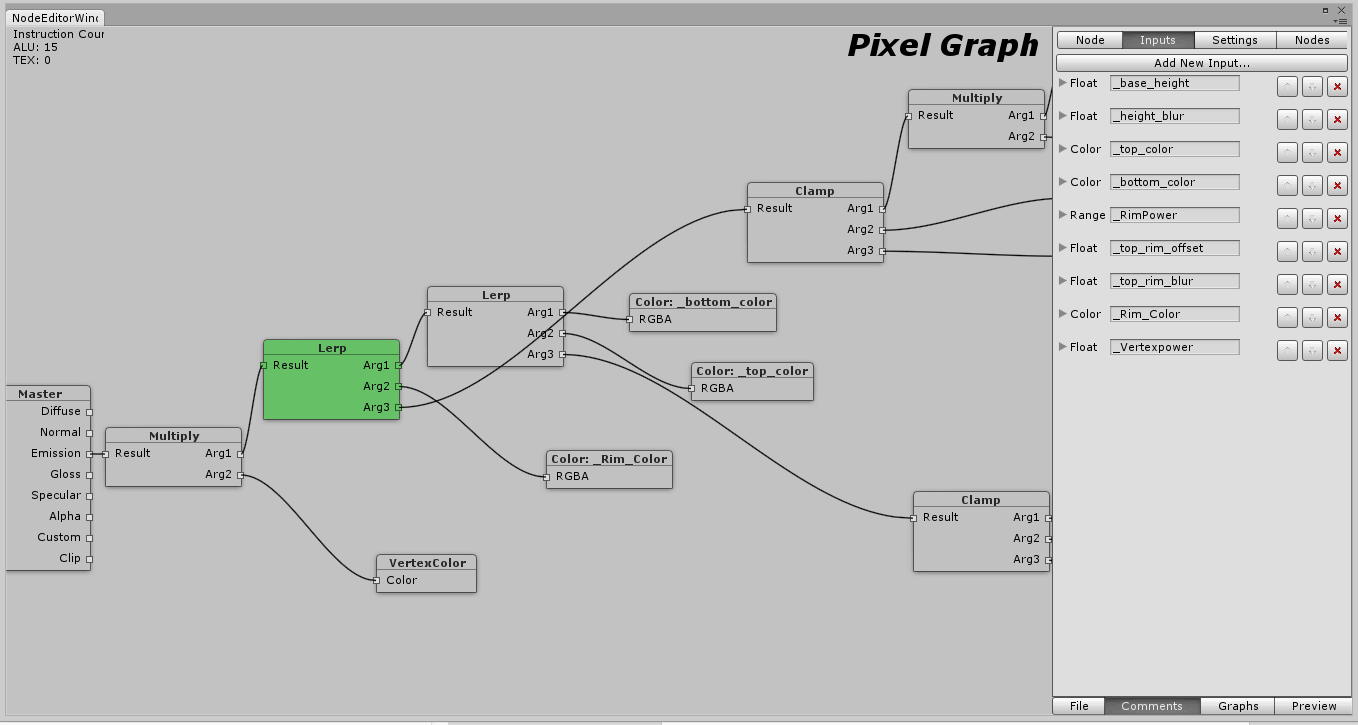
Mixing the fresnel, color gradient and vertex colors and outputting to emmisive (unlit).
At one point I even multiplied the gradient with the Y component of the vertex normal, in order to have one color on flat horizontal surfaces and another on vertical surfaces, creating a true height-map look, however I discarded this as being to cluttering in the scene.Here’s a link to a decent description of what “fresnel” means: 3drender.com
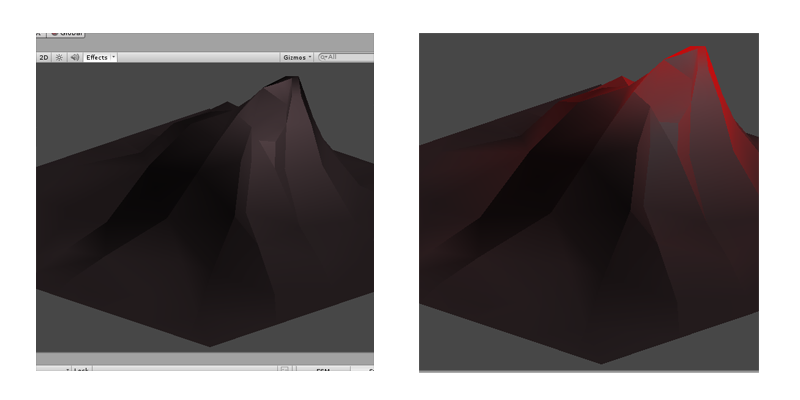
No fresnel effect on the left, and a red fresnel applied on the right, with it masking off towards the bottom.
5. Using unlit shaders, without lights, but with real-time shadows
Nowadays in Unity3D 4+ you can use real-time directional shadows on mobile platforms, which is great. However, shadows in shaderlab (the in-between system Unity uses for cross-platform compatibility) are part of the lighting calculations. This means that if you make an unlit shader, you have to add shadows in a separate pass, as making shaders unlit or emmisive excludes the effect of lamps or lights on the model, and thus the ability to cast or receive shadows.Luckily I’ve already done an entire post on this topic , which you can read here: Blog.littlechicken.nl
6. Using select post-fx (bloom) to enhance / soften the look.
Post-fx are effects that take the entire final rendered image of your game and apply different effects to it. Unity Pro ships with a few post-fx shaders that are optimized for mobile platforms. For example: the Depth of Field shader uses a black and white depth image to blur the 3D world, based on depth. This makes everything in the foreground sharper and at the same time blurs the background.One of the post-fx I’d like to point out is Mobile Bloom and Fast Bloom. The bloom shader is simple: it makes a copy of your final renderview, blurs it and multiplies the blurred result back onto the original, thus creating a soft glow that is most pronounced at very light areas such as the sky.
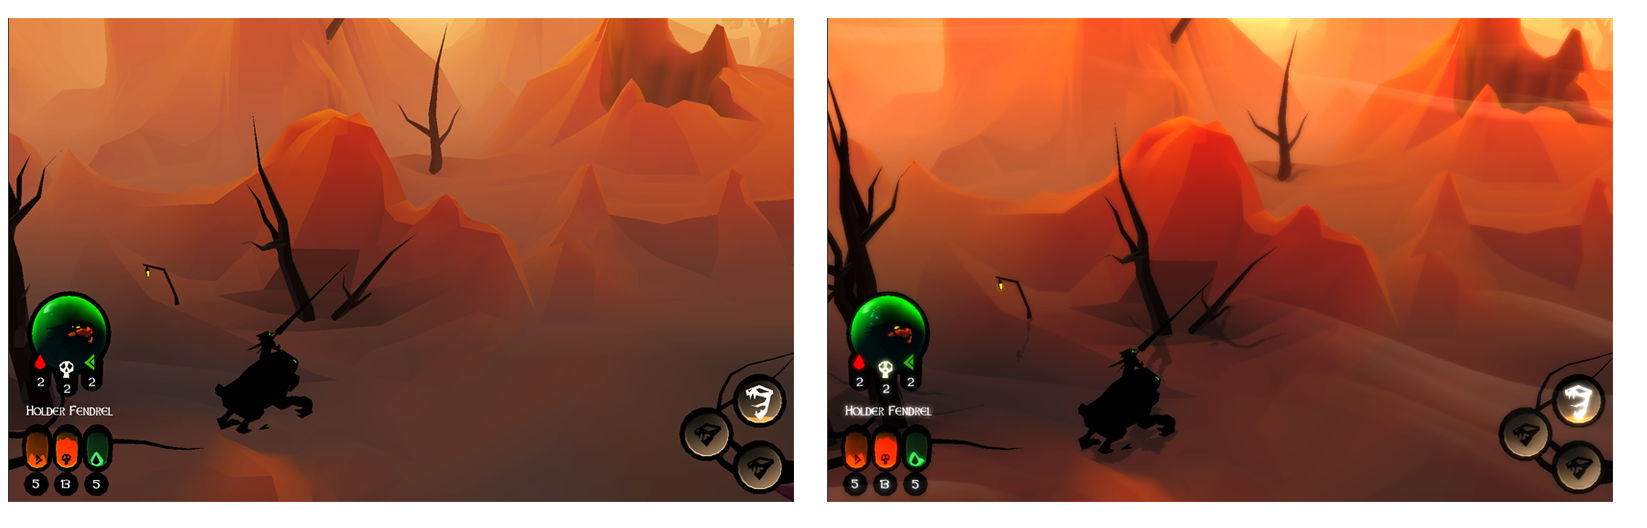
Without (left )and with (right) the bloom shader.
End of Part 1
I hope this post provided some insight into making a pure3D or textureless 3D game. It’s not all that difficult, but it does require you to use your tools differently. That being said, much of what I wrote here also applies to more “normal” 3D art assets.Please let me know on twitter or facebook what you think, or if there’s anything you’d like to see explained or shared. Just hit me up and i’ll do my best. I’ll try and get into specific shaders in the near future.Cheers,
Tomas Sala


Thank you, sir! I've never ever thought of smoothing those models like that!
Fantastic thanks for sharing!
Great one! I really like what you show us here. I'm using textures in my project, but very lightly, and less and less in each iteration.
Your screenshots are amazing. I would really like to see them in motion. I'm going to browse your profile now :).
Thanks and good luck!
This comment is currently awaiting admin approval, join now to view.
Nice and clear man!
This comment is currently awaiting admin approval, join now to view.