Download MCG Darkest Hours Full Version 4.2 FINAL! - Mod DB

MechCommander Gold - Darkest Hours
Original campaign merge
Overview & Operation 1
"I have been playing your Darkest Hours campaign for quite a while now, and I must say I absolutely love it. Let me offer some commentary on my experience thus far. I actually only have a very few complaints, but many praises. Overall, the difficulty feels just right, not too easy or too hard.
Critiques -
- I don't like that many missions don't give you any RP, or give you only a pittance. The later missions sometimes give you like 5000, when it costs that much alone to repair a badly damaged mech! With that being said, I just started OP2, so that may improve in time, so I apologize if I have 'jumped the gun,' so to speak. It also might be that much salvage is captured to make up for this, which, if this is true, is appreciated and makes up for this.
- Many of the new female characters are set to male video sets during alerts. They have female voices, but seeing a woman look like the Beast is a bit odd, to say the least.
- Missing my boy Outlaw, haha.
Praises -
- Absolutely love the seamlessness of the campaigns with the expansion content weapons and 'Mechs. The missions blend so well, and I love how you integrated the expansion weapons into the original. It's really cool getting the Sniper and C ER-PPC earlier. They're definitely needed during certain missions, ha! I like that I got Mantis earlier. She's one of my absolute favourite MechWarriors and I like having her in my group. She promoted to Elite at Op1M18.
- The variation in classes of 'Mechs is good, IE in the vanilla Beachhead, you only had light and medium 'Mechs. In your mod, the dynamic has changed. It's no longer progression of 'start small and work your way up.' Instead, it is 'use what 'Mechs are right for the mission.' In one mission, you will have your Atlases, and in the next, are right back to Ullers and Cougars, haha. I like this, since it makes everything more dynamic and interesting.
- Love that my favourites have time to be promoted. Like I've seen you and others say in the past, by the time your team gets really skilled as Elites, the game is pretty much over. Here, my favourites are reaching Veteran and Elite and I can still enjoy the game with them as such, and also train new people I don't normally use.
- I like that you get a lot of salvage when you capture resources. Makes it a lot easier to customize your 'Mechs the way you want.
- The variation in new missions is pretty interesting. I like that they're quite varied and unique.
- The game still has that classic progressive feel as your team 'levels up,' which I am very thankful for."
by stud84 on reddit
Introduction
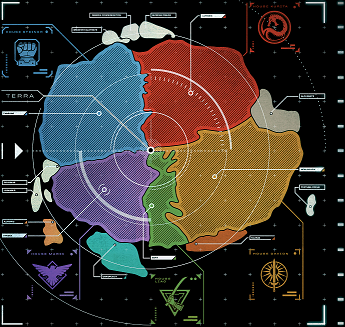
Inner Sphere before in timeline before Claninvasion 3.056
Canonicity from sarna.net
Computer games are explicitly excluded from the list of products that contribute straight Canon to the BattleTech universe while at the same time it was stated that the IP owners are "not in total denial about these sources either"; it has also been stated that fluff from certain official, licensed products (namely certain computer games including those produced by Microsoft) can be assumed to be part of the shared universe as long as it is not directly contradicted, and makes sense. On this premise, MechCommander is considered to be an apocryphal product.

Inner Sphere circa 3056 - during Clan Invasion
Plot synopsis from sarna.net
Storyline
In 3059 Operation BULLDOG, Zulu company from the Federated Commonwealth's First Davion Guards RCT was largely responsible for taking back the planet Port Arthur from Clan Smoke Jaguar.
The First Battalion of the First Davion Guards eliminated the Jaguar satellite network and cleared enemy ground forces from its intended landing site, but lost the DropShip York, which was carrying X-Ray Company, to the Smoke Jaguars' space defense system.
Yankee and Zulu companies launched Operation BEACHHEAD, which was aimed at destroying key Clan targets in the vicinity of the landing zone to establish a secure foothold on Port Arthur. Elements of Zulu Company liberated Work Camps Alpha and Beta, rescued captured pilots from a prison barn, escorted a Raven to safety, and defended a resistance cell's base of operations. The majority of the opposition encountered during BEACHHEAD consisted of second line bondsman forces equipped with BattleMechs and vehicles of Inner Sphere technology.
Following the success of Operation BEACHHEAD, Yankee and Zulu companies launched Operation SKYHOOK, in which they attempted to cut Jaguar supply and communication lines, with targets identified by local resistance cells. Zulu Company rescued a Kurita DEST operative from behind enemy lines, destroyed power generators along the Ai-Ki River, destroyed a supply convoy at Bakerville, disabled the planetary Hyperpulse Generator, destroyed a supply train, and captured a supply and logistics base at Serpent Bay. Yankee Company was overwhelmed and destroyed by elite Clan forces during the latter stages of SKYHOOK.
Incorporating survivors from Yankee, Zulu Company undertook Operation VANGUARD, with the goal of liberating the city of Affendale. Zulu escorted a medical convoy to Field Hospital Delta, captured a supply convoy in the Kenuk River region, liberated prisoners from a re-education camp in the Mayan Canyons, defended a bondsman garrison base on the outskirts of Affendale, and liberated Affendale by destroying the Clan Smoke Jaguar administration building in the foothills of Mount Samurai.
With Affendale liberated, the Davion Guards launched Operation LINCHPIN, aimed at destroying the surface-to-orbit guns that had destroyed X-Ray Company's DropShip. Zulu Company captured a Masakari and used it to destroy orbital guns, captured the Kylemartin supply depot, reactivated and defended a fortified Clan field base in the Cambridge region, captured and defended an industrial facility, intercepted and destroyed a flanking force of heavy Jaguar OmniMechs, and located and destroyed the Jaguars' mobile orbital guns.
With the Jaguar SDS crippled, the Davion Guards launched Operation CUTTHROAT, aimed at securing the main starport. Zulu Company rescued survivors of X-Ray Company under Captain Nairn, destroyed an elite Binary of Clan OmniMechs near Chresbute, captured and defended the Weisman Fuel Depot and Processing Station, positioned friendly artillery on the ridge of the Miasota Basin (at the end of the Lambert Valley) to support the starport assault, knocked out geothermal power stations in the Bellum area, and destroyed the orbital guns covering the approaches to the starbase.
Zulu Company was surprised by the arrival of Smoke Jaguar reinforcements at the starport, and prepared for a last stand against overwhelming odds. The elimination of the orbital guns, however, cleared the way for DCMS forces to land in force at the starport and shatter the final Jaguar counterattack, securing a Star League victory on Port Arthur.
Darkest Hours Plot
--- udenr ctscnoirun ---
Overview - Ultimate user campaign merge
All MechCommander Gold - Darkest Hours Original Campaign Merge Missions!
Operation 1
- Operation 1, Mission 1 - The beginning!
- Operation 1, Mission 2 - Original Merge
- Operation 1, Mission 3
- Operation 1, Mission 4
- Operation 1, Mission 5
- Operation 1, Mission 6
- Operation 1, Mission 7
- Operation 1, Mission 8
- Operation 1, Mission 9
- Operation 1, Mission 10
- Operation 1, Mission 11
- Operation 1, Mission 12
- Operation 1, Mission 13
- Operation 1, Mission 14
- Operation 1, Mission 15
- Operation 1, Mission 16
- Operation 1, Mission 17
- Operation 1, Mission 18
- Operation 1, Mission 19
- Operation 1, Mission 20
Operation 2
- Operation 2, Mission 1
- Operation 2, Mission 2
- Operation 2, Mission 3
- Operation 2, Mission 4
- Operation 2, Mission 5
- Operation 2, Mission 6
- Operation 2, Mission 7
- Operation 2, Mission 8
- Operation 2, Mission 9
- Operation 2, Mission 10
- Operation 2, Mission 11
- Operation 2, Mission 12
- Operation 2, Mission 13
- Operation 2, Mission 14
- Operation 2, Mission 15
- Operation 2, Mission 16
- Operation 2, Mission 17
- Operation 2, Mission 18
- Operation 2, Mission 19
Operation 3
- Operation 3, Mission 1
- Operation 3, Mission 2
- Operation 3, Mission 3
- Operation 3, Mission 4
- Operation 3, Mission 5
- Operation 3, Mission 6
- Operation 3, Mission 7
- Operation 3, Mission 8
- Operation 3, Mission 9
- Operation 3, Mission 10
- Operation 3, Mission 11
- Operation 3, Mission 12
- Operation 3, Mission 13
- Operation 3, Mission 14
- Operation 3, Mission 15
- Operation 3, Mission 16
Operation 4
- Operation 4, Mission 1
- Operation 4, Mission 2
- Operation 4, Mission 3
- Operation 4, Mission 4
- Operation 4, Mission 5
- Operation 4, Mission 6
- Operation 4, Mission 7
- Operation 4, Mission 8
- Operation 4, Mission 9
- Operation 4, Mission 10
- Operation 4, Mission 11
- Operation 4, Mission 12
- Operation 4, Mission 13
- Operation 4, Mission 14
- Operation 4, Mission 15
- Operation 4, Mission 16
- Operation 4, Mission 17
- Operation 4, Mission 18
Operation 5
- Operation 5, Mission 1
- Operation 5, Mission 2
- Operation 5, Mission 3
- Operation 5, Mission 4
- Operation 5, Mission 5
- Operation 5, Mission 6
- Operation 5, Mission 7
- Operation 5, Mission 8
- Operation 5, Mission 9
- Operation 5, Mission 10
- Operation 5, Mission 11
- Operation 5, Mission 12
- Operation 5, Mission 13
- Operation 5, Mission 14
- Operation 5, Mission 15
- Operation 5, Mission 16
89 Original campaign merge missions Total!
Darkest Hours Original Campaign
Operation 1 - Mission 01-20
Operation 1 - Mission 1
The very first beginning - remastered!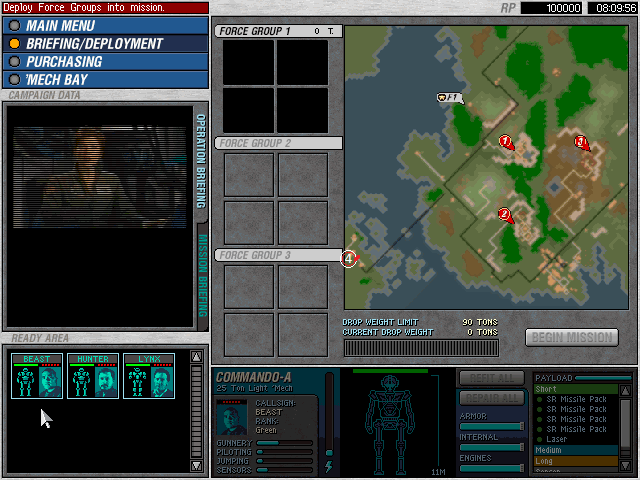 Original Mission 01/01
Let´s play! - Youtube
Mission Objectives:
+ Destroy the HQ and the Gas Tower at point Alpha (8.000 RP)
+ Destroy the three Garrison Buildings at point Beta (16.000 RP)
+ Destroy the HQ (20.000 RP)
* Capture Crate Group West (5.000 RP)
Maximum Tonnage: 85 tons
Maximum Units: 3
Artillery: 1 small
Logistic Phase: Deploy all 'Mechs you have, and assign Hunter, the MechWarrior with the highest Gunnery value to the FireStarter W, and "sell" Hawk, you won't need this "pilot". Assign Linx to the Commando W and Beast to the Commando A.
Combat Phase:You'll start above the three objective counters. Start to head left until you reach a road, and destroy the sport car just for fun (?_?...), and follow the road ahead toward the first objective; it will be guarded by two Armored Cars (a single PPC hit from afar will blow them). The first champ has a laser turret defending it, though you won't need to engage it. Coming from the North there is a ridge you can use to fire at the Tanker near the Gas Tower. This will blow nearly everything. If you need to finish off something, use the Firestarter's PPC to hit from a safe position. Then head North-West, toward the little peninsula. You'll find two J.Edgars guarding a container with 2 Lasers inside.
Now head toward the second objective; you'll need your Firestarter's PPC to disable the Laser Turret. Make Hunter fire from a safe distance. This should bring up the Commando A guarding the three garrison buildings. Concentrate fire on it, and don't bother to replay the mission if you don't salvage the 'Mech. After your first 'Mech to 'Mech battle, step into the champ and reduce all three buildings to rubble.
Now head toward the third and last objective. Destroy the turret near the area, the circle it to reveal an Uller W guarding the last objectives and some vehicles without crew. The Uller is a good piece of battlefield salvage, so try to hit its head or its leg. Engage it at short range with your Commandos first, then order your Firestarter to fire its PPC from afar. This should allow you to finish the Uller quickly. After this battle, destroy the small building near the vehicles.
RizZ-Enhancement: Optional you can challenge a Mad-Cat during first mission at west-end. In original Mission 1 there was no bridge to the Western Island. Now there are three salvage buildings to gather & a Mad-Cat to compete. In order to beat the Mad-Cat attack him before taking salvage buildings. You need to bring him to hunt one of your units over the bridge and kill him on the other side with explosive buildings. In direct battle Mad-Cat will outtake your lance.
Notice: You don´t need to fight the Mad-Cat. When you finished all regular objectives just take the salvage buildings on west end of the map before Mad-Cat starts to attack. Then mission will end when you took last salvage depot and Mad-Cat will be ignored.
Congratulations, Mission 1 completed!
Moment! I totally dislike how this first mission was modded!
No problem!
Solution (playing the original mission one instead)
st Scenario0 = "RizZ0100"
to
st Scenario0 = "mis0101"
then you will be able to start the campaign with the real original beginning.
You can download the updatet file if you desire - when you put it into the folder above overriding the DH one you will start with the original into that campaign. Attachment left.
New mission update - 22/12/2018
- repaired secondary objective (mission ends now immediatly after the other objectives are triggered)
- resalvaged the whole map as replacement
- added the one or other explosive building to make it easier challenging the Mad-Cat on secondary objective if desired
This way the mission can be played like the original - when player wants to explore the additional stuff - there has to be minimum one of the first three mission objectives incomplete when you want to get the fourth objective done. Download 000_MCG_Darkest_Hours_Mispatch.rar below. Just copy and paste the two FST files into your game directory (readme inside).
Operation 1 - Mission 2 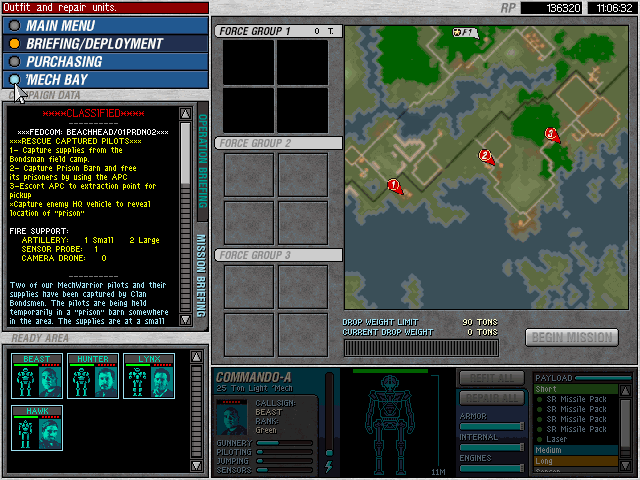 Original Mission 01/02
Mission Objectives:
+ Capture bondsmen prison-ban (6.000 RP)
+ Escort the APC to the extraction point (12.000 RP)
* Capture the Mobile HQ to reveal the prison position
Maximum Tonnage: 80 tons
Maximum Units: 4
Artillery: 1 Small, 2 Large
Logistic Phase: Just repair 'Mechs.
Combat Phase: The Dropship will position your three 'Mechs and one APC in a little forest in the northest part of the map. It is vital to guard the APC throughout the mission. Start by setting on fire a small number of trees. The APC carries a Laser, so use it to avoid ammo wastes. Now head left, and destroy all Armored Cars following you. Cross the brige, and destroy it. If you don't do it fast, other Armored Cars, J.Edgars and one Hollander A will be on you; as these units will follow you until you destroy them or they destroy you, heading left and destroying the bridge will keep enemies busy for the whole mission.
Now head south toward the last know position of the enemy's Mobile HQ. This vehicle will be guarded by a Striked and a J.Edgar; take out the Striker first, then maul the J.Edgar. During this battle, send one Commando or the APC to capture the Mobile HQ. There is also a container with 4 ACs in the area.
After you captured the vehicle, the area sorrounding the prison will be revealed. There are two Commandos, one W and the other A. Use your available artillery strikes to hit the Commandos. DO NOT place the artillery marks directly on the Commandos, or the artillery will destroy the prision. The large artillery attack should be enough to badly damage or even destroy both 'Mechs; after you hit the 'Mechs with artillery strikes, they'll begin to come after you (if still alive). Few well-placed shots, especially from the Firestarter's PPC, will destroy them. Now it is time to position the APC near the prison and escape to the extraction point. If you have enough armor left to fight the Hollander, three Armored Cars and one J.Edgar, position the APC near the trees sorrounding the point and move your 'Mechs toward the extreme East of the map. The Hollander might also be relatively near you, just pay attention to the contacts your MechWarriors report. Do not try to engage the Hollander at long and medium ranges, the Gauss Rifle can destroy your light 'Mechs with few shots; instead keep your 'Mechs close with the 'Mech, and ignore vehicles until you ahve destroyed it. Now finish off the vehicles, and coast along the small lake to find a warehouse with two Clan Streak SRM Racks. Now return to the extraction mark and be ready for the third mission.
Operation 1 - Mission 3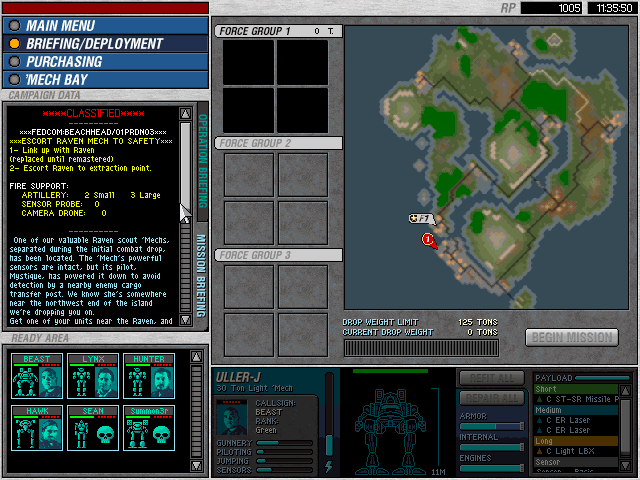 Original Mission 01/03
Mission Objectives:
+ Find the Raven (9.000 RP)
+ Escort the Raven to the extraction mark (9.000 RP)
Maximum Tonnage: 115 tons
Maximum Units: 4
Artillery: 2 Small, 3 Large
Logistic Phase: You should be able to buy a new Firestarter W and Siren, a good MechWarrior, will be available. Use her on the Commando A, and move Beast on the Commando W and Linx to the new Firestarter. Useless to say that you must repair all damages suffered by your 'Mechs. Deploy the two Firestarters and the two Commandos.
Combat Phase: You start in the west. Quickly capture the container (2 LRM Racks), the move your 'Mechs toward the forest to the North. Do not try to cross the bridge or get near it, several air strikes will reduce it to rubbles. Not enough a Saracen will try to fire at you with its long-range guns, so be quick to move your 'Mechs.
Begin to follow the road until you see some fuel tanks. Move all but one 'Mechs away from them, and keep this 'Mech at a safe distance from them, though it should be able to fire at the tanks. Two vehicles are patrolling the area, and the quickest way to destroy them is to hit on tank; the hockwave will destroy all other tanks and everything near them. Now move right. and climb the hill. Being at the top of the hill will reveal a small champ with two Commandos (W version) guarding two containers, and one Saracen patrolling the area. Use your two small artillery strikes to attack directly the Commandos. Now move near the trees east to the hill; the Commandos (it is unlikely that the two strikes will kill the 'Mechs) will begin to move toward you, like the Saracen mentioned before. Finish them, and move to capture the two containers (1 Large Pulse Laser, 1 Streak SRM Rack).
Now it is time to head to west, and locate the Raven. Your friend is shutdown, and you do not have access to Beagle Probes for now, so you must visually localize it, and approach it to start it up. The Raven you'll get (and will keep throughout the game) is a W variant, and is piloted my Mistyque, a good MechWarrior (not excellent, but can be useful on light and medium 'Mechs). Now you have to take her and the 'Mech to the extraction point. As the bridge was destroyed at the beginning of the mission, you must complete your clock-wise turn on the island. Before doing so, head west. You should have noticed vehicles patrolling the western part of the island, and in fact their are guarding some containers. If are good enough at calculating artillery's lag, use one large strike to destroy the Striker and the J.Edgar patrolling the area together, but be ready to engage other vehicles.
After this little detourn, return to head right, until you reach a paved road. Position your 'Mechs near the small island, and send one 'Mech (whatever...the Raven is the best, though this is going to be risky) where the road does a 90? turn; while you are doing so, to Commandos-J will begin to move toward your reinforced lance, but they will stop just before the road. The scouting 'Mech should be able to have a clear line of sight to the Commandos, or just have uncovered the map to place an artillery strike (a big one) very near to the two enemies. This attack will put the 'Mechs out of commission, though they won't be salvageable...continue to move right until your Raven picks up two unknow signals. Begin to move along the lake/sea's coast, until you find a small champ with 4 AC turrets and the relative Control Tower. Use one of your Commandos to capture the Twoer, then the small container (1 SRM Rack). Position all of your 'Mechs, except one within the champ's perimeter, and move the remaining one tworad the tow previous signals and when they begin to move, order your 'Mech to take position with the others. Thw two signals are 2 Firestarters-A, and the AC turrets will help to bring 'hem down. Have you did so, move on of your 'Mechs where the Firestarters were, and capture the large resuppling base (3 Heavy Flamers, 1 Pulse Laser, 2 LRM Racks, 1 Pulse Laser and 1 LRM Rack).
Now move all of your forces toward the lower left edge of the map, on the small hill; at the very edge of the map there is a small island connected with a bridge to the main area, sorrounded by fuel tanks. On this small islans there is a Mad Cat A, and your five 'Mechs won't be able to face it, even if you use the previously captured AC Turrets. To destroy it, place one Firestarter within effective PPC range near the first fuel tank, and use one other 'Mech to attract the Mad Cat away from its position, and let the Firestarter use its PPC on the fuel tank: the resulting explosion will destroy all other tanks, the Mad Cat and the bridge. It is also possible to simply issue an artillery strike on the bridge or directly firing on the fuel tank, but you won't get the kill mark for this Clan OmniMech.
Now it's time to destroy the Saracen patrolling the extraction zone, capture a container with one PPC inside and escape from this island by walking on the extraction mark.
Operation 1 - Mission 4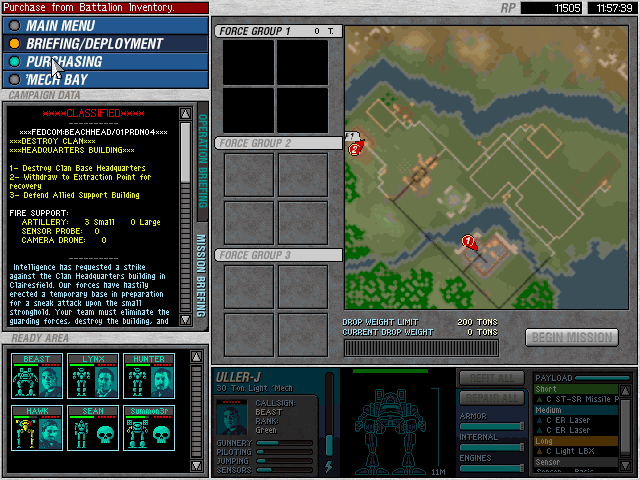 Original Mission 01/04
Mission Objectives:
+ Destroy Clan HQ (9.000 RP)
+ Retreat to extraction marker (12.000 RP)
* Defend allied supply base (7.000 RP)
Maximum Tonnage: 200 tons
Maximum Units: 6 (4/2)
Artillery: 3 Small
Logistic Phase: Repair your 'Mechs, and make all your wounded pilots to rest and buy Countess. From this mission, examining the map before entering combat is vital. You start in the upper-left edge of the map, and your objective is on the lower edge, near the horizontal center of the map; the HQ is located on a small island connected by two bridge to the land; the main bridge, in the south, heads directly to the base main gates, while the second, from the east, to a small plain near the south wall of the base. Between these two bridges there is a small hill. Other terrain features aren't important for the mission.
Combat Phase: You begin in the supply base you can defend. Though this is an optional objective, the RPs of this objective will be useful, and you won't have too much to do. If you deployed the Raven, its pilot will spot 5 contacts, 2 at the right an 3 directly in front of you. Move to intercept the two contacts, they are going after the base. As these contacts are Saracens, close quickly with them and hammere them away with short range weapons.
Now it's time to destroy the three contacts at the south; they are 2 SRM Carriers and one J.Edgar. Try to destroy them all now, or all retreating units will reinforce the enemy base defense force. Continue to follow the road directing south, and you'll find an Uller A; try to salvage it, then move toward East; there is also a small hill that allows you too see the northest part of the enemy base. From what you see, the Clan HQ is at its center, with fuel tanks and a power generator to its right. At its left there is a crew barrack, one Bulldog without crew and one Striker (active). Though it would be easy to destroy the HQ with the artillery strikes, use one of the strikes on the fuel tanks; this will destroy a portion of the perimetal wall and the power generator. Without this generator the laser turrets sorrounding the base won't be active. Then use the second strike on the crew barrack (the bulldog won't be activated) and the third on the Striker. Continue to move toward east until one of your MechWarriors spot 3 contacts, then head toward them. Destroy the 2 SRM Carriers and the single J.Edgar, and cross the nearby bridge. Once you have stepped over the small island, several (about 10) Armored Cars will swarm you. This attack will pose some problems, as the Cars won't stop to move to hit your backs; do not order to all 'Mechs to attack a single Car, but instead order a single 'Mech to engage a single Car; this will allow you to destroy the group faster. Now take care of the previously hidden Striker, and then of the remaining Uller A. Try to salvage it. Now the base is free of enemy presence, except the inactive Bulldog. If you want destroy it and capture the two containers (4 SRM Racks, 2 ACs, 2 Sensors-Basic); destroy the Clan HQ and return to your base.
Operation 1 - Mission 5
Original Mission 01/05
Mission Objectives:
+ Defend both farms (45.000 RP)
Maximum Tonnage: 240 tons
Maximum Units: 10 (4/4/2)
Artillery: 5 Small, 1 Large
Logistic Phase: I hope you salvaged at least one Uller in the previous missions. Repair your 'Mechs and buy Hitman and Scarab. Buy a Minelayer too.
You start in the upper-right corner of the map; to reach the first farm proceed in a straight line; for the seond, turn left at the first farm. Both farms are sorrounded by forests which limit movements and access points, except a wide area on the second farm's north side. On the upper edge of the map there is a small champ with some containers defended by vehicles, but do not try to capture it if this is the first time you play the mission. Not so far away, on the west there is a railroad.
Combat Phase: Start by mining the road where you start, and move all of your 'Mechs except two to the second farm. After the minelayer finished in mining the road, move it to the small passage between the two forests, and mine the sorrounding are, passage included. If you aren't fast enough to mine this are 4 Saracens will begin to fire at your minelayer. If this happends, move the minelayer to the second farm, and let the Saracens walk on the mines. If something survives, finihs it off with the two 'Mechs guarding the first farm, and them move all 'Mechs in the second farm's area, which is under attack by four Condors.
Near the second farm, on the east, there is a small passage, which will be used by enemy vehicles, usually 2 LRM Carriers; send you minelayer to mine the area, and then move it to the big cultivated area, and begin to mine it, especially where the trees form a natural passage between the farms and the other parts of the map. While you are doing so, to SRM Carriers will attack the first farm, but if you mined the areas I told you, they won't be a trouble. Returing to your minelayer, when the LRM Carriers begin to close and/or when you spot an Hunchback A and two SRM Carriers, move it to the second farm and mine the are sorrounding the farm. Your enemies will begin to step on the mines: the LRM/SRM Carriers will be destroyed at the first contact, while the Hunchback will need some mines to go down; hopefully, it will be badly damage when it will reach the farm; to engage it, fire your long range weapons as many times as you can, and if it closes on your 'Mechs, keep them moving.
Now it's time to repel an attack by two couples of light 'Mechs, nominally a Cougar A with an Uller A and an Uller W and a Firestarter A. The attack directions and timings of these couples differ slightly, though the will attack from the railroad, and will come after your 'Mechs and the second farm. Note that these 'Mechs will try to "engage" the farms instead of your 'Mechs, so you'll have to jump from target to target. After these four 'Mechs have been destroyed, the mission is finished.
Operation 1 - Mission 6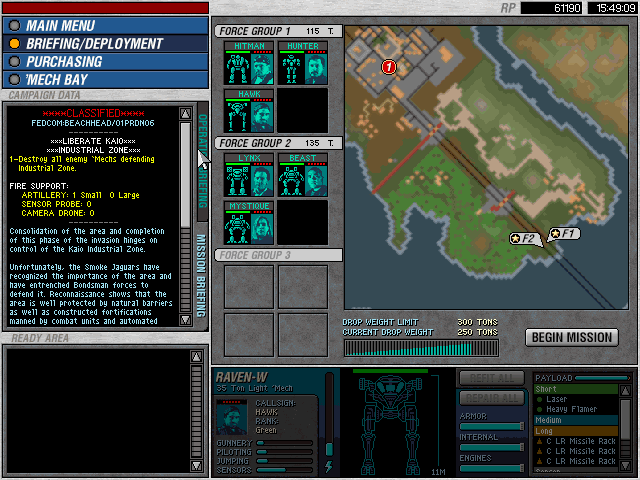
Original Mission 01/06
Mission Objectives:
+ Destroy all 'Mechs defending the industrial complex (10.000 RP)
Maximum Tonnage: 350 tons
Maximum Units: 8
Artillery: 1 Small
Logistic Phase: For this mission you'll need at least one medium 'Mech. If you salvaged the Hunchback in the previous mission, replace all damage equipment, and buy a new Centurion (maybe a W variant). Repair all 'Mechs and assign your best pilots to the medium ones. If you captured the Mad Cat during the third mission (or installed the Mad Cat patch, whihc gives you a Mad Cat A for free...), deploy it immediately, the mission contains 7 'Mech and more than 10 vehicles, and they are not Armored Cars. This mission is staged on a small peninsula: you start in the south and your obejctive is in the north. There are two roads which goes directly to the industrial complex, and there is a concrete wall acting a guard point before the real wall sorrounding the complex. On the right you have some hills, but if you haven't jump-capable 'mechs you won't be able to move on them. On the right there is a forest. Intelligence reports that a Clan captain piloting a Catapult is in the area.
Combat Phase: It is foolish to force the two blockades: turrets and vehicles will make your life very difficult, and you need all of your weapons and armor for the industrial complex. Begin to enter the forest, and follow the ideal road that the trees create. You may need to set on fire some trees. Be careful, this way is the most secure, but it has few pop-up turrets. When you spot a clearing, you will notice rectangels with the same colors of the background, though their perimeter is clearly visible. Have your 'Meches fire when these turrets are still hidden; theorically you need only to destroy three of them.
When you leave the forest, you'll be on the west-most part of the wall closing the industrial complex. All the perimeter is guarded by AC Turrets, but you won't need to destroy them, there is the possibility to capture them and use for your mission, but you must first penetrate into the perimeter. Destroy the two nearest turrets with long and medium-range fire, the destroy two section of the wall, and send the fastest 'Mech you have to capture the Control Tower. This will bring on your side the remaining turrets, but not all. Now six vehicles, two SRM Carriers, and four J.Edgars will begin to attack you, but won't be a real problem. After this skirmish enter the perimeter and move along the wall to reach the main gates (on the right). Quickly dispatch the Rommel tank and the Striker. The Rommel has an AC as short-range weapon, so pick it out with long-range weapons, then close with the Striker and send it to its creator (Kali Yama Weaponries, Vehicle Dision...ah ah ah ah...ehm ?_?...).
Capture the Gate and Turret Control towers, and group your 'Mechs near the barracks, but not so close, try to keep a safe distance from the fuel tanks. Two Harraser will try to attack you, but the closed gates and the turrets will blown them, so turn your attention to the several contacts near the objective counter. These contacts are 6 Firestarters (5 W variants and a single A). Send the fastest 'Mech you have to lure these 'Mechs into a trap: once they are near the fule tanks, fire at them and destroy/damaged them with little effort. Finish the 'Mechs with concentrated fire.
Now it is time to destroy the last 'Mech, a Catapult A, patrolling a hill on the northest edge of the map, piloted by the Clan captain. Once again, send your fastest 'Mech near the contact, and let the Catapult fire one LRM volley; this will reveal the map sorrounding the firing position, eventually giving you a place where setting your only artillery strike. Place it near the two other vehicle contacts, this will destroy the Catapult's close-range escort. Now move all your 'Mechs to engage the Catapult; it is foolish to try to start a long-range fight with it, whatever 'Mechs you have. Move on the hill (the access ramp is located on the north side), and slug its armor with close-range weapons. If you have only light 'Mechs this battle will last for a while, but with a Centurion and other medium 'Mechs (who said Hunchback?) you'll get the upper hand faster. Congratulations, you have just finished operation Beachhead!
Operation 1 - Mission 7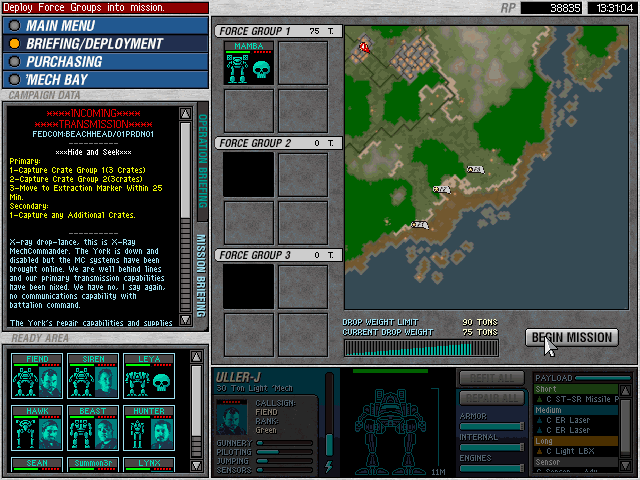
X-Ray Mission 01/01
"Didn't like that it was mandatory to need jump jets. I actually had to consult the walk through online to find this out, since I couldn't finish the mission. Maybe add a hint to this in the briefing so the player can have a push on what to do? Or make the island crates optional?"
Help! - I can´t find all crates!?!?
Here is an overview, you will need a jump mech to get all crates:

Help! - This mission keeps crashing (access violation)!
You find more information about this general MechCommander technical issue here:
Technical Issues of good old MechCommander
Waypoint bug (Access violation)
Operation 1 - Mission 8
X-Ray Mission 01/02
"Loved it. Defending the base missions are my favourite, and Nairn was really strong and kicked some ass, ha!"
Operation 1 - Mission 9
X-Ray Mission 01/03
Operation 1 - Mission 10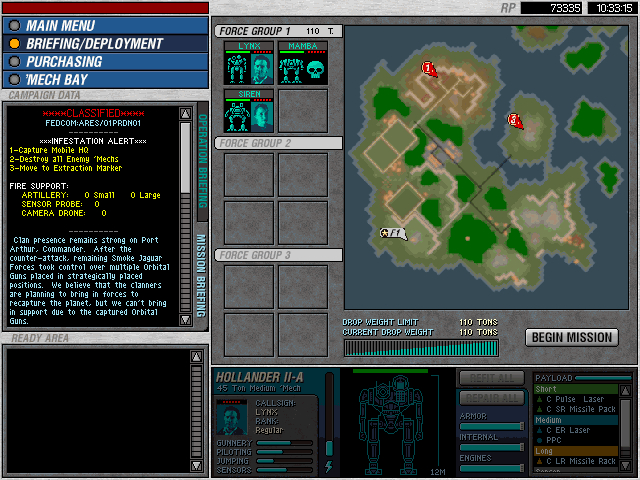
Xenocide Mission 01/01
Operation 1 - Mission 11
Xenocide Mission 01/02
Operation 1 - Mission 12
Xenocide Mission 01/03
Operation 1 - Mission 13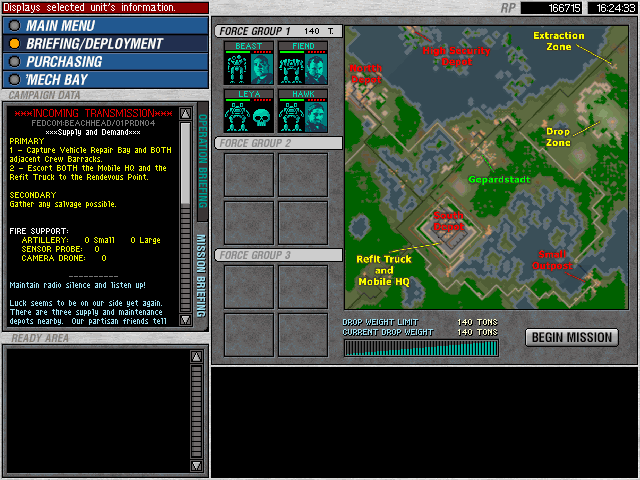
X-Ray Mission 01/04
Update entry
In this mission the salvage was bugged (overwritten with useless code) - i erased the obsolete lines, recreated the map data (with two more gauss cannons and a power generator) without the useless heavy turret control tower on the northern islands and added salvage to all depots. (+ some hidden bonus salvage)
This update is part of MCG Darkest Hours v4.1 patch
Operation 1 - Mission 14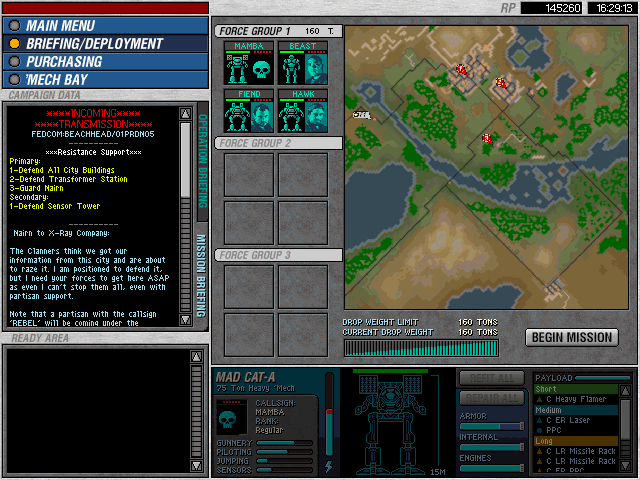
X-Ray Mission 01/05
Notice: Many people say they stuck on this mission and that there is no extraction marker. But there is an extraction marker exactly on the position that is shown by minimap as blinking mission objective. To end mission just move ALL your units to there. The makers of this mission forgot to add an optical sight able marker point but the extraction point is there, just invisible. It's enough to be just nearby it with ALL units including the refit truck you get in this mission.
Update entry
I have added an extraction marker and added salvage to this map. One building can't be used as salvage building - some kind of overlay problem i think. Maybe i will release another update one day filling even this little GAP - but for now with the file below this mission works 100% perfectly now - WITH VISIBLE extraction marker! (it is part of v4.1 update for Darkest Hours)
Operation 1 - Mission 15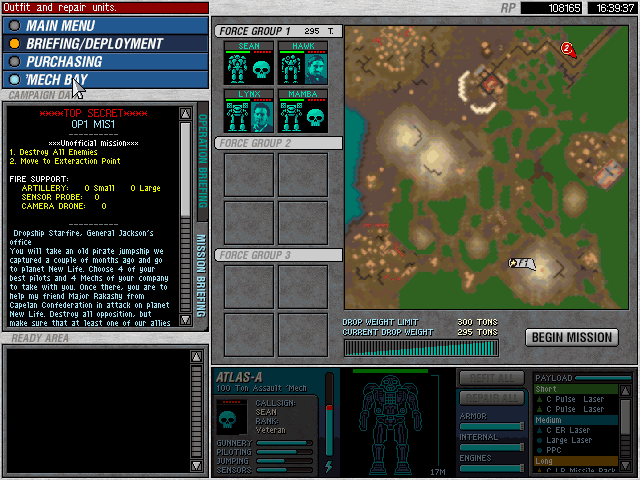
Exodus 01/01
" This one was so much fun, probably my second fav so far. You think you're done once you clear out that top left base, but then boom, all these 'Mechs power up and you're forced to stop them, haha. Epic and intense."
Operation 1 - Mission 16
Exodus 01/02
"A really tough one, but I enjoyed it. Had to manage team carefully."
Operation 1 - Mission 17
Xenocide 01/04
"Another really nasty one. I don't know how I did it, haha. Thanks to the Sniper and bottlenecking them into the entrance, I think!"
Operation 1 - Mission 18
Exodus 01/03
"The INFAMOUS Mission 18 - Had to consult a walkthrough as well. Just had my guys set up one to each marker before proceeding with my first lance. The triple Atlases were tough, but manageable. Easy after that. Would probably provide an in-game clue for this one as well, since it's easily possible to mess up the mission if you advance to the bridge too early."
by stud84
RizZ Notes: Many people say they can't simply get over that bridge without exploding. Here a solution;
"I play this mission with four very light mechs (commando) and four heavy mechs.
After cleaning south side and caring for not going to a close distance to the bridge i put my commandos on the four markers. They will remain there until the heavy mechs have past the bridge and activated another marker hidden in the north next to the atlas units. For that i use a heavy J mech crossing the woods eastside where a bypass leads to the marker. When the marker next to the Atlas units is reached you can immediatly order your commandos to the other side. Bridge arms are disarmed now.
The Atlas units can be led by the J mech - best option is leading them next to the pipeline and blow this up - the additional damage will weaken them and you can attack them with full force from all sides.
When you finished the mission you can go to the last extraction marker in the middle of the map. Theoretically you can avoid fighting the atlas units when you reach the marker with all lances before they arrive. Be careful that you don't accidantly leave mission when you wanna salvage them. So keep minimum one unit away from the center marker until you want the mission to end."
Operation 1 - Mission 19
X-Ray 01/06
"Hardest mission. Had to restart it about four times. I had to destroy bridges A2, SW1 in order to survive. The turrets were extremely helpful, and if you don't blow the top right bridge, the Vulture's star will come in and absolutely destroy you. Managed to wait out the time and he didn't even show up, so I survived. Very tough."
Operation 1 - Mission 20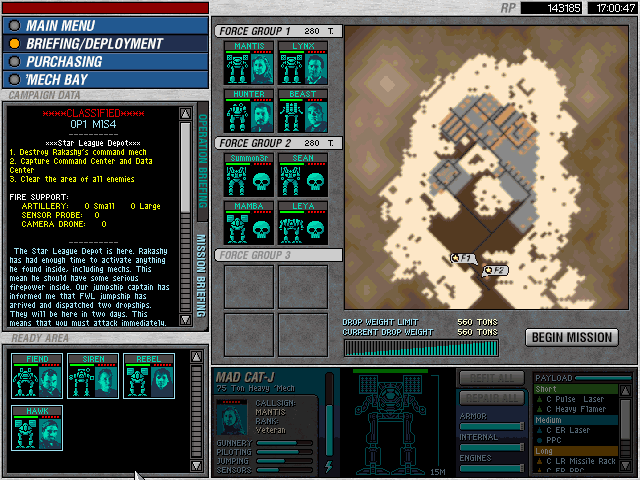
Exodus 01/04 - Op1 Final
"The best mission in OP1. A classic "Your best versus their best" mission in every sense. Loved the nice bit of salvage after the battle, too! Excited for OP2."
Thread under ungoing development. You would like to see your walkthrough here?
Contact RizZ and hand it in!
"Thank you for making this mod! I love it a lot and will update you when I get past OP2. If you have any questions, feel free to ask me and I'll do what I can to answer or elaborate."

(c) by RizZen & stud84 2017 - overhauling (2020)


If you encounter an issue on any mission inside the campaigns and you cant get it solved (Mission does not end because an objective is still unsolved and you cant solve it anymore - e.g. bulding is already destroyed)
No problem!
Solution - dismiss this mission for now and play a different mission you like?
I had trouble with the campaign merge mission OP2 - Mission 10 (Thats Xray 02/02)
Open your gamefolder "MCG Darkest Hours\data\missions\..." and open the file "mechcmdr1.fit" with notepad, then change the entry:
st Scenario29 = "6d9308f5_7d78_40b8_a129_30e632a05c9a" // X-Ray 02/02
to
st Scenario29 = "a072c582_1579_11d5_834c_be80434fd920"
then you will be able to start the campaign with a different mission you already played but in the end you can go on with the missions from the original merge afterwards!
This comment is currently awaiting admin approval, join now to view.