Greetings, ninjas!
Something really cool about game development is the creation process. We are not professionals, but enthusiasts looking to learn everything for the project, with the internet being our greatest teacher. There are many people willing to teach, I am grateful to them all. Thinking about it I thought it would be interesting to show some production processes eventually, bringing some steps we take to create something. If you have questions or want some tips and guidelines, feel free to comment or send an email to contatogalope@hotmail.com and I'll answer as soon as I can! All work is being done in Photoshop CC.
I thought it best to start with the Cinematics .
Something special in Meawja is the presence of cinematics, we tried to do in an interesting way but at the same time direct and clean. To work in them I studied the principles of Storyboarding including composition and storytelling as its core. If you are interested in learning, I studied from this link that has a very complete guide: Drawing and Composition for Visual Storytelling
Storyboard
I'll show here how I planned the cinematic that appears at the end of the training phase (phase 0), when the hero meets the Master. I initially scribbled the storyboard without drawing too much detail, my goal was to make it clear where each character was and what the camera would show. As Meawja is inspired by the NES games, there is a higher limit for the camera size, so the Storyboard already takes this into consideration. I also describe some ideas, but can always be modified (click the image to enlarge it).
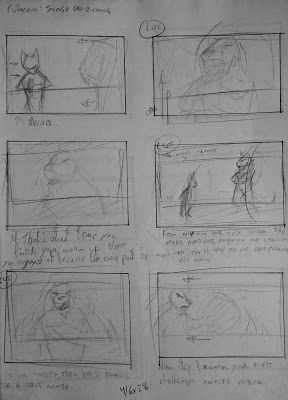
In the end there was 6 scenes. I had in mind I should use as few scenes as possible, only what is essential, since the finalization process is very time consuming. In this case, there are only 2 people working on the game but only me responsible with the art, then the cinematics need to be efficient and show just what it needs to. The speeches were initially thought during the storyboard and improved later.
Animatic
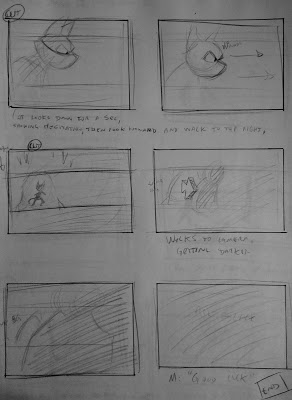
After setting the storyboard, my next step was to create a Animatic: a raw preview of the animation. This preview should be fast, using only simple designs to define the movements, the location of characters, expressions and scenery. I've set the animation to be as still as possible, and any movement should only have a maximum of 3 frames (1 being the initial pose (key), the second one the final (key) and 1 between them) or 2 depending on the action. Make pixel art is really laborious and a frame-by-frame animation would take weeks, so you have to keep in mind the time you have to complete the project. Moreover, as I said earlier, Meawja is inspired by the NES games and have fewer frames end up being more authentic. Because of this limitation, I used camera movements to make some most interesting scenes (something also used in the NES).

What was done in the Storyboard comes alive in Animatic. This way I can test the time, spacing, expressions / actions and already define where the lines will be. Each scene need to have a purpose and use the least possible illustrations. I had to keep in mind: who needs to appear on the scene, what and why. I saved some scenes by leaving the lion in front of the cave (the next goal of the hero) and simply getting him out of the way at the end. This could have been done in a more interesting way, but again I needed to be effective. In the final scene I've made more than 3 frames for the "animation" of the hero into the cave, which evades my previous rule, but in this case it was because only his silhouette would be shown - a much faster work. In Animatic I also do tests to see if the composition works and modify if necessary.
Final result
Defined the number of frames, the camera movements and actions, the next step was to finish up the artwork. I created a copy of the file, leaving the original intact if needed. Then, as first step, I made the scenario, leaving the composition in order to favor the characters. I did not detailed much because it was not necessarily. The only detailed scenario was the cave entrance, it is a key point of the animation and is where the attention of the viewer is. In this case I had a color palette to work, using the same one as used in the gameplay (and the NES limitation). Because of that I had a problem: one of the lion color was the same used in the cave entrance. I softened it by leaving the character outline a bit thicker.

Finally we come to the end result, something very close to the draft. Some modifications were made (in the storyboard the hero walked to the right instead of jumping to the cave), but the essence remained the same. Does not include the text lines, it would be very time consuming for a simple demonstration. I spent nearly 10 hours to finish this cinematic.
Well, this was my creation process. It may not be the best method, but it was what worked for me and I'm happy to share. If you have questions, just get in touch and will help as can =)
Onward, ninjas!


Very cool! Kudos. Keep those dev diaries coming. :)
Thank you, Sph!nx! I'll try to post regularly =)