Our first dose of spice last time leaned heavily on risk-reward potential in the form of dangerous cargo convoys, whereas our second dose here is more about introducing additional challenging situations and increasing overall difficulty--less reward, more risk (although as you'll see this new feature might also involve rewards for some builds).
Introducing the Heavy class, the first new common combat class ever added to Cogmind! New uniques and otherwise special bots from other factions have joined us over the years, but the ranks of standard 0b10 combat bots had remain unchanged in the time since the first release in 2015.

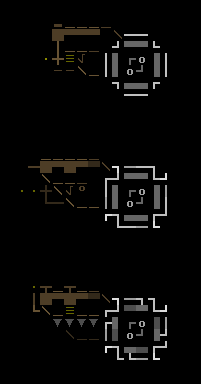
Heavy class tiles. The ASCII version is an uppercase 'H'.
The "Heavy" name was first used in Cogmind offshoot POLYBOT-7 back in 2018, where it represented a defender built around a single cannon and stronger than a typical Sentry, so kinda like a "1-tile Behemoth." At the time I imagined we might see something like that in Cogmind one day, and here we are, although as you'll see in this article there is a lot more to these guys than just cosplaying a smaller Behemoth!
The majority of threats in Cogmind's primary maps come in three forms: active patrols, security bots guarding over a small area, and garrisons which can dispatch reinforcements. Heavies combine all three of these by usually defending a single location, but sometimes moving to guard another location, and also capable of calling in additional squads like a garrison can. In other words Heavies are a sort of "mobile garrison" that tends to be stationary more often than not.
As such, these are obstacles you're more likely to want to avoid rather than confront, in many ways even more dangerous than garrisons since these can fight (!) and the latter can be destroyed or even hacked. Heavies can technically be hacked as well, although only by RIF builds--there is indeed a Relay Coupler [Heavy].
Of course, avoidance isn't always an option, or in some cases doing so could put you in even more tactical danger for whatever reason, so let's take a look at what confronting a Heavy really entails and how they live up to their "area denial" role.
Heavy Capabilities
There are multiple reasons to fear a Heavy, otherwise they wouldn't make very good area denial bots, now would they? :P
Loadout
Even ignoring their other abilities, simply based on their build alone Heavies are not to be underestimated in a head-on fight. They're heavily armored with a fairly well-covered chunky core and lots of supporting offensive utilities behind a huge cannon.
Compared to facing an entire squad of bots with more combined integrity and weaponry they're technically not that bad when encountered alone, and in that regard can be considered somewhat glass cannon-y, but few enemies carry such a devastating weapon as their heavy cannon. Specifically for Heavies I added a set of new dual-slot kinetic cannons capable of inflicting a concentrated blast of damage along with a non-insignificant chance to also apply the Blast critical effect, which is quite powerful in combination with such high base damage. Of course as with most parts players can also acquire these cannons and put them to good use, along with other potentially useful Heavy salvage including their treads, unique sensors, Transmission Jammer (the only way to reliably get one of these via salvage), Weapon Cycler, Kinecellerator (no other reliable salvage sources for this, either)...
Extra-heavy, extra-large heavy variants of existing cannons created for Heavies.
Mechanically speaking, the star of their loadout would be the other part added specifically for Heavies, namely the Active Sensor Suite which I detailed in an earlier article. This plays an important role in service of their area denial capabilities, since they can use it to accomplish two powerful AOE effects:
- 1. Call reinforcements: Unidentified signals detected within their sensor range are considered suspicious and they'll eventually take action against them by summoning a squad to check out the area. Up to two separate such squads can be active at once, so spending too much time near a Heavy without actually engaging it could be problematic in the long term.
- 2. Mask allies: All of the Heavy's combat allies within its sensor range are masked from detection by normal sensors, making it somewhat more dangerous to approach them, not knowing whether a regular patrol is passing through, or where summoned reinforcements may be lurking. Cogmind can see through the masking if using their own Active Sensor Suite, FarCom, or a relevant RIF ability, but those are special options many builds won't necessarily have access to or want to take advantage of and therefore have to consider the threat of masked enemies if relying on sensors (builds not using sensors anyway simply won't care about this aspect :P).
Destroying a Heavy here shows what their sensors were masking.
Here it's important to bring up several of the QoL mechanics that round out the Heavy experience.
First of all, as soon as Cogmind enters the Heavy's active sensor range, its exact position is revealed on the map. This is important for balance, since projecting their location lets players plan for how to approach or traverse the area, if they want to at all. Heavies are fun challenges, but would be a lot less so if they didn't reveal their location! This kind of mechanic also logically falls in line with the idea of "active scanning."
Heavies don't just pop into view, either, instead animating their full sensor range around them on the map as a prominent warning.
Heavy Active Sensor Suite AOE warning animation.
Holding the cursor over a known Heavy will also recall that range for reference
Another important piece of info clearly telegraphed to aid planning is the timing of relevant squad dispatches, which we'll get to further below.
Summoning
Tangling with a Heavy, or even passing nearby, is cause for concern because it's hard to be certain just how far such an encounter could escalate (unless you're really confident in your tactics). After all, they're going to call for help, which means more enemies, more danger, more alert (also more loot, for players into that type of salvage!).
There are actually two kinds of reinforcements available, the first being those sent out to search for the source of the sensor blips, and another which the Heavy calls to its side as soon as it comes under attack. Heavy behavior is rather unlike other combat bots: since it can rely on allies to go after potential targets while it holds its ground, it therefore doesn't need to chase them down on its own, but may also want additional protection capable of reacting to visible threats against its position. This mechanic makes it more dangerous to attack a Heavy without fully committing right away, since there will definitely be another squad arriving to fortify the area at some point. This "close defense squad" is composed of more typical front-line combat bots, different from the types sent after enemies (like Cogmind) detected on sensors. (Like most other calls for reinforcements, the Heavy can also be jammed with a Transmission Jammer, which again they happen to also use themselves so become a source for a second type of salvage that's useful against them.)
Note that none of the reinforcements summoned by a Heavy actually go after a specific target until they spot one, they're just sent in to reinforce the area, emphasizing the area denial aspect by increasing hostile bot density in the local area.
Regardless of the type of dispatch, all of them are announced, and in the case of reinforcements targeting sensor blips, they'll even specify the type of squad sent out because Heavies don't react in the same way to every signal!

This Heavy is calling in... Cutters?!
Over time Cogmind has been trending towards more dynamic responses to different play styles, especially the significant difference between fast and slow player builds. Thus a Heavy that detects an unknown high-speed bot on their sensors is more likely to send out faster bots to intercept it, or if the target is slow it's better to call in slower bots carrying heavier firepower.
The bot of choice to go after slow targets? Specialists.
Specialists
Specialists are an unusual case in Cogmind, relatively underused despite falling under the "common" (non-prototype) combat bot umbrella. They could sometimes be found in Garrisons or attached to assaults, but otherwise weren't a part of regular patrols/reinforcements/investigations, at least not until now :)
There were also only three variants and that wouldn't do for reinforcements meant to support Heavies across a large number of depths and situations--simply not enough variety and too predictable in terms of their capabilities. We're going to need more variants, so I more than doubled it to seven.
Specialists also got unique depth-spawning rules, made possible as a result of being the only bot with a different variant for every level on which they might appear, and desirable especially due to the unique nature of their loadouts. Unlike other bots that have consistent loadouts across all their variants (e.g. all kinetic weaponry and relevant supporting parts), each Specialist has a mostly unique loadout aside from the common theme of "legged combat bot," building around a different damage type or combat style. And unlike other bots which use the same predictable variant at each depth (the highest one rated at or below that level), Specialists are now selected randomly from among any variants at, directly above, or directly below, the current level. So there are up to three possibilities for a given squad. (A single squad of Specialists will all be the same type, however, to avoid mixing them and making them hard to visually distinguish during an engagement--Cogmind the game is mostly intended to have predictable enemy loadouts known purely by looking at a robot's ASCII on the map without a need to further examine details once you're familiar with them from previous runs.)
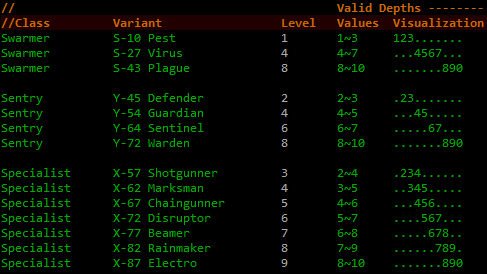
Sample chart showing how some class variants are normally distributed by depth, and how that compares to Specialists. Notice the overlap, more easily seen using the visualization. ("Level" 1 refers to -10/Materials, and goes up from there to -1/Access which is equivalent to level 10.)
As you can see above, Specialists may spawn slightly OOD (out-of-depth, giving access to better loot if you take them down!), or even slightly weaker, and this approach is perfect for the job here with regard to Heavy reinforcements since you can't be sure what the variant will be, and therefore not exactly sure whether or not it's a variant you're better equipped to deal with. This again makes hanging around near Heavies a bit riskier, or at least more interesting :)
These unique selection rules apply to all Specialists wherever they may appear, meaning they're also good for convoy defense variability, since those may be accompanied by Specialists, too, as well as Garrison interiors.
But Specialists certainly aren't going to cut it when it comes to chasing down fast movers--for that we now have Cutters!
Cutters
Wow, all those years without any new common 0b10 combat classes and now we have two at once! I've added a second class of bots specifically to play a supporting role for Heavies, aiming to give faster player builds more of a challenge with this one. For a little flying bot it sure took a while to put these guys together, involving a range of new parts and multiple new AI features.
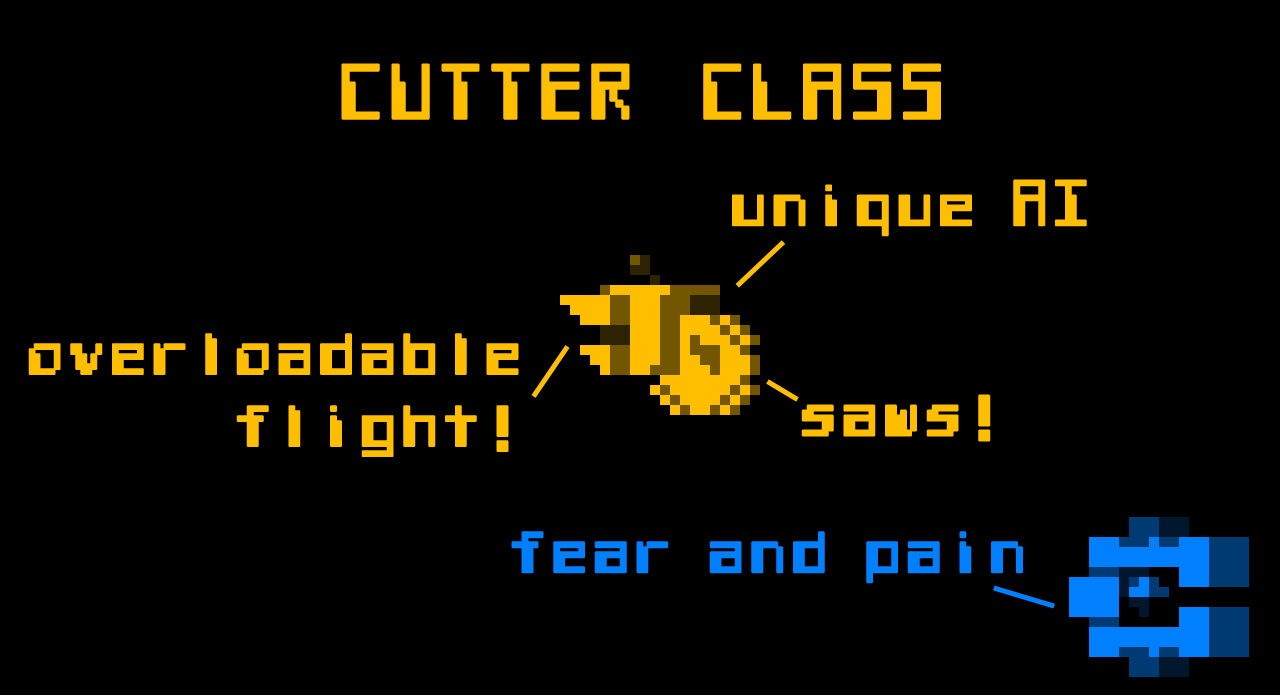
Cutter class tile. The ASCII version is a lowercase 'c'.
(Image originally put together for one of my YouTube videos on this topic :P)
Of course if you want to catch fast targets you probably want to be fast yourself, so the Cutter class is blazing fast, or at least can be. To accomplish this it's the first AI capable of selectively toggling overloadable flight units. Cutters normally move at their propulsion's base speed, but as soon as they have a known enemy they'll overload and chase at a speed that only the fastest builds would be able to outrun.
In designing robots there's always the important consideration of what players will do with the salvage, so in this case because I didn't want Cutters to be a reliable source of widely desirable overloadable flight propulsion, I had to add a new set of parts with their own drawbacks. Enter "Surge Thrusters," a rather different kind of flight propulsion which while overloadable and quite fast, also has higher integrity and coverage, lower mass support, and burns out faster than the usual overloadable airborne prop. Surge Thrusters can theoretically be useful in a pinch or as part of some specific strategies, but the average flight build will pass.
Another reason Cutters need speed is that they are primarily melee fighters that need to actually close the gap with targets before being blasted to bits. They're built around a saw, which sounds as scary as it is with its very high slashing critical effect. Maybe one is not too bad, but having several of these bots racing towards you can be pretty scary and cause for emergency measures.
A range of saw variants created for Cutters.
Cutters also have a single-fire ranged option they'll use on first sighting a target, one that also involved adding a new mechanic: AOE knockback.
Explosions in Cogmind don't normally move bots, since as neat as that would be it would also make using them (or having them used against you) even more chaotic, further interfering with the planning that goes into the tactical positioning behind success during Cogmind encounters. But this is a special case where we can make an exception since that's part of the intent...
The first application of this mechanic is the Cutter's short-range "Concussive RPG," which is hard to aim and doesn't inflict much damage, but knocks targets away from its origin to disorient them, and due to the poor targeting the projectile may likely even miss and could knock a target back closer to the Cutter's position!
Firing a basic Concussive RPG. More powerful variants have more significant knockback effects.
The RPG projectile itself (not the resulting blast) is also the first in Cogmind to do ranged impact damage, which is also quite scary for flight players since it's more likely to smash fragile systems, although actually scoring a direct hit on an evasive target with such an inaccurate weapon is not very likely.
Again with the salvage concern, we can't really have players repeatedly firing a reliably accessible AOE knockback weapon like this, hence part of the reason behind its design as a single-use disposable launcher, though this approach also happens to be more appropriate for Cutters themselves anyway since their priority is obviously to cut things :D
This part of their loadout required yet more new AI behavior tweaks to enable them to effectively use a disposable launcher and switch weapons when appropriate, in addition to taking special care to avoid firing while too close to a target, or with other Cutters nearby, lest it become easy to deal with an entire squad of these by letting them get in your face and tanking the first shot so they just kill themselves :P
The Cutter design was inspired by the Striker prototype, which also has a two-weapon design based around firing several shots of its Compact Linear Accelerator at long range before rapidly advancing to engage a target with its Plasma Lance, though internally the Striker was much easier to handle since there's no AOE effect to consider, and getting them to switch weapons was as easy as making sure they'd run out of matter to fire their accelerator after X shots. (Strikers are similarly an anti-fast-bot design, though much beefier and not quite that fast.)
Heavy Placement
Where and how frequently these new Heavies appear is a vital part of how effective they'll be at making exploration more interesting. Too few and they don't add any of that meaningful and challenging area denial effect, too many and that would be a problem since the idea is that there are usually supposed to be ways to circumvent them if desired/necessary (though again this sometimes comes at the risk of being forced to do something else dangerous--hard to say!).
Heavy presence is not really a thing until the mid-game. Early-game maps are relatively small by comparison, so only a couple maps down there contain a single Heavy. There and even on into the mid-game you might even go a few floors without ever seeing one depending on how much you explore. More importantly, within a single map multiple Heavies will not be stationed near one another, since as one can imagine even just having their sensor ranges overlap could theoretically be an incredibly dangerous place where multiple reinforcement squads could converge more quickly than usual.
In terms of bot quotas, Heavies were not included as raw additions to the original inhabitants of each map. Instead they are replacing some of the Sentries originally stationed on a map, and similarly guard junctions or exits (but not individual rooms like Sentries might).
Heavies are usually placed in high-value junctions, potentially giving them a good vantage point for keeping watch over long corridors to make best use of their visual range and heavy cannon, or at least a position connected to multiple paths from where it makes sense to intercept hostile signals.
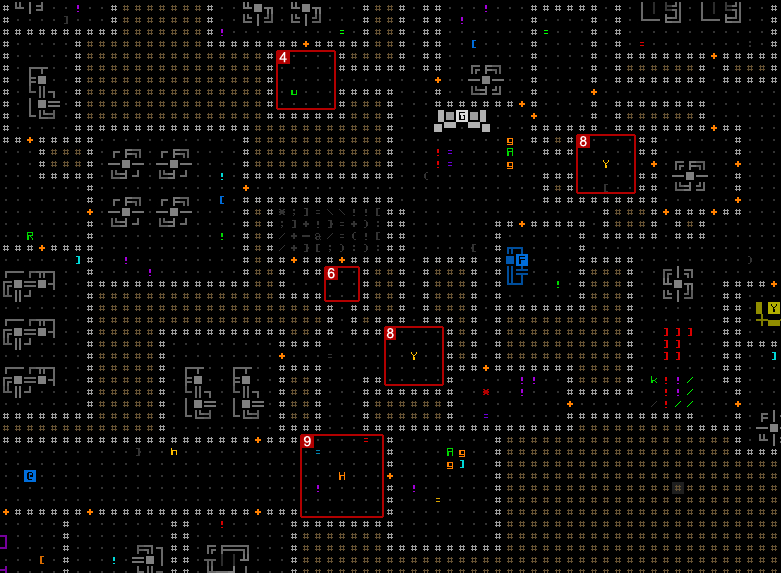
Local map junctions labeled with their relative value (see "Desire Paths" for a Robot World for more about junctions). Notice how the highest-rated junction in this are contains a Heavy ('H'), while two others are guarded by Sentries ('Y').
Heavies may also sit right on an exit--good luck circumventing that one if your goal is that particular exit! (just kidding, there are lots of strategies available, but naturally this complicates things)
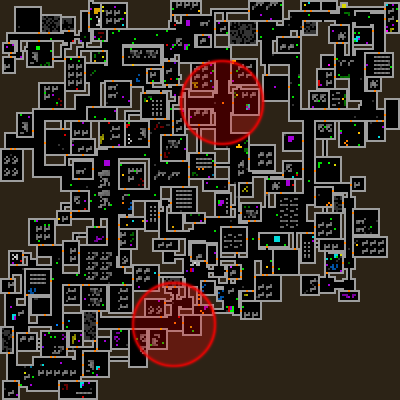
Sample default Heavy distribution on an earlier Factory map (-6), with circles representing their active sensor range coverage. Not too bad here, as there are clearly many other optional paths, and these two may never even be seen at all depending on Cogmind's route. Both of these are guarding junctions rather than exits.
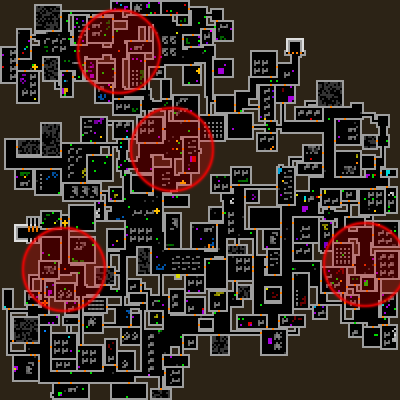
Another Heavy distribution map including sensor coverage, this one a -5/Factory layout with somewhat higher Heavy density. These also happen to be only guarding junctions.
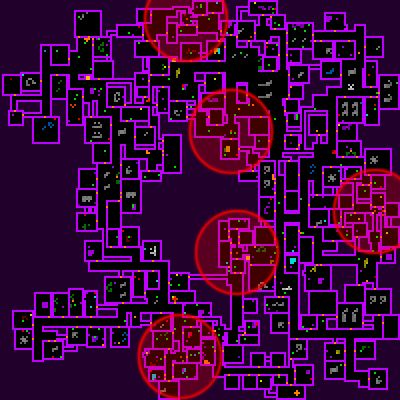
This Heavy distribution scenario on -3/Research could be a bit more problematic, not unlikely on Research maps since they tend to be more maze-like and have more bottlenecks. Being forced to pass near or directly engage a Heavy is more common in the late game. The Heavy stationed at the top there is guarding an exit to the next depth.
Notice how none of the Heavies are too close to one another, and there are ways around them but they stand as obstacles on some paths.
An exception to rule ensuring each Heavy has its own mutual exclusion zone is a new 0b10 event meant to further spice up the main complex: Security rotation!
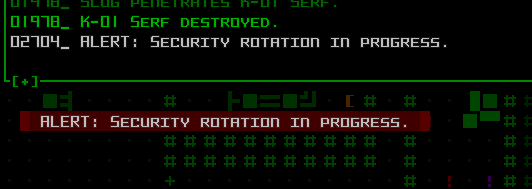
ALERT: Heavies on the move!
Every so often Complex 0b10 will call for a security rotation, in which all Heavies will cycle to one of the other Heavy locations (and coincidentally any Heavies found to have been destroyed since the last rotation may be replaced by a new one dispatched before long).
While this can create extra danger in the form of a powerful bot on the move, and even more so when more than one Heavy might be moving through the same area (!), it might also open up a window of opportunity to slip through an area previously overseen by a Heavy.
Of course it also helps that you can always see them while they're taking part in a rotation, due to their active sensors, thereby making planning a route past them, or evading their approach, that much more possible even without your own sensor data. From a design standpoint this is another part of their appeal, giving players a critical piece of information needed to help face a challenge, without solving the entire problem.
Aside from the above predetermined defense points, Heavies also star in Complex 0b10's new cargo convoy interception response mentioned in the previous post, where "Access Lockdown redirects Heavy bots posted at junctions to exits across the map, and if necessary calls in additional Heavies to defend any other unprotected exits."
Player Reception
In general players are loving the addition of a Heavy class, as its serving to spice up the main maps by making them even more dynamic and challenging on an intermediate level we didn't really see before. We've always had "low-level" stationary enemies and roaming patrols that require LOS on a target (or a corresponding alert) to go after it, and "meta-level" extermination and assault dispatches with accurate long-distance tracking, but nothing quite like Heavies, occupying a space in the middle of that spectrum in the form of an enemy that can use sensors to more effectively control an entire area.
I'm really happy with how they've turned out!

The effects in the gifs look really well done. Great job!
Thanks, been at it for years and gifs are always still the most effective way to demo something so I record a lot of them :P