Dev Update 30-May-2017
This time it took me a little longer to finish this next milestone – I had some crunchtime at my dayjob, so not much time to spend on working on Biosignature. However, I still somehow managed to keep the ball rolling and I am glad to say that the “dirty” part – getting cyclic level generation running – is finally done! YES!
Why cycles?
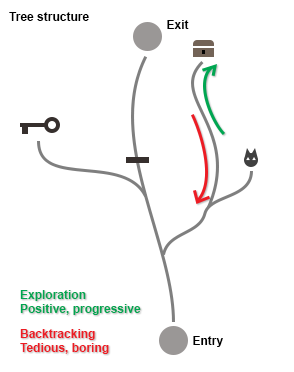
And why did I spend so much time reimplementing something I already had?! Well, because I hadn’t. My generator logically built a tree. This is a design choice I made to make sure that levels are always solvable and still give me the chance to put locks/keys without breaking the game. You can read more about this approach here.
A tree however is unfortunatly not really interesting for players to explore, and that is because whenever you follow a side branch, you will always have to walk back to the main branch. Backtracking can be tedious. And if anything, I want to avoid the player has a tedious, boring experience.
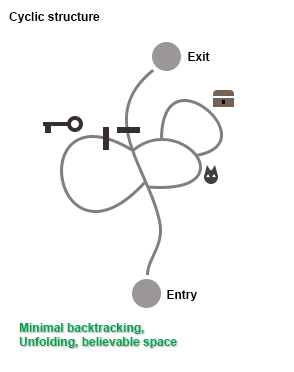
So, cycles! Or rather circles. They offer some interesting settings! Example: You come across a red locked door blocking the main path, and you need the red key to open this door, which you don’t have yet. So you go searching for the key in a side path. You find the key, and you also find another red locked door. You can now open this door rightaway, and you figure this is actually a shortcut back to the first locked door! So you never had to walk back. Actually you can push this to a point that you have a hub section with multiple cirlces around it. You will feel progression through exploration as the place slowly unfolds and more and more areas unlock.
Purpose and theme of cycles can vary a lot. Optional cycles may give you valuable loot but come with additional risk. There could be alternative paths that require a different playstyle or skillset, ie combat vs timing.
Multifloor!
When I started with the new level generator, I had the crazy idea to try span levels across multiple floors, even though this is a top down game.
Multifloor levels allow some interesting settings, ie whenever you allow the player to see down on the lower area. Again, I got inspired by one of the slides Joris Dormans presented when talking about cyclic level generation, which actually was a lovely D&D map made by Mike Schley (purchasable through this link):
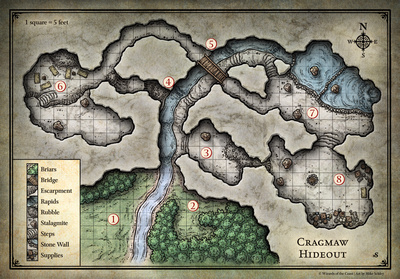
Notice the bridge in the middle of the map, now how cool is that!
Imagine you traverse over the bridge first, but you can’t go down yet. However you can see there is a treasure chest down there. Can’t wait to get there! Or imagine there is a terrifying monster down there. Now when you finally reach the river, you will be thrilled. Vice versa, imagine you made it through the river and cross the bridge afterwards. You will be reminded how you made your way through this area and feel achivement/progression. You can do many more things, like “platforming”, with the chance to fail and drop down to the lower floor.
Another aspect is you gain a third dimension for your algorithm to plan your level. You sure know about how well executed the world layout of dark souls is. Its connectivity is amazing, and I think this is only possible because it is spread across the y-Axis a lot. Ie, when my algorithm is trying to produce a shortcutloop from the last third of the dungeon back to the beginning, where it might have placed a comeback place like a shop or similar, it is much simpler when it can create a bridge or a tunnel.
So, how to do it?
There are for sure lots of ways to get the job done. My generation algorithm is now broken down in 5 steps:
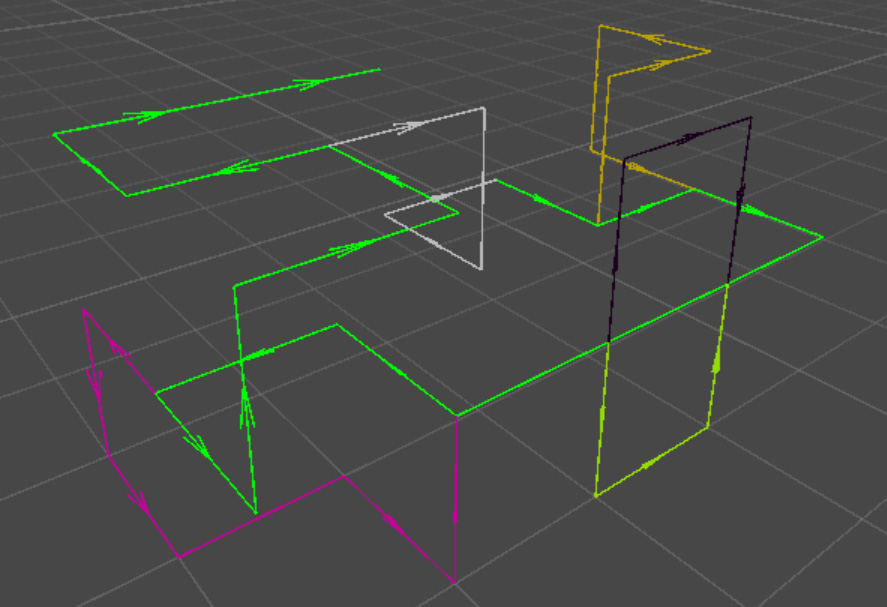
- Generation of a main path and circles on a simple 3D grid – one node occupies one unit, and multiple units connect to a circle. Every node can have a maximum of 6 connections (North, East, South, West, Up, Down). I implemented a lightweight 3D A* pathfinder, because you need circles to avoid each other and find a way back to their root path.

- Turn the grid into actual spaces or Areas. Initially, every area is the same size. However I want to add variety to minimize the feeling of the level being too gridlike. My requirement is that every node is a box, and that there are no gaps between areas. This is possible with a simple trick. I only change areas with an even xz-coordinate, like (0,0), (0,2), (2,2) etc. Then I only expand/shrink along either the x-axis or the z-axis. The neighbor areas bounds need to be changed accordingly.

- Add Area connections. This is simple for horizontal connections – just find a place for a door on the shared wall. But it is pretty tricky for vertical connections, because they need actual space within the areas for a staircase or an elevator! In the above image, the smaller boxes are staircases. So I tackle this by shifting affected areas bounds, so that there is enough space for vertical connections but I can still keep every area have a box shape. This is important for the next step.
- Fill the areas with a layout for rooms and hallways. This is the actual playground. You may add as many algorithms for this as you like, the only rule is that every area connection can be reached. I started by implementing a simple hallway algorithm and a circle hallway algorithm. Both can have siderooms which can additionally connect to each other. Algorithms may vary based on purpose and location (main floor, basement, attic, boss encounter, …)
- Generate the actual geometry for the room layouts. Floor, walls, doors, furniture… Interiour themes as well vary based on the areas purpose and location. I could thankfully reuse this part from the original algorithm I had.

See a complete generation cycle:
Lovely :-)
Addendum: Runtime Navmesh Generation!
This is possible since Unity 5.6, just in time! I tried it out and got it working within an hour. So while the AStar Pathfinding project was really helpful, this is what I was actually hoping for, because a) I went with the free version and it had just the grid based navigation system for me, and Navmeshes are just not as griddy, and b) Avoidance! I don’t need to care about agents clipping into each other because Unity does it for me now :-) Yes!

That’s it for today! I will now implement more actual gameplay and hopefully there will be a new playtestsession soon!
Stay safe and see you next time,
Philipp :-)