Intro
After a swift and unexpected offensive, the Axis forces have retaken Cyrenaica and put the port of Tobruk under siege. From April 1941 onwards the Axis forces were firmly entrenchend around the Tobruk fortress, leaving the besieged 9th Australian division in a very precarious position. The British C-in-C General Wavell was under pressure by Whitehall to initiate an offensive as soon as possible.
The British have devised an operation with a goal to recapture the strategically important Halfaya Pass and to clear the frontier area of the enemy forces. Secondary objective was to advance towards Tobruk, if the situation permitted that. It was named: Operation Brevity.
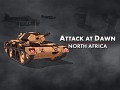
Axis Defences
The Libya-Egypt frontier was guarded by Kampfgruppe Herff, a mixture of German and Italian forces, infantry, tanks and AT guns spread out from Hafid Ridge to Halfaya Pass. The line started at the coast with positions at Sollum and Halfaya Pass, and went through the strongpoints of Bir Musaid, Fort Capuzzo and Bir Hafid (at Hafid Ridge). In the rear was the fortress Bardia, with Italian infantry battalion and German panzer battalion in reserve. Advanced recon troops were pushed forward, around Sidi Suleiman and Sidi Omar.
British plan
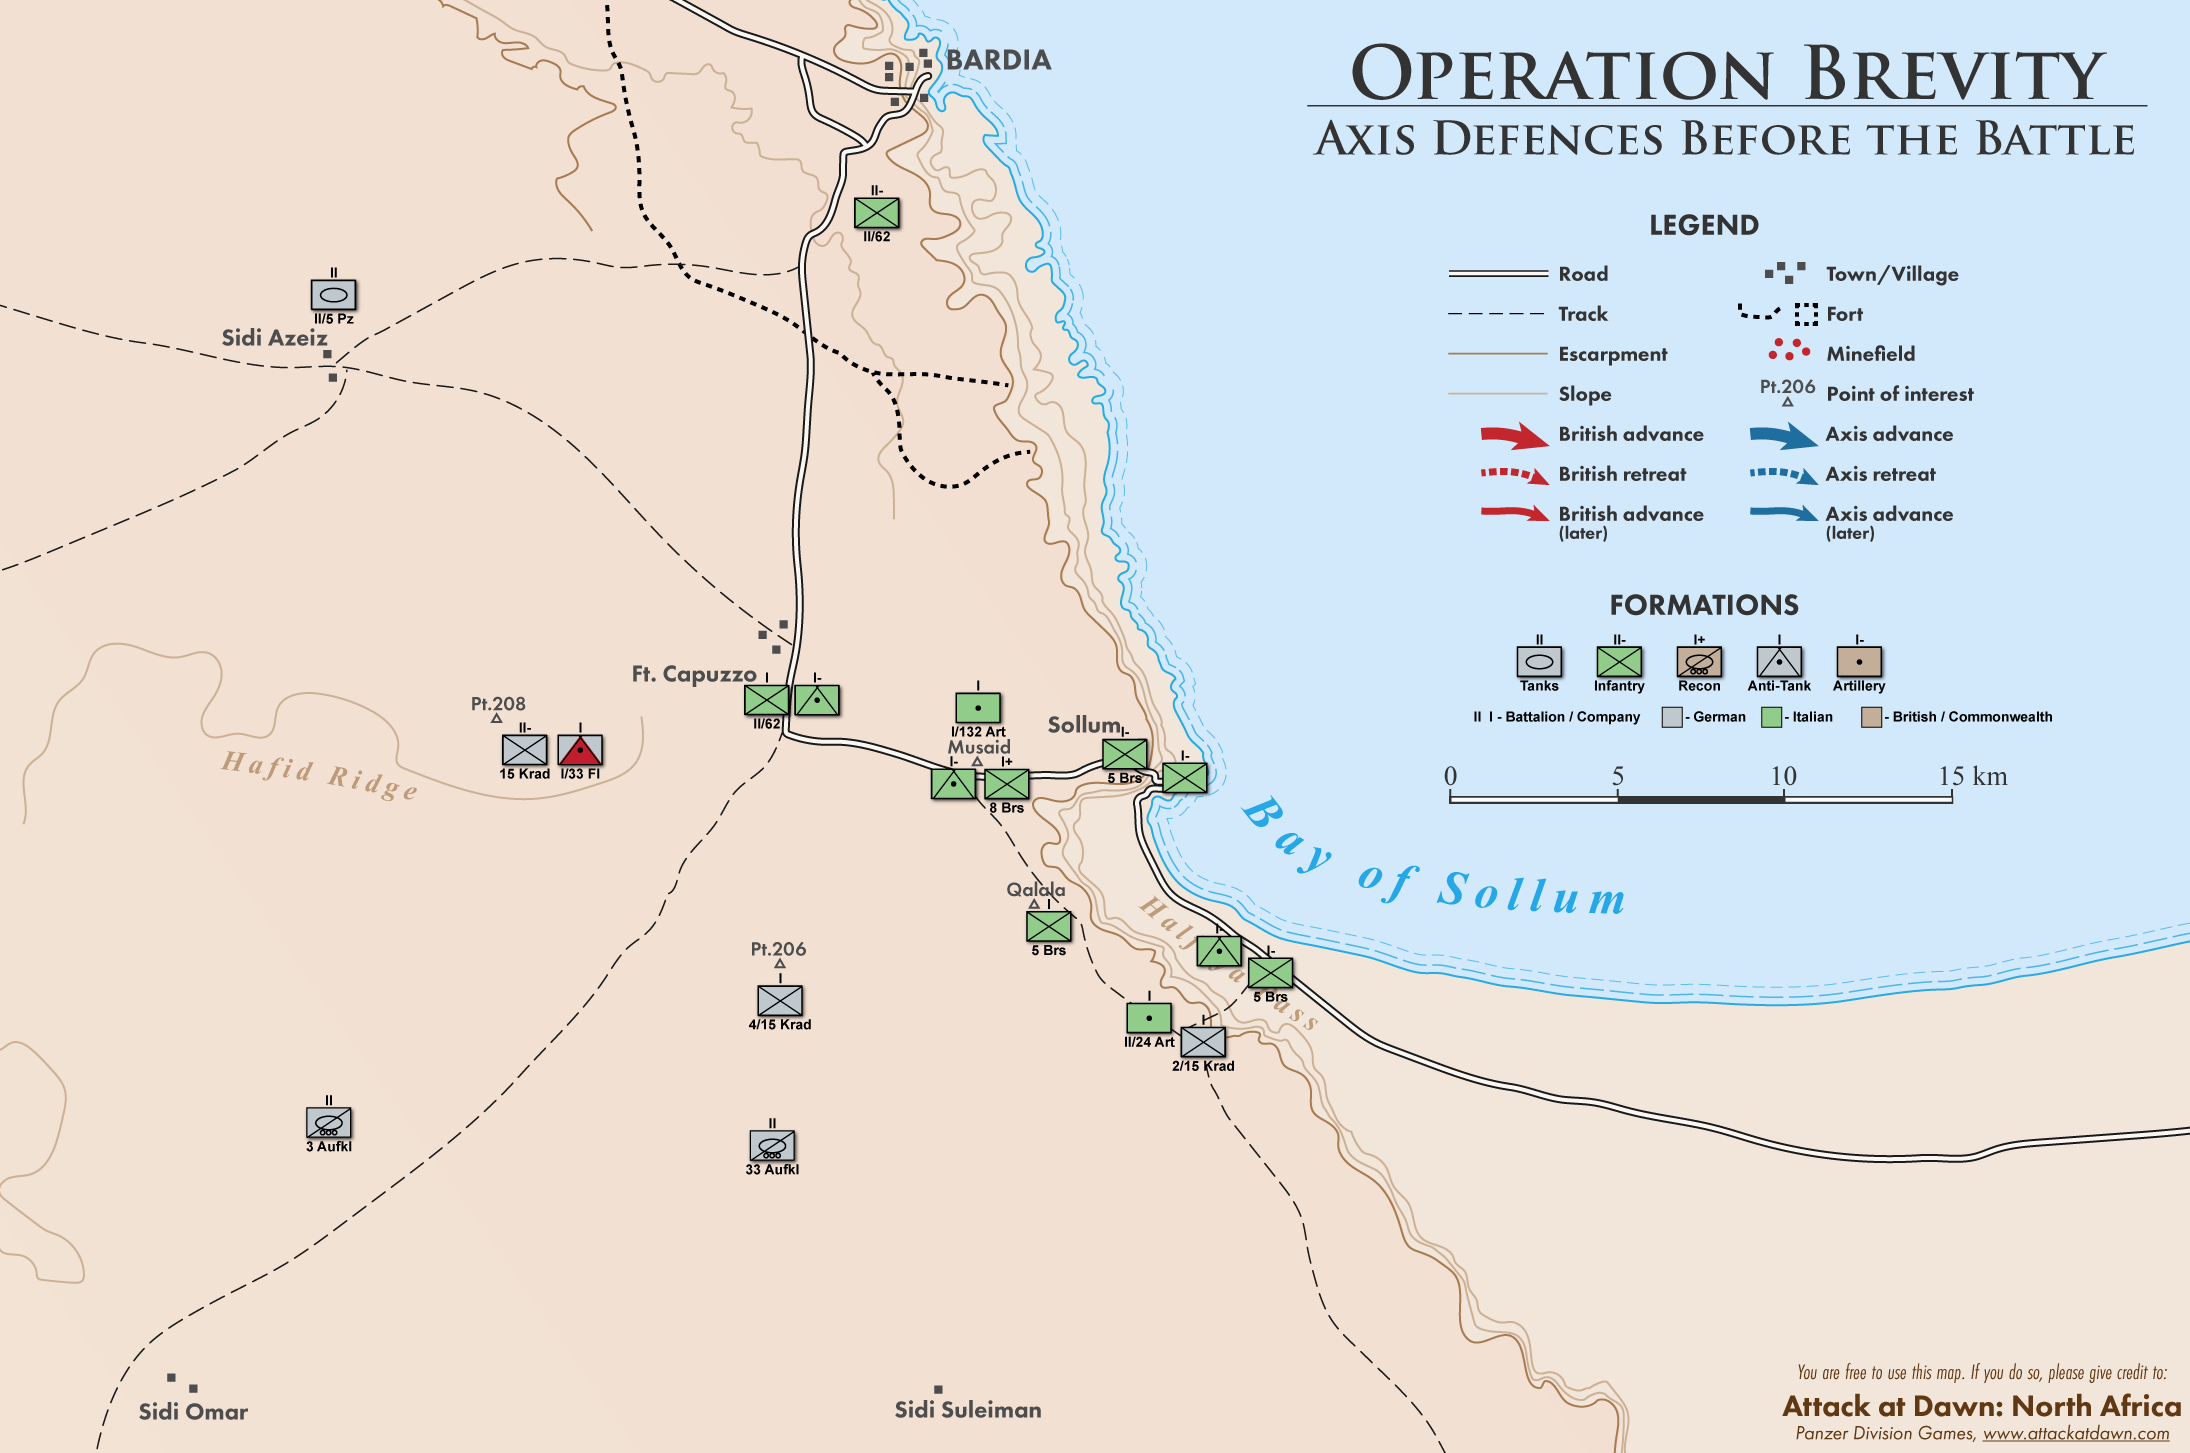
The British plan was to advance in 3 columns: 22nd Guards Brigade group, 7th Armoured Brigade group and Coast group. The commander of the mixed force was Brigadier William Gott.
22nd Guards Brigade group woud move centrally, above the escarpment. It had the task to clear top of Halfaya Pass, secure Fort Capuzzo and exploit northwards.
7th Armoured Brigade group was positioned on the left (desert) flank. It was ordered to advance northwards toward (towards Sidi Azeiz), protect the flank and destroy encountered enemy’s forces.
Coast Group was to advance over the coastal road and towards Sollum. It had the task of preventing enemy counterattack from coastal direction, and to capture lower Halfaya Pass and Sollum.
Day 1
The operation starts at 0550 on 15 May 1941, with Hurricanes of No. 274 Squadron maintaining a standing patrol over advancing columns.
22nd Guards (centre)
2nd Scots Guards and 4th Royal Tank Regiment run into heavy opposition from a company of Bersaglieri, supported by anti-tank guns. Italians put up a fight, but their 47 mm anti-tank guns cannot penetrate the armour of Matilda infantry tanks. The British finally take the position and push on northwards. By 1015 they capture Bir Wair and Musaid.
Axis Command
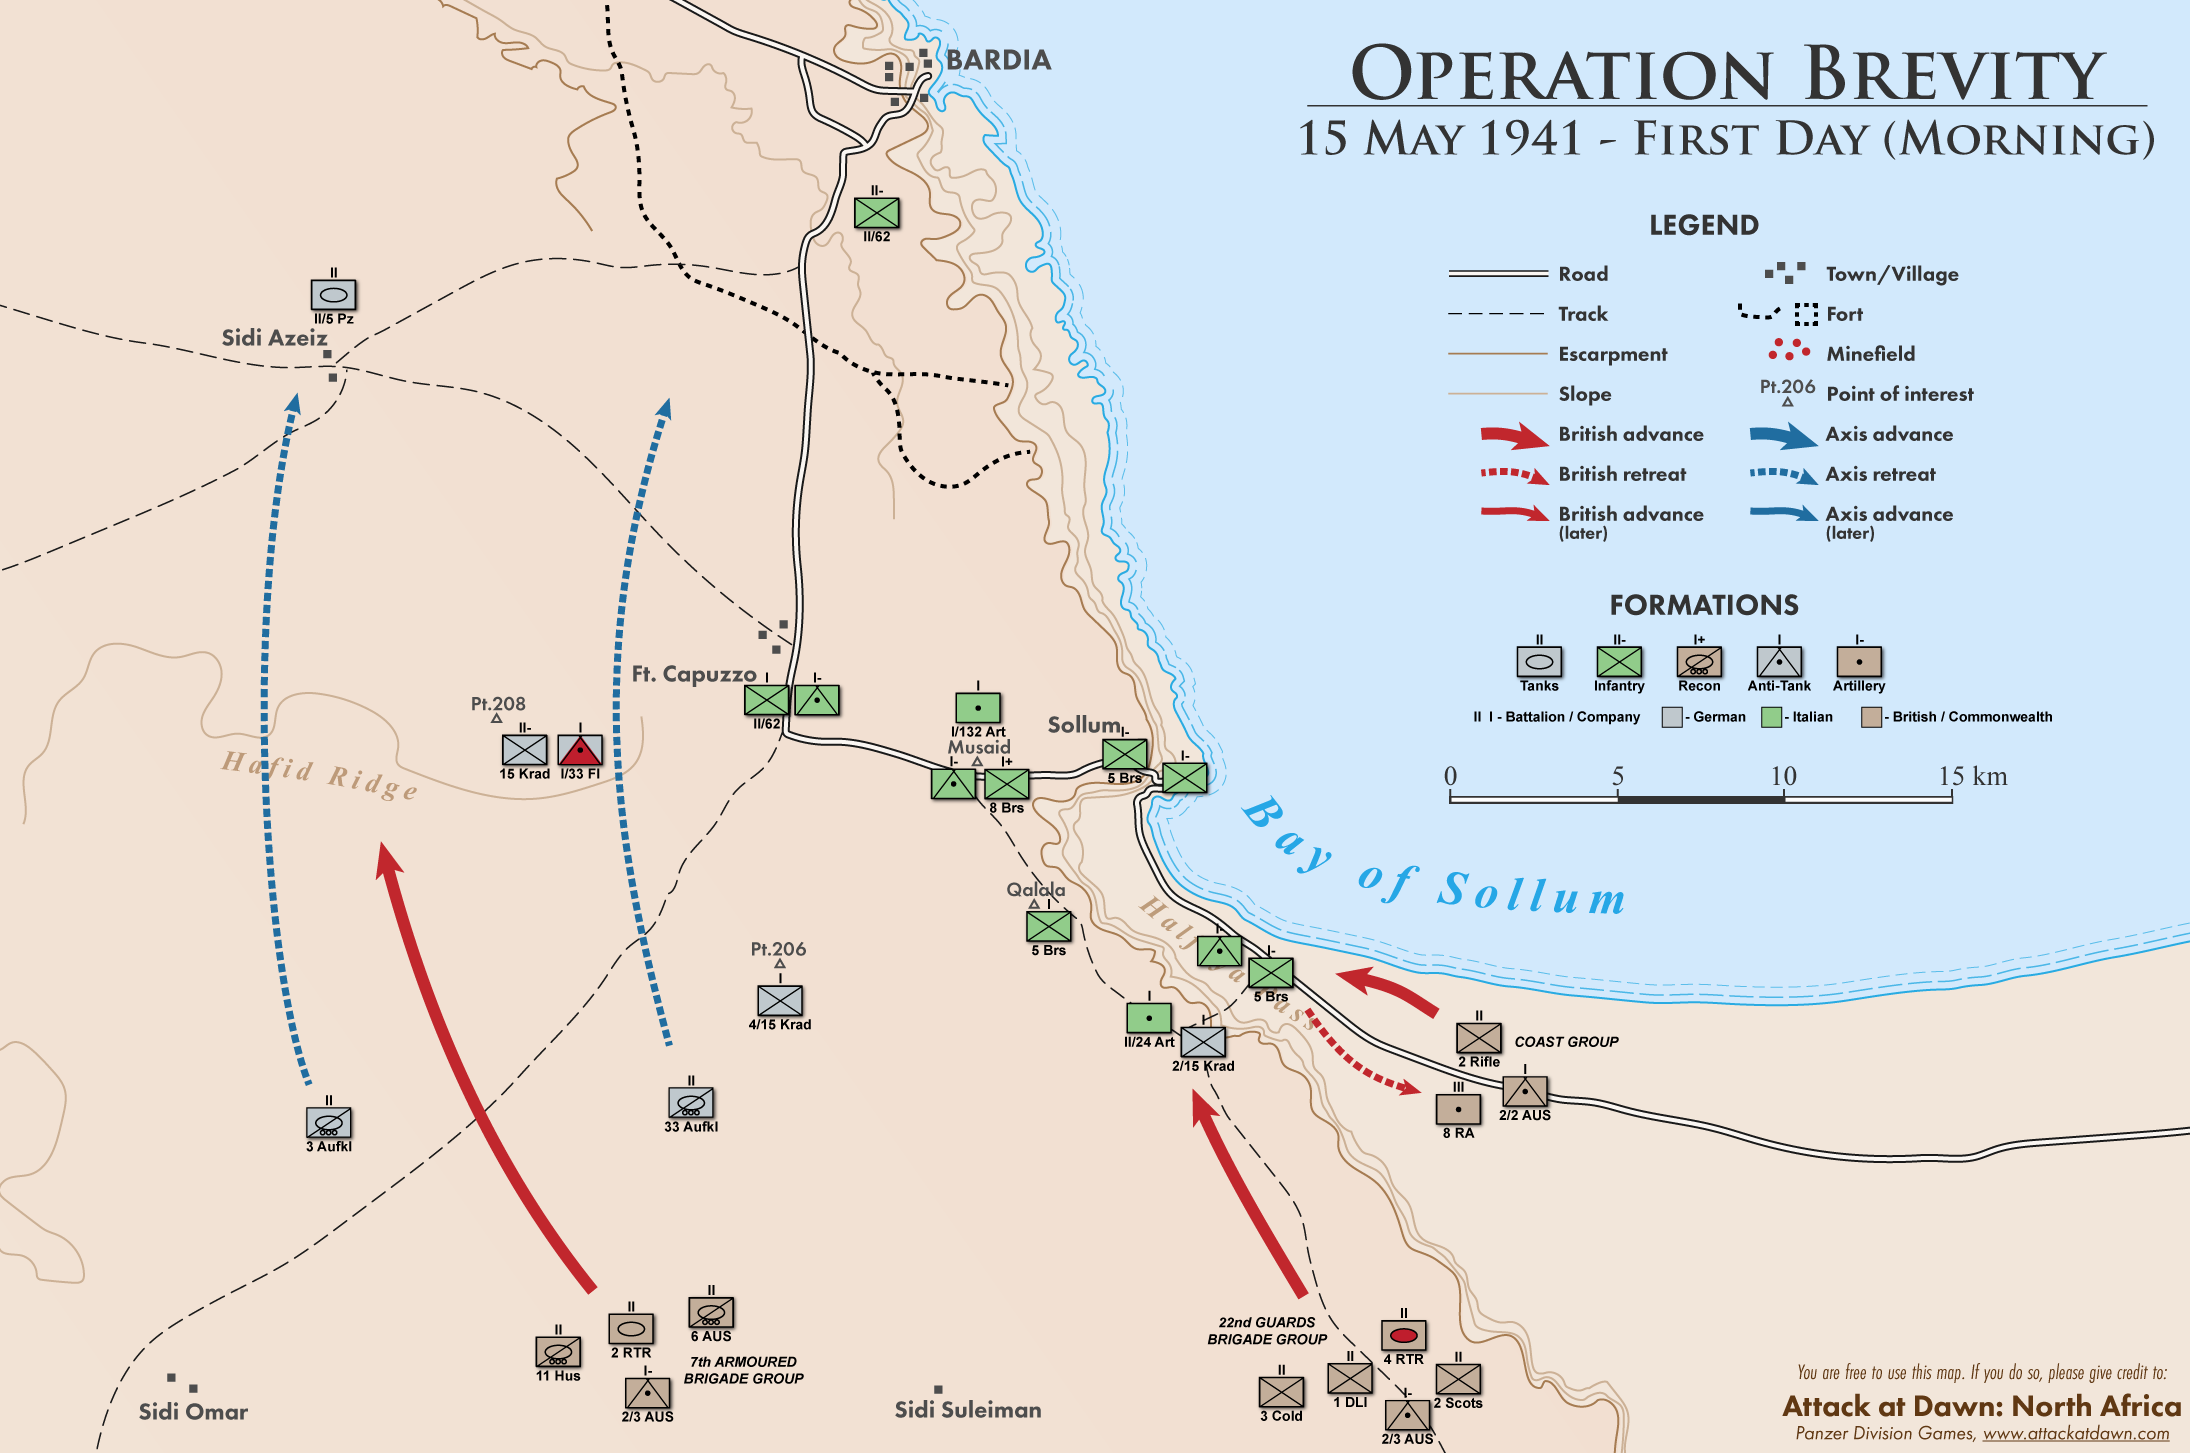
The Axis command believes that the offensive involves more than 100 tanks (it is actually half than that), and orders redeployment of forces around Tobruk, in order to prevent any attempt of relieving the siege. A reinforcement kampfgruppe is sent towards Sidi Azeiz, commanded by Lietenant-Colonel Hans Cramer and consisting of I/8. Panzer Regiment and a Flak-Batterie (with 88 mm guns). Another group commanded by General von Esebeck will be sent the following day, but it will come too late to take part in the action. II/5. Panzer Regiment is called for from its reserve position around Bardia, and redeployed towards Fort Capuzzo.
22nd Guards (centre)
1st Durham Light Infantry and A squadron of 4th Royal Tank Regiment press on to Fort Capuzzo. Near the fort there are 20-30 German panzers waiting for them. The fight ensues, and the Germans are forced to withdraw. In spite of the vigorous defence, the British capture the fort just before midday. II/5. Panzer Regiment later recovers and counterattacks Fort Capuzzo, driving the 1st Durham Light Infantry away by 1400, taking 70 British prisoners in the process.
Coast group
Coast group moves to the lower Halfaya Pass position, but is held up all morning by determined Italian resistance. Finally before the end of the day, S company of 2nd Rifle Brigade supported by Australian anti-tank gunners fighting as infantry overrun the Italian position and capture 124 prisoners.
7th Armoured Brigade group (desert flank)
7th Armoured Brigade group advances northwards as planned, chasing away the screening German recon units. By midday the group reaches position west of Fort Capuzzo, and by the evening they reach as far north as Sidi Azeiz. German recon units fall back to Sidi Azeiz and north of Fort Capuzzo.
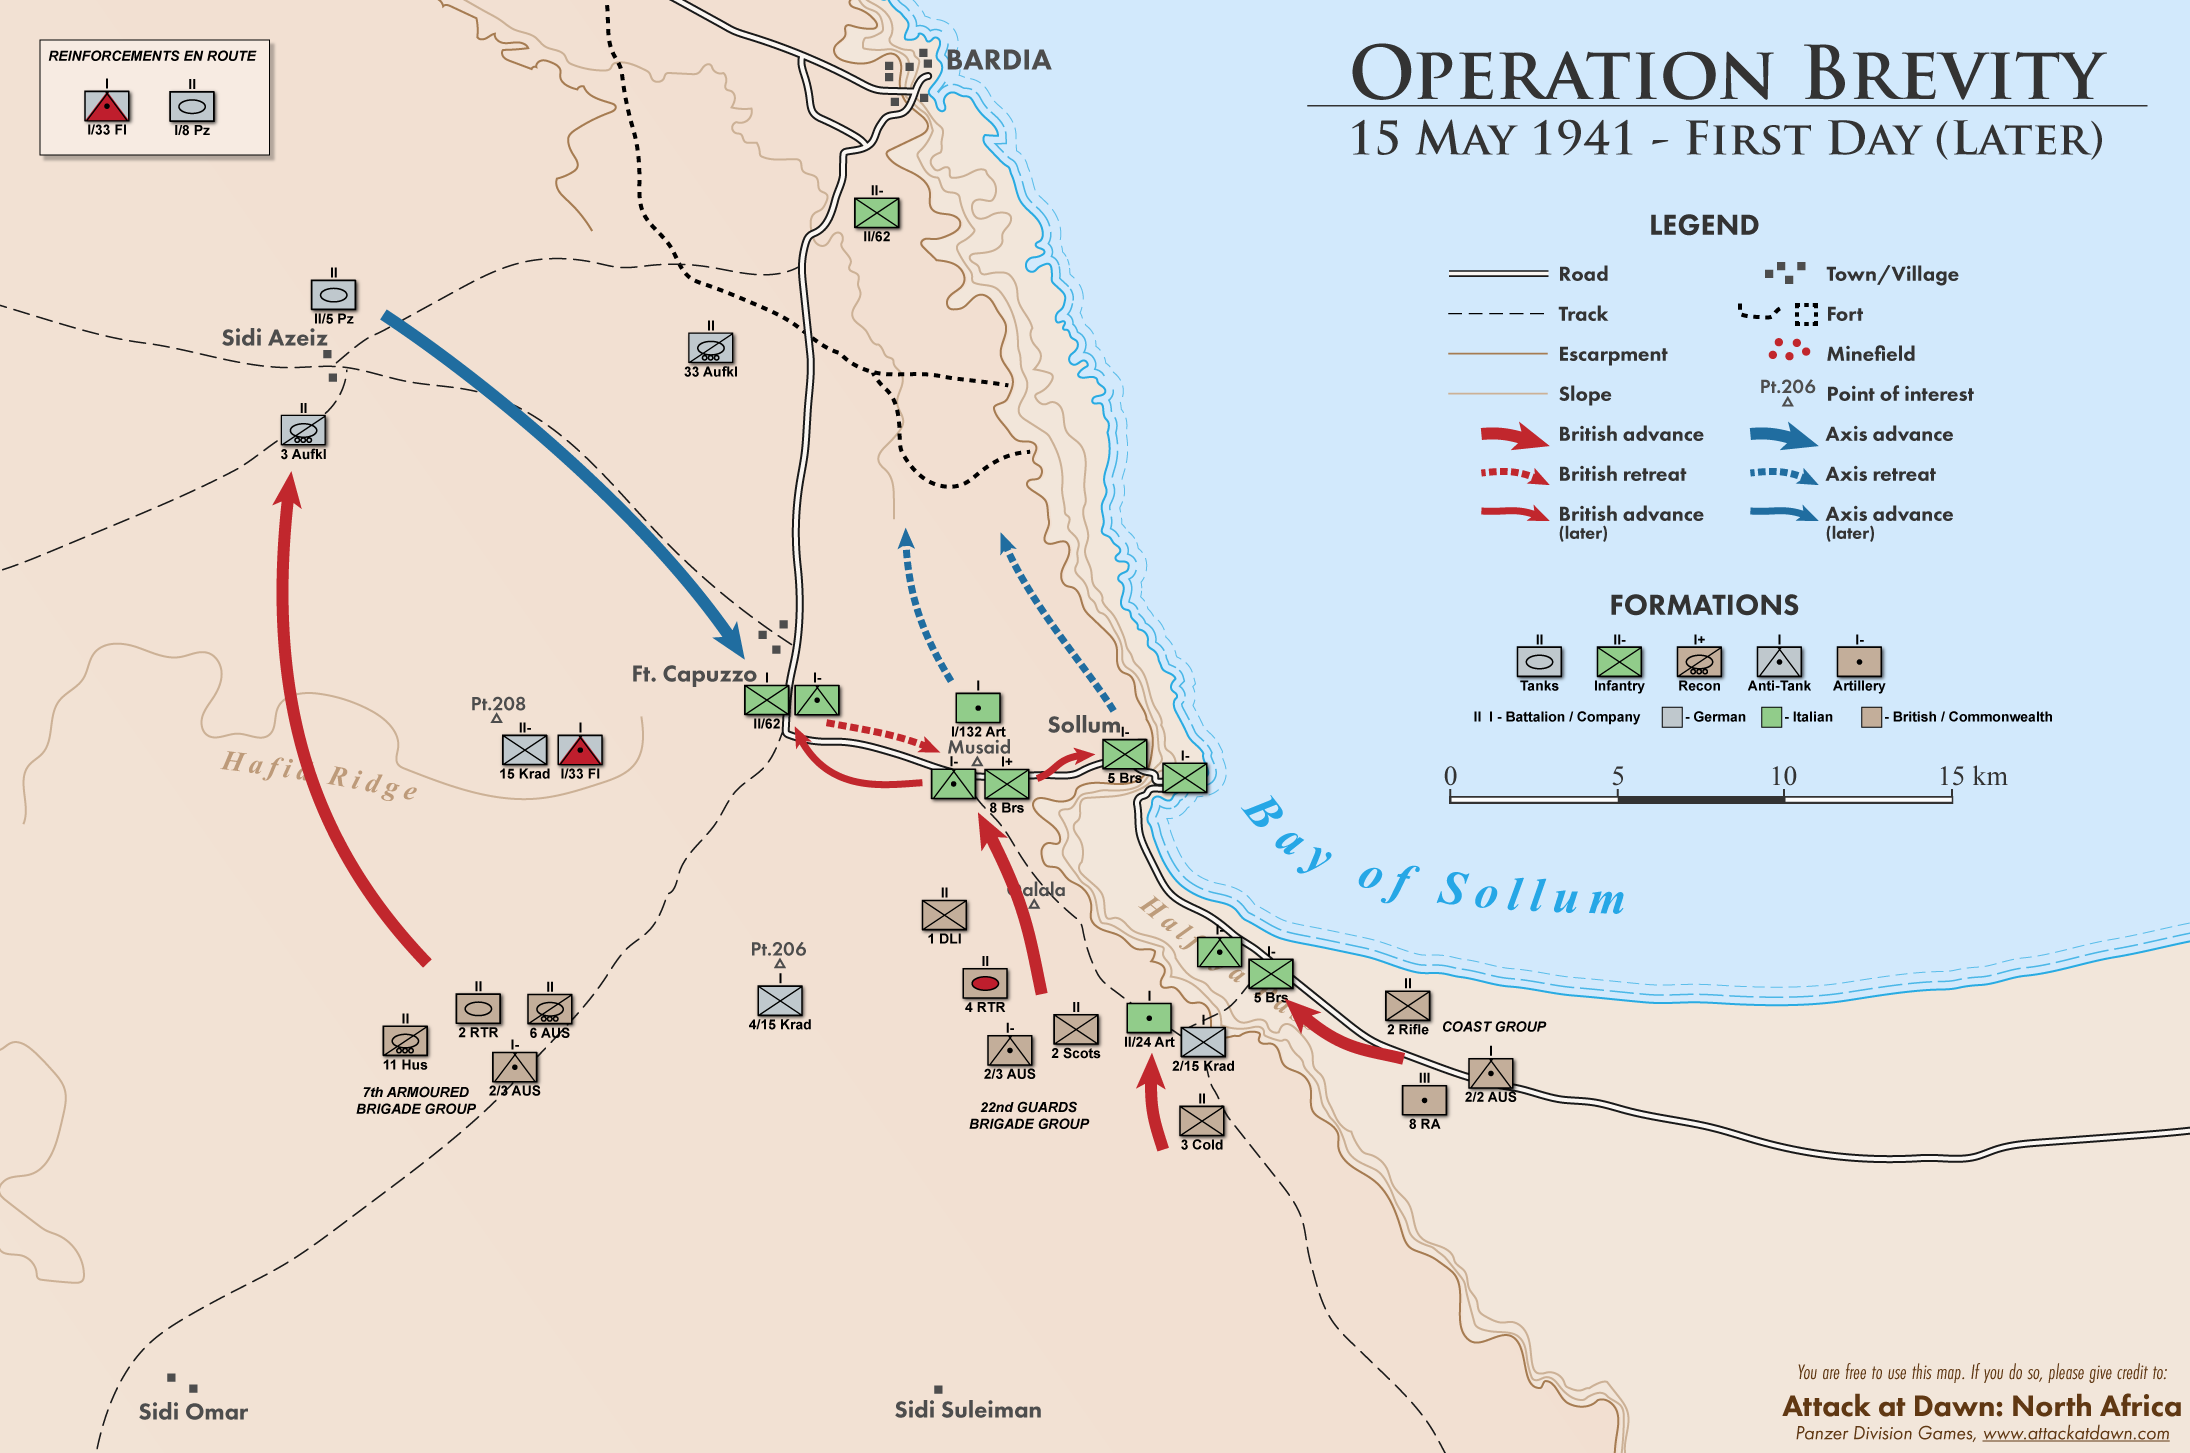
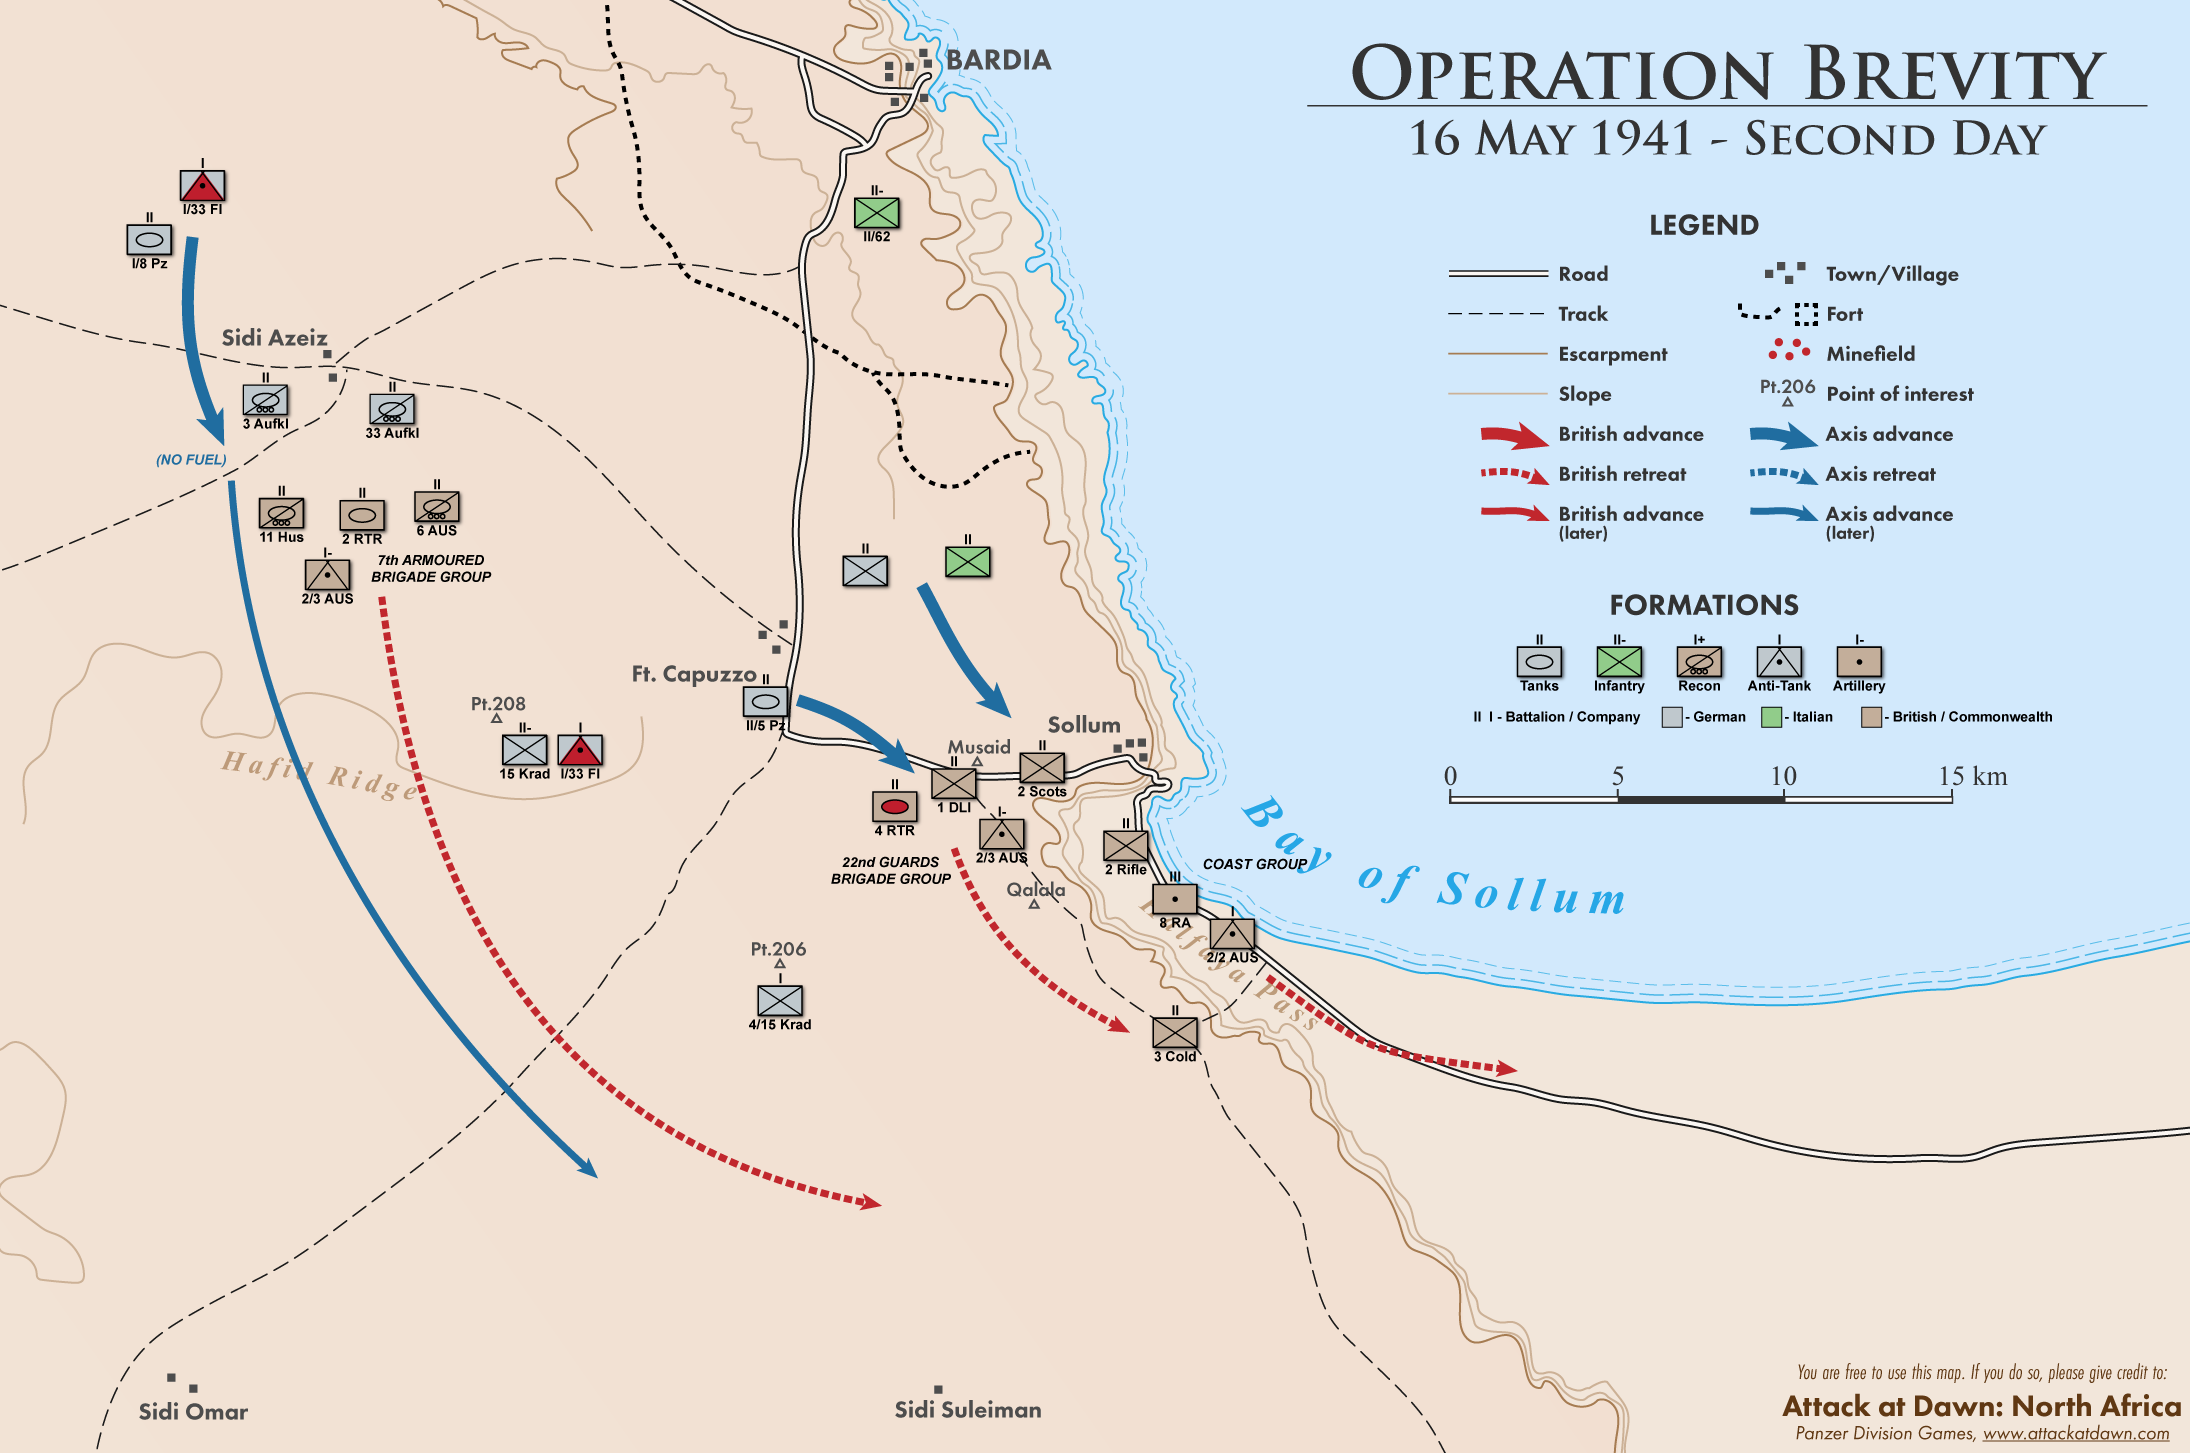
Day 2
During the night, Brigadier Gott realises that the central 22nd Guards Brigade group is vulnerable to German armoured counterattacks. So he decides to withdraw that group during the early hours of the second day. By 1000 the infantry takes up new positions at Halfaya Pass. 7th Armoured Brigade group is still left west of Fort Capuzzo.
German reinforcement group with I/8. Panzer Regiment and Flak-Batterie reach Sidi Azeiz around 0300, but soon run out of fuel and are unable to move. The German advance resumes later in the day, with armoured groups attacking from Fort Capuzzo and Sidi Azeiz. The British withdraw their desert flank and the frontline stabilises between Sidi Omar-Sidi Suleiman-Sollum. The Brevity ends with British still in control of Halfaya Pass.
Conclusion
The British failed to achieve most of their objectives, although the strategically important Halfaya Pass was taken. The highest British casualties were to the 1st Durham Light Infantry, which had lost 196 troops (killed, wounded or captured). The British also had 5 infantry tanks lost, and 13 damaged.
The Germans lost 258 men (killed, wounded or captured) and Italians around 400 troops. 3 panzers were destroyed.
Operation Brevity had shown to Rommel the importance of the Halfaya Pass. The control of the pass enabled one to have a good supply route, a vital prerequisite in mobile desert warfare. On 27 May, he launched Operation Skorpion, during which the German mobile units recaptured the pass and took the firm control of the frontier once again.
Sources
Tank Combat in North Africa: The Opening Rounds Operations Sonnenblume, Brevity, Skorpion and Battleaxe
Schiffer Military History, Thomas L. Jentz. Atglen, PA, 1998.
Mediterranean and Middle East Volume II: “The Germans Come to the Help of their Ally”
Pickle Partners Publishing, General I.S.O. Playfair. 2014.
Le Operazioni In Africa Settentrionale Vol. II Tobruk (Marzo 1941-Gennaio 1942)
Stato maggiore dell'esercito, Ufficio storico, Mario Montanari. 1993.
Battle Orders: Rommel's Afrika Korps, Tobruk to El Alamein
Osprey Publishing, Pier Paolo Battisteli. Oxford, UK, 2006.
The Crucible of War: Western Desert 1941
Paragon House, Barrie Pitt. New York, 1989.