Intro
Operation Battleaxe was an allied offensive that took place between 15 and 17 June 1941, during WW2 North African campaign. The goal of the operation was to raise the axis siege of Tobruk, and link with the besieged 9th Australian Division. Allied tried a similar offensive a month before (operation Brevity), and failed. This time, the British planned to use a new tank - Cruiser Mk VI, also known as “Crusader”. The expectations of this new vehicle were such that the British Government chose to ship the tank contingent via a short, but dangerous route – through the Mediterranean. The risk of tank convoy being sunk by Axis air and naval assets was deemed acceptable, because it was thought that the tank would give the British forces an edge in the offensive ahead. The so-called “Tiger convoy” arrived in Alexandria on 12 May, bringing 21 Mk VI light tanks, 82 Cruiser tanks (including 50 Crusaders) and 135 Matilda II Infantry tanks.
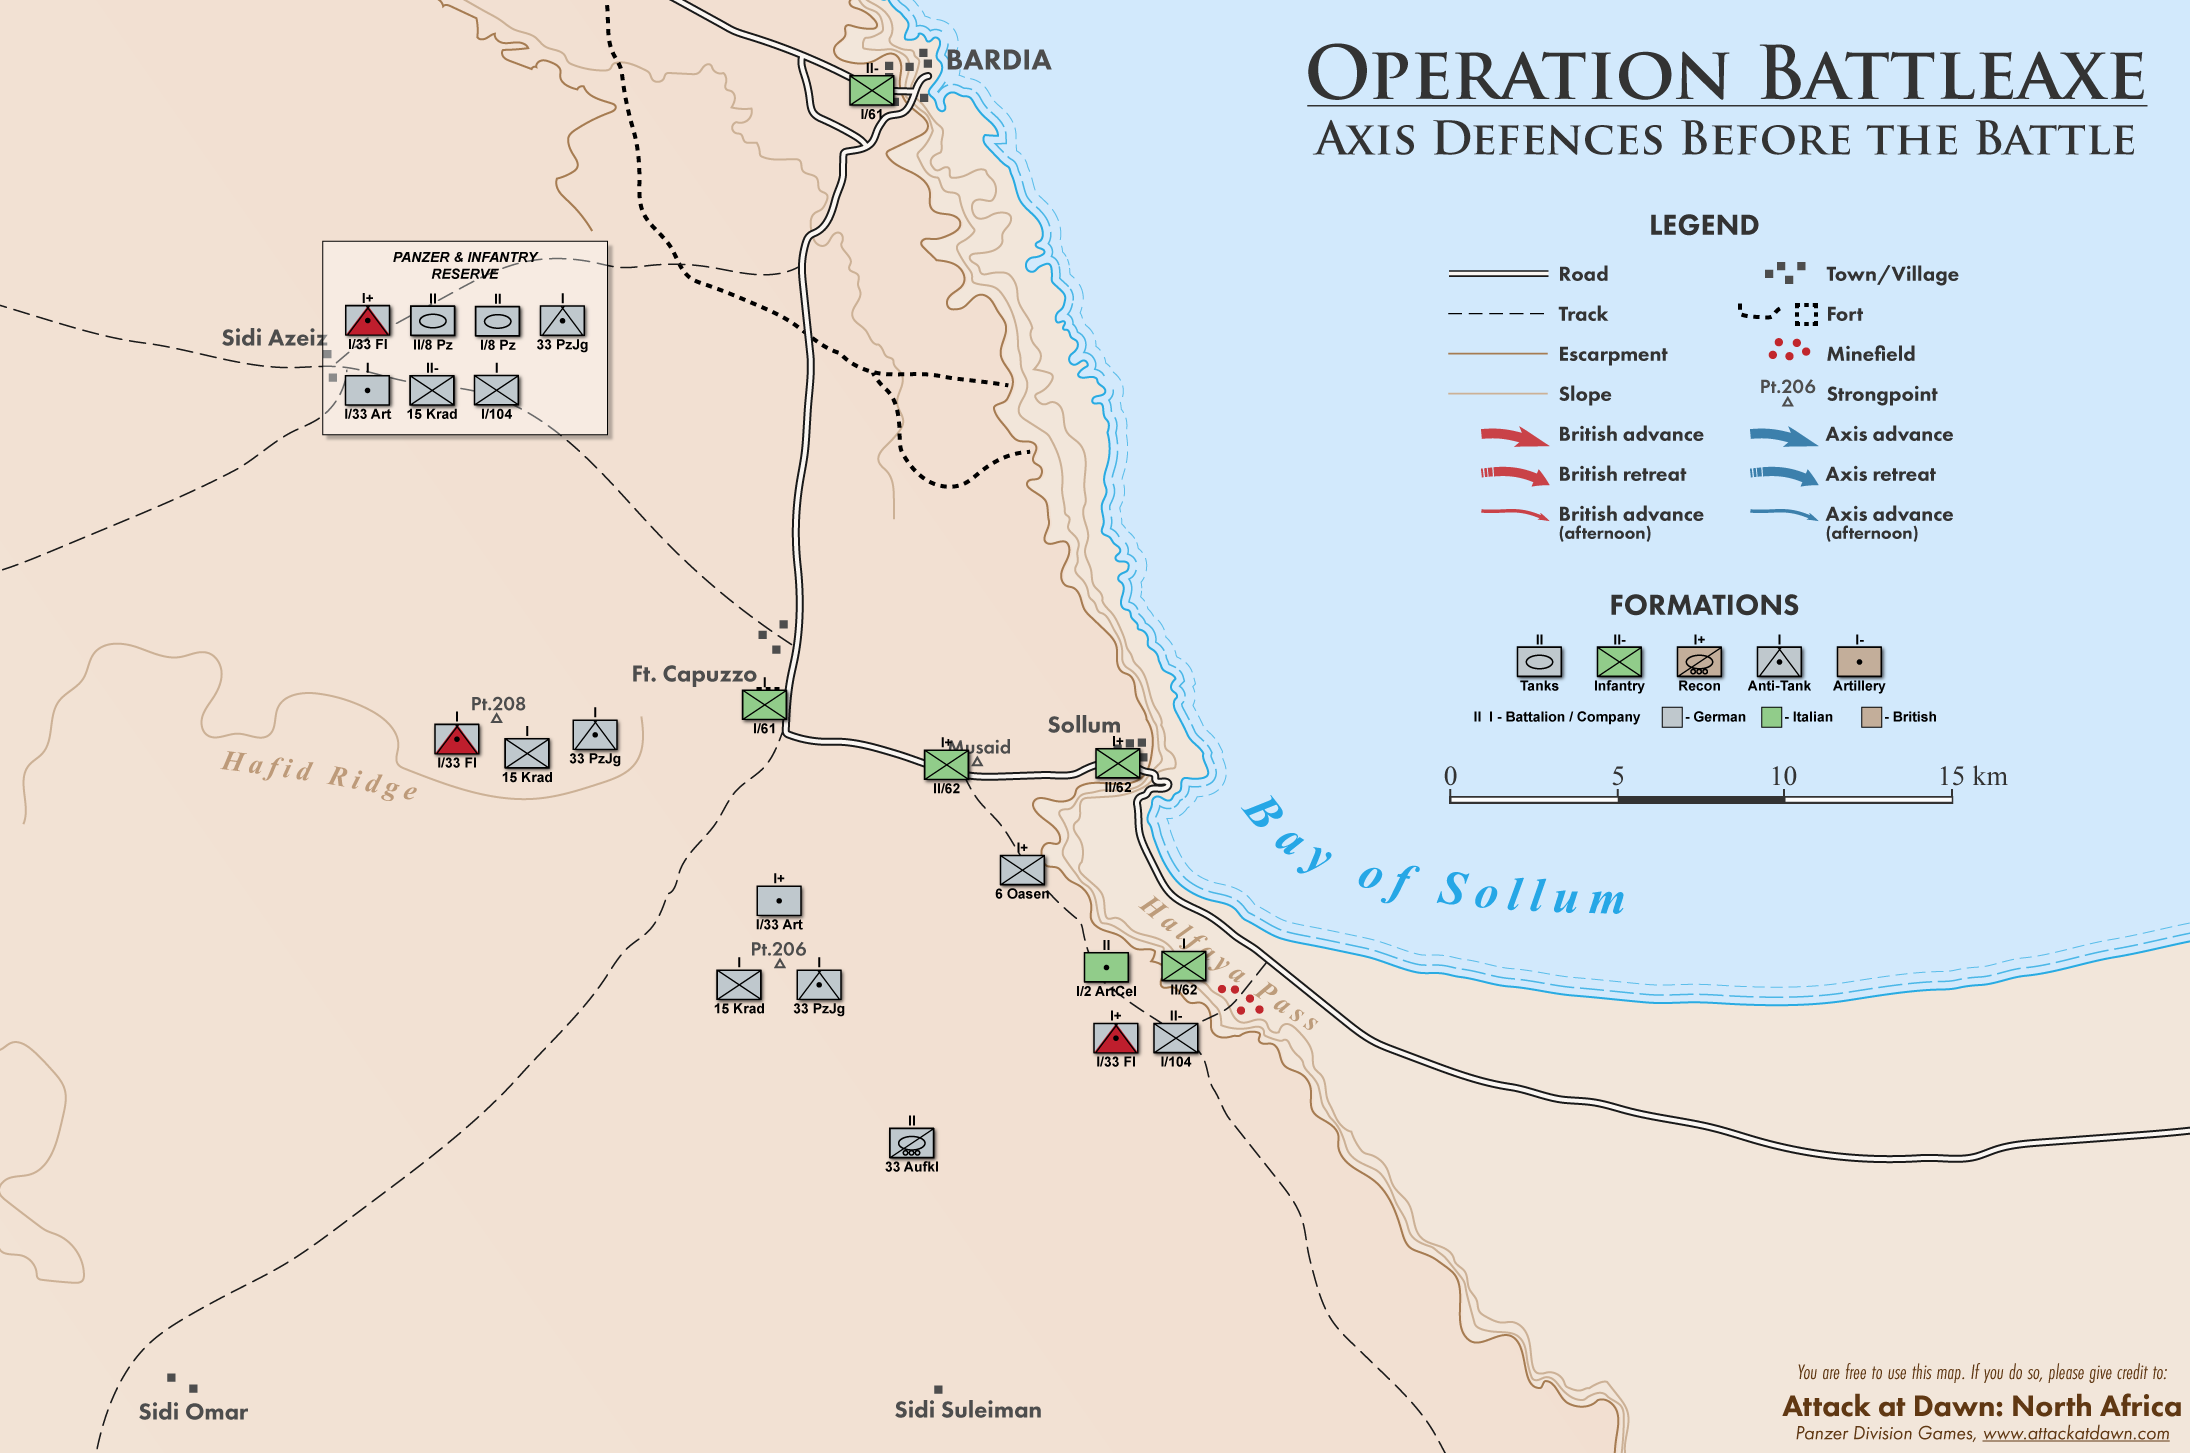
Axis Defences
The German-Italian frontier positions were well prepared for the British attack. Unlike the previous month (when the British have caught them off-guard), a series of fortified positions (so called Stuetzpunkte) was built. Apart from that, two reserve kampfgruppen (combat groups) were formed – one panzer, and one infantry group, and they would be used at the right moment to counterattack and break the enemy assault. If necessary, additional reinforcements could be sent from the Tobruk area.
British Plan
The British plan was practically a copy of the plan of the failed operation Brevity. The attack would be three-prong:
- Coast Force would advance beneath and on the escarpment, and capture the strategically important Halfaya Pass
- Escarpment force would advance in the middle and capture the old Italian fortress Capuzzo
- 7th Armoured Division (less 4th armoured brigade) would advance on the left (desert) flank and engage the expected German armour counterattack
After capturing the planned objectives (Halfaya Pass, Fort Capuzzo), the analysis would be made to determine if the offensive was to proceed in the direction of Sidi Azeiz-Gambut-Tobruk. If it were decided to continue the operation, the 9th Australian Division would be ordered to initiate a breakthrough and link with the relieving forces.
Day 1
Coast Force + Halfaya Group
On 15 June, Royal Air Force begins the operation by striking the Axis positions. At 5:15, the Coast Force starts its advance, with one group moving below the escarpment, and the other (Halfaya Group) moving above. Around 6:00, the Coast Force goes into the Halfaya Pass. 2/5th Mahratta Light Infantry and Matilda tanks from the 4th Royal Tank Regiment suffer heavy casualties and halt their attack.
Above them, the similar situation develops. 2nd Cameron Highlanders accompanied by Matildas goes into the attack, without the artillery support (which got bogged down in the soft sand while moving to the front). They are welcomed by a heavy fire from dug-in 88mm AA guns of the I/33. Flak Regiment. The Germans move to counter-attack and repel the British away from the Pass.
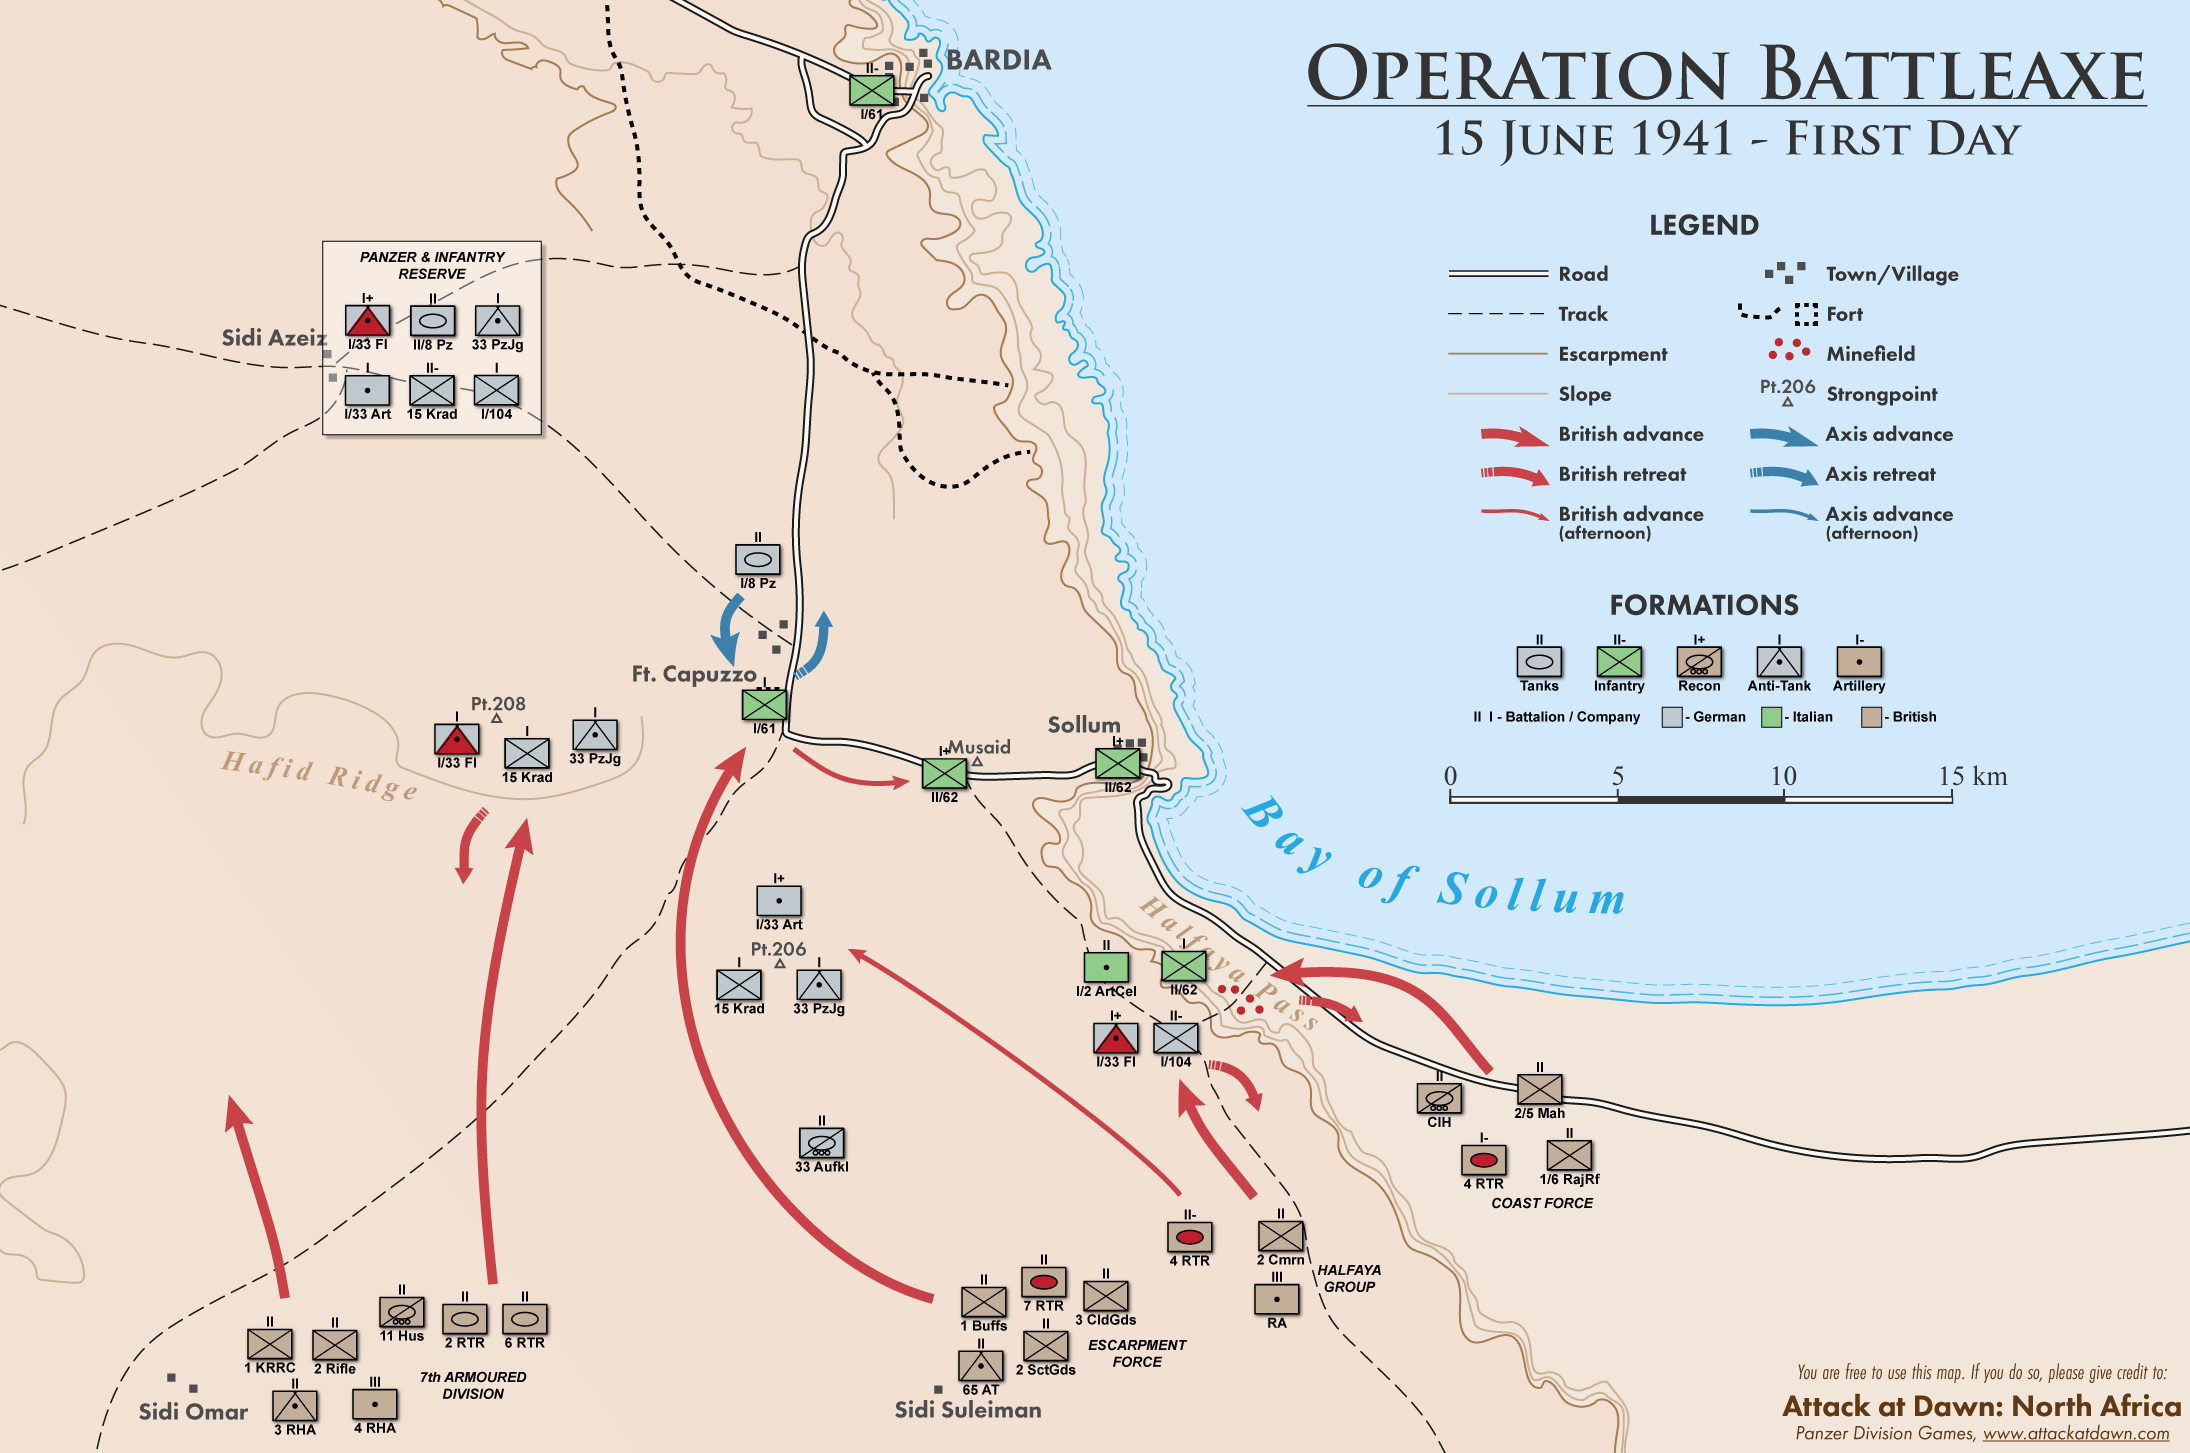
Escarpment Force
The Escarpment Force bypasses the Pt. 206, and moves directly to their objective – Fort Capuzzo. At around noon, the 7th Royal Tank Regiment arrives to Capuzzo and attacks it, without waiting for the rest of the group. They succeed in capturing the fort, after which the Germans initiate several counterattacks with their I/8. Panzer Regiment. The rest of the group (22nd Guards Brigade with artillery support) arrives during the day, and helps to keep Ft. Capuzzo in British hands. Later that day, the 2nd Scots Guards moves east towards Musaid, and captures it.
Also during the afternoon, the 4th Royal Tank Regiment detaches from the Coast Force and attacks Pt. 206, which was bypassed earlier. By the end of the first day, that position is also in British hands.
7th Armoured Division
The 7th Armoured Brigade advances north, while the 7th Support Group guards its left flank. At around 9:00, the 7 ArmBde reaches the Pt. 208 (Hafid Ridge), and attacks it with no artillery support (which is far behind, guarding the flank). The cruiser tanks initially succeed in pushing the enemy off the first ridge, but are later repulsed, while sustaining heavy casualties. The Germans have feinted a retreat from the ridge, only to lure the British into their AT guns.
Day 2
Situation
The British have captured the centre of the area (Pt. 206 and Ft. Capuzzo), but they have been checked on the right (Halfaya) and on the left flank (Pt. 208, Hafid Ridge). The Germans are receiving reinforcements: both reserve groups on the frontier are being activated and additional units from 5. leichte-Division (around Tobruk) are being sent.
German group Halfaya, under the command of Captain Wilhelm Bach has inflicted heavy casualties to British Matildas and infantry, but are completely surrounded and are low on ammunition. Rommel is concerned about losing that formation and the vital Halfaya Pass. He plans to use the newly arrived mobile group from 5th leichte-Division to move around the British left flank, and attack them into the rear (via route Sidi Omar-Sidi Suleiman-Halfaya Pass). At the same time, the reserves from the 15. Panzer-Division will attack Ft. Capuzzo.
Almost half of the British tank force has been destroyed or incapacitated on the first day of the operation. Nevertheless, the British press on with the attack on Halfaya and Hafid Ridge, while they defend Fort Capuzzo in the centre of the line. 4 ArmBde (consisting of 4 RTR and 7 RTR) is being shifted to the left flank, to join the 7 ArmDiv and help in repulsing the German panzer counter-attack.
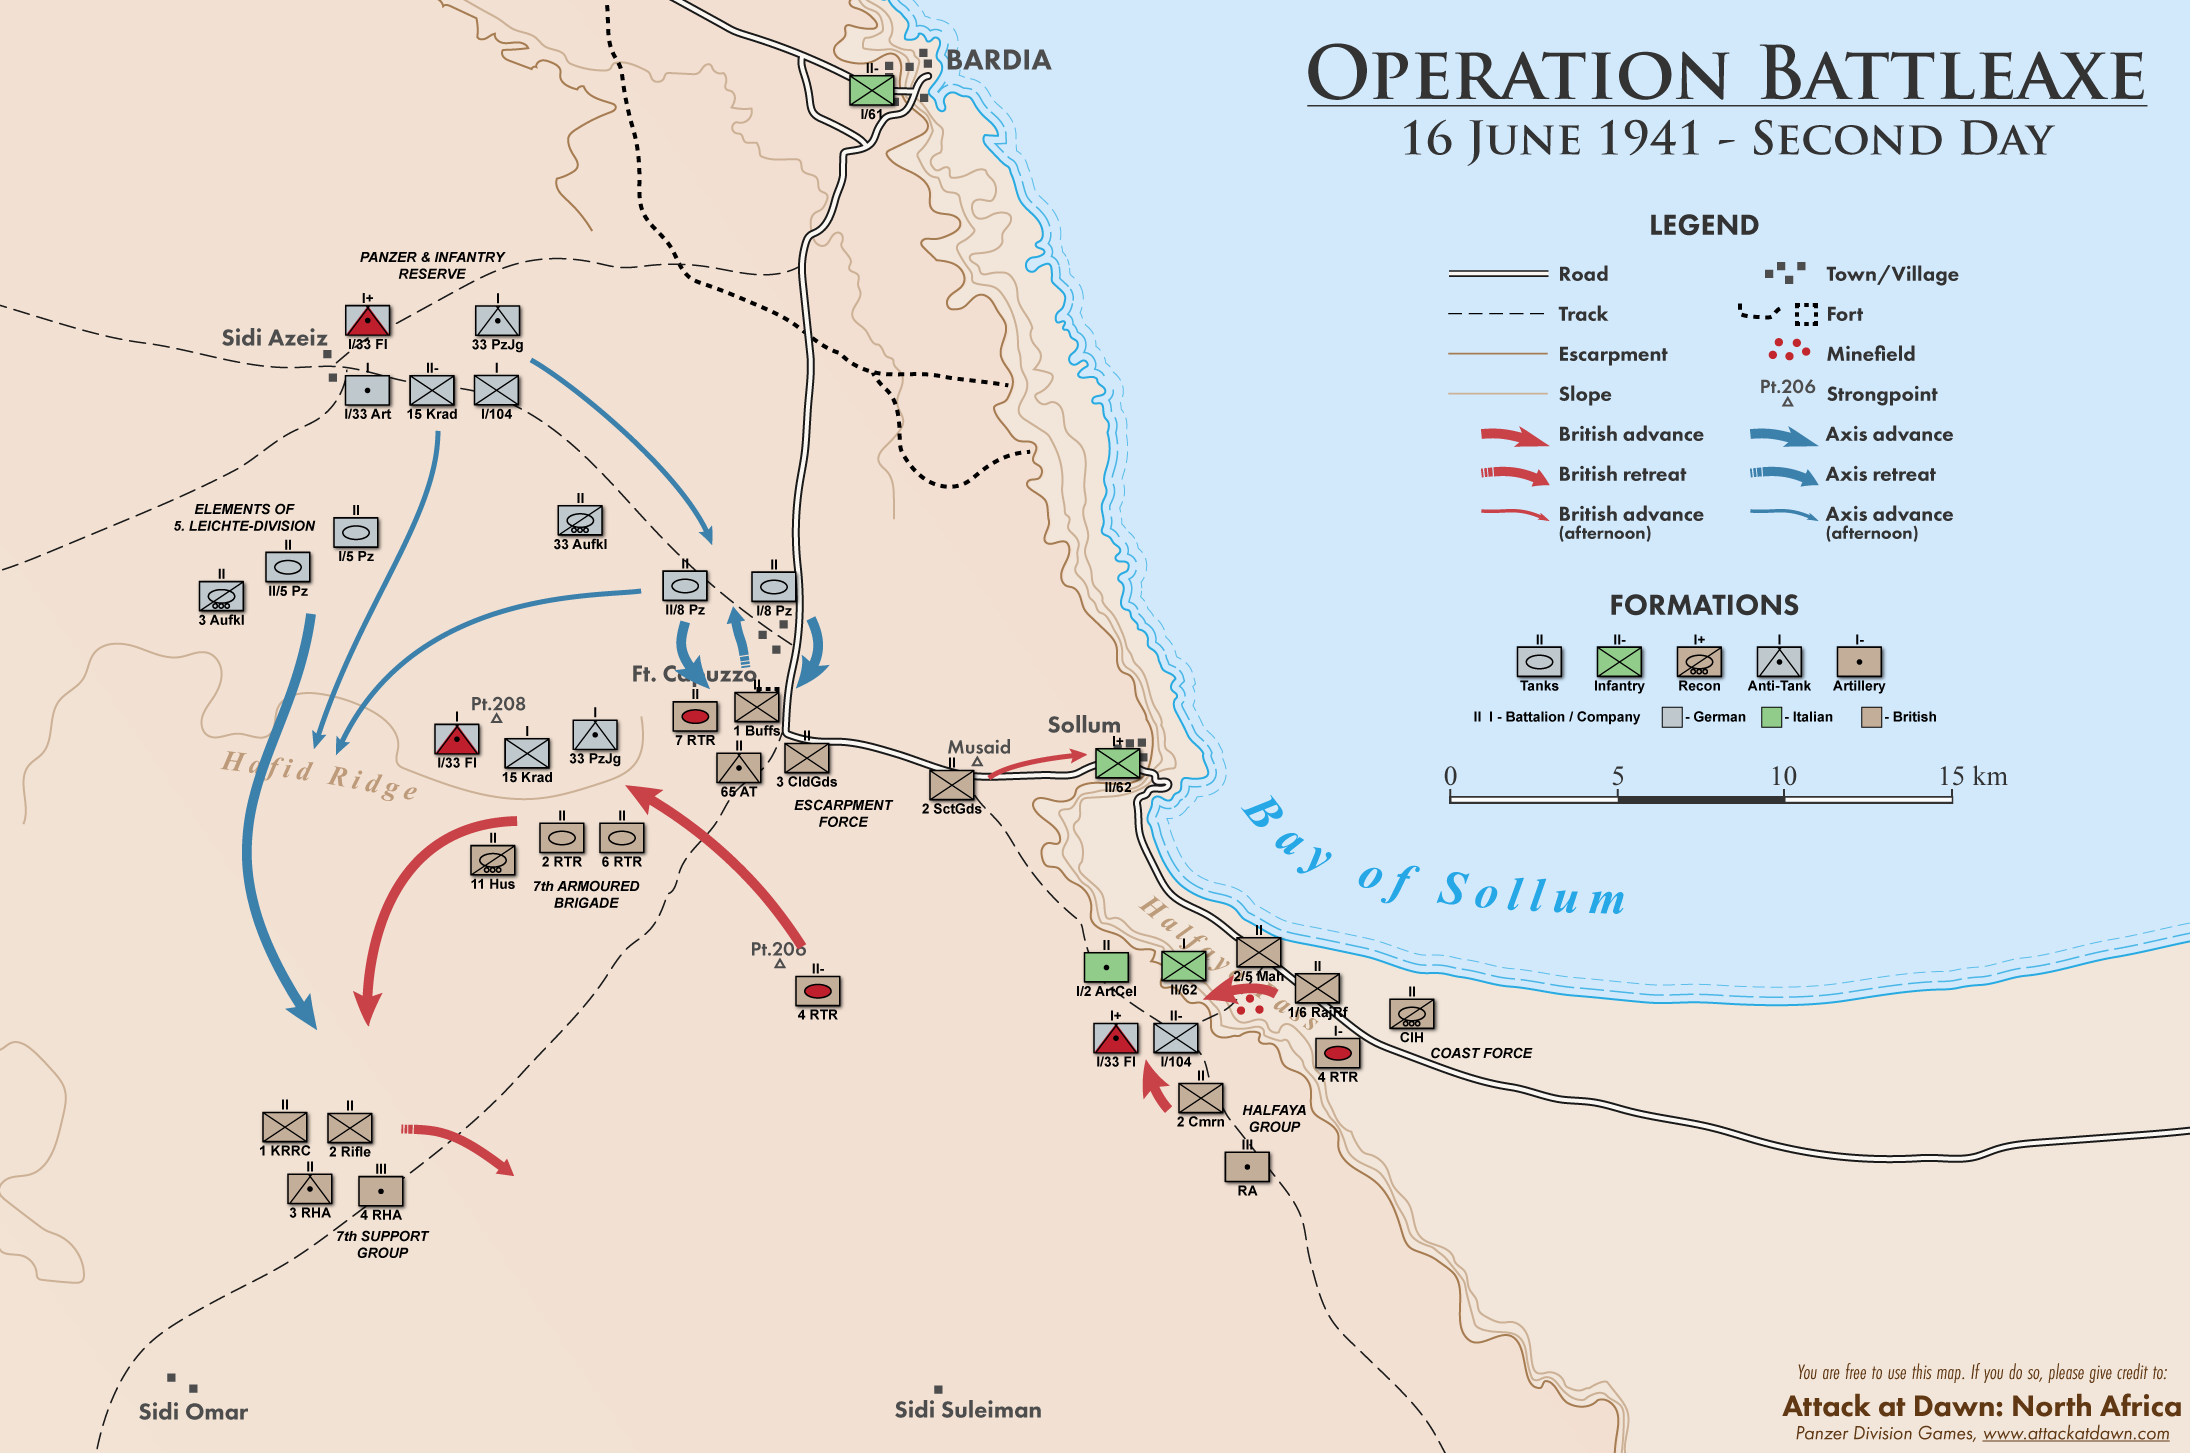
Ft. Capuzzo
At around 5:00, the both panzer abteilungen (battalions) of the 15. Panzer-Division attack Fort Capuzzo in pincer movement. The fighting is fierce, their losses are heavy, and the panzers are repulsed by noon having suffered heavy casualties. Meanwhile, 2nd Scots Guards advance east and capture the Sollum garrison.
Desert Flank
Mobile elements of the 5. leichte-Division go around the British desert flank and move towards Sidi Omar. 7 ArmBde leaves their position at Hafid Ridge to screen that German advance, and joins the 7th Support Group during the day. Germans and British exchange fire from the distance, resulting with heavy losses to the British artillery (due to the German use of HE shells).
Recognizing the opportunity, Rommel decides to change his main effort to this desert flank and orders the 15. PzDiv to pull back from Ft. Capuzzo, and send the majority of its forces to help the 5. ltDiv. By the end of the second day, the Axis forces have pushed the British over the frontier fence and back into Egypt. If the Germans succeed in pushing through to Halfaya, the British will be cut off.
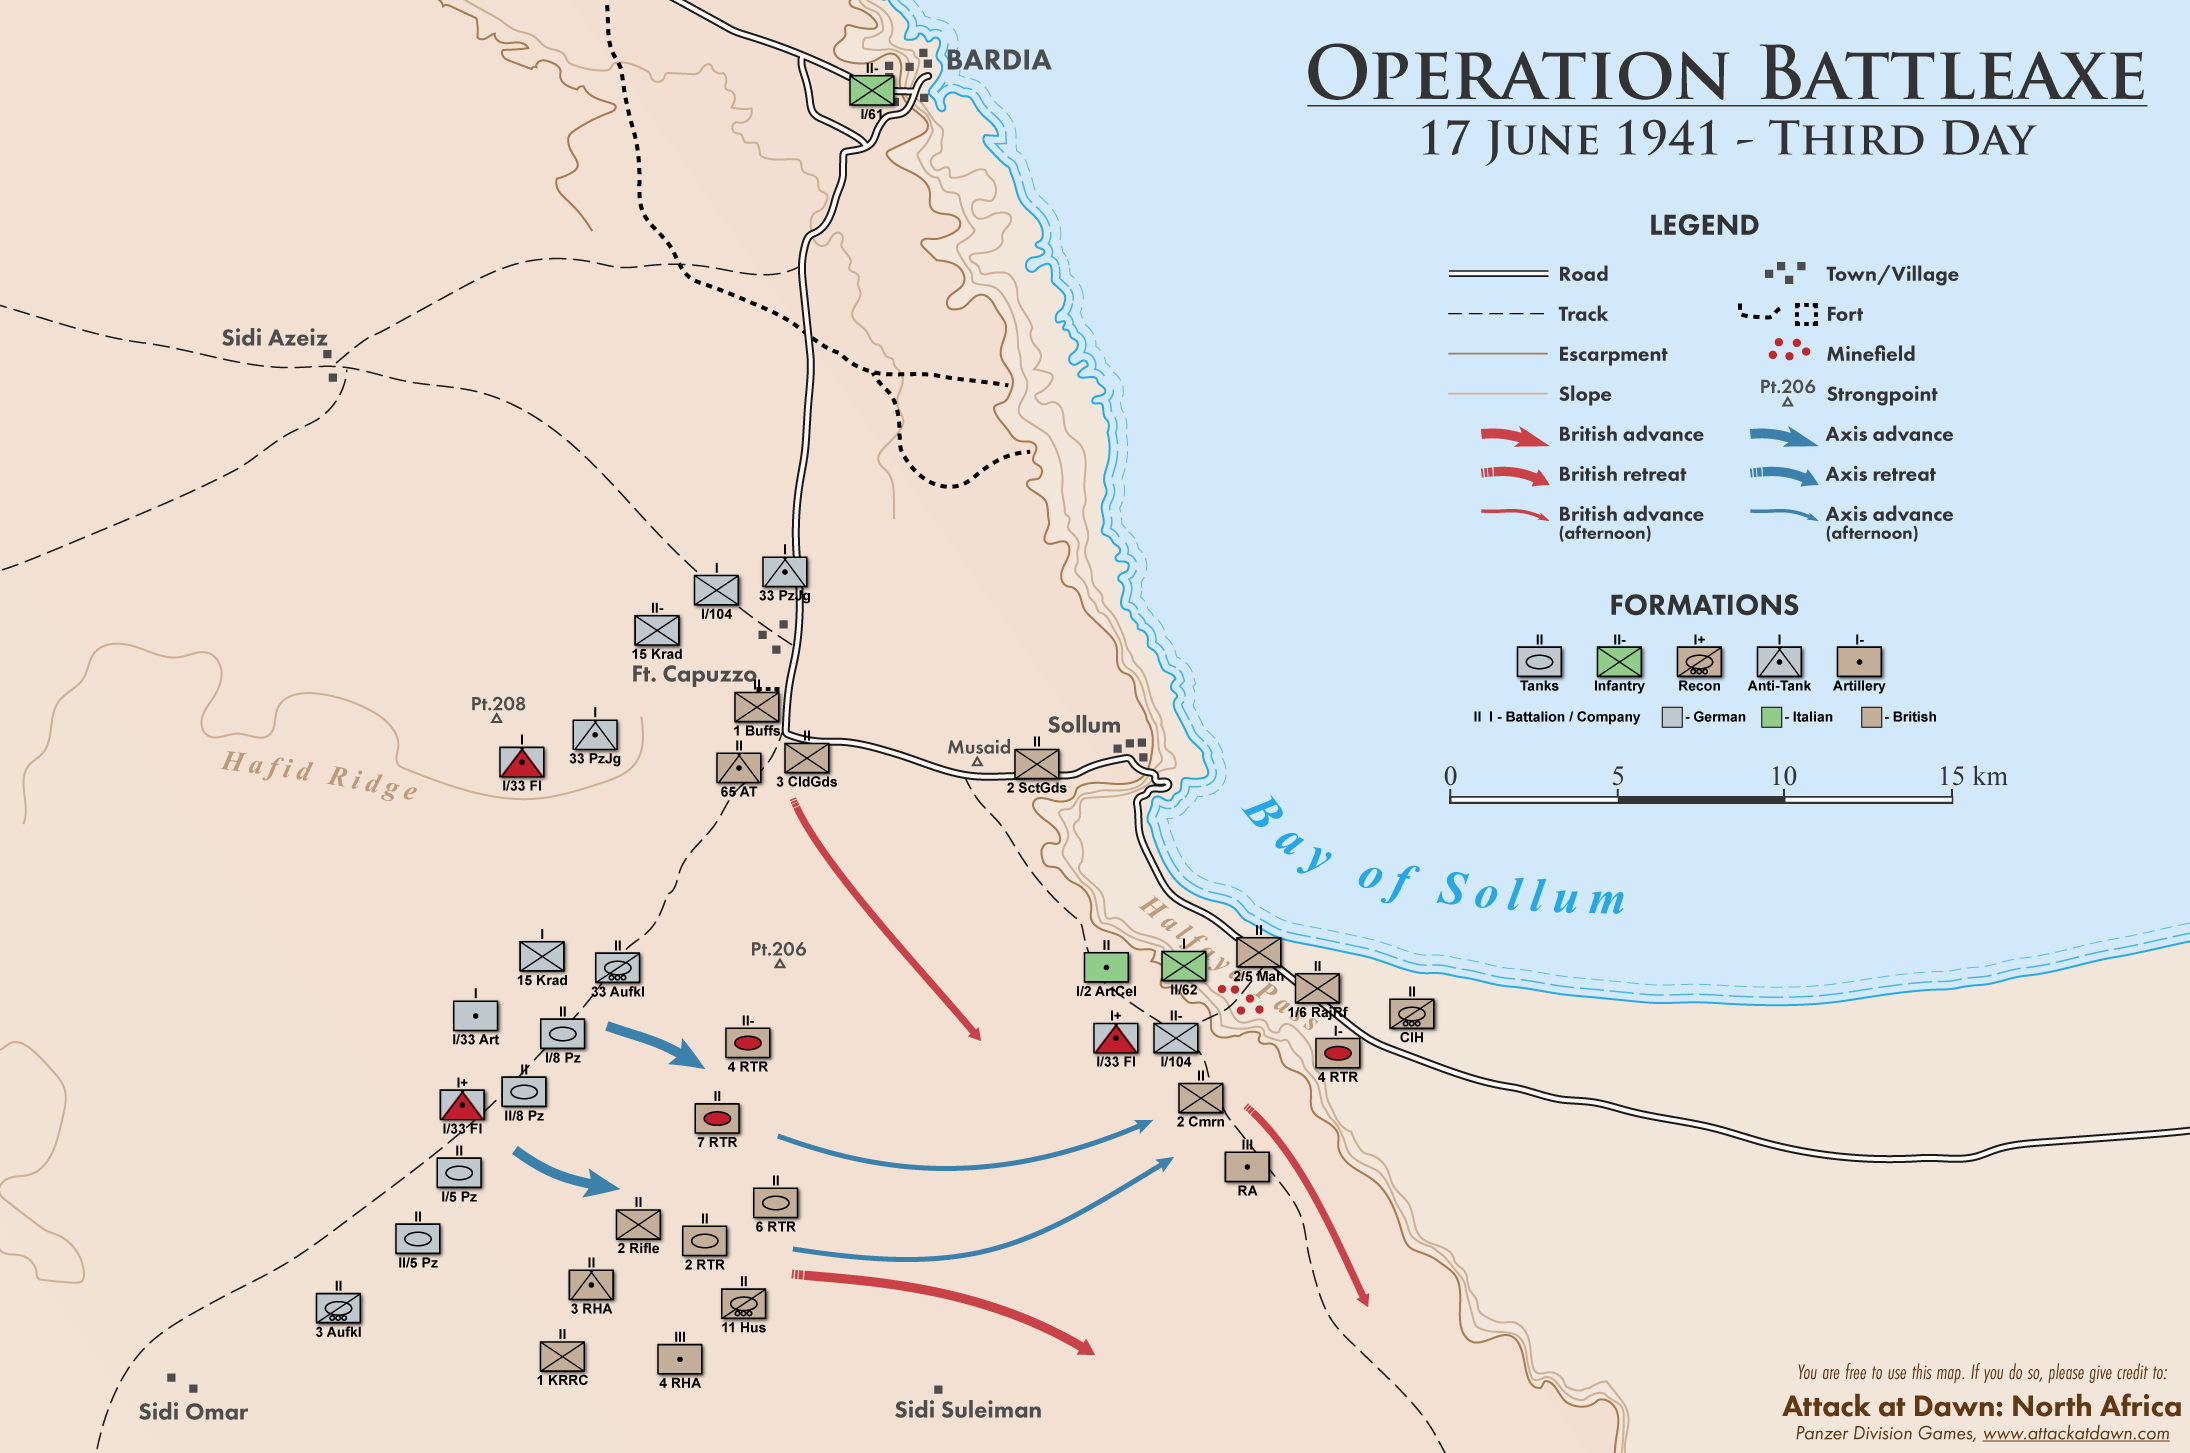
Day 3
The German mobile forces on the desert flank start their advance as the sun is rising. By 8:00, they reach Sidi Suleiman, and are half way to their objective – Halfaya Pass. The British realize the severeness of the situation and order a retreat back into Egypt. Heavy British Matilda tanks from the 4 RTR and 7 RTR hold the defensive position long enough for their comrades to pull out from Ft. Capuzzo and Halfaya Pass. By 16:00, the German panzers arrive at Halfaya Pass and finally join with the Bach’s exhausted group.
Conclusion
The operation was an Axis victory. Although Rommel wasn’t completely satisfied with the outcome, because he failed to cut off and destroy the British troops. German losses were only 12 tanks in total, while British lost around 100 tanks (including the new Crusaders). Each side also lost around 1000 troops. After another defeat, the British Government decided to relieve the C-n-C Middle East. General Wavell was replaced with General Auchinleck.
Sources
Tank Combat in North Africa: The Opening Rounds Operations Sonnenblume, Brevity, Skorpion and Battleaxe
Schiffer Military History, Thomas L. Jentz. Atglen, PA, 1998.
Battle Orders: Rommel's Afrika Korps, Tobruk to El Alamein
Osprey Publishing, Pier Paolo Battisteli. Oxford, UK, 2006.
Mediterranean and Middle East Volume II: “The Germans Come to the Help of their Ally”
Pickle Partners Publishing, General I.S.O. Playfair. 2014.
The Crucible of War: Western Desert 1941
Paragon House, Barrie Pitt. New York, 1989.
The REAL Operation Battleaxe 1941 | BATTLESTORM WW2 Documentary
YouTube, uploaded by TIK. 2007. Youtu.be
If you wish to support the game, be sure to wishlist it on STEAM: Store.steampowered.com
If you wish to watch the YouTube series in which I will show detailed gameplay of each of these operations described here, subscribe to our YouTube channel: Youtube.com
Find full-sized maps in the game Gallery: Attackatdawn.com