
Who doesn't know this problem. The PC is messed up and you really could need a quick tool to get it working again. Or you are with a poor soul using Windows and you want to show what better OS the life has to offer. Or you just need to reinstall a PC with the matching OS right now. Of course you could haul around with you tons of CDs and DVDs but not only is this impractical it is also environmental pollution throwing away CDs en-masse whenever a new version of a distribution comes out. You could create a boot-stick out of distros but then you need one stick for every distro. Not any less cumbersome to haul around. Why not have the ultimate boot stick? Why not have one USB stick hosting all kinds of repair, demo and install Linux distributions? Why not have an ultimate boot stick for all situations in life?
This article shows you how to create your very own ultimate boot stick... your swiss army knife at the size of a thumb.
The Prerequisites
To create such a boot stick you don't need lots of tools. Actually all you need is a Linux system, a 16GB (or larger) USB stick and a fat Internet connection to download as many Linux ISOs as you desire. To make sure all works make sure you have the following tools installed (emerge, apt-get or yum them if required):
- unetbootin (you need this to install ISOs onto your boot stick)
- grub 1 or 2 (1 is enough but 2 gives you more spiffy splash image)
- fdisk (or any partition editor you want)
Now you only need a 16GB or larger USB stick to get rolling.
Preparation Work
First we need to partition the USB stick to fit our purpose. By default USB sticks are formatted as one partition of VFAT type. For our purpose we want an own partition for each ISO we want to use as well as some helper partitions. The best way is to create the base partitions first. From there on you can later on add more partitions out of the remaining free space if you want to add more ISOs to your boot stick.
The most simple way is using fdisk which is included out of the box in any sane Linux distribution. If you are running KDE or Gnome you find there also graphical partition managers if you don't like a console tool. I'll stick to the console for this howto since with graphical partition managers the process is similar. Look on the net for how fdisk or the KDE partition manager works as I'm not going to explain this here.
Start by firing up the partition manager of your choice. Make sure you pick the right device. A run of the mill USB stick shows only a single VFAT entry. If this is the case you are on the right device.
Create first an empty partition table (or delete the one and only partition). Add now a windows partition of small size. This is required to keep windows happy as it expects USB sticks to have one VFAT partition usually ignoring anything afterwards. Add a partition with the following properties:
Type: Primary Partition
Size: 300MB
File System: FAT32
This partition you can use also to store files while doing recovery work or storing other stuff you need also for example on a windows system. 300MB is a good size but you can choose whatever you want.
Now we can add the actual important partitions. Add a second partition with the following parameters:
Type: Primary Partition
Size: 50MB
File System: EXT2
This will be our boot partition. To start various ISO we need this entry point partition hosting a boot manager we can use to dispatch booting to whatever ISO we like. GRUB is going to do this job for us.
Now you can add as many partitions as you want one for each ISO you wish to install on your USB stick. All these partitions well be now of type "Extended Partition" as partition tables allow only 4 primary partitions but any number of extended partitions. As file system use also EXT2. The following table lists partition size required for typical ISOs to install. In fact you can simply use the ISO size and add a few MBs to be sure it fits in.
- Ubuntu (including all derivates): 800MB
- Knoppix: 1.5GB
- GenToo: 400MB
- Finnix: 150MB (better 200MB as new versions tend to slightly grow)
In the end you end up with something like this (my layout, I'm using quite a bunch of ISOs):
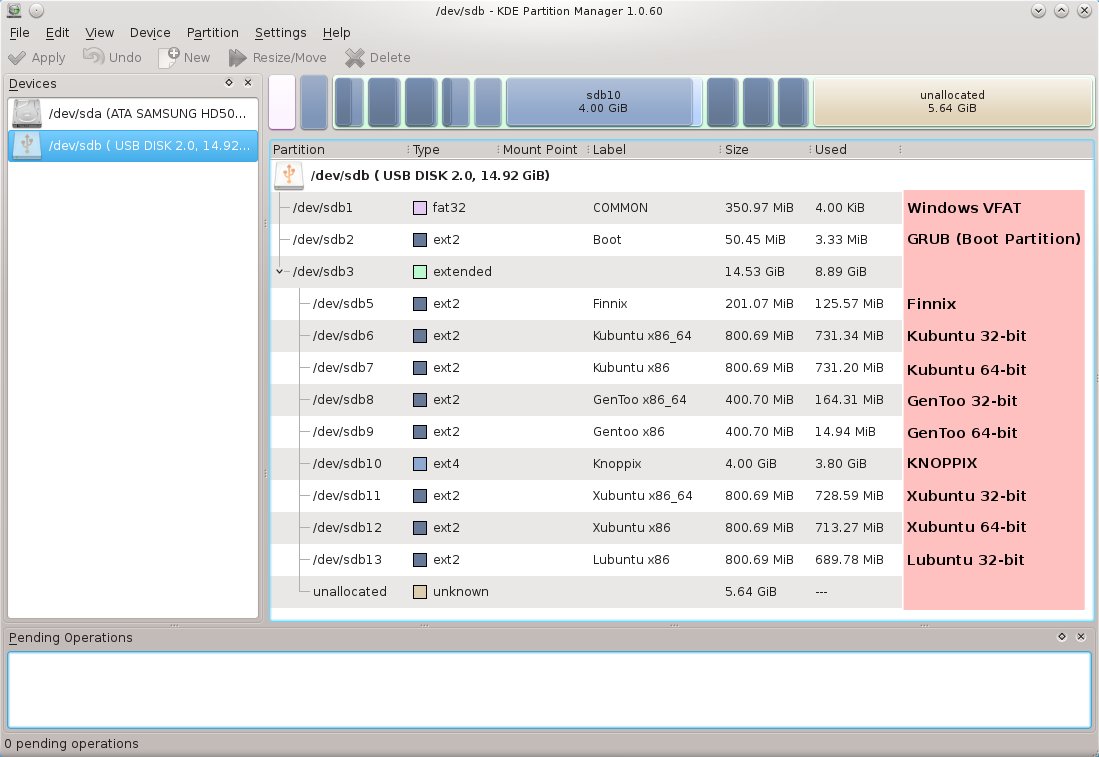
Partition layout (click for full view)
Now you have your partitions ready. Format all of them with the appropriate file format and you are ready to add content to your USB Stick.
Make the USB Stick Bootable
As mentioned on the previous step we need a boot manager on the USB stick to deal with the booting the various ISOs. The main problem with booting from USB is that ISOs are typically created for CD/DVD booting and this is not compatible with USB booting (which works like PC HD booting). Linux CD ISOs can though be booted with GRUB easily since they are designed to dispatch to a GRUB stored on the CD. We add here a master GRUB installation though since you can't boot GRUB from GRUB. For this we need a console and a Linux PC on which GRUB is installed. Mount the GRUB partition of your USB stick (the second partition you created). Enter the following
grub-install --root-directory=/media/disk /dev/sdb
and press ENTER. Replace first /media/disk with the path to your USB stick GRUB partition (file managers show you the name to use instead of "disk" typically) and /dev/sdb with the device of your USB stick. This one is the same as you used to partition in the previous step.
Final step is editing the file "device.map" in the "grub" directory. This file defines which devices exist. After the setup your HD is typically set as hd0 and the USB stick as hd1. We need it though the other way round. Make sure the file contains only this line:
(hd0) /dev/sda
If all works you have now GRUB installed on your USB stick partition and the USB stick is bootable. Now we can install the ISOs to the USB stick.
Install ISOs
Download an ISO of your choice, for example a Kubuntu ISO. Run unetbootin. You will be asked for your root password. This is required by UNetBootIn to function properly.

UNetBootIn configuration (click for full view)
Click on "Disk Image" and click on "..." to select your ISO file. For Ubuntu type distributions you can optionally set some persistent space on the ISO partition. This way you can keep certain configurations across multiple boots of your USB stick. Something like 20-50MB should be enough if you wish to use this feature. Now select the USB device and the partition to install to. If you kept a list of the partitions you made the first ISO partition is number 5 with all other ISO partitions afterwards (6, 7 and so forth). It is important that the USB partition is mounted before you continue at this point or the install fails. Press "OK" to get started. Just wait for the process to finish and your ISO is installed. UNetBootIn actually extracts the ISO content to the ISO partition. Once finished press "Exit" as you don't want to reboot your PC.
Repeat this step for every ISO you want to install on your USB stick. The nice feature here is that once a new revision of a Linux distribution arrives you can simply format the ISO partition on your USB stick and repeat the UNetBootIn step to add the new revision to your USB stick.
Once you are done you need to configure GRUB to make it know how to launch your ISOs.
Configurating GRUB
The installed GRUB does not yet know about your ISO partitions and thus won't be of much use until you teach it where is what. You have to do this step only the first time or when you add new partitions. You usually do not have to do this step if you simply update an ISO on your USB stick with a new revision.
Mount your GRUB partition if not done already. In there you find a directory "grub". Everything related to GRUB is located there. Find in there the file "menu.lst". This is the configuration file of GRUB defining all menu entries in the boot menu. Open it with a Text Editor. Basically you want it to read like this:
default 0
splashimage=(hd0,1)/grub/splash.xpm.gztitle=My ISO to Boot
root (hd0,4)
kernel /ubnkern root=/dev/sdb5 file=/cdrom/preseed/kubuntu.seed boot=casper maybe-ubiquity quiet splash
initrd /ubninit
The first 2 lines stay always the same. Afterwards you add blocks like the following 4 lines to define each of the installed ISO. The title is the text you see in the boot menu. Root defines the partition your ISO has been installed to. The 0 after the HD has to stay as 0 refers to your USB stick once you use it. The 4 after the comma is the partition number minus one. GRUB starts counting at 0 not 1 as Linux does hence if you installed for example to /dev/sdb5 the number to use in GRUB is actually 4 not 5. Hence (hd0,4) refers to the first extended partition with the number 5 on the USB stick.
The last two lines are the boot lines. The best way is to obtain them from the installation UNetBootIn created from the ISO files. Mount the ISO partition and look for a file "syslinux.cfg". In there you find entries similar to this one here (example from Kubuntu):
label unetbootindefault
menu label Default
kernel /ubnkern
append initrd=/ubninit file=/cdrom/preseed/kubuntu.seed boot=casper maybe-ubiquity quiet splash --
UNetBootIn creates a bunch of example entries but the important one is the first called "unetbootindefault". We are interested in the last two lines minus the trailing -- at the end. We have to copy the two lines but edit them somewhat to make them work for GRUB. Take first the entire kernel line. For Ubuntu it might be necessary to append "root=/dev/sdb5" to it where /dev/sdb5 is again the ISO partition (attention! not minus one here as this is a Linux partition string not a GRUB partition string). To be safe I add it always for Ubuntu. Now append from the content from the append line to starting after the initrd part not including the trailing -- at the end. The kernel line is not finished. For the initrd line afterwards simply copy the initrd part we skipped. Done so we end up with the example above in the GRUB file. To make it a bit easier here some typical examples to copy paste:
Ubuntu:
title=Kubuntu 12.04 (Precise Pangolin)
root (hd0,4)
kernel /ubnkern root=/dev/sdb5 file=/cdrom/preseed/kubuntu.seed boot=casper maybe-ubiquity quiet splash
initrd /ubninit
GenToo:
title=GenToo 11.2
root (hd0,4)
kernel /ubnkern root=/dev/ram0 init=/linuxrc looptype=squashfs loop=/image.squashfs cdroot vga=791
initrd /ubninit
KNOPPIX (two entries useful since KNOPPIX has a fail safe mode):
title=KNOPPIX 6.7
root (hd0,4)
kernel /ubnkern ramdisk_size=100000 lang=sg vt.default_utf8=0 apm=power-off nomce libata.force=noncq hpsa.hpsa_allow_any=1 loglevel=1 tz=localtime
initrd /ubninittitle=KNOPPIX 6.7 (Failsafe)
root (hd0,4)
kernel /boot/isolinux/linux ramdisk_size=100000 lang=sg vt.default_utf8=0 vga=normal atapicd nosound noapic nolapic noacpi pnpbios=off acpi=off nofstab noscsi nodma noapm nousb nopcmcia nofirewire noagp nomce libata.force=noncq hpsa.hpsa_allow_any=1 nonetwork nodhcp xmodule=vesa
initrd /boot/isolinux/minirt.gz
Finnix:
title=Finnix 103
root (hd0,4)
kernel /ubnkern vga=791 quiet
initrd /ubninit
Keep in mind to change the (hd0,4) parameter and root=/dev/sdb5 where used.
After you have done this your GRUB configuration is complete unless you want to spicy it up a bit.
GRUB Splash Image
GRUB shows a splash image by default as the background. You can change this splash image to have your personal USB boot stick. The image has to be 640x480 in size and 16 or 256 colors depending if you use GRUB 1 or GRUB 2. Most of the time though you have GRUB 1 hence using 16 colors is safer. Once created you have to safe your image as "splash.xpm" (GIMP knows this format well) and GZip it into "splash.xpm.gz". Replace the file in the GRUB directory with your new creation. That's all you need. Here is my GIMP file and Splash image I used for my USB boot stick. The splash.xpm.gz file is already usable (16 colors).
Finalizing
One last step we need. UNetBootIn has a little nasty "side-effect". It sets the partition bootable it just installed an ISO into. This is a problem though since the GRUB partition has to be bootable. To fix this fire up your partition manager pointing it at your USB stick. Make sure only the GRUB partition (second partition) is bootable and no other. It's possible this is not enough. If the USB Stick is still not bootable after you added an ISO repeat the "Make the USB Stick Bootable" step. This works for sure. This step you have to do unfortunately every time you install ISOs onto your USB stick.
That's it. You can now unmount all of your USB sick partitions and be proud owner of an Ultimate Boot Stick. Whack it into a PC to repair broken PCs, show why Linux is kicking like nothing else or install any Linux distro off the bat.
Final Words
My personal USB Boot Stick contains Kubuntu, Xubuntu, GenToo, KNOPPIX and Finnix each x68 and amd64 version. This fits nicely on a 16GB USB stick. What are these all for you might ask? Well here is a quick summary for you:
Ubuntu:
Live system useful to show others why Linux rocks. Plug it in, boot up and show what it has without altering the PC. And if required you can install right away. Also useful at the company if you need to reinstall a machine because somebody managed to mess it up big time. Kubuntu and Xubuntu are different flavors I keep around for stronger or weaker computers. Kubuntu is Ubuntu with KDE while Xubuntu is Ubuntu with XFCE. Later one is better suited for weaker computers.
GenToo:
Source based Linux distribution. I use this for servers or my own computer. Useful since you get precisely what you want and no other bloat other distribution install because it is "convenient".
KNOPPIX:
Repair distribution. KNOPPIX is a live distribution you can boot up packed full with various tools a system administrator needs to fix a broken machine. First step if a computer is busted and in need of repair. Just whip out the USB stick and get KNOPPIX going to get the machine working again. KNOPPIX is the largest of all distributions as it comes on a DVD.
Finnix:
Repair distribution for the hard case. In contrary to KNOPPIX this is console mode only and with a more specific set of administration tools. This one is the last resort if KNOPPIX can't help anymore and you need to get that PC fixed. This is the smallest of all distributions.
If you have question let it rip. I'll try to help you as good as possible.

great tutorial...now i just have to figure out how to get my wireless WUSB600N to work in Ubuntu.