The following examples can be found as templates in the WiMi5 Dashboard. Just click in the ‘Clone project’ button and select any of these examples to have a better understanding of how to create collisions.
In WiMi5 you can use the BoundingCollision blackbox for detecting collisions between objects. This blackbox is available in the 2D category of the blackboxes tab in the Logic Chart panel of the Game Editor.
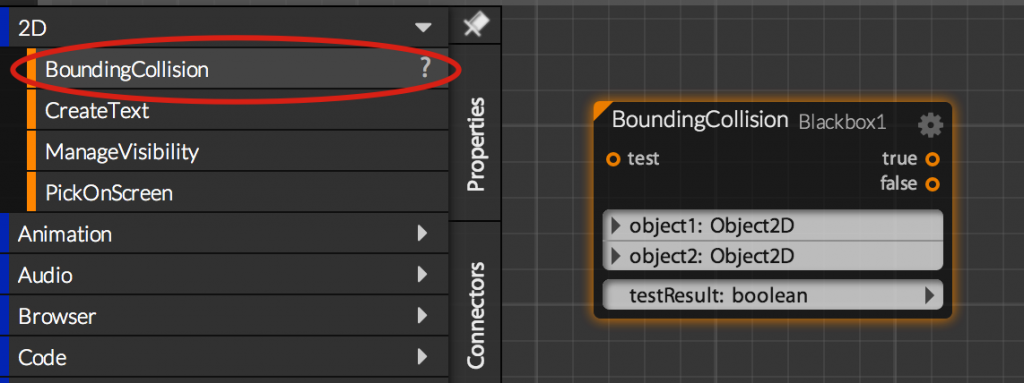
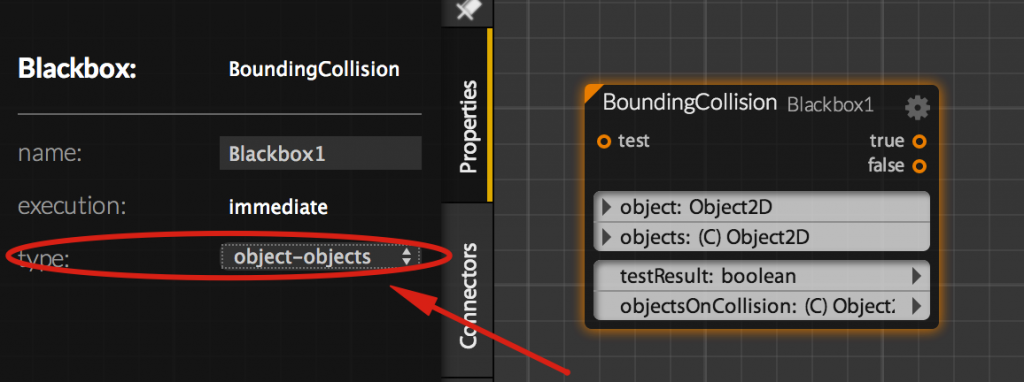
You can configure this blackbox. If you drop this blackbox to the Logic Chart and select it you will be able to see the properties tab for this blackbox. You can there select the type of collision you want to detect: object with object or object with objects.
This blackbox always has as input parameters the Object2D (Bitmap, Sprite and Text) on which we want to check collisions. The first parameter (object1 or object) is always a Object2D and the second parameter (object2 or objects) can be another Object2D or a Object2D collection, depending on the settings you have chosen for the blackbox.
When you activate this blackbox, using the test entry, the output true will be run if any of the parameters bounding box collides with the other parameter bounding box. And the output false will be run if there is no collision. These bounding boxes do not collide with the bounding boxes of other Object2D children in the hierarchy. Another interesting property of this blackbox is that invisible or transparent objects also collides with other objects, so you can create colisionable invisible areas.
Furthermore, the BoundingCollision blackbox outputs the parameter testResult. If the type of collision is configured as objetc-objetcs the output will be a collection containing the objects that are colliding with the object1 parameter.
Example 1: detecting collision between 2 bitmaps
The goal of this example is to drag a bitmap using the mouse and detect the collision between this bitmap and another one. When the collision is detected we will scale the collided bitmap for pointing out the collision.
Step 1. Scene creation
First step is create with the Scene Editor a scene containing 2 bitmaps. Upload your bitmaps to the Resource Manager and then drag and drop them to the SceneView panel.

Step 2. Dragging a bitmap with the mouse
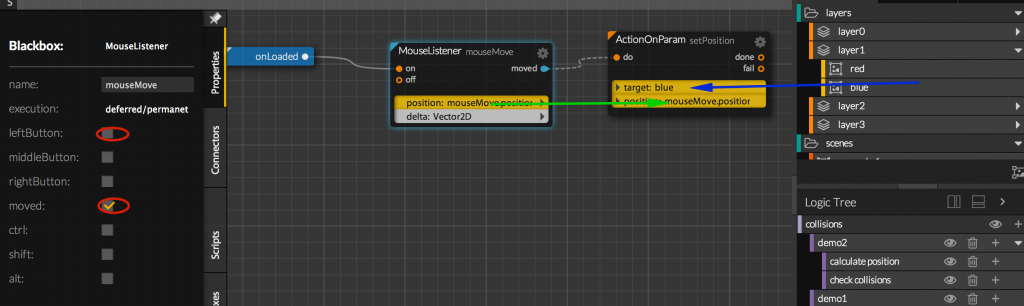
Drag and drop a MouseListener blackbox (LogicChart -> BlackBoxes tab-> Devices -> MouseListener) in the Logic Chart. Select it and in the Properties tab deselect leftButton and select moved.
In the 2D tab of the AssetManager panel you can select one of the imported Bitmaps and drop it in the LogicChart. This action will automatically create an ActionOnParam blackbox. Select this blackbox and in the Properties tab select setPosition for the Action property. Finally drag and drop the position parameter of the MouseListener blackbox over the position parameter of the ActionOnParam blackbox.
Step 3. Detect the collision
To detect the collision between two Object2D you just have to drag and drop a BoundingCollision blackbox to the LogicChart. Then drop both bitmaps you want to test collision over this blackbox parameters. If you want to check the collision every time you move the blue bitmap (dragged by the mouse) you have to link the moved output of the MouseListener with the test input of the BoundingCollision blackbox.
tip: if you select the created link between blackboxes you can see its call order property. This property sets the call order for the links of a blackbox output. It´s highly recommend to know this call order so you will exactly know how the Scripts are going to be executed.
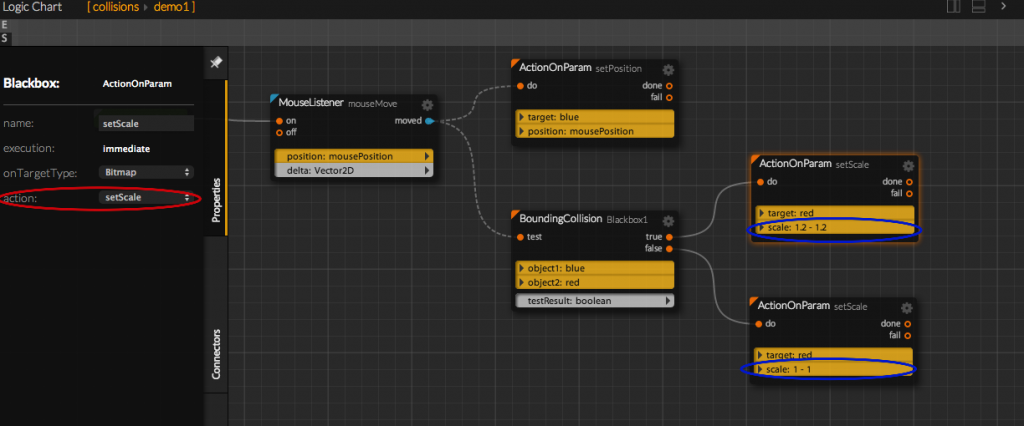
To visually check that the collision is being detected we are going to scale the red bitmap when it collides with the blue one. You can drag and drop the object2 parameter (the red box) from the BoundingCollision blackbox to any place in the LogicChart. This way an ActionOnParam blackbox will automatically be created with this parameter assigned to the target. Drag and drop it twice, so you can set the scale for both possible options (collision and no collision).
Select the created blackbox and select setScale in its action property. You easily can assign the scale by clicking with the right button on the scale parameter selecting assign. After that you can select the created parameter and set the x and y properties to 1.2. You have to repeat this process with the other ActionOnParam blackbox and set the x and y properties to 1.
Now you can click on the play button in the preview panel and check your work.
Example 2. Detecting a collision between a Bitmap and a Bitmap collection.
In this example we are going to make a square bounce with 4 walls while is rotating.
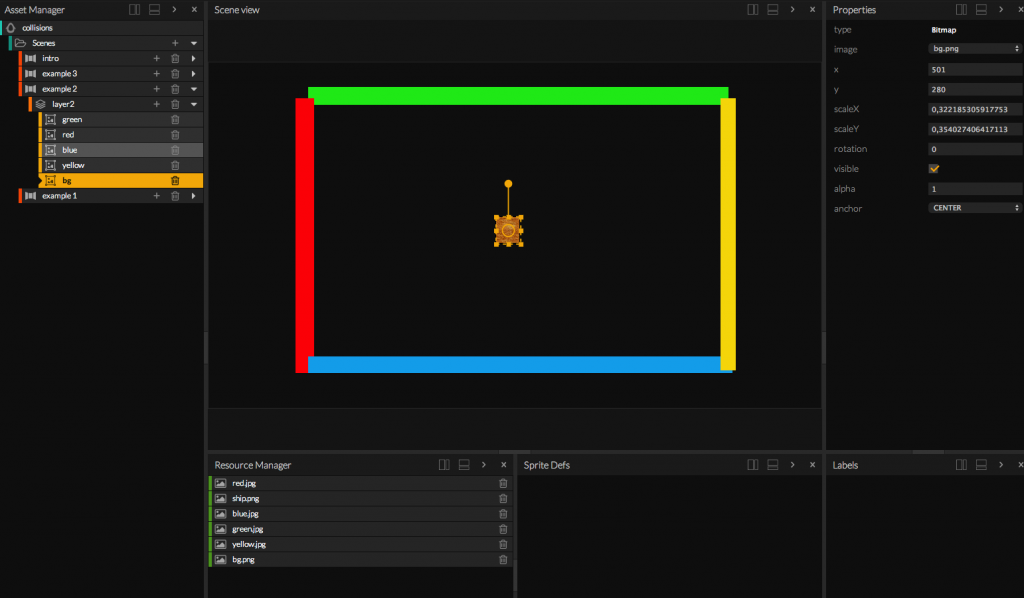
Step 1. Preparing the Scene.
Every one of the 4 walls will be a bitmap. Upload the 4 bitmaps for the walls and put them on the scene as shown in the figure below.
Step 2. Creating the elements collection that will collide
After preparign the scene you have to create a bitmap collection with the 4 created walls. To do that you have to drag and drop the AddItems blackbox ( LogicChart -> Blackboxes tab-> Collections -> AddItems ). You have to drag&drop; one of the bitmap walls from the 2D tab of the AssetManager panel to the item(s)1 parameter of the AddItems blackbox. After doing that a new parameter will be shown below the first one. You can now drag and drop the next wall on this new parameter and so on. Then you have to clikc with the right button on the targer parameter and choose Assign, creating a bitmap collection that we will use to add the walls configured in the parameters.
Step 3. Animating the bouncing box
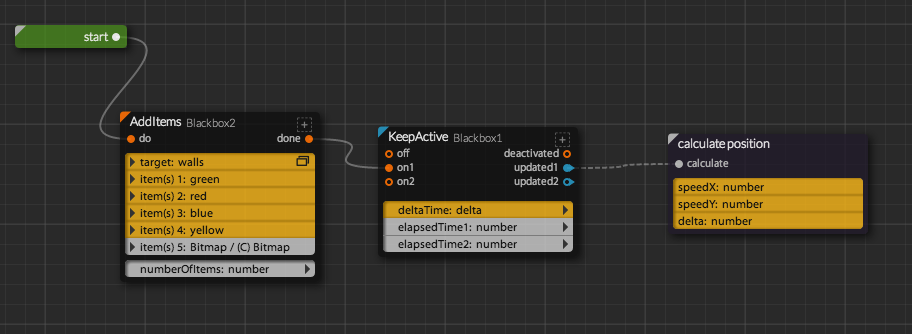
Once we have started the walls collection we need to animate the box that will collide with the walls. To do that you have create 2 different speeds on X and Y (so you can independently change the direction on X or Y) and a rotation speed. In every clock cycle we will apply these speeds to the position and rotation of the box.
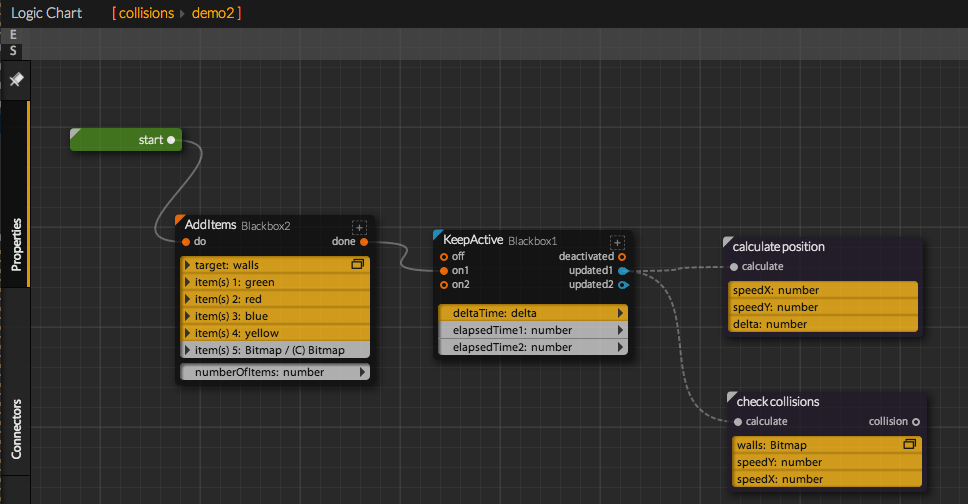
The first thing we need to do to animate anything is some kind of action that will be run in every clock cycle. For this you can use the KeepActive blackbox (blackboxes tab -> Stream -> KeepActive). This blackbox has a variable number of on triggers. Once these triggers are activated they run their related output in every clock cycle until the off input is activated, stopping the running of the blackbox. The blackbox provides, in the deltaTime parameter, the elapsed time from the previous clycle. Further more, for every added trigger it outputs a elapsedTimeN parameter the total elapsed time from its activation. You have to assign a value to deltaTime parameter by clicking with the right button over the blackbox. We also will use this blackbox for keeping active the collisions detection.
For a better understanding and management of this example you can create a Script that will deal with the box position calculation in every clock cycle. To create a Script just drag and drop a Script button from the Scripts tab to the LogicChart. You can also create a Script by clicking on the ‘+’ buttón in the Script in the Logic Tree panel. If you double click on the created Script you will access to the content of this Script.
If you want to create an animation with a constant speed, and with independence of the frameRate, you need to know the elapsed time between a frame and the next one. If you multiply this elapsed time by a constant value (speed) you get the needed value to have fluid and constant animations.
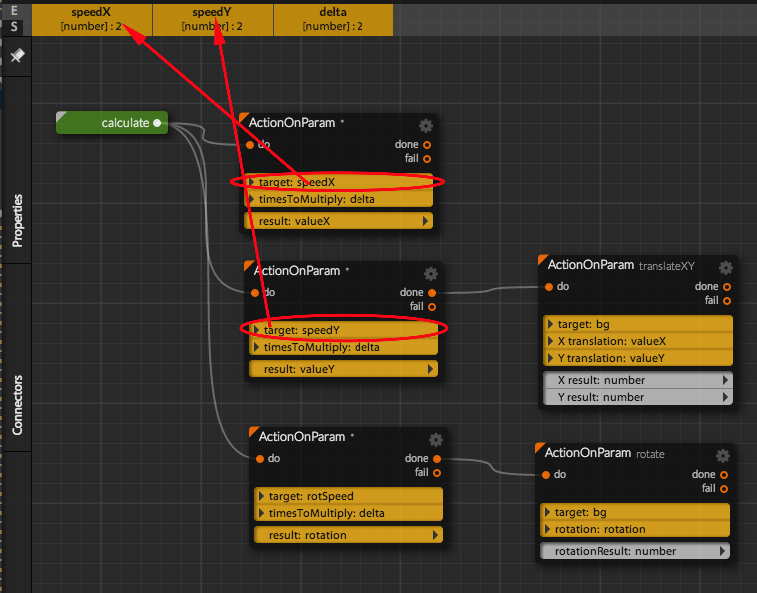
The best way to do it is create a numeric param of speed type. For example, drag and drop a parameter from Parameters tab -> Basic -> number to the LogicChart. This will create an ActionOnParam blackbox with an assigned numeric parameter.
We will create 3 blackboxes as the mentioned before (speedX, speedY and rotSpeed). Then click in the created parameters, setting to value 0,1 the content property for the speedX and speedY and 0,001 for rotSpeed. Once the speeds are assigned you have to verify that the selected operation for the blackboxes is ‘*’(which is the default operation for numerics) and drag the deltaTimed parameter of the KeepActive blackbox and drop in the timesToMultiply parameter of every actionOnParam.
To move the box bitmap you have to drag the box bitmap from the AssetManager and drop it in the LogicChart. In the created ActionOnParam select the translateXY operation. Then you have to drag and drop the X and Y speed calculation results on the X translation and Y translation parameters.
Repeat the same process for rotation using another ActionOnParam with a rotate operation.
To run the blackboxes inside this Script you need to create an input connector that starts the running of the Script (Connectors tab -> InputConnector drag it to the LogicChart). Rename it to calculate.
The result should look like this:

If we connect, in the root Script, the KeepActive blackbox with the created Script and click in the Play button of the Preview panel you should see how the box is moving:
Step 4. Calculating the collisions with the walls and changing the direction.
Now the box is moving but it does not collide with the walls. We are going to calculate the collision with the 4 walls and change the X or Y speed sign depending on the wall the box is colliding with.
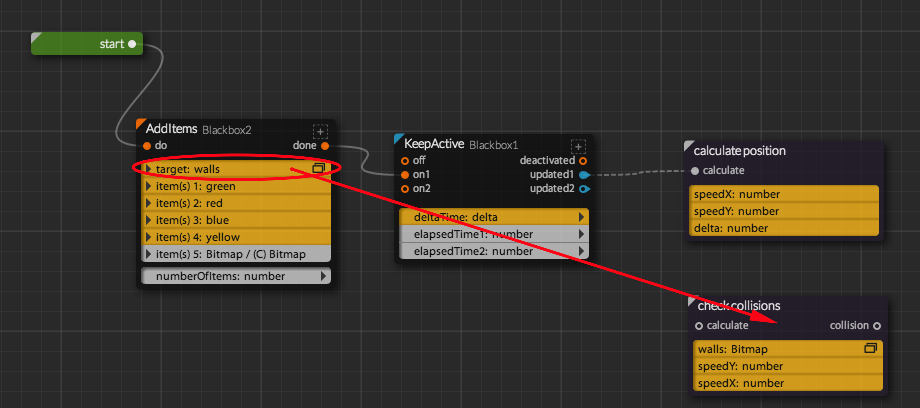
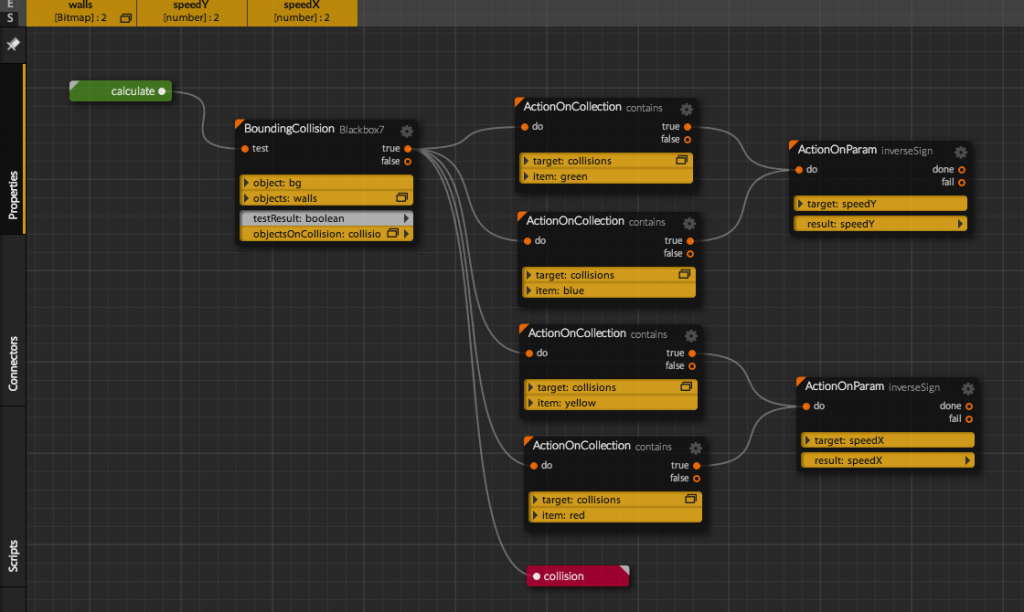
As we did before, we are going to create a new Script to have a better and more organized visual scripting. We create Script and rename it as checkCollisions. Inside this Script we drag and drop a BoundingCollision blackbox and set its type property to object-objects. Then we have to drop the box bitmap from the AssetManager to the object parameter. And in the objects parameter we should drop the walls collection created in the step 2. But this collection parameter is in the root Script so we have to go back to this Script and drag this parameter from the AddItems blackbox and drop it in the new checkCollisions Script. Now this parameter is available (in the top bar of the LogicChart) and you can drop it on the objects parameter. Finally you should assign an Object2D collection to the output parameter ObjectsOnCollision.
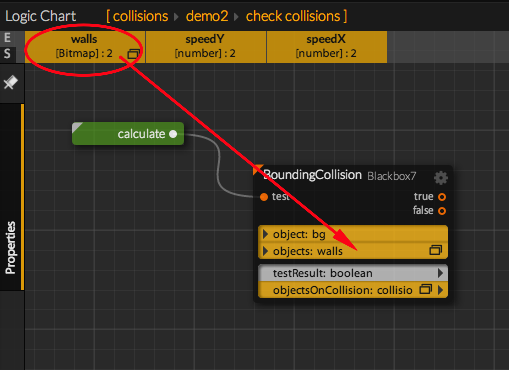
Now we are going to check the collision with every wall. We are going to create actionOnCollection blackboxes by dragging 4 times the output collection created before. We have to set the contains actions in the 4 created actionOnCollection. You have to assign every wall bitmaps to every actionOnCollection second parameter. As you can see the way of detecting the collision with a wall is by asking if this wall is in the output collection of the BoundingCollision blackbox.
Last thing you have to do is to change the sign of the speed in X if the collisions, is with the left or right walls, or the Y if the collisions is with the top or bottom ones. To access these speed parameters you need to share them from the Script calculatePosition created in the step 3. You have to access to this Script and drop the speed parameters for X and Y to the top bar of shared parameters in the LogicChart. Then you should drag and drop them, in the root Script, from the calculatePosition Script to the checkCollisions Script.
Now you can link all the elements.
If you run the game you will see that the collisions are correctly calculated, but sometimes the box gets stuck in the walls. This is because sometimes, in the collision time, the box is inside the wall. To avoid this effect you can save the box position (ParametersManagement blackbox -> Copy) before calculating it again and, if the collisions is detected, change the sign of the speed and also set the previous position.
You can get the position value by selecting a parameter in which is shown the box and dragging on the properties tab to the blackbox position that requires them. Do not forget to set the call order to ‘0’ for the link between KeepActive and Copy blackboxes.

Example 3: Accurate collisions.
One of the main problems with the BoundingCollision blackbox is that it uses all the containing box of the object2D for calculating collisions. It means that if we have an object with a big empty or transparent area (a lot of ‘air’), the collision will be detected in an undesirably way.
For detecting more accurate collisions you can create several smaller invisible objects and hang them in the hierarchy of the object you want to calculate the collision:
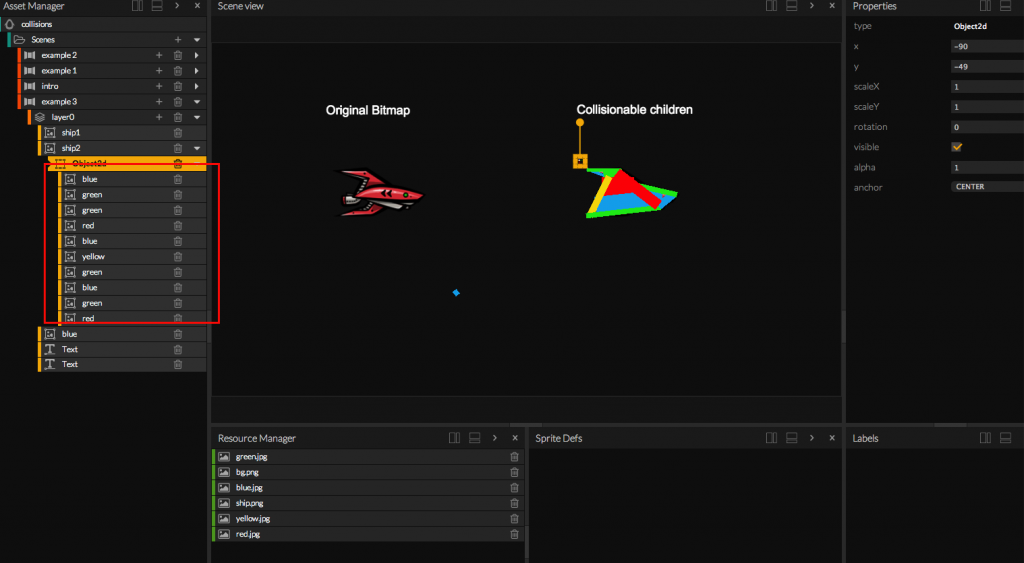
As we mentioned before, collisions are also checked with invisible objects, so we can set the objects visible property to false.
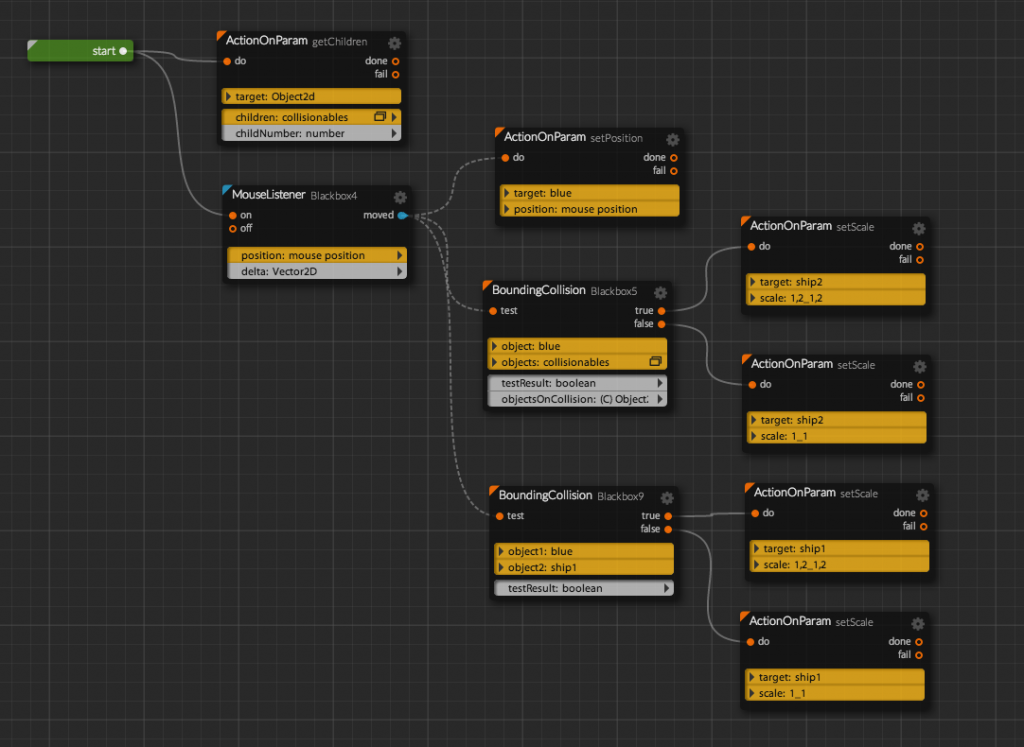
Now we are going to make the same steps as in the example 1 for the first spacecraft (the one that does not have hanged objects) and we are going to create a collection with the collidable objects of the second spacecraft. To do that we can use the getChildre action of the ActionOnParam blackbox, using as target the parent element of the collidable bitmaps. You can see the full example here:
If you click in the play button you can check the differences between both methods.
Finally you may be aware that detecting collisions is a costly process. You may be willing to make perfect collidable boxes for all your elements. But it will probably be more efficient if you try to use the minimum collidable objects to detect collisions.