In this article, we will cover a few aspects of the systems implemented in the code base of Shift Quantum. From how blocks composing the levels are managed, to our command system for the in-game level editor, including how we generate those commands from the HUD, you will have a better idea of how we handle all of this in code.
Separation between model and the view
Because basically our levels are a grid of blocks, early on in the development of the game we thought it would be best to separate the data from its representation. This would have several advantages:
- The game would only have to manipulate some raw and abstract data without having to take care of where to place the blocks for example.
- It's possible to have multiple representations of the model: a 3D representation like now, but also a complete 2D sprite based view if needed ( to generate a map for big levels for example ).
- It is very easy to write unit tests to validate that the data is correctly handled by the model, enforcing the validity of the various operations on the model throughout the development.
The model contains all the information related to the level, like the width and height, the current color space (Black or White), the rotation of the grid, or all the blocks coordinates. It also contains information used only by the in-game level editor, like the cursor coordinates and rotation.
The model communicates with the other classes using events. Lots of events... Here is a non exhaustive list of the names of the events to give you a rough idea: FOnInitializedEvent, FOnWorldRotationStartedEvent, FOnWorldRotationEndedEvent, FOnWorldColorUpdatedEvent, FOnBlockRegisteredEvent,FOnBlockUnRegisteredEvent, FOnDimensionsUpdatedEvent, etc…
The other classes which want to know when something happens in the model just need to subscribe to those events and react accordingly. For example, the level view is interested for example in knowing when the dimensions of the grid are updated, to adjust the boundaries around the play space, or when a block is registered, so the view can move the block to its correct location in the 3D world (because the model does not even know the blocks are in a 3d space), and so on…
One thing to note is that the model does not perform any logic when you update its data. It’s up to the caller to take care of removing an existing block before adding a new one at the same coordinates. More about that later in the commands section.
Level Editor Commands
During the incubation meetings, maybe the first answer given to the question "What do you think is important to have in an in-game editor?" was an Undo-Redo system for all the operations available.
So we obviously had to implement a command pattern. This is a very well-know pattern, so I don't think we need to dive a lot in the details. But if you need a refresher, here are some links.
Nonetheless, I can give you one advice: your command classes must be as lightweight as possible. No logic should happen in the commands, because the more logic you put inside, the more complicated it will be for you to handle the Undo and Redo parts of the contract.
As such, the declaration of the base command class is very simple and straightforward:
UCLASS()
class SHIFTQUANTUM_API USQCommand : public UObject
{
    GENERATED_BODY()

public:

    USQCommand();

    FORCEINLINE const FSQCommandContext & GetContext() const;

    virtual void Finalize();
    virtual bool Do();
    virtual void UnDo();

    void Initialize( const FSQCoords & coords );

protected:

    UPROPERTY( VisibleAnywhere )
    FSQCommandContext Context;
};
I think you will agree it can hardly be less than that. You may notice we don't have a ReDo function, because Do will be used in both scenarios.
To execute those commands (and of course to UnDo and Redo them), we have a command manager component attached to our level editor actor. As you can guess, its definition is very simple:
class SHIFTQUANTUM_API USQCommandManagerComponent : public UActorComponent
{
    GENERATED_BODY()

public:

    USQCommandManagerComponent();

    bool ExecuteCommand( USQCommand * command );
    bool UnDoLastCommand( FSQCommandContext & command_context );
    bool ReDoLastCommand( FSQCommandContext & command_context );
void ClearCommands();

private:

    UPROPERTY( VisibleAnywhere, BlueprintReadonly )
    bool bCanUndo;

    UPROPERTY( VisibleAnywhere, BlueprintReadonly )
    bool bCanRedo;

    UPROPERTY( VisibleAnywhere )
    TArray< USQCommand * > DoneCommands;

    UPROPERTY( VisibleAnywhere )
    TArray< USQCommand * > UnDoneCommands;
};
And its implementation is a classic too. For example, the ExecuteCommand:
bool USQCommandManagerComponent::ExecuteCommand( USQCommand * command )
{
    if ( command == nullptr )
    {
        UE_LOG( LogSQ_Command, Error, TEXT( "Can not execute the command because it is null." ) );
        return false;
    }

    if ( command->Do() )
    {
        DoneCommands.Add( command );

        for ( auto undone_command : UnDoneCommands )
        {
            undone_command->Finalize();
        }

        UnDoneCommands.Empty();

        bCanUndo = true;
        bCanRedo = false;

        return true;
    }

    return false;
}
One function which deserves a bit of explanation is Finalize. You can see this function is called on commands which have been UnDone at the moment we execute a new command, before we empty the UnDoneCommands array. This allows up to do some cleanup because we know for sure the commands won’t be executed again.
For example, when we want to add a new block in the world, the command generator will spawn that block, initialize it, and pass the block as a pointer to the RegisterBlock command. When we Do that RegisterBlock command, we just kind of toggle on the block (make it visible, set up the collisions, etc…), and when we UnDo the command, we do the opposite (hide it, disable the collisions, and so on…). Finalize then becomes the function of choice to destroy the actor spawned by the command generator.
void USQCommandRegisterBlock::Finalize()
{
    if ( ensure( Block != nullptr ) )
    {
        GetOuter()->GetWorld()->DestroyActor( Block );
    }
}

bool USQCommandRegisterBlock::Do()
{
    Super::Do();

    return ensure( GetTileManagerComponent()->RegisterBlock( *Block, Context.Coords ) );
}

void USQCommandRegisterBlock::UnDo()
{
    Super::UnDo();
    ensure( GetTileManagerComponent()->UnregisterBlock( Context.Coords ) );
}

void USQCommandRegisterBlock::Initialize( const FSQCoords & coords, ASQBlock & block )
{
    Super::Initialize( coords );
    Block = █
}
There are two things worth noting:
- Because the command manager only executes one command at a time, and because any action we do is made of several commands (for example, adding a block in the grid is made of at least 2 commands : remove the existing block at the cursor coordinates, then register the new block), we have a special command class named USQCommandComposite. It stores an array of sub-commands. Those sub-commands are executed linearly in Do and in reverse order in Undo.
- You may have noticed the FSQCommandContext structure. Each command holds a context internally, which is used to store some global informations at the moment the command is initialized (just before being executed for the very first time). This allows us to restore the cursor position and the zoom level of the camera when we undo / redo any command, allowing the player to have the editor in the same state as it was when he first executed an action.
Command generation
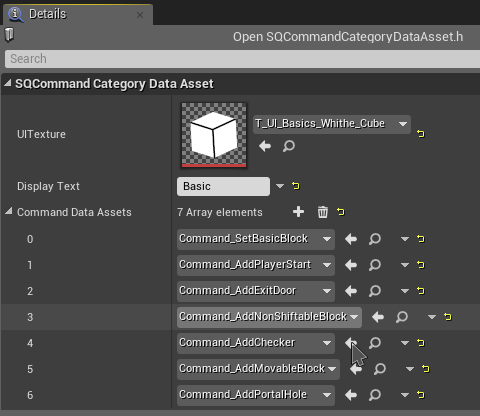
Because our commands are very simple, we need to put the logic elsewhere. And because we need a way to bind the generation of those commands to the UI, we created class hierarchy deriving from UDataAsset. This allows us to make properties editable in the UE4 editor such as the sprite to display in the HUD, the text to display under the sprite, the static mesh to assign to the cursor, or the maximum number of instances of a given actor which can be spawned in the level (for example, we only allow one start point and one exit door).
Here is an excerpt of the definition of this class:
UCLASS( BlueprintType, Abstract )
class SHIFTQUANTUM_API USQCommandDataAsset : public UDataAsset
{
GENERATED_BODY()
public:
USQCommandDataAsset();
FORCEINLINE bool CanBeExecuted() const;
virtual USQCommand * CreateCommand( ASQLevelEditor & level_editor ) const PURE_VIRTUAL( USQCommandDataAsset::CreateCommand, return nullptr; );
protected:
UPROPERTY( BlueprintReadonly )
uint8 bCanBeExecuted : 1;
UPROPERTY( EditAnywhere )
TSubclassOf< ASQBasicBlock > BasicBlockClass;
UPROPERTY( EditAnywhere, BlueprintReadonly )
UTexture2D * UITexture;
UPROPERTY( EditAnywhere, BlueprintReadonly )
FText DisplayText;
// …
};For example, here is the editor view of a command data asset used to add a game block in the level:

Our command generator assets are grouped by categories, which is another UDataAsset derived class:
In the in-game editor UI widget, we just iterate over all the commands of the selected category, and add new buttons in the bottom bar:

When the player presses the A button of the gamepad, we know the selected command data asset. Now, we just need to create the command out of this data asset, and give it to the command manager command:
bool ASQLevelEditor::ExecuteCommand( USQCommandDataAsset * command_data_asset )
{
    if ( command_data_asset == nullptr )
    {
        return false;
    }

    if ( !command_data_asset->CanBeExecuted() )
    {
        UE_LOG( LogSQ, Warning, TEXT( "The command %s can not be executed." ), *command_data_asset->GetClass()->GetFName().ToString() );
        return false;
    }

    LastCommandDataAsset = command_data_asset;

    auto * command = command_data_asset->CreateCommand( *this );
    return CommandManagerComponent->ExecuteCommand( command );
}
To finish this part, here is the implementation of the command data asset used to register a game block in the level:
USQCommand * USQCommandDataAssetAddGameBlock::CreateCommand( ASQLevelEditor & level_editor ) const
{
if ( !ensure( GameBlockClass != nullptr ) )
{
return nullptr;
}
// Get needed informations, like the cursor position, the current displayed color, and so on…
// Early return if we want to register a game block on coordinates which already has the same game block
if ( tile_infos.Block->IsA( GameBlockClass )
&& tile_infos.BlockPivotCoords == coords
)
{
return nullptr;
}
// Spawn the game block
auto * game_block = level_editor.GetWorld()->SpawnActor< ASQGameBlock >( GameBlockClass );
// … and initialize it
// Fill the array with all the coordinates the new game block will cover (some blocks are larger than a single tile)
TArray< FSQCoords > used_coords_array;
game_block->GetUsedTileCoords( used_coords_array );
const auto opposite_color = USQHelperLibrary::GetOppositeColor( world_color );
auto * command = NewObject< USQCommandComposite >( game_mode );
command->Initialize( "AddGameBlock", coords );
// For each coordinate used by the new game block, unregister the existing block
FillCompositeCommandWithUnsetCoords( *command, *tile_manager, used_coords_array, opposite_color );
auto * set_game_block_command = NewObject< USQCommandRegisterBlock >( game_mode );
set_game_block_command->Initialize( coords, *game_block );
// Finally, register the game block
command->AddCommand( *set_game_block_command );
game_block->FillCreationCommand( *command );
return command;
}As you can see, there is a lot more logic than inside the various commands, because here, we take care of all the steps needed to execute a final command. As mentioned in the first part, the model does not perform any logic related to the integrity of its data.
It’s then up to the command generator to make sure for example that all the coordinates of the grid which will be covered by a new game block are first cleared up.
This can expand quickly, because maybe one of the coordinates to clear is part of another game block. Then the complete game block must be removed too. But as we can not leave holes in the grid, we must in a last step fill the holes left by removing this game block, but not covered by the game block we want to add, by basic blocks.
This gets really hefty in the command generator which allows to resize the level, as you can imagine. And this is where being able to unit-test the model comes in very handy. (VERY!)
That’s all for today’s article. We hope you found it useful, and helped you understand a few of the systems we currently use inside our game.