In this post I want to give you some insights into our level workflow. The very first step, to get an idea what we want our setting to look like, was to create an analogue mood-board. After that we had a clear picture in mind. But at the beginning of the project we weren’t sure which technical way to choose to create a great mars terrain for our levels.

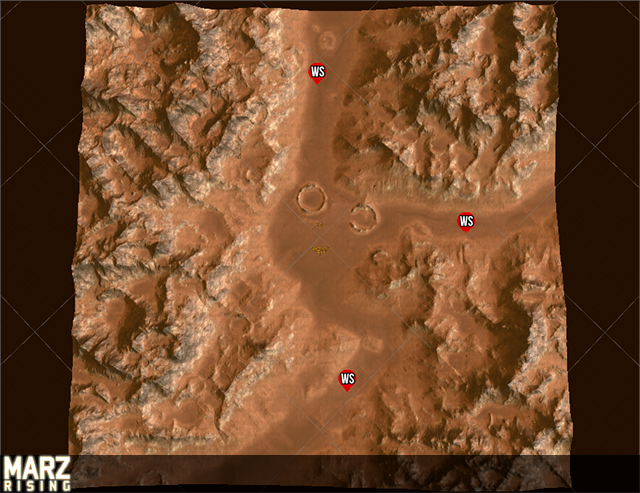
I did a lot of tests and look devs till I had this first image with the landscape. From this moment we knew, okay this is the way we should go. Nevertheless, it took a while till we had something that met our requirements, style-wise but also production-wise. (It should not take weeks or months to create one level)
I first checked out the default Unity Terrain System. But I had too much troubles using it. I felt very unflexible and in my opinion it uses too much performance. Performance in our case is very important because we really want to send hundreds of zombies out on the battlefield. So I thought the best way would be the old-school-way ;) just using meshes with a nice splatmap shader.
World Machine:
So I recently stumbled upon World Machine, okay, I knew it already for quite some time but I honestly never really gave it a go. First off, it is awesome! It really lets us create the whole level within World Machine. Although it is a procedural terrain generator, it is flexible enough and has great tools to control the terrain exactly as we want it. One of the best feature in my opinion is the tiled based building in World Machine.
For our level workflow we use a tile based map of 3×3 tiles. The center tile is basically the main tile, the area where the user can build it’s base in the game. The outer tiles are more like a backdrop, so texture and geometry resolutions can be reduced on them. At the point when I’m happy with the terrain in World Machine, I export several maps like a heightmap, splatmap, colormap and a normal map.
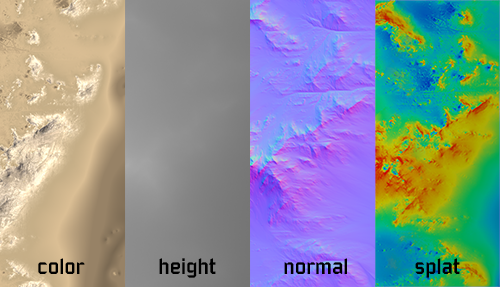
The colormap is basically just a map similiar to the splatmap just with different colors depending on the height of the terrain, I use it as the base texture. I then apply the height map on a subdivided plane and reduce it with meshlab. Meshlab has some cool poly reduction tools. In our case I use the quadric edge collaps decimation, which makes sure flat areas are reduced more than detailed areas.
Unity:
Back in Unity, I assign a custom splatmap shader on my meshes, with the base colormap(diffuse), normalmap and splatmap. The terrain in the picture uses 3 different detail textures, which are controlled by the splatmap colors(R,G,B). Some nice lighting, and…that’s it.
Up to now we are happy with the results. Enjoy the pictures :)
Cheers,
Marc


