The last of the six King’s Conflict kings has now been released onto the unsuspecting world – the Deathly King, lord of darkness, cold, decay, curses, unholy swarms, and of the undead. The Deathly King is not himself undead, but many of his servants are. His play-style is very different from anything you’ve seen before. He excels putting large numbers of weak units into play, that don’t do much damage but can be irritatingly hard to kill – he also has a lot of frost-magic using units, and some high-health card-generators. His commands are varied, and include a lot of ways to kill enemy servants, either slowly (curses) or quickly. He doesn’t however have much healing power, or area of effect weapons (other than Blizzard), or easy ways to knock over enemy structures. Economically he is less able than some – he relies on map control to make money, but is well able to do so with cheap units. Note that the Deathly King’s ‘cheap’ army relies heavily on the three ‘graveyard’ servants below (Zombies, Skeletal Archers and Ghouls) – these can be hard for him to place if his opponent can destroy any graveyard structures, as they then need a living unit to die before they can be put down.
New mechanics
The Deathly King introduces undead servants, and ‘skull’ tiles. Whenever a living unit dies (and there is a Deathly King on the map), it leaves behind a skull icon for two turns.
Certain undead servants (Zombies, Ghouls and Skeletal Warriors) can only be played on these skull tiles or next to a Graveyard, as they are essentially reanimated corpses. All undead units can also heal themselves for one point of damage by moving onto a skull tile – Ghouls heal all their damage if they do this.
Undead servants work like normal servants, but with a few extra rules. They use no food, but DO take one damage per turn in deserts nonetheless. They do not leave skulls behind when they die, but (as above) they can heal by moving into a skull tile, which uses the skull up. Finally, they cannot be healed by normal methods – normal healing (e.g. from blessing or priests) damages them instead. The Death Knight provides a form of ‘anti-healing’ which heals undead while damaging living units.
The Deathly King
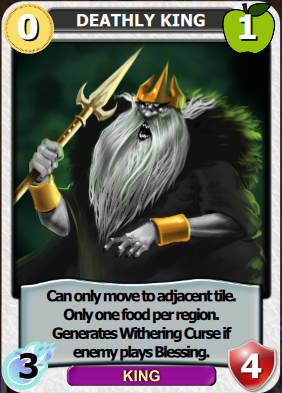
The Deathly King (DK) is something of a glass cannon –he has a powerful frost attack (so has a 50% chance to freeze any target), but is not well supplied with health. You will normally want to keep him safe and away from the action, though adding his firepower at critical moments might be useful.
The DK has one major disadvantage over all other kings – he is poor at generating food, only generating 1 rather than 2 food per region. Luckily, many of his servants are undead and do not require food; one reason why he has more cards than other kings is that he requires a lot of specialized servants of this type. He also has an additional power – whenever your opponent plays a blessing card, he generates a withering curse card (unless he already holds one) – a withering curse will slowly kill a servant and eventually turn it into an undead servant under your control. This may seem a little unfair on the Blessed King who is normally awash with blessings, but the Blessed King has his own advantages to counter this – blessings do one damage to undead units, and Holy Lights do two damage. He can also use Fire Priests to remove curses from his units. The Blessed King and Deathly King are natural enemies and have weapons designed to hurt each other - but neither side holds a fundamental advantage.
Servants

Carrion Crows are a cheap flying unit that can enter (and take control of) any tile. They have no combat power whatsoever (unless buffed by something like a fiery pit), but with their fast speed and all-terrain mobility are an excellent economic tool – use them to boost your income or deny it to your opponent. They also of course enable you to fly in and place units where your enemy really doesn’t want them to be. Finally, they are living units so leave a skull behind when they die – you can sacrifice them to put a skull somewhere useful (e.g. to let you place on of the graveyard units described below).
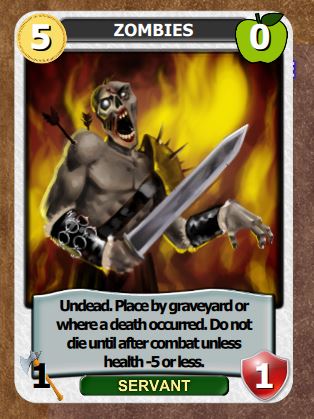

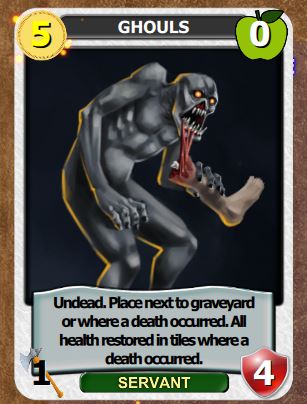
These three servants are collectively known as the graveyard units. They form the backbone of any Deathly King’s army – they are cheap, and while they have limited striking power they are all very effective ‘irritants'. Zombies are easy to kill – but as they will always survive until the end of combat they will always get a hit in. Skeletal archers are a ranged unit, and as such always useful. As they only take one damage from ANY ranged attack (and have two health) they will always get a shot off in one v one ranged combat. Finally ghouls have quite a bit of health for such a cheap unit, and an effective heal mechanism – they can take a little while to kill.
All three units have different placement rules to anything else in the game. They can be placed next to a graveyard (and graveyards also generate these cards), or on a ‘skull’ tile anywhere on the board. You can then, for instance, use them as a way to establish a presence on the enemy’s side of the map – kill an enemy unit (perhaps with The Reaper), then place one of these ‘graveyard’ units, perhaps followed by another more powerful servant.
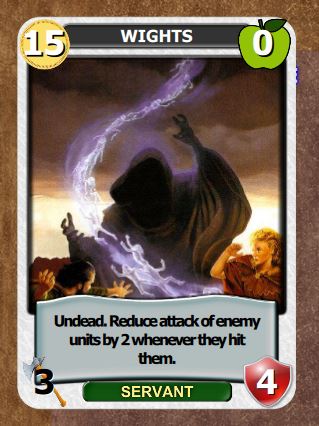
Wights are a bread-and-butter melee unit for the Deathly King – while their power of reducing enemy attack can certainly be useful (especially if you can hit an enemy king), primarily they are solid melee servants at relatively cheap price – the equivalent perhaps of the Warrior King’s Men at Arms (they are the same price, but are a little weaker and harder to heal or buff – though they do have their attack reduction power to compensate).

The Dark Warden is the Deathly King’s ‘card-pulling’ unit – though he does also have curse of power (see below) to help with this. He is expensive, but as a frost-magic servant certainly useful in combat. He can rarely be expected to actually kill enemies himself to generate cards, but as support in combat he can provide both extra freeze and firepower, combined with a supply of new cards.
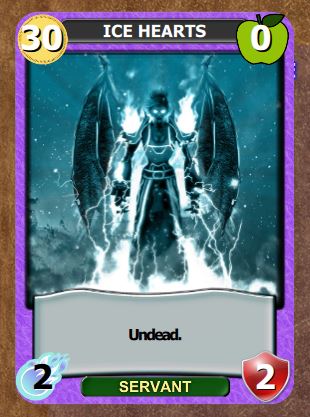
Ice Hearts are straightforward frost-magic units – they are not especially cheap, but still provide a invaluable ice-based firepower combined with more durability than many magic-using units. Combined with frost-buffs (from snow, or from the Ghostly Willow), they are especially dangerous.
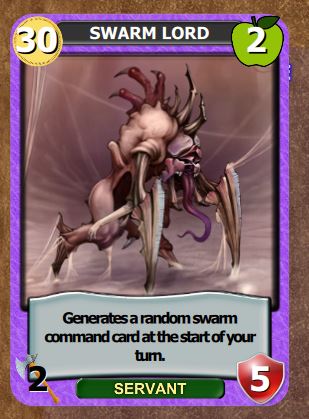
Swarm Lords are not undead, and require two food – this can be a problem for a Deathly King, and they can rarely be played early in the game before food supply is secure, although their high health does mean they can survive famine for a turn or two. Once on the field though they are powerful card-generators. While not particularly effective in combat they are well supplied with health, so cannot easily be sniped. The swarm cards they generate are all region-based area of effect commands that can damage or lock-down units, or remove food generation. A constant stream of these cards can easily put even the best opponent onto a back foot.
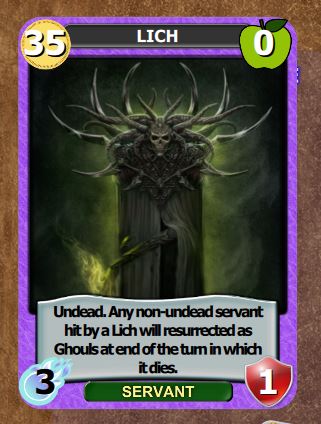
The Lich is a powerful unit, and good value for the money. For the same price as a Fire Mage, you get a frost-wielding unit (with the 50% chance freeze effect) – the freeze itself will normally more than compensate for the lower attack. You also get to generate a supply of units for yourself by killing enemy servants – once an enemy servant is hit, it doesn’t even matter if the lich is killed – when that servant dies it will become your ghouls. While the Lich is (like the Fire Mage) a glass cannon, it is nonetheless one of the most important servants in the Deathly King’s unholy menagerie.
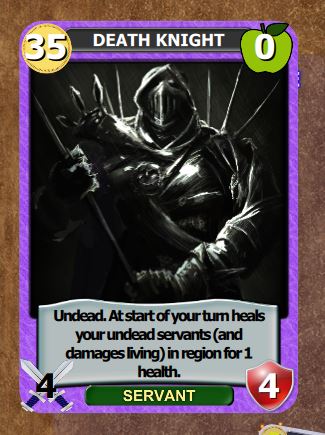
The Death Knight is the only source of healing for undead units (except for the minimal healing provided by moving onto skull tiles). He’s also a fast and capable combat unit – unlike the priest, which in some ways he resembles, you will want to keep him on the front lines. Note that the Death Knight cannot heal himself – two of them however can happily heal each other. Be careful when using Death Knights though – they damage living servants in their region, and not all the Deathly King’s servants are undead – units like carrion crows, swarm lords and dark wardens will all take damage from the Death Knight’s presence.
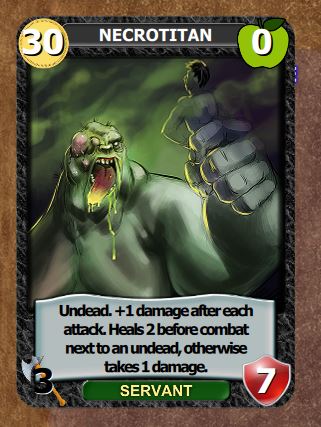
The Necrotitan is the Deathly King’s only epic servant. He is similar to the ‘golem’ units (Mountain Giants and Oaken Hearts) in many ways, but rather than a terrain preference he requires the presence of undead support to remain in good condition. Unlike the golems though he isn’t a quick-strike unit – it takes a while for him to build his strength up by wading through weaker enemy units. If he does so though he can be unstoppable.
Structures
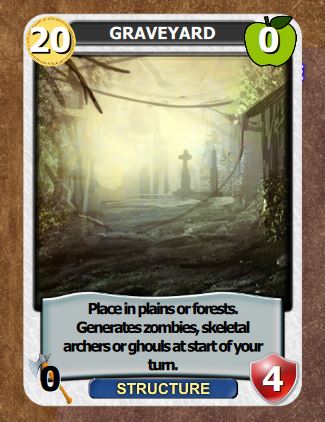
The Graveyard is perhaps the ‘signature’ structure of the Deathly King – not only does it generate graveyard servants, but it provides a way to place them without waiting for units to die. If you put one of more of these in your deck, consider ‘top-decking’ one so you can get a good supply of these units going from the start of the game – they rely on numbers to overwhelm the enemy, and the sooner you start the more you can get. Graveyards have no combat ability, but still provide an effective way to lock-down and claim a region – while they cannot fight, the units they generate certainly can!
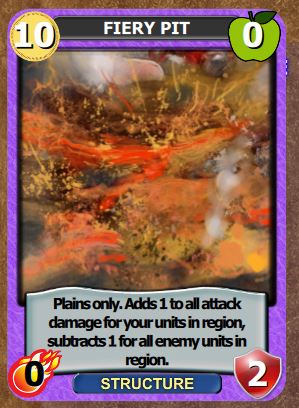
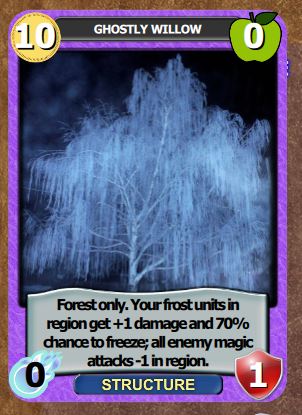
These two structures can be used as cheap ways to claim a region, or as support in combat. The willow makes an effective defense booster, as whatever other units you have, your king is certainly a frost mage, and will be seriously augmented by extra damage and a better chance of freezing. If the enemy is magic-heavy, the damage reduction on their units can also be very important. Fiery pits provide more general-purpose combat support. Both of these structures are limited by their terrain restrictions and low health, but when they work they can work very well indeed. Even when they don't, they can claim regions for you, and pay back their gold cost in a few turns.
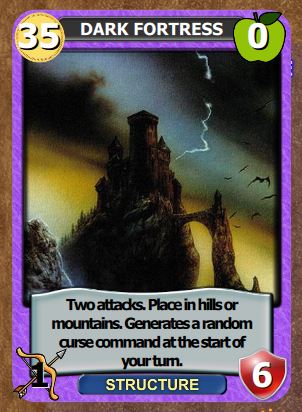
The Dark Fortress is similar to a slightly watered down castle, but with card generation built in. You’ll find it equally useful in both a combat support/area denial role (like a castle), and as a card-generating investment – if you can get it to do both (i.e. use it in combat but not get it killed) then it can be very cost effective. The curses it generates vary in utility, but can be very powerful – and as curse of power can lets you draw cards when a cursed unit dies, the Dark Fortress can also be thought of as a way to increase your card-pulling rate, albeit with something of a lag before the results start flooding in.
Commands

The four curses can be placed directly in your deck, but are perhaps more usefully also generated by the Dark Fortress. Withering curse is generated by your king as well, whenever the enemy plays a blessing. You are hence likely to see a lot of curse cards – use them well!
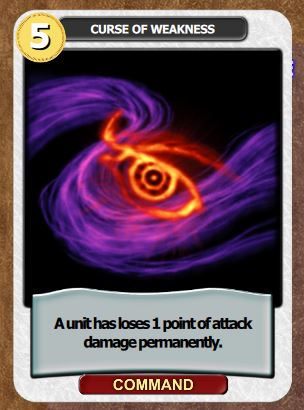
Curse of weakness is relatively innocuous, but notice that it can be played on any unit – this includes structures and King’s. Played on a blessed king or on a castle, it can make quite a difference.
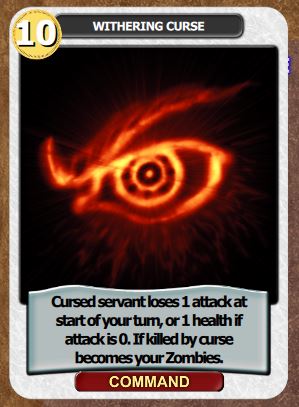
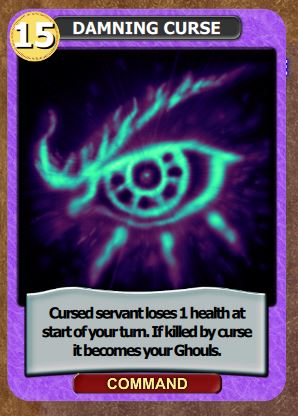
The other three curses are all similar in that they effect servants (and you can curse your own servants if you like), and take effect at the start of your every turn until the servant dies. Note that the ‘final’ effect of the curse requires that the curse itself causes the death – if the servant dies in any other way, the curse will not activate. Damning curse is best used your opponent’s servants to mark them for death – but be aware that it takes some time. Used on low-health glass-cannon type servants (e.g. enemy Liches or Fire Mages) it is devastating of course, and generating graveyard units in the heart of enemy territory can be useful. Withering curse is also a weapon to use against your opponent’s servants, particularly the big ones. It will take longer to kill things, but is a better bet for weakening combat units – once they can no longer attack, they will be pretty useless. Curse of Power is a little different – on some units the increasing attack power will be useful, so (if used carefully) it can be worth playing on one of your own units. You’ll also be very keen for the final payoff to actually happen, and if you play it on your own unit you will be better able to keep it alive. In general with these three curses be careful not to let your opponent ‘sacrifice’ cursed units in an attempt to stop the curse triggering – let them die naturally and you will get your reward.
Cursed zombies are a bit of a special case that needs a full explanation. Damning Curse and Withering Curse kill zombies straight away (i.e. when their health reaches 0). Withering Curse will then turn Zombies into Zombies – but there IS a change, and any buffs or other effects to the Zombies will be lost. Damning curse is more straightforward – the zombies die and become Ghouls. Curse of Power does NOT kill zombies straight away – they last until the end of your combat phase, and consequently when they die are not considered to have been killed by the curse – i.e. you do not get the cards.
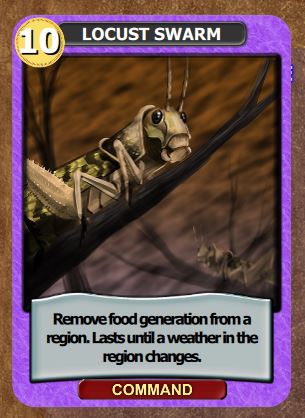
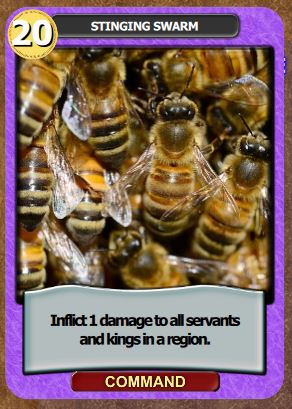
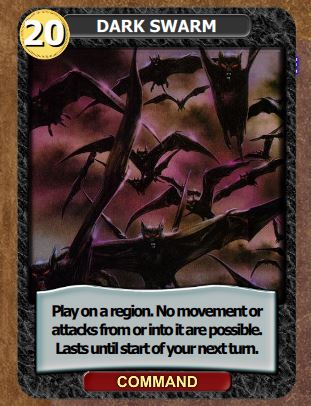
The second ‘set’ of commands are the swarm cards – these are generated by swarm lords, or can be selected directly for your deck. They all affect an entire region, but are otherwise rather different.
Locust swarm is used to help starve your opponent into submission – combined with snow (or even Blizzard) it can help you keep their food supply low and hence army size small. Unless your opponent is packing weather cards, the locusts are permanent. Note that only change in weather removes them – so playing a sun card on an already weather-free region will not do the job. This does also mean that it’s a bad idea to play them on weather-affected regions, as when the weather expires, so will the locusts.
Stinging swarm is a very handy area-of-effect damage command – it affects kings and servants (but not structures). If you can’t find bunched low-health units to use it on (and as such it’s great against other Deathly Kings), use it to snipe single weak card-generating units – in most cases the swarm will cost less than the target unit. While not quite as good as the King of the Hunt’s arrowfall, it’s still a very powerful weapon – and unlike arrowfall, it can be generated.
Dark swarm is a bit like fog on steroids. While it only lasts one full turn, it effectively takes an entire region and its contents out of play, and there is no counter (except to wait for it to expire). Use it to buy time for a retreat, to keep units alive for an extra turn, to slow down an attack, or to lock up units to let you run past.
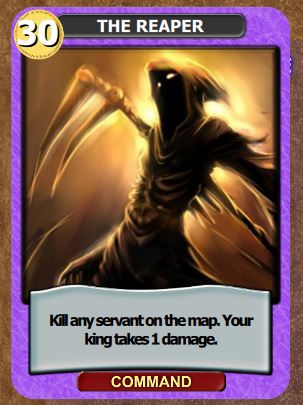
This card is a damage-at-a-distance ‘nuke’, and it’s probably the best one in the game, despite the damage to your king that will result (remember that your king is not undead – you can use a priest, for instance, to heal him). The Reaper kills anything, regardless of health, so even a buffed-up mountain giant is not immune. The only other card that can do this is assassin – and that requires a nearby agent to do the deed. The Deathly King deals in, well, death – this card is him all over.
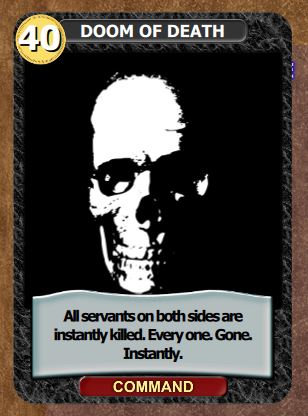
This powerful epic command is devastating. All servants will die on both sides. Save it for when you are losing – or let your enemy think they are winning, spend all their money on an army, and then wipe it out. See all those skulls littering the map? Now you can place all your ghouls and zombies!
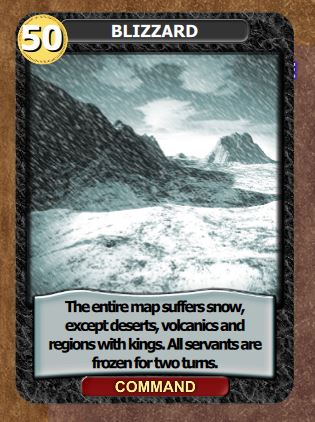
Another ‘wipeout’ command. At first sight you’d think this would be more of a ‘lock everything down and give me time to breathe’ command, but the snow removes most food generation from the entire map for three turns, which means that everyone is going to starve to death. While frozen the servants don’t use any food, the snow lasts longer than the freeze, so there are only then two turns to somehow establish a bit of food-generating capacity before everything unfreezes, and there is a mass die-off. As Deathly King units tend not to use food, this is going to be more of a problem for your opponent than it is for you. Blizzard is thus a general-purpose high-cost high-impact weapon – use it mid to late game, to put your enemy in really nasty position that they will struggle to recover from. If you can pull your servants back to your King's region before playing it, so much the better. It's obviously going to be far more effective if they are relying on regions rather than farms/peasants/hunters etc to generate their food.
So... there you have it. The Deathly King and his huge card-set is the last planned big addition to King's Conflict - a few more cards and a couple more maps, and we will be moving to Beta. See you there!