This is a short tutorial on how to create custom maps for grid cars.
It is divided into 3 short parts: “getting started”, “create the map” and “export the map”.
1. Getting started
You don't need to learn a whole new map editor, it's easier: You can use Blender* for that (or any other 3D Modeling Program which can export to .stl)!
To get started, you can import one of the already existing .stl maps (get them from the maps folder on github) and check out how they're set up. Then, read on about how to make your own map:
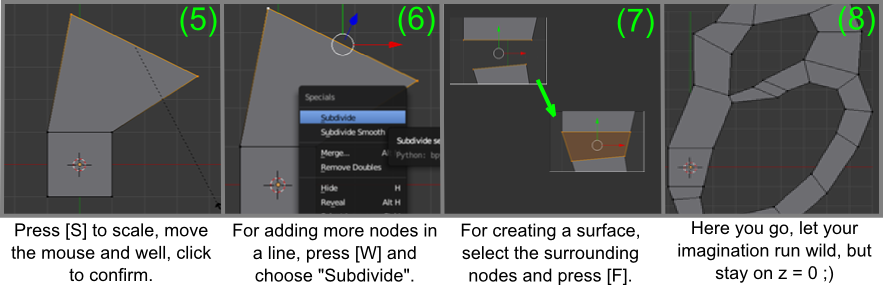
- Open Blender, delete everything (mouse cursor in 3D-view and press [A] twice: First time to deselect the cube, second time to select everything. then press [X] to delete and confirm).
- Now create a plane with [SHIFT + A]->Mesh->Plane.
- To see the map accurately click on the “View”->”Top” on the menubar of the 3D-Window (at the bottom).
- Go into the object “plane” by pressing [TAB] and here we go:
- In this object you can be as creative as you want to, except for some restrictions:
But how to build the road? How to set start positions and finishing line? Lets have a look in the second chapter...
*Blender is a free 3D-modelling and rendering software. We use this for a map editor, because it is a widely used tool. You can download Blender here.
You can read the Blender manual if you have further interest in Blender . But for creating maps for Grid Cars, the commands mentioned below should be enough, you don’t have to be a Blender -pro user.
2. Create the map
Here are some helpful commands:
- Select nodes: Rightclick on a node you want to select. SHIFT + Rightclick to select more. Press [B]for a rectangular region (border select). You see, there are different ways to select things in Blender. If you want more, check this out!
- Deselect nodes: Every node, which is colored yellow is a selected one. If you want to deselect, rightklick on the node or press [SHIFT+A] to deselect/select everything.
- Deleting nodes: As mentioned above, deleting is done by selecting the things you want to delete and pressing [X]. Confirm and it is deleted.
- Connecting nodes: Select the nodes, which you want to connect and press [F] for a face between them. It is also possible to merge nodes by selecting them and pressing [ALT + M] for merging.
- Creating more nodes: The easiest way is to use your plane and extrude the further road:
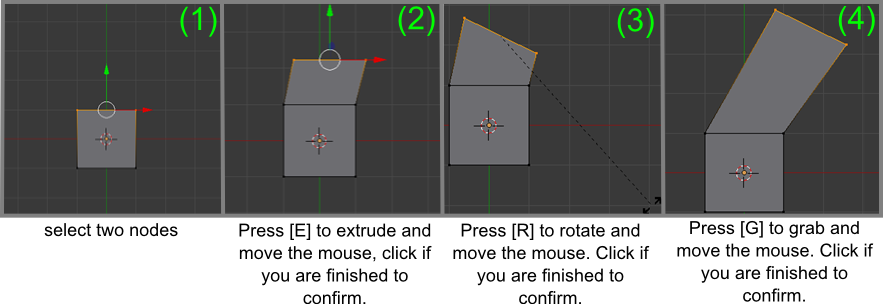
- You can go further:
3. Export the map
To export the map you have to remember four things:
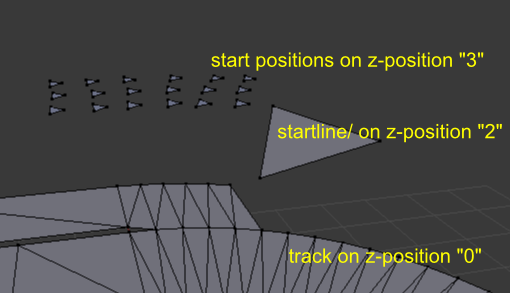
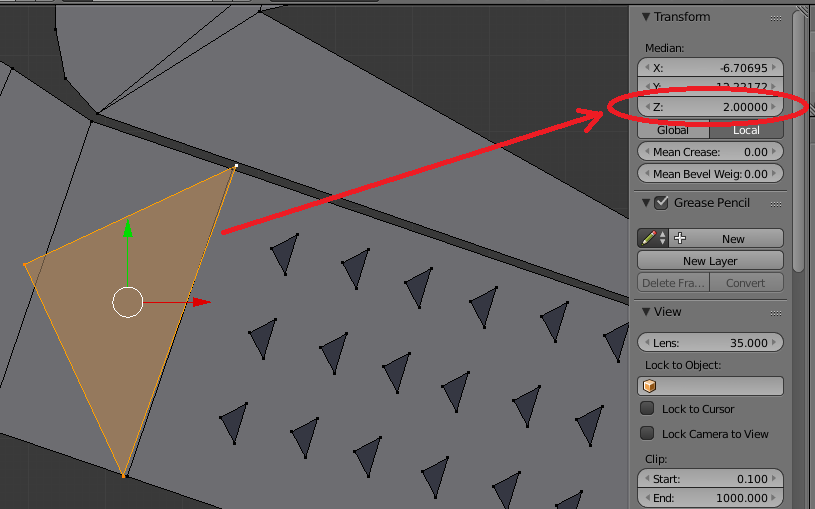
- Creating the startline: The start is a triangle across the entire width of the road, like shown in the picture. The triangle must be wider than it is tall and it must point into the direction which the cars should move in. Make sure that the z-position of this triangle is at 2.0! Otherwise it is not recognized as the startline! To check and edit the z-coordinates, select the triangle and press [N] to see the coordinates in the right of the 3D-View.
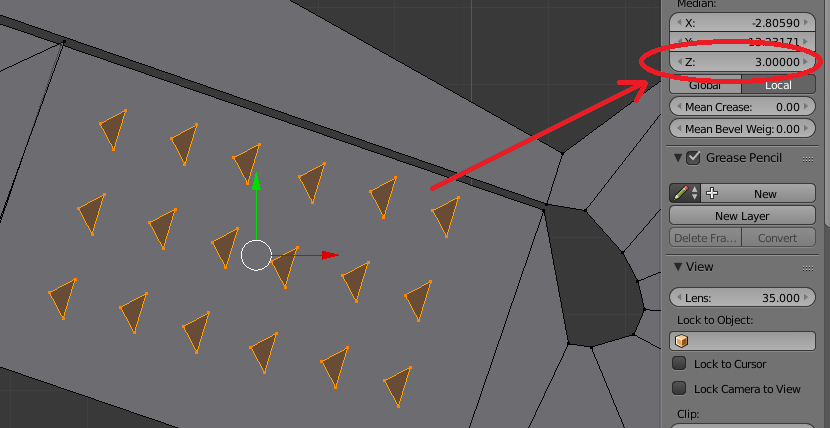
The startline also acts as the finishing line. - Creating the Start-positions: Create some small triangles for the start-position of the cars (at least 16 recommended - you need as many start positions as you want players on the map). These triangles all have to be on z-Coordinate "3.0". They should be at least 0.2 Blender units apart from each other, to count as individual start positions (start positions which are too close to each other will be merged into one, and then you'll get an error message when trying to host a map for 16 players but you have less start positions). The direction of these triangles is not important, but
- Are the layers correct? Road on z=0, startline on z=2, start positions on z=3. The layer z=1 is reserved for future features.
- Is the size of the map okay? To see the relation here is a screenshot of the standard-plane (which is 2 by 2 Blender units) in grid cars. Translated, this means that one blender-unit corresponds to 5 grids in the game:
Export and play!
Now the easiest part: To Export you can simply click in Blender "File" -> "Export" -> "*.stl".
Make sure you selected "ASCII" in the bottom left of the export window, so GridCars can import your nodes!
Save the *.stl-file folloving folder:
- Win: %APPDATA%/GridCars/maps
- Linux: ~/.local/share/love/GridCars/maps/
If "maps" doesn't exist, create it!
Great job, you did it :-)
You have created a cool map? Send us your map via email (gridcars@gmail.com) so we can upload the map to the server!
If you have any questions or need help with a map, email us as well!