To start with we will create a very simple level, and then learn by adjusting values and playing the level each time to see what has changed.
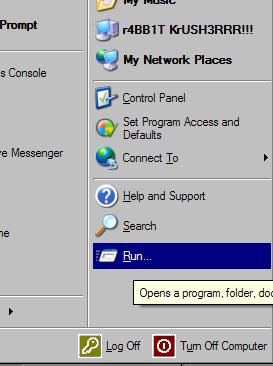
1.
Click Start

2.
Click on "Run".
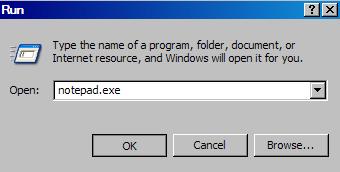
3.
Type "notepad.exe" into the box as shown, and click OK.
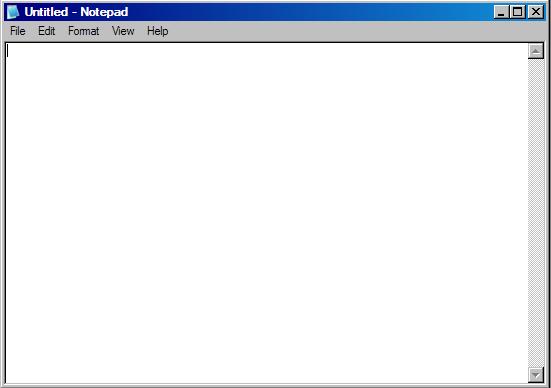
4.
Notepad opens.
5.
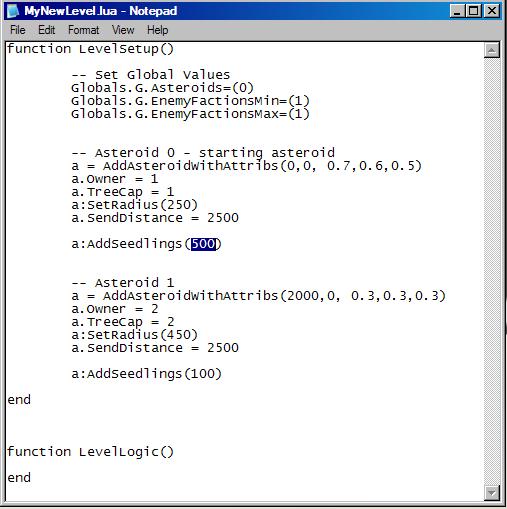
Enter the text shown below into Notepad.
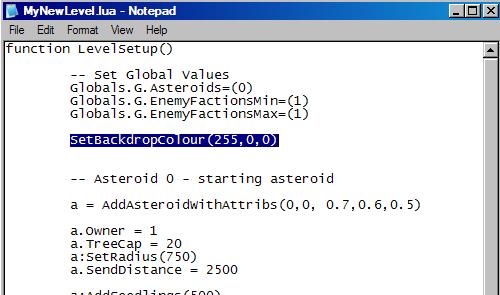
-- Set Global Values
Globals.G.Asteroids=(0)
Globals.G.EnemyFactionsMin=(1)
Globals.G.EnemyFactionsMax=(1)
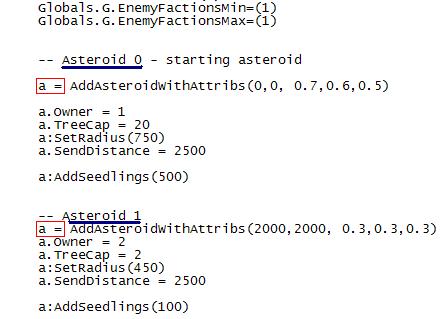
-- Asteroid 0 - starting asteroid
a = AddAsteroidWithAttribs(0,0, 0.7,0.6,0.5)
a.Owner = 1
a.TreeCap = 1
a:SetRadius(250)
a.SendDistance = 2500
a:AddSeedlings(90)
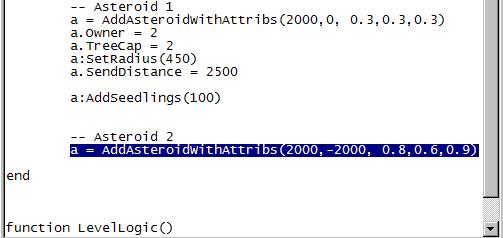
-- Asteroid 1
a = AddAsteroidWithAttribs(2000,0, 0.3,0.3,0.3)
a.Owner = 2
a.TreeCap = 2
a:SetRadius(450)
a.SendDistance = 2500
a:AddSeedlings(100)
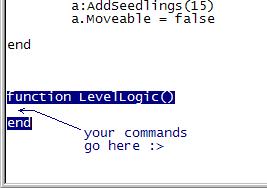
end
function LevelLogic()
end
So yours should look like this:

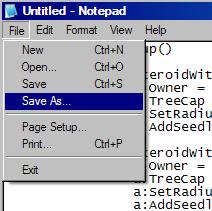
6.
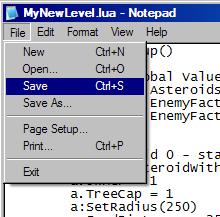
Now click "File" in the top left of Notepad, and choose "Save As".
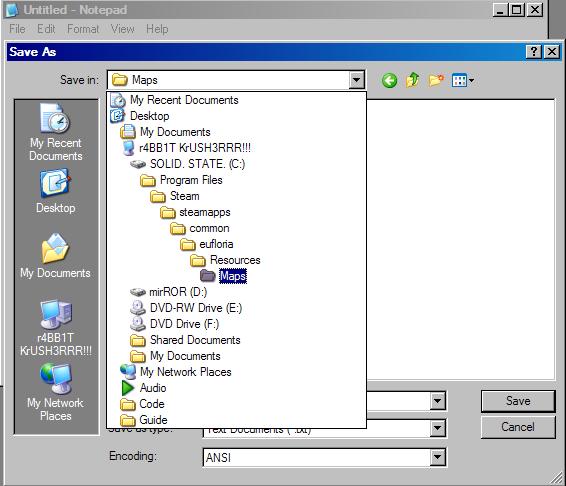
7.
We need to make sure we save it in the right folder.
The picture below shows the correct location of the "Maps" folder.
Use the drop-down box at the top of the "Save As" window to navigate to the right folder.
8.
Give your level a name, and make sure that it ends with ".lua"
Set the file type to All Files.
Set Encoding to ANSI.
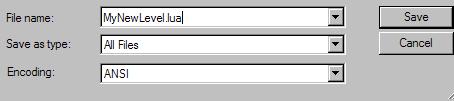
Then click the Save button. Now it's time to check out our level.
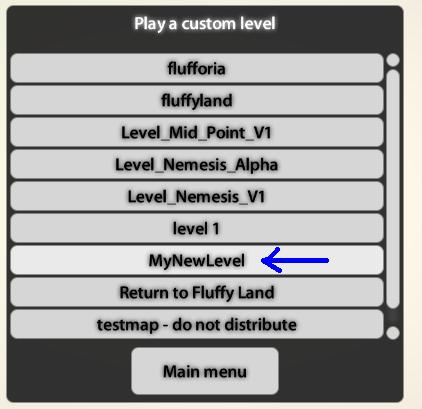
9.
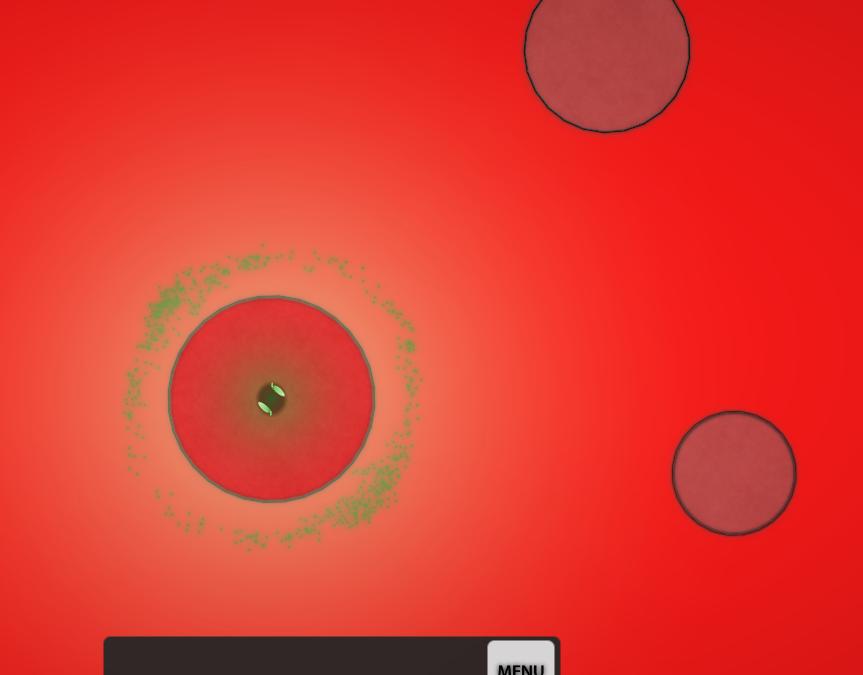
Load up Eufloria, choose "Custom Levels" from the main menu, and your new level should be waiting there.
Click on it to try playing it!
10.
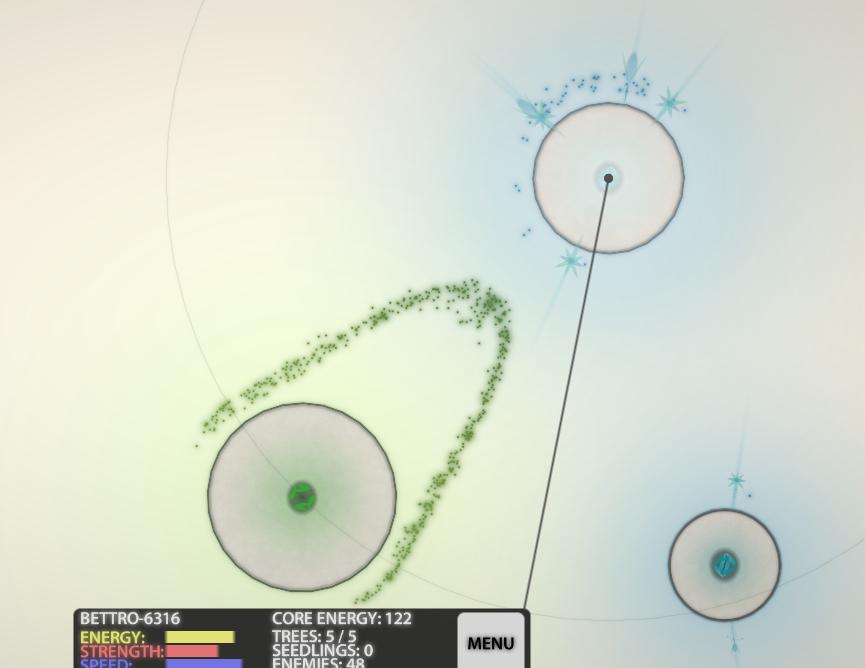
When it loads up, this is what it should look like.
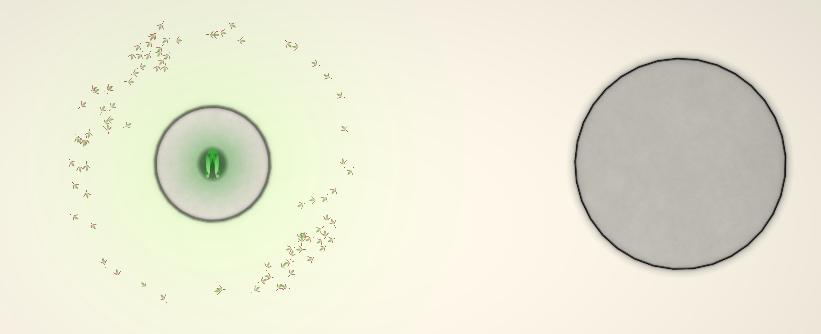
11.
If you send a scout to the asteroid next door, you should see that there are enemy seedlings orbiting it.
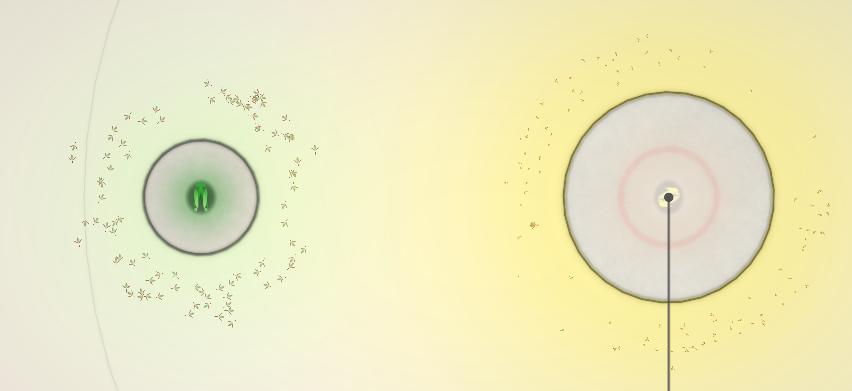
If you got this far, congratulations - you are through the biggest barrier, which is getting started. It will be plain sailing from here!
--
Now that we've made a simple level, lets experiment with it by changing some values.
12.
To start with, lets change the number of seedlings that the Player starts with from 90 up to 500. Make the change indicated below:
13.
Now that we've made the change, it is important that we remember to save the file. Otherwise our changes won't be apparent when we try to play the level.
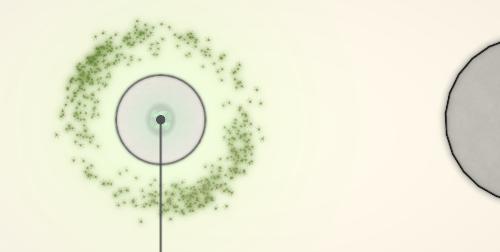
14.
Now go back to Eufloria and try loading up the level like before. You should start with loads of seedlings this time!
15.
Next lets try to change the size of the Player's asteroid. Make the change indicated below, and don't forget to save the level afterwards by clicking "File" and "Save", like in step 13.
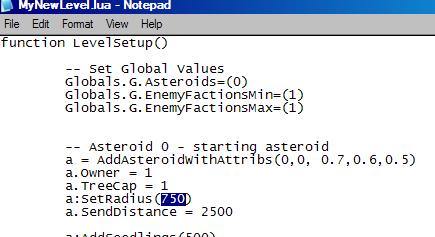
16.
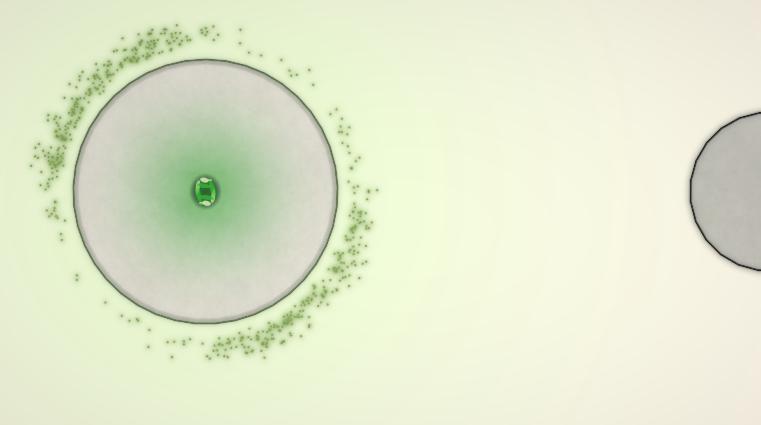
Now load the game up, and lo and behold your asteroid has swollen to epic proportions!
17.
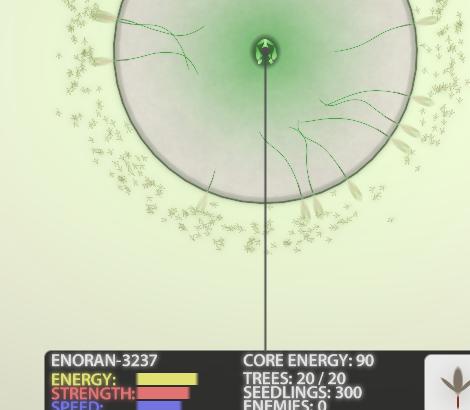
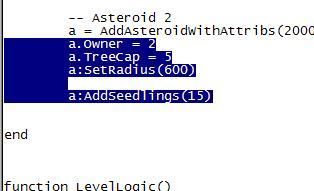
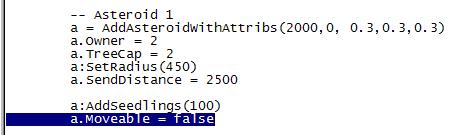
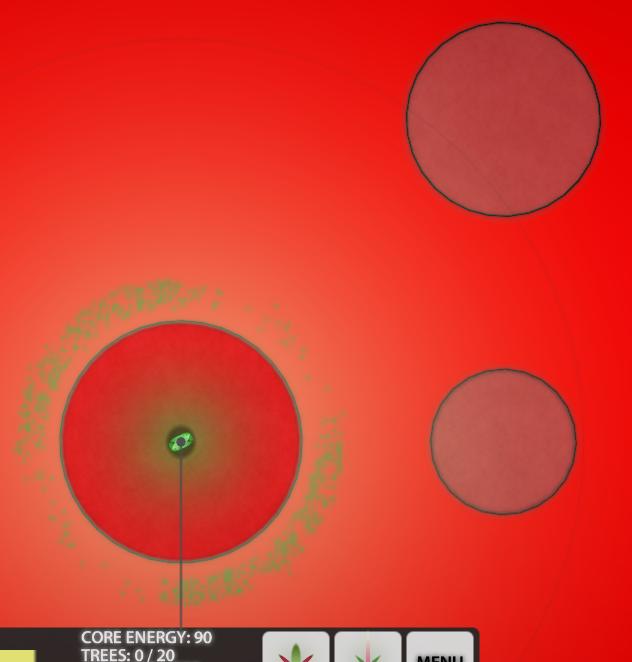
Next lets try changing the maximum number of trees allowed on the Player's asteroid. Make the change indicated below - make sure you change the right asteroid! Then save the level again.
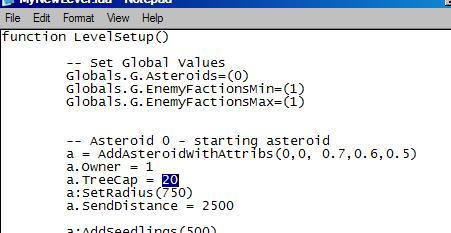
18.
Load it up in Eufloria and now we can plant up to 20 trees :>
Now try changing some of the other values yourself. I would suggest to only change one thing at a time - that way if you accidentally break the level, it's easy to know what to undo to fix the problem.
--
19.
Hopefully by now you should be getting an idea of how this works.
You can kind of tell what each line means... it doesn't take a genius to work out that "SendDistance" is how far the asteroid can send seedlings.
However, one command is not so obvious, and that is the AddAsteroidWithAttribs command, which as you might guess is used to create asteroids and set their basic attributes. Lets take a moment to look at that line, because it's a good example to teach us about the other commands as well.

Lets deal with the bits in brackets first.
There are 5 values seperated by commas.
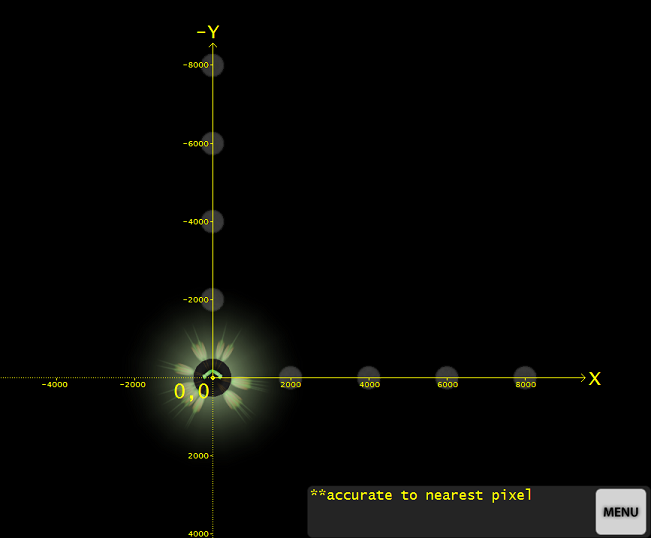
The first two values are the X and Y coordinates of the asteroid - it tells the game where on the map the asteroid is located. These have to be integers (whole numbers).
This map hopefully gives you an idea of what sort of values you can use.
20.
The next three values are the Energy, Strength, and Speed of the asteroid.

You can use any number between 0 and 1. So you could have 0.5, or you could have 0.55555 or whatever you like really.
21.
Now that we've dealt with the brackets, lets look at the bit at the start:

The command starts with an "a = ". The "a" is sort of like the name of the asteroid that we are creating.
Then we can use the various functions and property commands to tell the game what the asteroid is like.
This is what a.TreeCap is doing - we refer to the asteroid called "a", and then we tell the game that "a" has a Tree Cap of...whatever we set it to.

22.
You might notice that we use "a" a second time to make the second asteroid:
It doesn't matter if we use it twice in a row like that. When we use it to make the second asteroid, we are just telling the game to "forget" which asteroid "a" is, because now this asteroid is called "a". We just overwrite the old value by declaring a new one.
Then we can set the properties for the second asteroid using the same commands like before, such as "a.TreeCap" and "a:AddSeedlings()" and so on.
Note: You can give each asteroid a unique name if you wish, rather than just re-using "a" all the time. This can actually be useful if you want to refer to them in your scripts later on.
fluffy = AddAsteroidWithAttribs is perfectly acceptable. :> fluffy.TreeCap and other commands will work without problems.
"a." (with a dot) is used to set properties, and "a:" (with a colon) is used for functions. You must be careful not to mix them up, or the level won't load.
A complete list of the different commands you can use for asteroid properties can be found in the LUA Scripting Reference Sticky.
23.
Finally, the complete command looks like this:
NAME = AddAsteroidWithAttribs(Horizontal Position,Vertical Position,Energy,Strength,Speed)
24.
Now to try adding a new asteroid to your level.
You need to make sure you put it within the bounds of the function LevelSetup(). That is, it must appear after the LevelSetup() command, and before the end command, as shown.
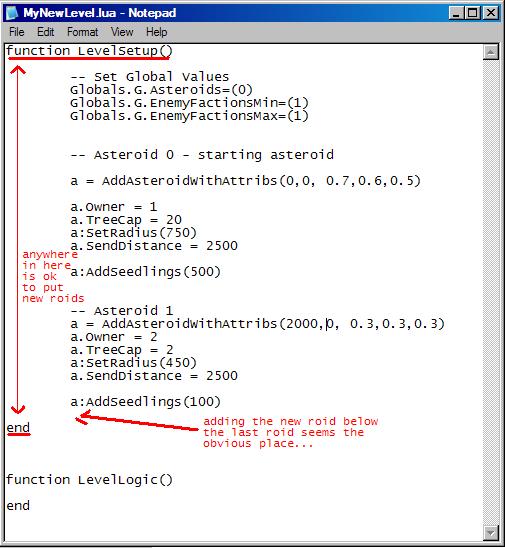
Lets make an asteroid by typing in the code for it where the red arrow indicates.
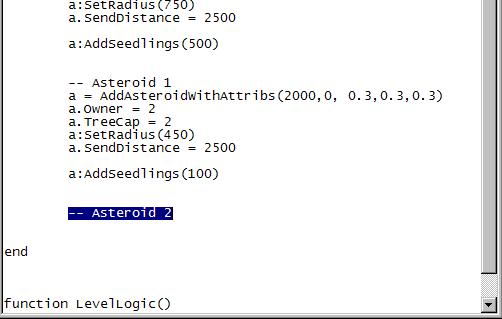
First we should make a comment to remind ourselves later on that this is Asteroid 2 (remember we had asteroid 0, 1, and this will be asteroid 2).
So type in "-- Asteroid 2" like this:
25.
Now lets type the command to add an asteroid, and pick some values for the new asteroid.
I'll use coordinates 2000, -2000 and energy 0.8, strength 0.6, speed 0.9.
26.
To save some time, I'll copy and paste the commands I used on the previous asteroids.
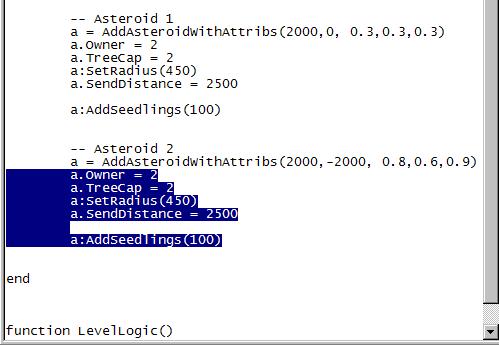
27.
Now I'll change the values around a bit to make the asteroid the way I want it:
28.
Now lets save the level, load it up, and check out the new roid! :D
29.
There are some other nifty commands you can use in LevelSetup.
A really handy one is SetBackdropColour() which lets you change the background colour using 3 comma-seperated RGB values between 0 and 255.
Lets make the background red!
30.
And the fruits of our work so far....
31.
Maybe you noticed by now that the asteroid positions don't seem to be quite right. Because of their large size the game is squashing them apart.
To prevent this behaviour, add this line to each of your asteroids:
32.
Save the level and try playing it. Now the asteroids are positioned exactly where we specified them in our coordinates. :>
--
33.
We have been studying the section called function LevelSetup(), which deals with the creation of the level and all the initial conditions.
Now it's time to have a look at the function LevelLogic() section. This section lets you make things happen during play, such as scripted events.
34.
To begin with, lets make a Message Box appear after 5 seconds of game time has passed.
The messagebox could contain a greeting, and instructions for the playr.
Add this code:
Timer = GetGameTime() + 5
while GetGameTime() < Timer do
coroutine.yield()
end
Pause()
MessageBox("Take the asteroid to the east to win. Don't lose yours.")
WaitDialog()
Unpause()

Load up the level to test it out:

35.
So what happened there? Lets think about this for a minute before we move on.
a.
Well, first we created a variable called Timer (case sensitive!).

We set it to Game Time + 5, and since it is the first thing the game evaluates once it's running, Timer must have a value of 0:05 seconds.
b.
Then we used something called a While loop to create a delay.

We told the game, while the game time is less than Timer, just keep repeating these commands.
c.
The part which tells it the loop has ended is the coroutine.yield() command.

This command tells the game the loop has ended and the game should go back up and check if the conditions of the While statement are still being met.
We don't have any commands in between our While statement and our coroutine.yield(). So basically the game just does nothing for 5 seconds. :>
d.
Once the 5 seconds are up, the While loop exits at the end statement.

e.
Then next thing that happens is that the game pauses, a Message Box appears, and when the player clicks OK, the game unpauses again.

Look at the commands and read over this part a few times if you need to. It is helpful if you can conceptualise what is going on here.
36.
The level is a bit easy at the moment. Lets add a scripted event where a bunch of enemy seedlings spawn on Asteroid 1.
I'll make mine 20 seconds after the Message Box appears, and I guess I'll add about... 400 seedlings.
You might notice I've started adding comments as well, to remind myself what each part does later on.
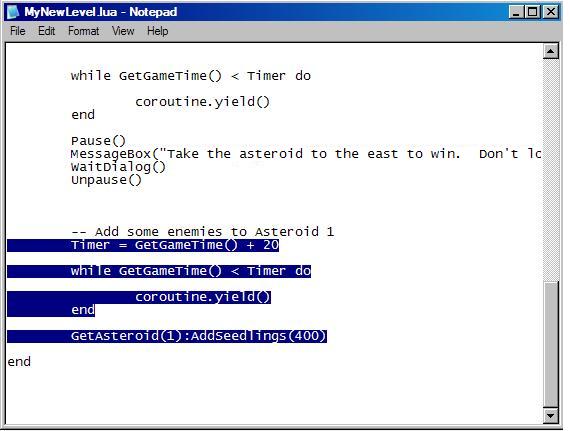
Did you notice we used the :AddSeedlings command in LevelSetup() too? Most of the commands used there are also usable here. In this case, we weren't able to refer to it by a name like "a" because "a" had been replaced with a different asteroid, so instead we just tell the game which asteroid we mean with GetAsteroid(ID). Hence, GetAsteroid(1):AddSeedlings(400) is the command to add 400 seedlings to asteroid 1.
37.
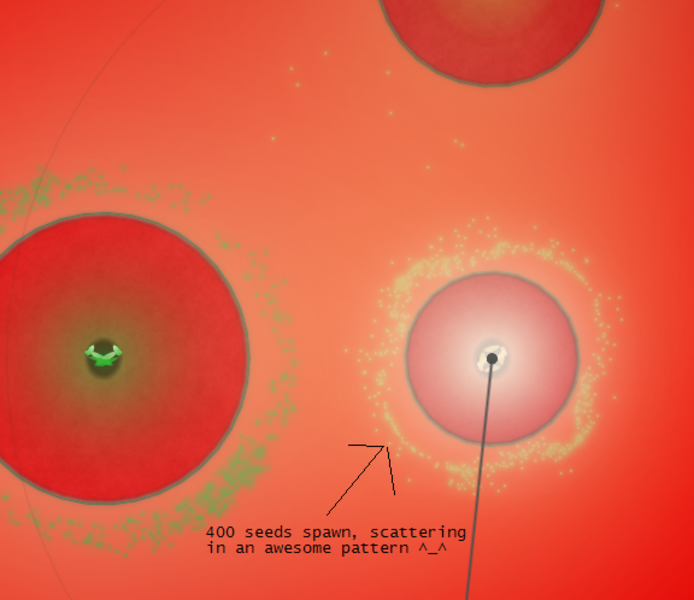
Lets save the level and see if the the enemies spawn correctly. :>
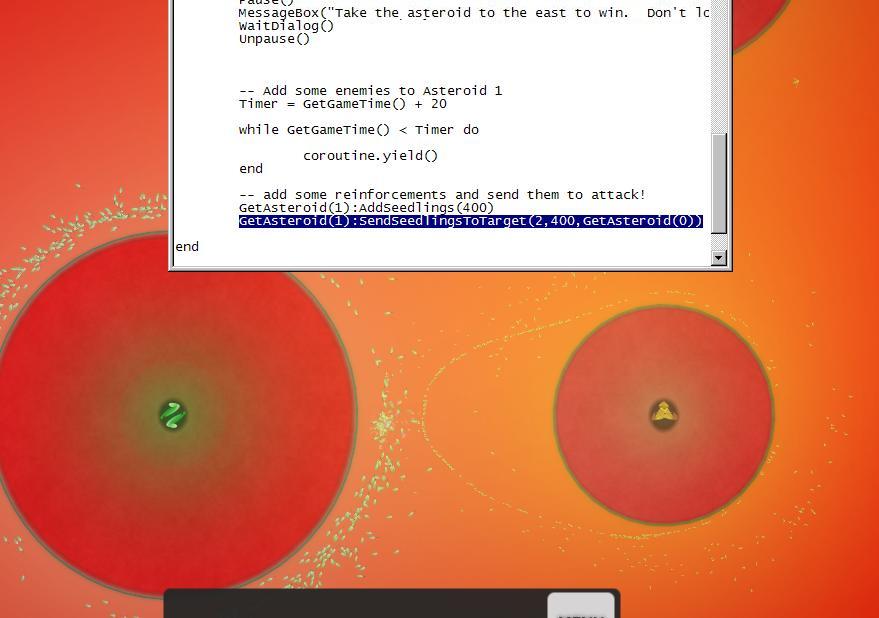
38.
If you would like to make it even more interesting, you can add the following line after:
GetAsteroid(1):SendSeedlingsToTarget(2,400,GetAsteroid(0))
This sends seedlings from Asteroid 1, belonging to player 2... it sends 400 of them, to Asteroid 0.
39.
At the moment, if the player takes over all the asteroids, the game just continues running. There is no way to "win".
We will create a winning condition and a losing condition, so that the game can actually be won or lost by the player.
Add this code:
while gamewon == 0 do
coroutine.yield()
end
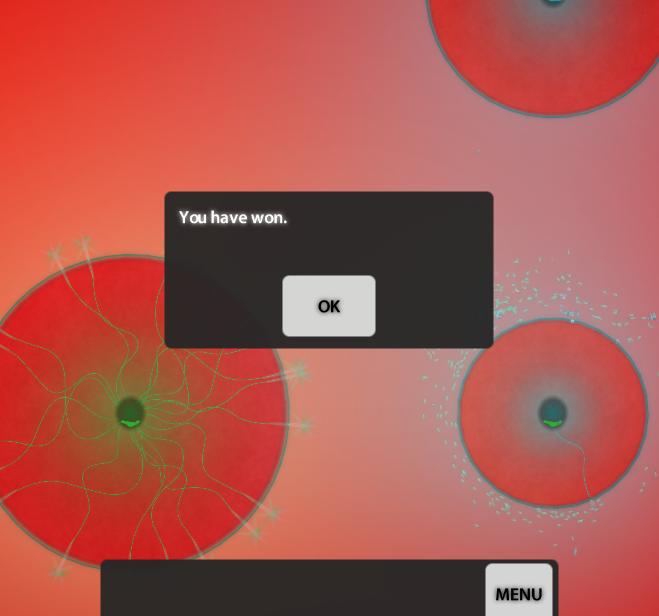
if gamewon == 1 then
Pause()
MessageBox("You have won.")
WaitDialog()
Unpause()
Quit(true)
end
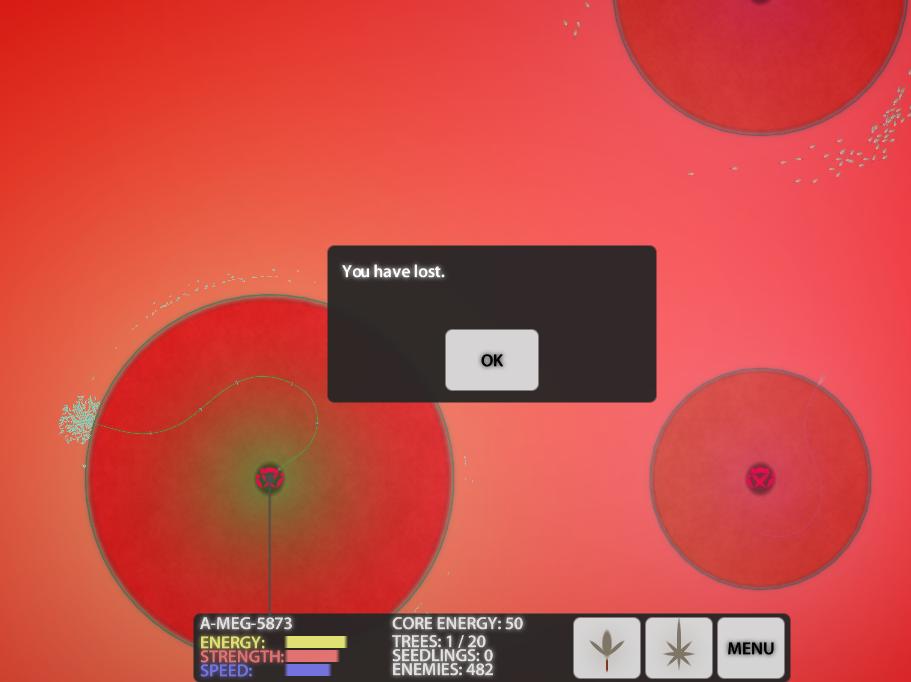
if gamewon == 2 then
Pause()
MessageBox("You have lost.")
WaitDialog()
Unpause()
Quit(false)
end

There are three new things here.
Quit(true) means the game ends and the player won.
Quit(false) means the game ends and the player lost.
If and then statements. These check if something is true, and if so, does something.
So if the variable gamewon is equal to 1, then the player is told they have won and the game ends in victory.
But if the variable gamewon is equal to 2, it skips the first If statement and proceeds to the second If statement... resulting in the player being told they have lost, and the game ending in defeat.
You might also notice that in some places we use a single "=", and in other places we use the double: "==".
A single equals sign "=" is used to set values, whereas the double "==" is used to compare values.
40.
Now that we have created the winning and losing code, we need to have some way to trigger the victory or defeat.
For this example, we will say that if Player 1 gets asteroid 1, the player wins (gamewon = 1). And if Player 2 gets Asteroid 0, the player loses (gamewon = 2).
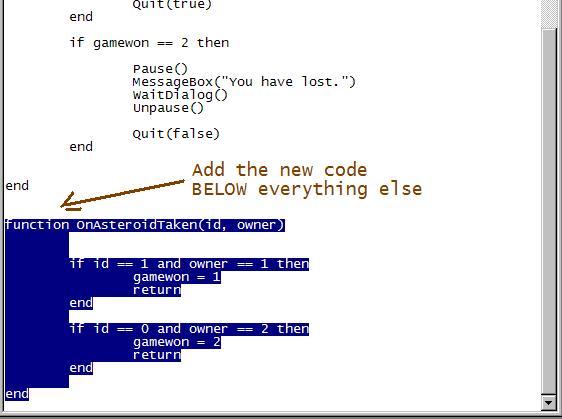
The easiest way to check this is to use an entirely new function - seperate entirely from function LevelLogic - this new one is called function OnAsteroidTaken, and we place it below everything else.
Add this code:
if id == 1 and owner == 1 then
gamewon = 1
return
end
if id == 0 and owner == 2 then
gamewon = 2
return
end
end
41.
function OnAsteroidTaken is triggered every time an asteroid changes owner.
We can put If statements in there to check the asteroid and the owner, and if appropriate, change the gamewon variable to either 1 or 2.
Once we change the gamewon variable to something other than 0, the While loop that we made in our function LevelLogic() for the victory/defeat code ends. Straight after that loop ends, the gamewon variable is evaluated to see whether the player lost or won. Go and look again at the code in step 39 and make sure you understand how this works.
Now you should understand the mechanism of our victory/defeat detection system.
Lets give it a try:
42.
Now you know enough to begin making your own levels.
I hope you will read the LUA Scripting Reference as well and see all the crazy things it's possible to change in this game, and let your imagination run wild :>
Happy coding,
-Fluffy


Awesome, if there was only a way to make New plants, it would be Marvelous.
Hi, there is a way to add Dyson trees and Defense trees, if that's what you mean. You can also change the properties of a defense tree to make it completely different from how they are in the normal game.
To add Dyson trees, you would create an asteroid with a command like:
a = AddAsteroidWithAttribs(0,0,0.5,0.5,0.5)
...and then add a Dyson tree to it with this command:
s = a:AddDysonTree()
That would add one Dyson tree. If you want three dyson trees, you can just do the "s = a:AddDysonTree()" command three times:
a = AddAsteroidWithAttribs(0,0,0.5,0.5,0.5)
s = a:AddDysonTree()
s = a:AddDysonTree()
s = a:AddDysonTree()
You can do this in function LevelSetup(), to have the trees there when the player starts the game, or you can also add the trees at a certain point during the game by scripting it into your function LevelLogic(). If you want to add trees at a certain point, I'd suggest creating the asteroid with a proper name that you won't overwrite later. EG:
asteroidone = AddAsteroidWithAttribs(0,0,0.5,0.5,0.5)
asteroidtwo = AddAsteroidWithAttribs(0,2000,0.5,0.5,0.5)
Then, later on in function LevelLogic() you will be able to do this:
s = asteroidone:AddDysonTree()
s = asteroidone:AddDysonTree()
s = asteroidtwo:AddDysonTree()
s = asteroidtwo:AddDysonTree()
So you can refer to them later :>
Alternatively, if you'd like to change the properties of trees themselves, I suggest reading the LUA reference sticky thread on the Eufloria forums. It has a good list of all the different commands you can use to change the properties of dyson and defense trees:
Dyson-game.com
Great tutorial for a great game.
Thanks ^_^