It’s been a while. I took a break from development for a week to play through Shenmue (one of my favorite games of all time) and charge up my batteries a bit. After that I’ve been quite busy with creating what will be the topic of this article: the level editor.
For those who know Game Maker: Studio it might not be shocking news that the room editor in Game Maker is quite lacking in functionality and user-friendliness. As I was working on the little train ride demonstration I was already noticing a lot of slowdown when moving objects around. In addition to that the unique way of drawing objects in fake 3D by stacking layers of sprites makes it hard to imagine the final output from the flat representation in the room editor. That made me come to the conclusion that making my own level editor (ironically in Game Maker) might be a good way to improve the workflow of putting together each level, of which there will be a lot.
While working on that I also started implementing a basic lighting feature, which you can see in action in the gifs below. But first let’s take a look at all the furniture I’ve created so far for the interior of many of the rooms you will be visiting.

Creating fake Worlds
At first I wasn’t the biggest fan of my own idea, as I don’t have a lot of experience in creating tools and most of the time they come with their own limitations and usability issues. The workflow of building the voxel models and getting them in a format that is usable for my fake 3D engine is already very time-consuming and complicated (needing four different programs), so my main focus was to make something that is very easy to use and only does what it needs to do.
I have to admit I took some shortcuts in order to speed up development, like putting most functionality on hotkeys without any second methods of input (like buttons). This might become messy if I take a longer break from it, as I’d likely forget which key does what, but I tried to only use Shift, Alt and Control for most of the stuff, so hopefully it’ll be managable.
I already showed the basic workflow in one of my last updates, so I won’t go into detail about putting down objects and such, but rather highlight what is new.
The first thing I had to think over was how I implemented the “ground” of levels. Before they were just another piece of fake 3D geometry I put in a level (as one object) with the special feature that it is not affected by the depth-sorting algorithm (as the ground should always be below everything else). Also, I didn’t split it up into chunks because of this, as no objects could move below the ground (even though I can fake this by assigning depth values by hand as I did in the train demonstration).
As I changed the whole engine from rotating around the player to rotating the world instead, there was a new possibility to implement the ground that was way easier, more flexible and less ressource-hungry: tiles.
This may sound like a no-brainer, but I was very happy when I realized that this was possible now. Adding functionality to place and remove tiles was quickly added, for the flood fill algorithm I needed some external help (a.k.a. a script from the Game Maker Marketplace).

Adding tiles via flood fill is very simple and also takes walls into account.
(please ignore the shading, this was still WIP at that point)
Let there be Light(ing)
I was playing around with the idea of having some kind of lighting (or shadow casting) in the game for quite a while, but couldn’t really think of a way to do it. Most 2D lighting engines I know just draw primitives away from the light source on a flat plane (a surface in Game Maker terminology), but that would look awkward when just put over the ground tiles. In order to find out if there are some stylized methods of creating a somewhat believable lighting system I just went ahead and implemented one of the engines I found (again on the Game Maker Marketplace, there’s some great stuff there). It worked pretty well as is and wasn’t as distracting as I thought it would be, but to improve the visuals a little I made two big changes:
- Add a second shadow mode: the lighting I got from the Marketplace draws primitives like I described above, which looks good for walls and other objects that don’t have a limited height. For everything else I added a second mode with more detailed shadows. For that I draw the whole stack of sprites of the object in the direction of the shadow. As I generate the shadow surface only at the beginning of the level, I can draw this as precise as I want (using hundreds of draw calls). You can see the difference between these two modes in the image below.
- Shade objects as a whole: I was trying to wrap my head around how to light objects from each side, but everything that came to mind was way to complicated, especially since I’m a shader noob. So instead I again went the opposite direction and tried to implement the easiest method, which is shading the whole object with one color. As the game uses highly stylized graphics with a lot to be left to the imagination of the player, this worked out pretty well, I think. As it is now I just look if the object is near a light source and whether it is occluded by another object and compute the amount of shading that way. It definitely needs some more tuning, but so far I’m very happy how much better this looks despite using very simple solutions.
As I mentioned earlier, the whole lighting system is static, the game only computes the shadows at the beginning of a level. I wanted to make it dynamic at first, but as most objects don’t move, there’s really not much use in generating a shadow surface in each step. In the end I will probably use a combination of both the static shadow map and a dynamic overlay for NPCs.
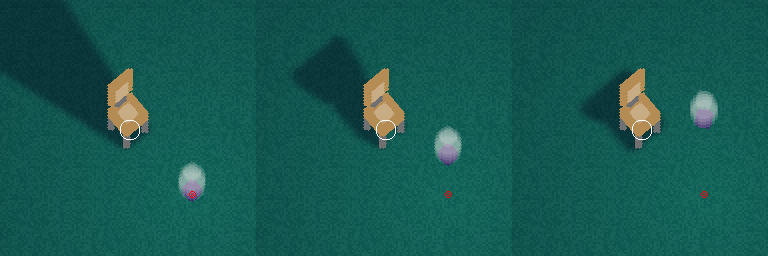
Left: the lamp is below the chair and therefore uses the simple shadow mode.
Center+Right: the lamp is above the chair and uses the more detailed shadow mode.
Here are two rooms with the lighting on:
What’s next?
After developing the level editor to a point where I could actually use it as intended (making levels and easily transferring them into the game), I immediately started creating the scripts used for cutscenes, which will be one of the most important aspects of the game, as there will be a lot of story. It took a few days, but one of the first scenes I’ve written is now playable in the game. I’ve tried to make it easy to build cutscenes, but in the end I will need another self-made tool to speed up the process, so in the upcoming weeks I will do just that: make another editor for cutscenes that allows to drag and drop elements into a container, set each value of these elements (there will be quite a few elements, like one to start a conversation or one to move an NPC, etc.) and test the scene on the fly without having to recompile the project. I already have a pretty specific vision in my head how it will look in the end, so let’s see if I can actually pull it off. :D
Below you can see a video of the cutscene I built (as always: WIP).
If you have feedback to anything regarding the game, I’d love to hear from you! :)