In this article by Dan Tracy, author of CryENGINE 3 Cookbook, we will cover the following:
- Creating a new level
- Generating a procedural terrain
- Navigating a level with the Sandbox Camera
- Terrain sculpting
- Setting up the terrain texture
Time to learn!
Creating a new level
Before we can do anything with the gameplay of the project that you are creating, we first need a foundation of a new level for the player to stand on. This recipe will cover how to create a new level from scratch.
Getting ready
Before we begin, you must have Sandbox 3 open.
How to do it...
At any point, with Sandbox open, you may create a new level by following these steps:
- Click File (found in the top -left of the Sandbox's main toolbar).
- Click New.
From here, you will see a new dialog screen that will prompt you for information on how you want to set up your level. The most important aspect of a level is naming it, as you will not be able to create a level without some sort of proper name for the level's directory and its .cry file. You may name your level anything you wish, but for the ease of instruction we shall refer to this level as My_Level:
- In the Level Name dialog box, type in My_Level.
- For the Terrain properties, use the following values:
- Use Custom Terrain Size: True
- Heightmap Resolution:512x512
- Meters Per Unit: 1
- Click OK.

Depending on your system specifications, you may find that creating a new level will require anywhere from a few seconds to a couple of minutes. Once finished, the Viewport should display a clear blue sky with the dialog in your console reading the following three lines:
Finished synchronous pre-cache of render meshes for 0 CGF's
Finished pre-caching camera position (1024,1024,100) in 0.0 sec
Spawn player for channel 1
This means that the new level was created successfully.
How it works...
Let's take a closer look at each of the options used while creating this new level.
Using the Terrain option
This option allows the developer to control whether to have any terrain on the level to be manipulated by a heightmap or not. Sometimes terrain can be expensive for levels and if any of your future levels contain only interiors or only placed objects for the player to navigate on, then setting this value to false will be a good choice for you and will save a tremendous amount of memory and aid in the performance of the level later on.
Heightmap resolution
This drop-down controls the resolution of the heightmap and the base size of the play area defined. The settings can range from the smallest resolution (128 x 128) all the way up to the largest supported resolution (8192 x 8192).
Meters per unit
If the Heightmap Resolution is looked at in terms of pixel size, then this dialog box can also be viewed as the Meters Per Pixel. This means that each pixel of the heightmap will be represented by these many meters. For example, if a heightmap's resolution has 4 Meters Per Unit (or Pixel), then each pixel on the generated heightmap will measure four meters in length and width on the level.
Even though this Meters Per Unit can be used to increase the size of your level, it will decrease the fidelity of the heightmap. You will notice that attempting to smoothen out the terrain may be difficult as there will be a wider minimum triangle size set by this value.
Terrain size
This is the resulting size of the level with the equation of (Heightmap Resolution) x (Meters Per unit). Here are some examples of the results you will see (m = meters):
- (128x128) x 4m = 512x512m
- (512x512) x 16m = 8192x8192m
- (1024x1024) x 2m = 2048x2048m
There's more...
If you need to change your unit size after creating the map, you may change it by going into the Terrain Editor | Modify | Set Unit Size. This will allow you to change the original Meters Per Unit to the size you want it to be.
Generating a procedural terrain
This recipe deals with the procedural generation of a terrain. Although never good enough for a final product because you will want to fine tune the heightmap to your specifications, these generated terrains are a great starting point for anyone new to creating levels or for anyone who needs to set up a test level with the Sandbox. Different heightmap seeds and a couple of tweaks to the height of the level and you can generate basic mountain ranges or islands quickly that are instantly ready to use.
Getting ready
Have My_Level open inside of Sandbox.
How to do it...
Up at the top-middle of the Sandbox main toolbar, you will find a menu selection called Terrain. From there you should see a list of options, but for now you will want to click on Edit Terrain. This opens the Terrain Editor window.
The Terrain Editor
window has a multitude of options that can be used to manipulate the heightmap in your level. But first we want to set up a basic generated heightmap for us to build a simple map with.
Before we generate anything, we should first set the maximum height of the map to something more manageable. Follow these steps:
- Click Modify.
- Then click Set Max Height.
- Set your Max Terrain Height to 256
(these units are in meters).
Now, we may be able to generate the terrain:
- Click Tools.
- Then click Generate Terrain.
- Modify the Variation (Random Base)to the value of 15.
- Click OK.
After generating, you should be able to see a heightmap similar to the following screenshot:

This is a good time to generate surface texture (File | Generate surface texture | OK), which allows you to see the heightmap with a basic texture in the Perspective View.
How it works...
The Maximum Height value is important as it governs the maximum height at which you can raise your terrain to. This does not mean that it is the maximum height of your level entirely, as you are still able to place objects well above this value. It is also important to note that if you import a grey scale heightmap into CryENGINE then this value will be used as the upper extreme of the heightmap (255,255,255 white) and the lower extreme will always be at 0 (0,0,0 black). Therefore the heightmap will be generated within 0 m height and the maximum height.
Problems such as the following are a common occurrence:
- Tall spikes are everywhere on the map or there are massive mountains and steep slopes:
- Solution: Reduce the Maximum Height
to a value that is more suited to the mountains and slopes you want
- Solution: Reduce the Maximum Height
- The map is very flat and has no hills or anything from my heightmap:
- Solution: Increase the Maximum Height
to a value that is suitable for making the hills you want
- Solution: Increase the Maximum Height
There's more...
Here are some other settings you might choose to use while generating the terrain.
Terrain generation settings
The following are the settings to generate a procedural terrain:
- Feature Size: This value handles the general height manipulations within the seed and the size of each mound within the seed. As the size of the feature depends greatly on rounded numbers it is easy to end up with a perfectly rounded island, therefore it is best to leave this value at 7.0.
- Bumpiness / Noise (Fade): Basically, this is a noise filter for the level. The greater the value, the more noise will appear on the heightmap.
- Detail (Passes): This value controls how detailed the slopes will become. By default, this value is very high to see the individual bumps on the slopes to give a better impression of a rougher surface. Reducing this value will decrease the amount of detail/roughness in the slopes seen.
- Variation: This controls the seed number used in the overall generation of the Terrain Heightmap. There are a total of 33 seeds ranging from 0 - 32 to choose from as a starting base for a basic heightmap.
- Blurring (Blur Passes): This is a Blur filter. The higher the amount, the smoother the slopes will be on your heightmap.
- Set Water Level: From the Terrain Editor window, you can adjust the water level from Modify | Set Water Level. This value changes the base height of the ocean level (in meters).
- Make Isle: This tool allows you to take the heightmap from your level and automatically lowers the border areas around the map to create an island. From the Terrain Editor window, select Modify | Make Isle.
Navigating a level with the Sandbox Camera
The ability to intuitively navigate levels is a basic skill that all developers should be familiar with. Thankfully, this interface is quite intuitive to anyone who is already familiar with the WASD control scheme popular in most First Person Shooters Games developed on the PC.
Getting ready
You should have already opened a level from the CryENGINE 3 Software Development Kit content and seen a perspective viewport displaying the level.

The window where you can see the level is called the Perspective Viewport window. It is used as the main window to view and navigate your level. This is where a large majority of your level will be created and common tasks such as object placement, terrain editing, and in-editor play testing will be performed.
How to do it...
The first step to interacting with the loaded level is to practice moving in the Perspective Viewport window.
Sandbox is designed to be ergonomic for both left and right-handed users. In this example, we use the WASD control scheme, but the arrow keys are also supported for movement of the camera.

- Press W to move forwards.
- Then press S to move backwards.
- A is pressed to move or strafe left.
- Finally, D is pressed to move or strafe right.
- Now you have learned to move the camera on its main axes, it's time to adjust the rotation of the camera.
- When the viewport is the active window, hold down the right mouse button on your mouse and move the mouse pointer to turn the view.
- You can also hold down the middle mouse button and move the mouse pointer to pan the view.
- Roll the middle mouse button wheel to move the view forward or backward.
- Finally, you can hold down Shift to double the speed of the viewport movements.

How it works...
The Viewport allows for a huge diversity of views and layouts for you to view your level; the perspective view is just one of many. The perspective view is commonly used as it displays the output of the render engine. It also presents you a view of your level using the standard camera perspective, showing all level geometry, lighting, and effects.
To experiment further with the viewport, note that it can also render subsystems and their toolsets such as flow graph, or character editor.
There's more...
You will likely want to adjust the movement speed and how to customize the viewport to your individual use. You can also split the viewport in multiple different views, which is discussed further.
Viewport movement speed control
The Speed input is used to increase or decrease the movement speed of all the movements you make in the main Perspective Viewport.

The three buttons to the right of the Speed: inputs are quick links to the .1, 1, and 10 speeds.
Under Views you can adjust the viewport to view different aspects of your level
Top View, Front, and Left views will show their respective aspects of your level, consisting of bounding boxes and line-based helpers. It should be noted that geometry is not drawn.
Map view shows an overhead map of your level with helper, terrain, and texture information pertaining to your level.
Splitting the main viewport to several subviewports
Individual users can customize the layout and set viewing options specific to their needs using the viewport menu accessed by right-clicking on the viewports header.

The Layout Configuration window can be opened from the viewport header under Configure Layout. Once selected, you will be able to select one of the preset configurations to arrange the windows of the Sandbox editor into multiple viewport configurations. It should be recognized that in multiple viewport configurations some rendering effects may be disabled or performance may be reduced.

Terrain sculpting
In this section, we will cover the basics of painting your heightmap by hand. This recipe will teach you how to flatten, raise, lower, and smoothen the heightmap by hand, painting in both the Terrain Editor
window as well as Perspective View.
Using the Terrain Brush from the Terrain Editor is good for a general high level pass over your level; it is only decent when starting on a fresh level. For more detailed work, many designers use the Terrain Brush from within the Perspective Viewport to see their results instantly. We will be covering both methods.
Getting ready
- Have My_Level open inside of Sandbox.
- Review the Generating a procedural terrain recipe to learn about the Terrain Editor.
- Review the Navigating a level with the Sandbox Camera recipe to get familiar with the Perspective View.
- Have the Rollup Bar available in your Sandbox layout and ready.
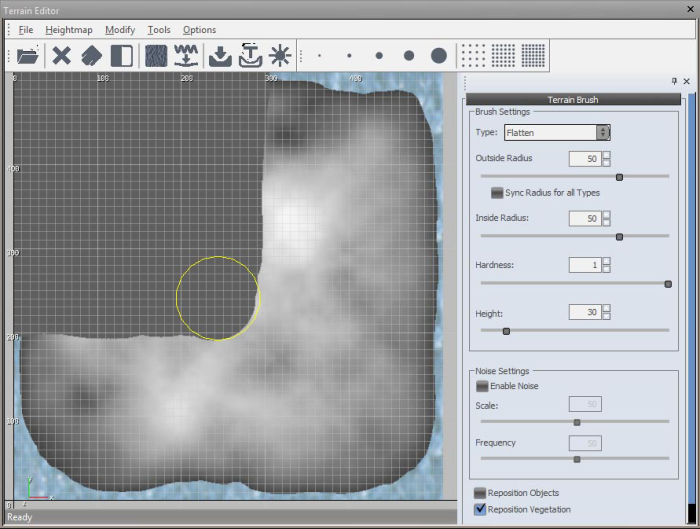
How to do it... On the right-hand side of this window you will see a rollout menu that reads Terrain Brush. This menu is the focal point of this recipe and has the same functions in both the Terrain Editor and Perspective View methods.
- To start, we will flatten a section of the level. Change the Type of brush (drop-down menu to Flatten) and set the following parameters:
- Outside Radius = 50
- Inside Radius = 50
- Hardness = 1
- Height = 30
- Now paint over the north-west corner of the map and flatten that whole quarter of the map.
(Move the mouse over the image to enlarge.)
- Change the Type of brush to Smooth and set the following parameters:
- Outside Radius = 50
- Hardness = 0.7
- Between the flattened area and the rest of the generated heightmap, paint over this area, which will smoothen the slope between the lower flattened area and the higher up locations.
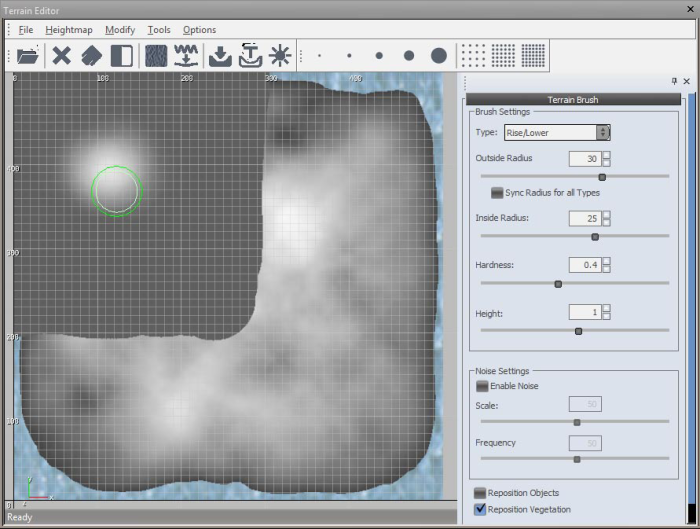
- Change the Type of brush to Raise/Lower and set the following parameters:
- Outside Radius = 30
- Inside Radius = 25
- Hardness = 0.4
- Height = 1
- In the Flattened area, paint around in the same spot to see the heightmap rise.
- Sculpt the terrain in the perspective view. The Perspective View method has the very same brushes as demonstrated previously, except you can find where to change them in the Rollup Bar under the Terrain tab | Modify button.
How it works...Even though each of the brush's functions are self-explanatory based on their name, they share many of the same properties. These properties are Outside Radius, Inside Radius, Hardness, and Height (with the exception of Smooth). The following is what each of these properties does:
- Outside Radius: The outer edge of the brush that will feel the least impact from the rest of the brush's parameters.
- Inside Radius: The inner area that will feel the most impact. Depending on Hardness and Height, there is a fall off between the Inside Radius and Outside Radius.
- Hardness: How hard should the brush be when painting? Basically, if the Hardness
is set to 1, then within one click you will have the desired height. If set to 0.01, then it will take 100 clicks to achieve the same result. (For smooth, this controls how hard it will try to normalize the triangles of the heightmap). - Height: This controls the desired height you wish the Flattentool to set the terrain to, or controls the step size (meters) of the Raise/Lower tool.
To create steeper mounds, hills, or mountains, set the inside and outside radius to be close to each other. To get more shallow and smoother hills, set inside and outside radius further apart.
There's more...
Here are some other additional settings you may wish to use when sculpting a terrain.
Noise settings
Enabling Noise only works with the Flatten and Raise/Lower brushes. This setting adds a bit of random variation to the heightmap when painting with these brushes.
- Scale (%): How high/low the noise modification will be
- Frequency (%): How often the noise will vary the height along the surface of the terrain
Reposition objects and vegetation Enabling either of these tickboxes will reposition the Object/Vegetation after the height underneath that Object/Vegetation has changed (this does not work if the object is underneath the terrain).
All vegetation that is affected is under the Terrain | Vegetation tab in the Rollup Bar.
All objects affected are under the Objects tab in the Rollup Bar.
Setting up the terrain texture
In this recipe, we will teach you how to set up a new grass-like terrain texture for you to paint on the terrain.
Getting ready
- Have My_Level open inside of Sandbox.
- Review the Generating a procedural terrain recipe to learn about the Terrain Editor.
- Review the Navigating a level with the Sandbox Camera recipe to get familiar with the Perspective View.
- Review the Terrain sculpting recipe.
- Have the Rollup Bar open and ready.
How to do it...
- First open the Terrain Texture Layers window, found in the main Sandbox Toolbar | Terrain | Texture.
- In this window, create a new layer-Add Layer.
- Rename your NewLayer to Grass (double-click NewLayer to rename it).
- Then change the layer texture of this layer: Change Layer Texture | Terrain Folder | ground_mud_grey.dds.
- Now change the detail texture; click on the material path for this layer, Materials/material_terrain_default | Terrain Folder | grass_7. Go back to Terrain Texture Layers
window | Assign Material. - Set up your layer to have a greenish color to it-RollupBar | Terrain
tab | Layer Painter | select Grass. Set the color in the color box to Red: 191, Green: 215, Blue: 138. - Save the color to your layer and click the Layer button above the color box.
- Paint on your terrain.

How it works...
The Layer Texture and Detail Texture work together in an overlapping fashion to breathe life into the terrain texture that is applied onto the terrain. While the Layer Texture works best as an overall brightness randomizer (seen with the ground_mud_grey texture) to break up the distant tiling, the Detail Texture is the main texture that is seen when closest to the player's view.
It is important to note that the Detail Texture should provide the detail only and not so much of the color (the color is handled in the Layer Texture). Grayish textures within the detail material do not interfere with the colors from the Layer Texture. Each of these diffuse textures should be high pass filtered.
There's more...
Here are some additional settings that can be utilized.
Radius and Hardness: Much like Sculpting Terrain, you can change the brush size and hardness in the Layer Painter to either a blanket wide area with your Terrain Texture, or just to get those fine details where you need them.
Altitude and Slope: These parameters can be set per layer allowing you to only paint that layer within the Altitude (meters) or Slope (degrees) threshold. This is especially useful for cliff-like layers (for example, 55 to 90).
Filter (Brightness): The Filter slider is an extra brightness pass on the color you have already set. Without needing to change the color over and over, you may change the brightness quickly with this slider.
Tile Resolution: Tile Resolution affects how many terrain tiles are in each terrain sector. The higher the resolution, the higher the amount of tiles used (better layer blending as well as softer transitions in the Layer Texture).
Ranging from 64x64 to 2048x2048, this tiling resolution is an important factor when it comes to optimization as well as high quality terrain. It is recommended that you use a higher value for play areas of your map and low values for terrain sectors that will not have the player in it.
Generating Surface Textures: It is important after doing work with the Terrain Textures on your map to a Generate Surface Texture to bake your textures into your terrain. This creates a compressed version of your painted terrain texture job into a .pak file called terraintexture.pak. The information stored in this .pak file reduces the total terrain texture size of the map to 1/6 of its original size as well as reducing the amount of drawcalls on the level.
 To generate surface textures, go to File | Generate Surface Texture | Pick resolution (higher = better quality, lower performance) | (Optional) High Quality (does an additional pass over the textures to bake in further detail while keeping the same memory footprint) | OK.
Over 90 recipes written by Crytek developers for creating third-generation real-time games

hey can anyone help me out?
I'm missing a lot of textures, such as "grass_7" and "ground_mud_grey.dds" mentioned in the tutorial.
Does anyone know why I dont have these?